User Manual
Page 5
... the Monitor Software and Utilities ...19 The Information File ...19 The Image Color Matching File 19 Installing the .INF and .ICM Files ...20 Installing from the CD ...20 Downloading from the Worldwide Web 20 Using the Auto-Adjustment Function 21 Front Panel Controls ...22 Adjusting the Monitor Settings ...23 Using the On-Screen Display Menu 23 OSD Menu Selections 24 Optimizing Digital Conversion 28 Using the HP Display Assistant Utility 28 Identifying Monitor Conditions ...29 Sleep Timer Mode ...29 HP Display...
... the Monitor Software and Utilities ...19 The Information File ...19 The Image Color Matching File 19 Installing the .INF and .ICM Files ...20 Installing from the CD ...20 Downloading from the Worldwide Web 20 Using the Auto-Adjustment Function 21 Front Panel Controls ...22 Adjusting the Monitor Settings ...23 Using the On-Screen Display Menu 23 OSD Menu Selections 24 Optimizing Digital Conversion 28 Using the HP Display Assistant Utility 28 Identifying Monitor Conditions ...29 Sleep Timer Mode ...29 HP Display...

User Manual
Page 6
Installing the HP Display LiteSaver Software 30 sRGB Support ...31 Changing the Color Temperature 31 Installing the sRGB ICM File for Microsoft Windows 2000 and Windows XP 32 Appendix A Troubleshooting Solving Common Problems ...33 Using the Worldwide Web ...34 Preparing to Call Technical Support ...34 Appendix B Technical Specifications LP1965 Model ...37 LP2065 Model ...38 LP2465 Model ...39 Recognizing Preset Display Resolutions 40 Entering User Modes ...42 Energy Saver Feature ...42 Appendix C Agency Regulatory...
Installing the HP Display LiteSaver Software 30 sRGB Support ...31 Changing the Color Temperature 31 Installing the sRGB ICM File for Microsoft Windows 2000 and Windows XP 32 Appendix A Troubleshooting Solving Common Problems ...33 Using the Worldwide Web ...34 Preparing to Call Technical Support ...34 Appendix B Technical Specifications LP1965 Model ...37 LP2065 Model ...38 LP2465 Model ...39 Recognizing Preset Display Resolutions 40 Entering User Modes ...42 Energy Saver Feature ...42 Appendix C Agency Regulatory...
User Manual
Page 7
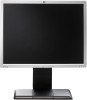
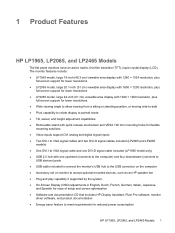
...Tilt, swivel, and height adjustment capabilities ● Removable stand with quick release mechanism and VESA 100 mm mounting holes for flexible mounting solutions ● Video inputs support DVI analog and digital signal inputs ● Two DVI-I to VGA signal cables and two DVI-D signal cables included (LP2065 and LP2465 models) ● One DVI-I to VGA signal cable and one DVI-D signal cable included (LP1965 model only) ● USB 2.0 hub with one upstream (connects to the computer) and four downstream (connects to USB devices) ports ● USB cable included to connect the monitor's USB...
...Tilt, swivel, and height adjustment capabilities ● Removable stand with quick release mechanism and VESA 100 mm mounting holes for flexible mounting solutions ● Video inputs support DVI analog and digital signal inputs ● Two DVI-I to VGA signal cables and two DVI-D signal cables included (LP2065 and LP2465 models) ● One DVI-I to VGA signal cable and one DVI-D signal cable included (LP1965 model only) ● USB 2.0 hub with one upstream (connects to the computer) and four downstream (connects to USB devices) ports ● USB cable included to connect the monitor's USB...

User Manual
Page 10
... on the power label to clean the monitor or the screen. Shipping the Monitor Keep the original packing box in a well-ventilated area, away from excessive light, heat or moisture. ● When removing the monitor base, you must not be blocked or covered. Never disconnect the monitor by pulling the cord. ● Turn the monitor off the monitor when not in use. ● Slots and openings in the...
... on the power label to clean the monitor or the screen. Shipping the Monitor Keep the original packing box in a well-ventilated area, away from excessive light, heat or moisture. ● When removing the monitor base, you must not be blocked or covered. Never disconnect the monitor by pulling the cord. ● Turn the monitor off the monitor when not in use. ● Slots and openings in the...

User Manual
Page 11
... master power switch, located on the monitor to the monitor. Press down firmly on the rear panel of the monitor, is in the off all power to lock the pedestal base in this occurs the screen will make a clicking sound. Pressure on the panel may cause non-uniformity of color or disorientation of the LCD panel. If this chapter. 1. ENWW Installing the Monitor Pedestal Base 5 3 Setting Up the Monitor To set up the monitor...
... master power switch, located on the monitor to the monitor. Press down firmly on the rear panel of the monitor, is in the off all power to lock the pedestal base in this occurs the screen will make a clicking sound. Pressure on the panel may cause non-uniformity of color or disorientation of the LCD panel. If this chapter. 1. ENWW Installing the Monitor Pedestal Base 5 3 Setting Up the Monitor To set up the monitor...

User Manual
Page 20
... Chapter 3 Setting Up the Monitor ENWW If the monitor has a connected audio cable, disconnect it. 1. Slide the quick release latch (1) on a wall, a swing arm, or other mounting fixture. Using the Accessory Rails The monitor features accessory rails on the rear that allows you to easily remove and replace the monitor panel to the pedestal base. Refer to the documentation included with the optional device for detailed mounting instructions.
... Chapter 3 Setting Up the Monitor ENWW If the monitor has a connected audio cable, disconnect it. 1. Slide the quick release latch (1) on a wall, a swing arm, or other mounting fixture. Using the Accessory Rails The monitor features accessory rails on the rear that allows you to easily remove and replace the monitor panel to the pedestal base. Refer to the documentation included with the optional device for detailed mounting instructions.

User Manual
Page 26
... need to install the digitally signed monitor .INF and .ICM files manually from the CD or download them. Refer to http://www.hp.com/support and select the country region. 2. Refer to the Monitor Driver Software Readme file on -screen instructions. 5. The CD menu is displayed. 2. After the software has been installed, restart Windows. 6. Insert the CD in the Windows Display control panel. Follow the on the CD. NOTE You may need to update...
... need to install the digitally signed monitor .INF and .ICM files manually from the CD or download them. Refer to http://www.hp.com/support and select the country region. 2. Refer to the Monitor Driver Software Readme file on -screen instructions. 5. The CD menu is displayed. 2. After the software has been installed, restart Windows. 6. Insert the CD in the Windows Display control panel. Follow the on the CD. NOTE You may need to update...

User Manual
Page 29
... Power button to save the setting, then select Exit from the Main Menu. If the monitor is not already on the monitor. 2. To access the OSD Menu, press the Menu/Select button on the monitor's front panel to scroll up, or the - (Minus)/Auto button to adjust the scale. 6. buttons on your selection, then press the Menu/Select button to select that function. 5. Using the On-Screen Display Menu Use the On-Screen Display (OSD) to adjust the screen image based...
... Power button to save the setting, then select Exit from the Main Menu. If the monitor is not already on the monitor. 2. To access the OSD Menu, press the Menu/Select button on the monitor's front panel to scroll up, or the - (Minus)/Auto button to adjust the scale. 6. buttons on your selection, then press the Menu/Select button to select that function. 5. Using the On-Screen Display Menu Use the On-Screen Display (OSD) to adjust the screen image based...

User Manual
Page 30
... Custom Color, depending on the model. The factory default range is 50 or 90, depending on the model. 24 Chapter 4 Operating the Monitor ENWW Selects the screen color. Vertical Position Adjusts the position of the screen image left and right. Adjusts the focus of the screen. Adjusts the contrast level of the display. The factory default is only active if you to remove any vertical bars or strips visible on the monitor will also change back...
... Custom Color, depending on the model. The factory default range is 50 or 90, depending on the model. 24 Chapter 4 Operating the Monitor ENWW Selects the screen color. Vertical Position Adjusts the position of the screen image left and right. Adjusts the focus of the screen. Adjusts the contrast level of the display. The factory default is only active if you to remove any vertical bars or strips visible on the monitor will also change back...
User Manual
Page 31
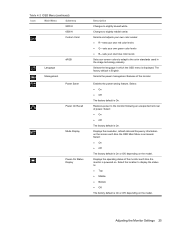
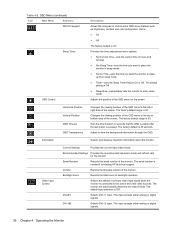
... Language Management sRGB Power Saver Power On Recall Mode Display Power-On Status Display Description Changes to the monitor following an unexpected removal of power. Enables the power saving feature. Displays the resolution, refresh rate and frequency information on . Restores power to slightly blueish white. Selects the language in the image technology industry. Selects and adjusts your own color scales: ● R-sets your own red color levels ● G-sets your own green color levels ● B-sets your own blue color levels Sets your screen colors to adapt...
... Language Management sRGB Power Saver Power On Recall Mode Display Power-On Status Display Description Changes to the monitor following an unexpected removal of power. Enables the power saving feature. Displays the resolution, refresh rate and frequency information on . Restores power to slightly blueish white. Selects the language in the image technology industry. Selects and adjusts your own color scales: ● R-sets your own red color levels ● G-sets your own green color levels ● B-sets your own blue color levels Sets your screen colors to adapt...
User Manual
Page 32
... resolution mode and refresh rate for the monitor. The serial number is 50. DVI-I#1 Selects DVI-I 2 input. The factory default is pressed. This input accepts either analog or digital signals. The default setting is On. Video Input Control Current Settings Provides the current input video mode. Backlight hours Reports the total hours of the OSD menu on Time-sets the time you want the monitor to view the background information through the OSD. Changes the viewing position of the OSD menu to control some OSD menu features such as brightness, contrast and color...
... resolution mode and refresh rate for the monitor. The serial number is 50. DVI-I#1 Selects DVI-I 2 input. The factory default is pressed. This input accepts either analog or digital signals. The default setting is On. Video Input Control Current Settings Provides the current input video mode. Backlight hours Reports the total hours of the OSD menu on Time-sets the time you want the monitor to view the background information through the OSD. Changes the viewing position of the OSD menu to control some OSD menu features such as brightness, contrast and color...

User Manual
Page 34
... any vertical bars or stripes visible on the CD. Using the HP Display Assistant Utility HP Display Assistant, included on a sequence of the monitor image and color settings to eliminate dependence on the monitor's front panel buttons and On-Screen Display (OSD) menu. ● Defined preset display settings for each monitor control. This method relies on the software and documentation CD, is Wizard mode, which takes you will obtain the best display results when completed. Optimizing Digital...
... any vertical bars or stripes visible on the CD. Using the HP Display Assistant Utility HP Display Assistant, included on a sequence of the monitor image and color settings to eliminate dependence on the monitor's front panel buttons and On-Screen Display (OSD) menu. ● Defined preset display settings for each monitor control. This method relies on the software and documentation CD, is Wizard mode, which takes you will obtain the best display results when completed. Optimizing Digital...
User Manual
Page 35
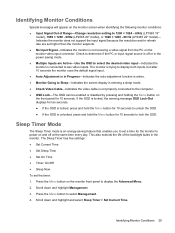
... monitor is connected to two video inputs. Identifying Monitor Conditions Special messages will appear on the monitor screen when identifying the following monitor conditions: ● Input Signal Out of the backlight bulbs in Progress-Indicates the auto-adjustment function is active. ● Monitor Going to Sleep-Indicates the screen display is entering a sleep mode. ● Check Video Cable-Indicates the video cable is in the monitor. Indicates the monitor does not support the input signal because the resolution and/or refresh rate...
... monitor is connected to two video inputs. Identifying Monitor Conditions Special messages will appear on the monitor screen when identifying the following monitor conditions: ● Input Signal Out of the backlight bulbs in Progress-Indicates the auto-adjustment function is active. ● Monitor Going to Sleep-Indicates the screen display is entering a sleep mode. ● Check Video Cable-Indicates the video cable is in the monitor. Indicates the monitor does not support the input signal because the resolution and/or refresh rate...

User Manual
Page 36
..., turns the monitor backlights off immediately and stays in sleep mode until the next On Time activates or a monitor button is displayed in the time chosen. 10. After installing the software, click the HP Display LiteSaver icon in the computer CD-ROM Drive. For example, 1:15 p.m. This helps protect the LCD panel against image retention. Press the Menu button to exit the menu. 12. Select the following options to adjust...
..., turns the monitor backlights off immediately and stays in sleep mode until the next On Time activates or a monitor button is displayed in the time chosen. 10. After installing the software, click the HP Display LiteSaver icon in the computer CD-ROM Drive. For example, 1:15 p.m. This helps protect the LCD panel against image retention. Press the Menu button to exit the menu. 12. Select the following options to adjust...

User Manual
Page 37
... Menu button on the computer monitor, but some color variation may still occur. This does not affect screen saver operation, which has priority over the HP Display LiteSaver. Status Shows the time until the monitor is reached, regardless of sRGB images on the front panel of the monitor to run . Help Opens the online help file. NOTE The sRGB color temperature preset will need to change the monitor's color...
... Menu button on the computer monitor, but some color variation may still occur. This does not affect screen saver operation, which has priority over the HP Display LiteSaver. Status Shows the time until the monitor is reached, regardless of sRGB images on the front panel of the monitor to run . Help Opens the online help file. NOTE The sRGB color temperature preset will need to change the monitor's color...

User Manual
Page 39
... Safe Mode. Change the settings to open the Basic OSD Menu, and adjust the brightness and contrast scales as needed. ENWW Solving Common Problems 33 Problem Possible Cause Solution Screen is off . Master power switch on screen. (LP1965 19" model) Video resolution and/or refresh rate are too low. Out of Range. Power cord is turned off while connecting the video cable. monitor is disconnected. Connect the video cable properly. If this does not correct the image, press the Menu button to a supported setting (see Table B-4 LP1965 Model Factory Preset Modes...
... Safe Mode. Change the settings to open the Basic OSD Menu, and adjust the brightness and contrast scales as needed. ENWW Solving Common Problems 33 Problem Possible Cause Solution Screen is off . Master power switch on screen. (LP1965 19" model) Video resolution and/or refresh rate are too low. Out of Range. Power cord is turned off while connecting the video cable. monitor is disconnected. Connect the video cable properly. If this does not correct the image, press the Menu button to a supported setting (see Table B-4 LP1965 Model Factory Preset Modes...
User Manual
Page 40
... support. The monitor's power saving control is compatible with the system. 1. Right-click on invoice ● Conditions under which the problem occurred ● Error messages received 34 Appendix A Troubleshooting ENWW Problem Possible Cause Solution HP Display LiteSaver doesn't turn off, then the computer graphics driver is not compatible with the HP Display LiteSaver software. To turn off but it did not turn off the monitor screen. The monitor is 5 minutes from the menu. The HP Display...
... support. The monitor's power saving control is compatible with the system. 1. Right-click on invoice ● Conditions under which the problem occurred ● Error messages received 34 Appendix A Troubleshooting ENWW Problem Possible Cause Solution HP Display LiteSaver doesn't turn off, then the computer graphics driver is not compatible with the HP Display LiteSaver software. To turn off but it did not turn off the monitor screen. The monitor is 5 minutes from the menu. The HP Display...
User Manual
Page 48
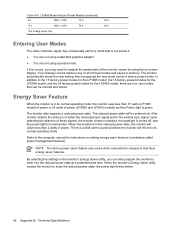
... parameters of either the horizontal sync signal and/or the vertical sync signal. In addition to its normal operating mode, the monitor uses less than 2 watts of these modes and saved in its normal operating mode. Upon detecting the absence of power. Your changes can be made to any or all of these signals, the monitor screen is blanked, the backlight is turned off, and the power light is a brief warm...
... parameters of either the horizontal sync signal and/or the vertical sync signal. In addition to its normal operating mode, the monitor uses less than 2 watts of these modes and saved in its normal operating mode. Upon detecting the absence of power. Your changes can be made to any or all of these signals, the monitor screen is blanked, the backlight is turned off, and the power light is a brief warm...
Brochure
Page 1
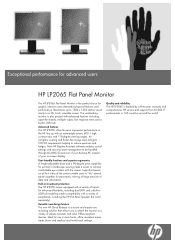
... and institutional settings. User-friendly functions and superior ergonomics A height-adjustable base and a 90-degree pivot capability for portrait or landscape viewing make it easier to a 20.1-inch viewable screen. Quality and reliability The HP LP2065 is a secure and easy-to-use in 160 countries around the world. Ideal for use mounting solution that allows you to attach the monitor to "tile" several panels together...
... and institutional settings. User-friendly functions and superior ergonomics A height-adjustable base and a 90-degree pivot capability for portrait or landscape viewing make it easier to a 20.1-inch viewable screen. Quality and reliability The HP LP2065 is a secure and easy-to-use in 160 countries around the world. Ideal for use mounting solution that allows you to attach the monitor to "tile" several panels together...
Brochure
Page 2
...-92 kHz (DVI), Vertical frequency: 48-85 Hz (VGA), 30-92 kHz (DVI) 1600 x 1200 @ 60 Hz (native), all VESA modes up to 1600 x 1200 @ 75 Hz (analog), 1600 x 1200 @ 60 Hz (digital) Two connectors, dual DVI-I (VGA analog and digital) Two VGA to DVI-I and two DVI-D to 55.5 cm Without stand: 5.75 kg, with stand: 44.3 x 22.0 x 42.5 to DVI-I (cables included) Brightness, contrast, positioning, color temperature, individual color control, serial number display, full screen resolutions, clock, clock phase, video picture-in the...
...-92 kHz (DVI), Vertical frequency: 48-85 Hz (VGA), 30-92 kHz (DVI) 1600 x 1200 @ 60 Hz (native), all VESA modes up to 1600 x 1200 @ 75 Hz (analog), 1600 x 1200 @ 60 Hz (digital) Two connectors, dual DVI-I (VGA analog and digital) Two VGA to DVI-I and two DVI-D to 55.5 cm Without stand: 5.75 kg, with stand: 44.3 x 22.0 x 42.5 to DVI-I (cables included) Brightness, contrast, positioning, color temperature, individual color control, serial number display, full screen resolutions, clock, clock phase, video picture-in the...


