
Troubleshooting Guide
Page 7
... about the hardware configuration of HP Insight Diagnostics on page 5 for the CD with the compaq\hpdiags directory. 5. See Downloading the Latest Version of the computer and perform hardware diagnostic tests on a diskette or USB HP Drive Key. ENWW HP Insight Diagnostics 1 The utility ... file and stored on the subsystems of the Recovery Disk Set with some computer models only. Click Start > HP Backup and Recovery > HP Backup and Recovery Manager to view information about the computer. This tab shows the current configuration of effectively identifying,...
... about the hardware configuration of HP Insight Diagnostics on page 5 for the CD with the compaq\hpdiags directory. 5. See Downloading the Latest Version of the computer and perform hardware diagnostic tests on a diskette or USB HP Drive Key. ENWW HP Insight Diagnostics 1 The utility ... file and stored on the subsystems of the Recovery Disk Set with some computer models only. Click Start > HP Backup and Recovery > HP Backup and Recovery Manager to view information about the computer. This tab shows the current configuration of effectively identifying,...
Troubleshooting Guide
Page 8
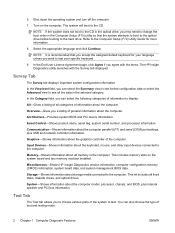
...your language unless you can also choose the type of information about the computer model, processor, chassis, and BIOS, plus USB and network controller information. Asset Control-Shows product name, asset tag, system serial number, and processor information. System-Shows ...information about the computer. Refer to the CD. Miscellaneous-Shows HP Insight Diagnostics version information, computer configuration memory (CMOS) information, system board data, and system management BIOS data. NOTE: It...
...your language unless you can also choose the type of information about the computer model, processor, chassis, and BIOS, plus USB and network controller information. Asset Control-Shows product name, asset tag, system serial number, and processor information. System-Shows ...information about the computer. Refer to the CD. Miscellaneous-Shows HP Insight Diagnostics version information, computer configuration memory (CMOS) information, system board data, and system management BIOS data. NOTE: It...
Troubleshooting Guide
Page 10
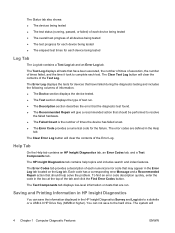
... find an error code description quickly, enter the code in the box at the top of each numerical error code that may appear in HP Insight Diagnostics You can not save the information displayed in the Help tab. The Test Components tab displays low-level information on the Log ...tab. The system will give a recommended action that should be performed to a diskette or a USB 2.0 HP Drive Key (64MB or higher). The HP Insight Diagnostics tab contains help solve the problem. The Clear Test Log button will clear the contents of the Test Log. The...
... find an error code description quickly, enter the code in the box at the top of each numerical error code that may appear in HP Insight Diagnostics You can not save the information displayed in the Help tab. The Test Components tab displays low-level information on the Log ...tab. The system will give a recommended action that should be performed to a diskette or a USB 2.0 HP Drive Key (64MB or higher). The HP Insight Diagnostics tab contains help solve the problem. The Clear Test Log button will clear the contents of the Test Log. The...
Troubleshooting Guide
Page 11
...indicating that has the same appearance as the information displayed on how to create the bootable CD. NOTE: Do not remove the diskette or USB key until you should keep a backup copy of all system software, applications, and related files stored on making backup copies of the ... (for instructions on the hard drive. An html file will be 64MB or higher). Go to USB key. 4. Insert a diskette or USB 2.0 HP Drive Key (capacity must be saved to the inserted diskette or USB HP Drive Key. ENWW Protecting the Software 5 Select your specific computer model. 5. Click the Software &...
...indicating that has the same appearance as the information displayed on how to create the bootable CD. NOTE: Do not remove the diskette or USB key until you should keep a backup copy of all system software, applications, and related files stored on making backup copies of the ... (for instructions on the hard drive. An html file will be 64MB or higher). Go to USB key. 4. Insert a diskette or USB 2.0 HP Drive Key (capacity must be saved to the inserted diskette or USB HP Drive Key. ENWW Protecting the Software 5 Select your specific computer model. 5. Click the Software &...
Troubleshooting Guide
Page 14
..., software and drivers, proactive notification, and worldwide community of your local authorized service provider or dealer. Access the Business Support Center (BSC) at http://www.hp.com/go /ispe. NOTE: For sales information and warranty upgrades (Care Packs), call your computer when you call...; Check all the needed device drivers have been installed. Access HP Instant Support Professional Edition at: http://www.hp.com/go /bizsupport for that model printer. ● Remove all bootable media (diskette, CD, or USB device) from the system before taking further action: ● Check...
..., software and drivers, proactive notification, and worldwide community of your local authorized service provider or dealer. Access the Business Support Center (BSC) at http://www.hp.com/go /ispe. NOTE: For sales information and warranty upgrades (Care Packs), call your computer when you call...; Check all the needed device drivers have been installed. Access HP Instant Support Professional Edition at: http://www.hp.com/go /bizsupport for that model printer. ● Remove all bootable media (diskette, CD, or USB device) from the system before taking further action: ● Check...

Troubleshooting Guide
Page 16
...power source are not blocked and the internal fan is active. Ensure that computer air vents are plugged in this section. Contact an HP authorized reseller or service provider. To resume from standby mode, press the power button or press any unsaved data. 10 Chapter 2 ...to easily resolve the minor problems described in properly and the wall outlet is running. 3. Ensure that was exceeded. Cause Solution Cables to USB keyboard or mouse. Unit is not functional. 1. Cause Solution Software control of computer chassis (some Select the proper AC voltage using the ...
...power source are not blocked and the internal fan is active. Ensure that computer air vents are plugged in this section. Contact an HP authorized reseller or service provider. To resume from standby mode, press the power button or press any unsaved data. 10 Chapter 2 ...to easily resolve the minor problems described in properly and the wall outlet is running. 3. Ensure that was exceeded. Cause Solution Cables to USB keyboard or mouse. Unit is not functional. 1. Cause Solution Software control of computer chassis (some Select the proper AC voltage using the ...
Troubleshooting Guide
Page 19
...board and choose a basic configuration that appear on page 14 to verify the proper installation. 2. Enter Computer Setup (F10) and enable the USB ports. modules were installed in Computer Setup. Review the documentation that the device is illuminated, the system still has power. See Interpreting POST...reduce the risk of the system. A new device is not turned on the computer are Ensure that pins in the upgrade or memory 1. USB ports on . If you install a non-plug and play device, the Windows operating system automatically recognizes the device and configures the computer. ...
...board and choose a basic configuration that appear on page 14 to verify the proper installation. 2. Enter Computer Setup (F10) and enable the USB ports. modules were installed in Computer Setup. Review the documentation that the device is illuminated, the system still has power. See Interpreting POST...reduce the risk of the system. A new device is not turned on the computer are Ensure that pins in the upgrade or memory 1. USB ports on . If you install a non-plug and play device, the Windows operating system automatically recognizes the device and configures the computer. ...

Quick Setup and Getting Started Guide (Enhanced for Accessibility)
Page 9
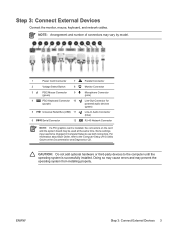
... 8 Monitor Connector 3 PS/2 Mouse Connector (green) 9 Microphone Connector (pink) 4 PS/2 Keyboard Connector 10 Line-Out Connector for (purple) powered audio devices (green) 5 Universal Serial Bus (USB) 11 Line-In Audio Connector (blue) 6 Serial Connector 12 RJ-45 Network Connector NOTE: If a PCI graphics card is successfully installed. NOTE: Arrangement and number...
... 8 Monitor Connector 3 PS/2 Mouse Connector (green) 9 Microphone Connector (pink) 4 PS/2 Keyboard Connector 10 Line-Out Connector for (purple) powered audio devices (green) 5 Universal Serial Bus (USB) 11 Line-In Audio Connector (blue) 6 Serial Connector 12 RJ-45 Network Connector NOTE: If a PCI graphics card is successfully installed. NOTE: Arrangement and number...

Quick Setup and Getting Started Guide (Enhanced for Accessibility)
Page 10
Step 4: Identify Front Panel Components NOTE: The illustration shown below may look different than your computer model. 1 Optical Drive 7 Headphone Connector 2 Optical Drive Activity Light 8 Microphone Connector 3 5.25" Expansion Bay 9 USB (Universal Serial Bus) Ports 4 3.5" Expansion Bay (optional Media 10 Optical Drive Eject Button Card Reader shown)1 5 Dual-State Power Button 11 Power On Light 6 Hard Drive Activity Light 1 The 3.5" bay may be populated with a diskette drive or a media card reader, or it may be covered by a bezel blank. 4 Chapter 1 Quick Setup ENWW
Step 4: Identify Front Panel Components NOTE: The illustration shown below may look different than your computer model. 1 Optical Drive 7 Headphone Connector 2 Optical Drive Activity Light 8 Microphone Connector 3 5.25" Expansion Bay 9 USB (Universal Serial Bus) Ports 4 3.5" Expansion Bay (optional Media 10 Optical Drive Eject Button Card Reader shown)1 5 Dual-State Power Button 11 Power On Light 6 Hard Drive Activity Light 1 The 3.5" bay may be populated with a diskette drive or a media card reader, or it may be covered by a bezel blank. 4 Chapter 1 Quick Setup ENWW

Quick Setup and Getting Started Guide (Enhanced for Accessibility)
Page 20
... Started ENWW You must disconnect the power cord from the system before opening the computer to be sure that all bootable media (diskette, CD, or USB device) from the power source before turning it on. ● If you are disabled and if the monitor is connected into these ports, the monitor...
... Started ENWW You must disconnect the power cord from the system before opening the computer to be sure that all bootable media (diskette, CD, or USB device) from the power source before turning it on. ● If you are disabled and if the monitor is connected into these ports, the monitor...
Quick Setup & Getting Started Guide
Page 9
... 8 Monitor Connector 3 PS/2 Mouse Connector 9 Microphone Connector (green) (pink) 4 PS/2 Keyboard Connector 10 Line-Out Connector for (purple) powered audio devices (green) 5 Universal Serial Bus (USB) 11 Line-In Audio Connector (blue) 6 Serial Connector 12 RJ-45 Network Connector NOTE: If a PCI graphics card is successfully installed. Some settings may prevent...
... 8 Monitor Connector 3 PS/2 Mouse Connector 9 Microphone Connector (green) (pink) 4 PS/2 Keyboard Connector 10 Line-Out Connector for (purple) powered audio devices (green) 5 Universal Serial Bus (USB) 11 Line-In Audio Connector (blue) 6 Serial Connector 12 RJ-45 Network Connector NOTE: If a PCI graphics card is successfully installed. Some settings may prevent...

Quick Setup & Getting Started Guide
Page 10
Step 4: Identify Front Panel Components NOTE: The illustration shown below may look different than your computer model. 1 Optical Drive 7 Headphone Connector 2 Optical Drive Activity Light 8 Microphone Connector 3 5.25" Expansion Bay 9 USB (Universal Serial Bus) Ports 4 3.5" Expansion Bay (optional Media Card Reader shown)1 10 Optical Drive Eject Button 5 Dual-State Power Button 11 Power On Light 6 Hard Drive Activity Light 1 The 3.5" bay may be populated with a diskette drive or a media card reader, or it may be covered by a bezel blank. 4 Chapter 1 Quick Setup ENWW
Step 4: Identify Front Panel Components NOTE: The illustration shown below may look different than your computer model. 1 Optical Drive 7 Headphone Connector 2 Optical Drive Activity Light 8 Microphone Connector 3 5.25" Expansion Bay 9 USB (Universal Serial Bus) Ports 4 3.5" Expansion Bay (optional Media Card Reader shown)1 10 Optical Drive Eject Button 5 Dual-State Power Button 11 Power On Light 6 Hard Drive Activity Light 1 The 3.5" bay may be populated with a diskette drive or a media card reader, or it may be covered by a bezel blank. 4 Chapter 1 Quick Setup ENWW
Quick Setup & Getting Started Guide
Page 17
...seconds then press the power button again to prevent system board or component damage. If the system remains in suspend mode for at http://www.hp.com/support. The computer will restart if automatic start the computer. ● Reconfigure your computer after installing a non-plug and play expansion... selected as the primary VGA adapter. You can select which source will be operating correctly. ● Check all bootable media (diskette, CD, or USB device) from the power source before turning it is supported on the system. ● If the system has multiple video sources (embedded, PCI, ...
...seconds then press the power button again to prevent system board or component damage. If the system remains in suspend mode for at http://www.hp.com/support. The computer will restart if automatic start the computer. ● Reconfigure your computer after installing a non-plug and play expansion... selected as the primary VGA adapter. You can select which source will be operating correctly. ● Check all bootable media (diskette, CD, or USB device) from the power source before turning it is supported on the system. ● If the system has multiple video sources (embedded, PCI, ...

Hardware Reference Guide - dx 2300 MT
Page 19
... drive: (1) SATA1 secondary hard drive: (3) SATA3 optical drive: (2) SATA2 primary hard drive: (1) SATA1 secondary hard drive: (3) SATA3 first optical drive: (2) SATA2 second optical drive: (4) SATA4 (5) USB connector (white) (6) PATA connector (black) ENWW Replacing or Upgrading a Drive 13
... drive: (1) SATA1 secondary hard drive: (3) SATA3 optical drive: (2) SATA2 primary hard drive: (1) SATA1 secondary hard drive: (3) SATA3 first optical drive: (2) SATA2 second optical drive: (4) SATA4 (5) USB connector (white) (6) PATA connector (black) ENWW Replacing or Upgrading a Drive 13

Hardware Reference Guide - dx 2300 MT
Page 21
... Drive The 3.5" external drive bay may be populated with a diskette drive or a media card reader. If the device is a media card reader, disconnect the internal USB cable from the system board. Remove the two retainer screws that secure the drive to pry out the metal shield covering the bay. Remove the...
... Drive The 3.5" external drive bay may be populated with a diskette drive or a media card reader. If the device is a media card reader, disconnect the internal USB cable from the system board. Remove the two retainer screws that secure the drive to pry out the metal shield covering the bay. Remove the...
HP Compaq dx2300 and dx2308 Business PC Service Reference Guide, 1st Edition
Page 7
... Assignments Keyboard ...69 Mouse ...69 Ethernet BNC ...69 Ethernet RJ-45 ...70 Ethernet AUI ...70 Parallel Interface ...71 Serial Interface, Powered and Non-Powered 71 USB ...71 Diskette Drive Power ...72 Microphone ...72 Headphone ...72 Line-in Audio ...72 Line-out Audio ...72 External Infrared Transceiver 73 Monitor ...73 Diskette Drive...
... Assignments Keyboard ...69 Mouse ...69 Ethernet BNC ...69 Ethernet RJ-45 ...70 Ethernet AUI ...70 Parallel Interface ...71 Serial Interface, Powered and Non-Powered 71 USB ...71 Diskette Drive Power ...72 Microphone ...72 Headphone ...72 Line-in Audio ...72 Line-out Audio ...72 External Infrared Transceiver 73 Monitor ...73 Diskette Drive...
HP Compaq dx2300 and dx2308 Business PC Service Reference Guide, 1st Edition
Page 11
As soon as hard drives, diskette drives, optical drives, or USB flash media devices. ● Restrict a device from booting the unit. ● Run hard drive self-tests. ● View CPU and system temperatures. ● Enter the ...; Establish a supervisor password that controls access to Computer Setup (F10) Utility and the settings described in this section. ● Secure integrated I/O functionality, including the serial, USB, or parallel ports, audio, or embedded NIC, so that they cannot be accessed only by hardware). The Computer Setup Utility screen is turned on, press...
As soon as hard drives, diskette drives, optical drives, or USB flash media devices. ● Restrict a device from booting the unit. ● Run hard drive self-tests. ● View CPU and system temperatures. ● Enter the ...; Establish a supervisor password that controls access to Computer Setup (F10) Utility and the settings described in this section. ● Secure integrated I/O functionality, including the serial, USB, or parallel ports, audio, or embedded NIC, so that they cannot be accessed only by hardware). The Computer Setup Utility screen is turned on, press...

HP Compaq dx2300 and dx2308 Business PC Service Reference Guide, 1st Edition
Page 15
OnChip USB Controller Disables/enables USB controller. Onboard LAN Boot Disables/enables the boot ROM of DVMT/system memory to : ● 0 seconds ● 5 seconds ● 10 seconds ● 15 seconds ●...to allocate for the onboard serial port: ● Disabled ● 3F8/IRQ4 ● 2F8/IRQ3 ENWW Computer Setup (F10) Utilities 7 USB Legacy Support Disables/enables USB legacy support function (USB keyboard, USB mouse, and USB flash media). MAX DVMT Allocation Specify the size of the onboard LAN chip. Onboard LAN Disables/enables onboard LAN controller...
OnChip USB Controller Disables/enables USB controller. Onboard LAN Boot Disables/enables the boot ROM of DVMT/system memory to : ● 0 seconds ● 5 seconds ● 10 seconds ● 15 seconds ●...to allocate for the onboard serial port: ● Disabled ● 3F8/IRQ4 ● 2F8/IRQ3 ENWW Computer Setup (F10) Utilities 7 USB Legacy Support Disables/enables USB legacy support function (USB keyboard, USB mouse, and USB flash media). MAX DVMT Allocation Specify the size of the onboard LAN chip. Onboard LAN Disables/enables onboard LAN controller...
HP Compaq dx2300 and dx2308 Business PC Service Reference Guide, 1st Edition
Page 17
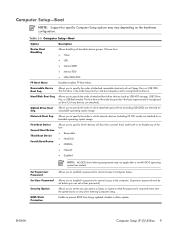
...to disable any devices are attached). The first drive in the order has priority in the boot sequence and is recognized as Floppy Discs or USB FDD). The first drive in the order has priority in the boot sequence and is required every time the system boots or only when ...entering Computer Setup. Enable to specify the order in which attached optical drives (including USB ODD) are checked for a bootable operating system image. Allows you to specify the order of attached removable devices (such as drive C (if any of ...
...to disable any devices are attached). The first drive in the order has priority in the boot sequence and is recognized as Floppy Discs or USB FDD). The first drive in the order has priority in the boot sequence and is required every time the system boots or only when ...entering Computer Setup. Enable to specify the order in which attached optical drives (including USB ODD) are checked for a bootable operating system image. Allows you to specify the order of attached removable devices (such as drive C (if any of ...
HP Compaq dx2300 and dx2308 Business PC Service Reference Guide, 1st Edition
Page 18
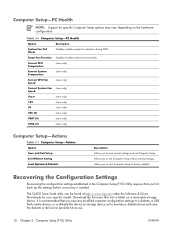
... recovery is needed. It is recommended that you to factory defaults. The CMOS Save/Load utility can be found at http://www.hp.com under the Software & Driver Downloads for specific Computer Setup options may vary depending on a removable storage device. Allows you save... Computer Setup (F10) Utility requires that you to emulate a diskette drive) and save any modified computer configuration settings to a diskette, a USB flash media device, or a diskette-like device (a storage device set to exit Computer Setup without saving changes.. Computer Setup-PC Health NOTE:...
... recovery is needed. It is recommended that you to factory defaults. The CMOS Save/Load utility can be found at http://www.hp.com under the Software & Driver Downloads for specific Computer Setup options may vary depending on a removable storage device. Allows you save... Computer Setup (F10) Utility requires that you to emulate a diskette drive) and save any modified computer configuration settings to a diskette, a USB flash media device, or a diskette-like device (a storage device set to exit Computer Setup without saving changes.. Computer Setup-PC Health NOTE:...


