Deskwriter 600 Cartridge - HP
Deskwriter 600 Cartridge

Related Manual Pages


Similar Questions

Toner Cartridge Numbers
What are the toner cartridge numbers for the toner that is used in this printer M551?Thanks.
What are the toner cartridge numbers for the toner that is used in this printer M551?Thanks.
(Posted by sternweiscindy 10 years ago)

Ink Cartridge
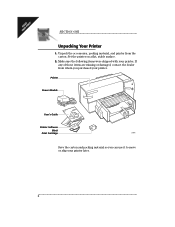
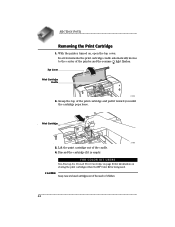
I need instructions that explain how to replace the ink cartridges in my printer.
I need instructions that explain how to replace the ink cartridges in my printer.
(Posted by robsond01 11 years ago)

Use The Printer With Single Ink Cartridge
does the HP DeskJet 2000 works with only single cartridge? the color one for example
does the HP DeskJet 2000 works with only single cartridge? the color one for example
(Posted by mdcco 12 years ago)
Related Terms
The following terms were also used when searching for Deskwriter 600 Cartridge - HP:- hp deskwriter 600
- deskwriter 600
- hp deskwriter 600 printer
- hewlett packard deskwriter 600
- deskwriter 600 driver
- deskwriter 600 printer
- hp deskwriter 600 ink
- hewlett packard deskwriter 600 printer
- hp deskjet 600
- hp deskjet 600 printer
- hp deskjet 6000
- hp deskjet 6000 printer
- hp deskwriter 600 cable
- hp deskwriter 600 cartridge
- hp deskwriter 600 driver
- hp deskwriter 600 features
- hp deskwriter 600 for sale
- deskwriter 600 troubleshooting
- hp deskwriter 600 install
- hp deskwriter 600 manual
- hp deskwriter 600 parts manual
- hp deskwriter 600 printer driver
- hp deskwriter 600 printer manual
- hp deskwriter 600 review
- hp deskwriter 600 sale
- hp deskwriter 600 series
- hp deskwriter 600 software
- hp deskwriter 600 troubleshooting
- deskwriter 600 mac
- deskjet 600 printer
- deskjet 6000
- deskjet 6000 printer
- deskwriter 600 cable
- deskwriter 600 cartridge
- deskwriter 600 drivers
- deskwriter 600 features
- deskwriter 600 for sale
- deskwriter 600 hp
- deskwriter 600 ink
- deskwriter 600 install
- deskwriter 600 xp
- deskwriter 600 parts manual
- deskwriter 600 printer driver
- deskwriter 600 printer manual
- deskwriter 600 repair
- deskwriter 600 review
- deskwriter 600 sale
- deskwriter 600 series
- deskwriter 600 service manual
- deskwriter 600 specifications
- deskjet 600