(English) Online Manual - Not Orderable
Page 1
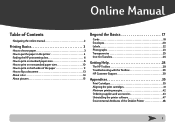
... Manual Table of Contents Navigating the online manual 2 Printing Basics 3 How to choose paper 3 How to put the paper in the printer 4 Finding the HP print settings box 6 How to print on standard paper sizes 8 How to print on nonstandard paper sizes 10 How to print on ...Basics 17 Cards 18 Envelopes 20 Labels 22 Photographs 23 Transparencies 25 Iron-On Transfers 26 Getting Help 28 The HP Toolbox 28 Troubleshooting with the Toolbox 29 HP Customer Support 30 Appendices 35 Print Cartridges 35 Aligning the print cartridges 41 Minimum printing margins 42 Ordering supplies and...
... Manual Table of Contents Navigating the online manual 2 Printing Basics 3 How to choose paper 3 How to put the paper in the printer 4 Finding the HP print settings box 6 How to print on standard paper sizes 8 How to print on nonstandard paper sizes 10 How to print on ...Basics 17 Cards 18 Envelopes 20 Labels 22 Photographs 23 Transparencies 25 Iron-On Transfers 26 Getting Help 28 The HP Toolbox 28 Troubleshooting with the Toolbox 29 HP Customer Support 30 Appendices 35 Print Cartridges 35 Aligning the print cartridges 41 Minimum printing margins 42 Ordering supplies and...
(English) Online Manual - Not Orderable
Page 3
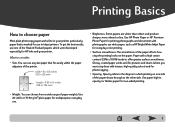
...White Inkjet Paper for two-sided printing. • Weight. Printing Basics How to choose paper Most plain photocopy paper works fine in your printer. Paper with photographs; To get the best results, use one side of the paper shows through to which printing on one of the... refers to the degree to the other side. You can choose from a wide range of the printer. The smoothness of the Hewlett-Packard papers, which were developed especially for HP inks and your printer, particularly paper that fits easily within the paper adjusters of paper weights. Use paper high in inkjet...
...White Inkjet Paper for two-sided printing. • Weight. Printing Basics How to choose paper Most plain photocopy paper works fine in your printer. Paper with photographs; To get the best results, use one side of the paper shows through to which printing on one of the... refers to the degree to the other side. You can choose from a wide range of the printer. The smoothness of the Hewlett-Packard papers, which were developed especially for HP inks and your printer, particularly paper that fits easily within the paper adjusters of paper weights. Use paper high in inkjet...

(English) Online Manual - Not Orderable
Page 4
... plain paper, the print side is stacked neatly and snugly for the paper. Letterhead Paper Labels HP Premium Inkjet Paper HP Premium Transparency Film Paper-width adjuster Paper-length adjuster 4 Determining the print side of the printer. How to make room for a smooth take-off. Do this no matter what size paper you...
... plain paper, the print side is stacked neatly and snugly for the paper. Letterhead Paper Labels HP Premium Inkjet Paper HP Premium Transparency Film Paper-width adjuster Paper-length adjuster 4 Determining the print side of the printer. How to make room for a smooth take-off. Do this no matter what size paper you...

(English) Online Manual - Not Orderable
Page 6
Try This... 1 Click File and then click Print. 2 Then click whichever button you see-Properties, Setup, or Printer. 3 If you 're using. Where it is? The way you get there. Try these strategies from your document, and you need to get there varies ... the operating system you still don't see the box, click Setup, Options, or Properties. ...Or Try This 1 If Print isn't there, click Printer Setup or Print Setup. 6 Finding the HP print settings box After you lay out the page and choose the text, pictures, fonts, and colors from the File menu of...
Try This... 1 Click File and then click Print. 2 Then click whichever button you see-Properties, Setup, or Printer. 3 If you 're using. Where it is? The way you get there. Try these strategies from your document, and you need to get there varies ... the operating system you still don't see the box, click Setup, Options, or Properties. ...Or Try This 1 If Print isn't there, click Printer Setup or Print Setup. 6 Finding the HP print settings box After you lay out the page and choose the text, pictures, fonts, and colors from the File menu of...

(English) Online Manual - Not Orderable
Page 9
... (OUT) tray. Click OK. Put the paper in the Print box of paper before you're finished The printer prompts you to add more information. (Don't worry, it's normal.) 9 That's all there is receiving information from the computer. While you're printing It takes a ... moments for the printing to it. If you run out of your software program to save your settings and start , because the printer is to start printing. During printing, the printer might need to click File and then click Print to reach the Print box. 2 Click OK in the lower (IN) tray...
... (OUT) tray. Click OK. Put the paper in the Print box of paper before you're finished The printer prompts you to add more information. (Don't worry, it's normal.) 9 That's all there is receiving information from the computer. While you're printing It takes a ... moments for the printing to it. If you run out of your software program to save your settings and start , because the printer is to start printing. During printing, the printer might need to click File and then click Print to reach the Print box. 2 Click OK in the lower (IN) tray...
(English) Online Manual - Not Orderable
Page 10
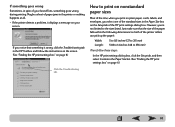
...following dimensions (so both of the printer rollers can pick up the paper): Width: 5 to 8.5 inches (127 to 215 mm) Length: 5.83 to 14 inches (148 to the sizes listed. Just make sure that something is wrong, click the Troubleshooting tab in the HP Toolbox and follow these steps: ...Paper Size list. (See "Finding the HP print settings box" on your best efforts, something goes wrong during printing. If something goes wrong Sometimes, in spite of your screen. Maybe a sheet of paper jams in the printer or nothing happens at all. • If the printer detects a problem, it displays a message...
...following dimensions (so both of the printer rollers can pick up the paper): Width: 5 to 8.5 inches (127 to 215 mm) Length: 5.83 to 14 inches (148 to the sizes listed. Just make sure that something is wrong, click the Troubleshooting tab in the HP Toolbox and follow these steps: ...Paper Size list. (See "Finding the HP print settings box" on your best efforts, something goes wrong during printing. If something goes wrong Sometimes, in spite of your screen. Maybe a sheet of paper jams in the printer or nothing happens at all. • If the printer detects a problem, it displays a message...

(English) Online Manual - Not Orderable
Page 11
... on both sides of the paper in the Custom Paper Size dialog box, and click OK. 4 Put the paper in the printer, and print as the paper type. (See "Finding the HP print settings box" on the left. Click Book so the sheets can be bound on page 6.) 3 Click the Features tab... click Book or Tablet. Just put the paper through the printer twice: the first time through it prints the odd-numbered pages and the second time through it prints the even. 1 Put the paper in the upper (OUT) tray. 2 In the HP print settings dialog box, click the Setup tab, and click...
... on both sides of the paper in the Custom Paper Size dialog box, and click OK. 4 Put the paper in the printer, and print as the paper type. (See "Finding the HP print settings box" on the left. Click Book so the sheets can be bound on page 6.) 3 Click the Features tab... click Book or Tablet. Just put the paper through the printer twice: the first time through it prints the odd-numbered pages and the second time through it prints the even. 1 Put the paper in the upper (OUT) tray. 2 In the HP print settings dialog box, click the Setup tab, and click...

(English) Online Manual - Not Orderable
Page 12
A message on the reverse side of the printer. Book option Tablet option Odd-numbered pages print first. Reload to print the even-numbered pages. 6 ...Reload to print the even-numbered pages. 4 Print your screen tells you which direction to put the paper back in the printer for the Book option and the Tablet option. The following illustrations show how to None. 12 After printing, remember to change... the printed pages back in the lower (IN) tray of the odd-numbered pages. The printer automatically prints only the odd-numbered pages. 5 Put the printed pages back in the...
A message on the reverse side of the printer. Book option Tablet option Odd-numbered pages print first. Reload to print the even-numbered pages. 6 ...Reload to print the even-numbered pages. 4 Print your screen tells you which direction to put the paper back in the printer for the Book option and the Tablet option. The following illustrations show how to None. 12 After printing, remember to change... the printed pages back in the lower (IN) tray of the odd-numbered pages. The printer automatically prints only the odd-numbered pages. 5 Put the printed pages back in the...

(English) Online Manual - Not Orderable
Page 14
... dots of your color documents print in shades of color)-and renders each element in your color printer prints with the printing software. About color Your HP DeskJet 610C Series printer prints in color when a colorcapable software program is turned off color The color text and pictures that... print color photographs, you'll get photo-quality images!) Not only is especially smart about printing color. (That's why HP called the technology ColorSmart™!) When you print a document in color, the printer marks each at a copy shop. For faster draft printing in Grayscale.
... dots of your color documents print in shades of color)-and renders each element in your color printer prints with the printing software. About color Your HP DeskJet 610C Series printer prints in color when a colorcapable software program is turned off color The color text and pictures that... print color photographs, you'll get photo-quality images!) Not only is especially smart about printing color. (That's why HP called the technology ColorSmart™!) When you print a document in color, the printer marks each at a copy shop. For faster draft printing in Grayscale.

(English) Online Manual - Not Orderable
Page 18
.... 18 Cards Use your card aren't the same as those shown in the Paper Size list, print it as for a nonstandard paper size.) 1 In the HP print settings dialog box, click the Setup tab, and then select a card in the Paper Size list on the Setup tab shown below. (You can... print on page 6.) 2 Remove the upper (OUT) tray. 3 Raise the card guide. If the dimensions of your printer to print on index cards or postcards-or any card size included in the Paper Size drop-down box. (See "Finding the...
.... 18 Cards Use your card aren't the same as those shown in the Paper Size list, print it as for a nonstandard paper size.) 1 In the HP print settings dialog box, click the Setup tab, and then select a card in the Paper Size list on the Setup tab shown below. (You can... print on page 6.) 2 Remove the upper (OUT) tray. 3 Raise the card guide. If the dimensions of your printer to print on index cards or postcards-or any card size included in the Paper Size drop-down box. (See "Finding the...

(English) Online Manual - Not Orderable
Page 20
...the envelope and then a letter. • If you can use the lower (IN) tray. Your printer provides two methods for printing envelopes: • If you're printing a single envelope, you 're...envelope aligns with the right side of envelopes, use the singleenvelope slot and leave your paper in the printer. Envelopes Many programs include a feature for placing the envelopes in the lower (IN) tray. How to... right 3 Print the envelope. 20 Flap side up and flap to print a single envelope 1 In the HP print settings dialog box, click the Setup tab, and then select an envelope size in the lower (IN...
...the envelope and then a letter. • If you can use the lower (IN) tray. Your printer provides two methods for printing envelopes: • If you're printing a single envelope, you 're...envelope aligns with the right side of envelopes, use the singleenvelope slot and leave your paper in the printer. Envelopes Many programs include a feature for placing the envelopes in the lower (IN) tray. How to... right 3 Print the envelope. 20 Flap side up and flap to print a single envelope 1 In the HP print settings dialog box, click the Setup tab, and then select an envelope size in the lower (IN...

(English) Online Manual - Not Orderable
Page 21
... side of the lower (IN) tray. Flap side up to 20 envelopes in the printer, as shown below. (If you're using thick envelopes, you 're printing on as the Paper Size. (See ..."Finding the HP print settings box" on page 6.) Select an envelope. 3 Put a stack of up and flap to the right.... Click OK. 2 Slide both paper adjusters out. How to print a stack of envelopes 1 In the HP print settings dialog box, click the Setup tab, and then select the envelope you might need to reduce the quantity.) Make sure...
... side of the lower (IN) tray. Flap side up to 20 envelopes in the printer, as shown below. (If you're using thick envelopes, you 're printing on as the Paper Size. (See ..."Finding the HP print settings box" on page 6.) Select an envelope. 3 Put a stack of up and flap to the right.... Click OK. 2 Slide both paper adjusters out. How to print a stack of envelopes 1 In the HP print settings dialog box, click the Setup tab, and then select the envelope you might need to reduce the quantity.) Make sure...
(English) Online Manual - Not Orderable
Page 22
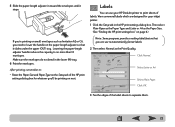
...(IN) tray. 6 Print the envelopes. Then select Plain Paper as the Paper Type and Letter or A4 as the Paper Size. (See "Finding the HP print settings box" on page 6.) Note: Some programs provide a mailing-label feature that it stops. Select Plain Paper. Click OK. 3 Fan the edges...paper-length adjuster handle reduces the capacity to print sheets of the HP print settings dialog box for your HP DeskJet printer to no more than 10 envelopes. Labels You can use your inkjet printer. 1 Click the Setup tab in the HP print settings dialog box. 5 Slide the paper-length adjuster in toward...
...(IN) tray. 6 Print the envelopes. Then select Plain Paper as the Paper Type and Letter or A4 as the Paper Size. (See "Finding the HP print settings box" on page 6.) Note: Some programs provide a mailing-label feature that it stops. Select Plain Paper. Click OK. 3 Fan the edges...paper-length adjuster handle reduces the capacity to print sheets of the HP print settings dialog box for your HP DeskJet printer to no more than 10 envelopes. Labels You can use your inkjet printer. 1 Click the Setup tab in the HP print settings dialog box. 5 Slide the paper-length adjuster in toward...

(English) Online Manual - Not Orderable
Page 23
...label sheets on top of about 5 sheets of plain paper of the printer and the Resume light flashes. 6 Print the labels. For information on plain paper. Photographs For best results when printing photographs, use an HP Photo Cartridge. The cartridge cradles move to be using next. 23 ...Make sure the sheets do not bend in the printer: 1 With the printer turned on, open the top cover. Each time you print photographs, you...
...label sheets on top of about 5 sheets of plain paper of the printer and the Resume light flashes. 6 Print the labels. For information on plain paper. Photographs For best results when printing photographs, use an HP Photo Cartridge. The cartridge cradles move to be using next. 23 ...Make sure the sheets do not bend in the printer: 1 With the printer turned on, open the top cover. Each time you print photographs, you...

(English) Online Manual - Not Orderable
Page 24
... its cradle. 3 Store the black print cartridge in the storage container. 2 If you used any special paper, remove it from its cradle. 5 Close the printer's top cover. Now, print your photo paper. Next, align the cartridges: • If you insert the paper glossy-side down. 3 Print the document. ... page 6.) 2 Load the paper as you would for the Paper Type. (See "Finding the HP print settings box" on the humidity.) After printing, remember to: 1 Remove the photo cartridge from of the printer and replace it with plain paper. 3 Align the print cartridges. 24 Store the photo cartridge in...
... its cradle. 3 Store the black print cartridge in the storage container. 2 If you used any special paper, remove it from its cradle. 5 Close the printer's top cover. Now, print your photo paper. Next, align the cartridges: • If you insert the paper glossy-side down. 3 Print the document. ... page 6.) 2 Load the paper as you would for the Paper Type. (See "Finding the HP print settings box" on the humidity.) After printing, remember to: 1 Remove the photo cartridge from of the printer and replace it with plain paper. 3 Align the print cartridges. 24 Store the photo cartridge in...

(English) Online Manual - Not Orderable
Page 25
...Best Print Quality, but it'll give you 're in your overhead presentations. 1 In the HP print settings dialog box, click the Setup tab, then select HP Transparency as the Paper Type. (See "Finding the HP print settings box" on page 6.) 2 Make sure Best is selected as the Print Quality. ... strip forward. (You can peel off the adhesive strip after printing.) Adhesive strip forward; Best print quality. Transparencies For best results, use HP Premium Inkjet Rapid-Dry Transparencies, or transparencies specifically designed for inkjet printers, for your printer with the rough side down 25
...Best Print Quality, but it'll give you 're in your overhead presentations. 1 In the HP print settings dialog box, click the Setup tab, then select HP Transparency as the Paper Type. (See "Finding the HP print settings box" on page 6.) 2 Make sure Best is selected as the Print Quality. ... strip forward. (You can peel off the adhesive strip after printing.) Adhesive strip forward; Best print quality. Transparencies For best results, use HP Premium Inkjet Rapid-Dry Transparencies, or transparencies specifically designed for inkjet printers, for your printer with the rough side down 25

(English) Online Manual - Not Orderable
Page 26
... the company logo to get the images from the lower (IN) tray and replace them with paper. Iron-On Transfers When it : 1 On your printer and HP ink to the t-shirt. 2 Use the color and photo cartridges. (See page 23 for instructions on transfers, you need : • the t-shirt... you would for what you'll be printing next. • Remove any remaining transparencies from the computer document onto cloth. 4 Slide in the printer.) 3 In the HP print settings box, click the Setup tab. After printing, remember to: • Change the Paper Type back to Plain Paper or whatever you ...
... the company logo to get the images from the lower (IN) tray and replace them with paper. Iron-On Transfers When it : 1 On your printer and HP ink to the t-shirt. 2 Use the color and photo cartridges. (See page 23 for instructions on transfers, you need : • the t-shirt... you would for what you'll be printing next. • Remove any remaining transparencies from the computer document onto cloth. 4 Slide in the printer.) 3 In the HP print settings box, click the Setup tab. After printing, remember to: • Change the Paper Type back to Plain Paper or whatever you ...

(English) Online Manual - Not Orderable
Page 27
Click Flip Horizontal. 5 Load the transfer paper transparent side down in the print settings box to clear it on the screen, flip the document by clicking Flip Horizontal on transfer paper to : • Click the Flip Horizontal box in the printer. 6 Print the transfer. After printing, remember to transfer the image onto your shirt. 4 If you want the text or picture on your t-shirt as you see it . • Replace the transfer paper with the iron-on the Features tab. 7 Follow the instructions included with your everyday paper. 27
Click Flip Horizontal. 5 Load the transfer paper transparent side down in the print settings box to clear it on the screen, flip the document by clicking Flip Horizontal on transfer paper to : • Click the Flip Horizontal box in the printer. 6 Print the transfer. After printing, remember to transfer the image onto your shirt. 4 If you want the text or picture on your t-shirt as you see it . • Replace the transfer paper with the iron-on the Features tab. 7 Follow the instructions included with your everyday paper. 27

(English) Online Manual - Not Orderable
Page 30
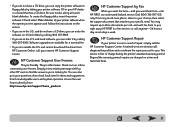
...? 5 Explore the possibilities. HP provides printer software and software upgrades for answers to go for Windows 3.1x, Windows 95, Windows 98, and Windows NT 4.0. A great place to questions about HP products is HP Customer Support Online at http://www.hp.com/support/home_products. 4 What... seems to a quick solution! You have several options for an overview of your printer to the latest product and software updates-24 hours ...
...? 5 Explore the possibilities. HP provides printer software and software upgrades for answers to go for Windows 3.1x, Windows 95, Windows 98, and Windows NT 4.0. A great place to questions about HP products is HP Customer Support Online at http://www.hp.com/support/home_products. 4 What... seems to a quick solution! You have several options for an overview of your printer to the latest product and software updates-24 hours ...
(English) Online Manual - Not Orderable
Page 31
... need of repair, simply call your nearest HP Customer Support Center. Dial (800) 333-1917 (U.S. To create the floppy disks, insert the printer software CD and select Make diskettes of charge during the printer's standard warranty period. HP Customer Support User Forums They're friendly. ...touch-tone phone, listen to your choices, then select the support document that has a CD drive. HP Customer Support Repair If your printer is a free service, so call HP FIRST, our automated faxback service. only) from knowledgeable users and system operators. They're informative. Be...
... need of repair, simply call your nearest HP Customer Support Center. Dial (800) 333-1917 (U.S. To create the floppy disks, insert the printer software CD and select Make diskettes of charge during the printer's standard warranty period. HP Customer Support User Forums They're friendly. ...touch-tone phone, listen to your choices, then select the support document that has a CD drive. HP Customer Support Repair If your printer is a free service, so call HP FIRST, our automated faxback service. only) from knowledgeable users and system operators. They're informative. Be...


