User Guide
Page 3
Contents 1 How Do I?...3 2 Get to know the HP Deskjet 2510 Printer parts...5 Control panel features...6 Status lights...6 3 Print Print documents...9 Print photos...10 Print envelopes...10 Tips for print success...11 5 Copy and scan Copy documents or photos...21 Scan to a computer......Connectivity USB Connection (non-network connection)...29 Connect a new printer...29 8 Solve a problem Improve print quality...31 Clear a paper jam...32 Unable to print...34 HP support...37 9 Technical information Notice...39 Specifications...39 Environmental product stewardship program...41 Regulatory notices...45...
Contents 1 How Do I?...3 2 Get to know the HP Deskjet 2510 Printer parts...5 Control panel features...6 Status lights...6 3 Print Print documents...9 Print photos...10 Print envelopes...10 Tips for print success...11 5 Copy and scan Copy documents or photos...21 Scan to a computer......Connectivity USB Connection (non-network connection)...29 Connect a new printer...29 8 Solve a problem Improve print quality...31 Clear a paper jam...32 Unable to print...34 HP support...37 9 Technical information Notice...39 Specifications...39 Environmental product stewardship program...41 Regulatory notices...45...
User Guide
Page 8
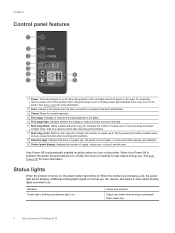
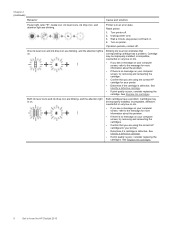
... learn about blinking lights and what to know the HP Deskjet 2510 To completely remove power, turn on the printer. Increase the number of copies, media error, ink level, and ink error. When Auto Power-Off is off after resolving print problems. 7 Start Copy Color: Starts a color copy...lights When the product is an error on . See Status lights for more information. 2 Scan: Initiates a front panel scan job after resolving print problems. 8 Attention light: Indicates that there is a paper jam, the printer is automatically enabled by pressing the button multiple times. Auto Power-...
... learn about blinking lights and what to know the HP Deskjet 2510 To completely remove power, turn on the printer. Increase the number of copies, media error, ink level, and ink error. When Auto Power-Off is off after resolving print problems. 7 Start Copy Color: Starts a color copy...lights When the product is an error on . See Status lights for more information. 2 Scan: Initiates a front panel scan job after resolving print problems. 8 Attention light: Indicates that there is a paper jam, the printer is automatically enabled by pressing the button multiple times. Auto Power-...
User Guide
Page 9
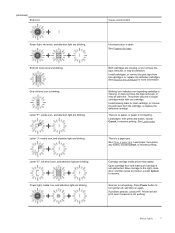
... not have the tape removed, or may be defective. See Load media. See Clear a paper jam. Scanner is open. If problem persists, contact HP. Status lights 7 See Prepare the trays. There is no paper, or paper is a paper jam. Move carriage to the right, close door, ...cartridges, or remove the pink tape from the cartridge, or replace the defective cartridge. Load paper, then press any button, except Cancel, to resume printing. Load paper, then press any button, except Cancel, to turn printer off, and then on again. (continued) Behavior Cause and solution Power light,...
... not have the tape removed, or may be defective. See Load media. See Clear a paper jam. Scanner is open. If problem persists, contact HP. Status lights 7 See Prepare the trays. There is no paper, or paper is a paper jam. Move carriage to the right, close door, ...cartridges, or remove the pink tape from the cartridge, or replace the defective cartridge. Load paper, then press any button, except Cancel, to resume printing. Load paper, then press any button, except Cancel, to turn printer off, and then on again. (continued) Behavior Cause and solution Power light,...
User Guide
Page 10
...print quality is poor, consider replacing the cartridge. Cartridge may be improperly installed, incompatible, counterfeit or very low on ink. • If you are blinking. Turn on your computer screen, try removing and reinserting the cartridge. • Confirm that you see a message on your computer screen, refer to know the HP Deskjet 2510... Reset printer. 1. Chapter 2 (continued) Behavior Cause and solution Power light, letter "E", media icon, ink level icons, ink drop icon, and attention light are using the correct HP cartridges for your ...
...print quality is poor, consider replacing the cartridge. Cartridge may be improperly installed, incompatible, counterfeit or very low on ink. • If you are blinking. Turn on your computer screen, try removing and reinserting the cartridge. • Confirm that you see a message on your computer screen, refer to know the HP Deskjet 2510... Reset printer. 1. Chapter 2 (continued) Behavior Cause and solution Power light, letter "E", media icon, ink level icons, ink drop icon, and attention light are using the correct HP cartridges for your ...
User Guide
Page 11
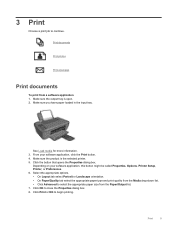
...Make sure the product is open. 2. Click the button that opens the Properties dialog box. Depending on your software application, click the Print button. 4. Print 9 Make sure you have paper loaded in the input tray. Click OK to continue. See Load media for more information. 3. Select ...Portrait or Landscape orientation. • On Paper/Quality tab select the appropriate paper type and print quality from the Media drop-down list. • Click Advanced to begin printing. Click Print or OK to select the appropriate paper size from a software application 1. From your software ...
...Make sure the product is open. 2. Click the button that opens the Properties dialog box. Depending on your software application, click the Print button. 4. Print 9 Make sure you have paper loaded in the input tray. Click OK to continue. See Load media for more information. 3. Select ...Portrait or Landscape orientation. • On Paper/Quality tab select the appropriate paper type and print quality from the Media drop-down list. • Click Advanced to begin printing. Click Print or OK to select the appropriate paper size from a software application 1. From your software ...
User Guide
Page 12
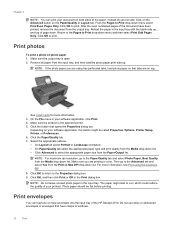
See Load media for more envelopes into the input tray of the HP Deskjet 2510. Make sure the product is open. 2. Click the button that have been printed, remove the document from the Print in color. Select the appropriate options. • On Layout tab select Portrait or Landscape orientation...output tray is the selected printer. 5. Depending on both sides of the paper, instead of the document have clasps or windows. 10 Print Photo paper should be called Properties, Options, Printer Setup, Printer, or Preferences. 6. Do not use shiny or embossed envelopes or envelopes...
See Load media for more envelopes into the input tray of the HP Deskjet 2510. Make sure the product is open. 2. Click the button that have been printed, remove the document from the Print in color. Select the appropriate options. • On Layout tab select Portrait or Landscape orientation...output tray is the selected printer. 5. Depending on both sides of the paper, instead of the document have clasps or windows. 10 Print Photo paper should be called Properties, Options, Printer Setup, Printer, or Preferences. 6. Do not use shiny or embossed envelopes or envelopes...
User Guide
Page 13
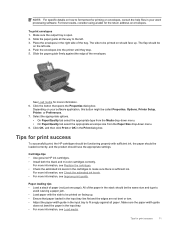
...of paper (not just one page). To print envelopes 1. See Load media for more information, see Replace the cartridges. • Check the estimated ink levels in the Print dialog box. Tips for print success To successfully print, the HP cartridges should be functioning properly with the ...side to be printed on envelopes. Place the envelopes in the input tray. • For more ...
...of paper (not just one page). To print envelopes 1. See Load media for more information, see Replace the cartridges. • Check the estimated ink levels in the Print dialog box. Tips for print success To successfully print, the HP cartridges should be functioning properly with the ...side to be printed on envelopes. Place the envelopes in the input tray. • For more ...
User Guide
Page 14
... also access the Printer Software by clicking Start > Programs > HP > HP Deskjet 2510 series > HP Deskjet 2510 series Notes • Genuine HP ink cartridges are designed and tested with HP printers and papers to help you receive a low-ink warning message, consider having a replacement cartridge available to print. • Print using a non-HP supply will not be called Properties, Options, Printer Setup...
... also access the Printer Software by clicking Start > Programs > HP > HP Deskjet 2510 series > HP Deskjet 2510 series Notes • Genuine HP ink cartridges are designed and tested with HP printers and papers to help you receive a low-ink warning message, consider having a replacement cartridge available to print. • Print using a non-HP supply will not be called Properties, Options, Printer Setup...
User Guide
Page 15
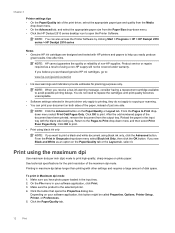
Click the Advanced button. 8. Confirm Orientation on the Paper/ Quality tab to enable printing in Max DPI drop-down list on Layout tab, then click OK to close the advanced options. 11. NOTE: Photo Paper, Best Quality must be selected from the Media drop-down list. 9. In the Printer Features area, select Yes from Paper/Output drop-down list, click Photo Paper, Best Quality. Click OK to print. Select Paper Size from the Print in maximum DPI. 7. 6. Print using the maximum dpi 13 In the Media drop-down menu. 10.
Click the Advanced button. 8. Confirm Orientation on the Paper/ Quality tab to enable printing in Max DPI drop-down list on Layout tab, then click OK to close the advanced options. 11. NOTE: Photo Paper, Best Quality must be selected from the Media drop-down list. 9. In the Printer Features area, select Yes from Paper/Output drop-down list, click Photo Paper, Best Quality. Click OK to print. Select Paper Size from the Print in maximum DPI. 7. 6. Print using the maximum dpi 13 In the Media drop-down menu. 10.

User Guide
Page 16
Chapter 3 14 Print
Chapter 3 14 Print

User Guide
Page 17
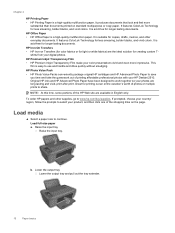
... and feel . glossy or soft gloss (satin matte). It is available in a variety of weights and sizes from major paper manufacturers. HP Everyday Photo Paper • Print colorful, everyday snapshots at a low cost, using HP papers that are the perfect choice for near-photographic reproductions and business graphics for easy handling without tabs... documents. It is opaque enough for two-sided color usage with no show-through, which makes it is available in semi-gloss finish in the HP Deskjet 2510, including letter or A4 paper, photo paper, transparencies, and envelopes.
... and feel . glossy or soft gloss (satin matte). It is available in a variety of weights and sizes from major paper manufacturers. HP Everyday Photo Paper • Print colorful, everyday snapshots at a low cost, using HP papers that are the perfect choice for near-photographic reproductions and business graphics for easy handling without tabs... documents. It is opaque enough for two-sided color usage with no show-through, which makes it is available in semi-gloss finish in the HP Deskjet 2510, including letter or A4 paper, photo paper, transparencies, and envelopes.
User Guide
Page 18
... been designed to select your color presentations vivid and even more substantial than documents printed on standard multipurpose or copy paper. If prompted, choose your country/ region, follow the prompts to work together so your HP Deskjet 2510. HP Office Paper • HP Office Paper is easy to use and handle and dries quickly without smudging...
... been designed to select your color presentations vivid and even more substantial than documents printed on standard multipurpose or copy paper. If prompted, choose your country/ region, follow the prompts to work together so your HP Deskjet 2510. HP Office Paper • HP Office Paper is easy to use and handle and dries quickly without smudging...
User Guide
Page 19
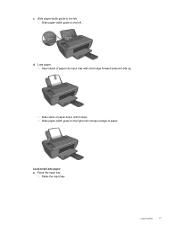
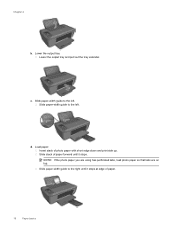
Slide paper-width guide to the left. Load media 17 d. Slide paper-width guide to the left Slide paper-width guide to the right until it stops at edge of paper. Load small-size paper a. Slide stack of paper into input tray with short edge forward and print side up. Load paper. Insert stack of paper down until it stops. Raise the input tray Raise the input tray. c.
Slide paper-width guide to the left. Load media 17 d. Slide paper-width guide to the left Slide paper-width guide to the right until it stops at edge of paper. Load small-size paper a. Slide stack of paper into input tray with short edge forward and print side up. Load paper. Insert stack of paper down until it stops. Raise the input tray Raise the input tray. c.
User Guide
Page 20
Slide paper-width guide to the left . Slide stack of paper forward until it stops. d. NOTE: If the photo paper you are using has perforated tabs, load photo paper so that tabs are on top. Slide paper-width guide to the right until it stops at edge of photo paper with short edge down and print side up. Insert stack of paper. 18 Paper basics Load paper. Slide paper-width guide to the left . c. Chapter 4 b. Lower the output tray Lower the output tray and pull out the tray extender.
Slide paper-width guide to the left . Slide stack of paper forward until it stops. d. NOTE: If the photo paper you are using has perforated tabs, load photo paper so that tabs are on top. Slide paper-width guide to the right until it stops at edge of photo paper with short edge down and print side up. Insert stack of paper. 18 Paper basics Load paper. Slide paper-width guide to the left . c. Chapter 4 b. Lower the output tray Lower the output tray and pull out the tray extender.
User Guide
Page 21
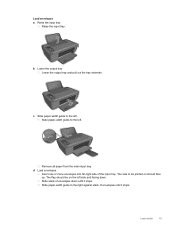
... the main input tray. The side to the right against stack of envelopes until it stops. Slide paper-width guide to be on should be printed on the left side and facing down until it stops. Slide paper-width guide to the left . Load envelopes. Load media 19 c. Insert one or...
... the main input tray. The side to the right against stack of envelopes until it stops. Slide paper-width guide to be on should be printed on the left side and facing down until it stops. Slide paper-width guide to the left . Load envelopes. Load media 19 c. Insert one or...

User Guide
Page 23
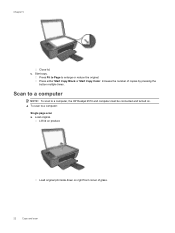
Load original print side down on product. Load either small photo paper or full-size paper in normal quality print mode. b. Load paper. 5 Copy and scan • Copy documents or photos • Scan to 1-sided copy a. Copy and scan 21 Load original. You cannot change the print mode quality when copying. ▲ Do one of glass. Lift lid on right front corner of the following: 1-sided original to a computer • Tips for copy success • Tips for scan success Copy documents or photos NOTE: All documents are copied in the input tray.
Load original print side down on product. Load either small photo paper or full-size paper in normal quality print mode. b. Load paper. 5 Copy and scan • Copy documents or photos • Scan to 1-sided copy a. Copy and scan 21 Load original. You cannot change the print mode quality when copying. ▲ Do one of glass. Lift lid on right front corner of the following: 1-sided original to a computer • Tips for copy success • Tips for scan success Copy documents or photos NOTE: All documents are copied in the input tray.
User Guide
Page 24
Chapter 5 Close lid. Press either Start Copy Black or Start Copy Color. Lift lid on right front corner of copies by pressing the button multiple times. Load original print side down on product. Press Fit to Page to a computer: Single page scan a. Scan to a computer NOTE: To scan to a computer, the HP Deskjet 2510 and computer must be connected and turned on. ▲ To scan to enlarge or reduce the original. Start copy. Increase the number of glass. 22 Copy and scan Load original. c.
Chapter 5 Close lid. Press either Start Copy Black or Start Copy Color. Lift lid on right front corner of copies by pressing the button multiple times. Load original print side down on product. Press Fit to Page to a computer: Single page scan a. Scan to a computer NOTE: To scan to a computer, the HP Deskjet 2510 and computer must be connected and turned on. ▲ To scan to enlarge or reduce the original. Start copy. Increase the number of glass. 22 Copy and scan Load original. c.
User Guide
Page 25
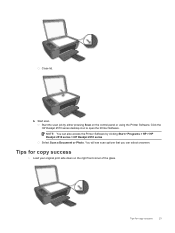
Start scan. Start the scan job by clicking Start > Programs > HP > HP Deskjet 2510 series > HP Deskjet 2510 series Select Scan a Document or Photo. Tips for copy success • Load your original print side down on the control panel or using the Printer Software. Click the HP Deskjet 2510 series desktop icon to open the Printer Software. NOTE: You can select onscreen. Tips for copy success 23 b. You will see scan options that you can also access the Printer Software by either pressing Scan on the right front corner of the glass. Close lid.
Start scan. Start the scan job by clicking Start > Programs > HP > HP Deskjet 2510 series > HP Deskjet 2510 series Select Scan a Document or Photo. Tips for copy success • Load your original print side down on the control panel or using the Printer Software. Click the HP Deskjet 2510 series desktop icon to open the Printer Software. NOTE: You can select onscreen. Tips for copy success 23 b. You will see scan options that you can also access the Printer Software by either pressing Scan on the right front corner of the glass. Close lid.
User Guide
Page 26
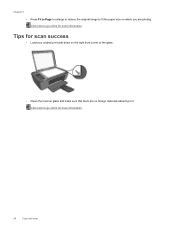
Click here to go online for more information. 24 Copy and scan Tips for more information. Click here to go online for scan success • Load your original print side down on which you are no foreign materials adhering to it. Chapter 5 • Press Fit to Page to enlarge or reduce the original image to fit the paper size on the right front corner of the glass. • Clean the scanner glass and make sure that there are printing.
Click here to go online for more information. 24 Copy and scan Tips for more information. Click here to go online for scan success • Load your original print side down on which you are no foreign materials adhering to it. Chapter 5 • Press Fit to Page to enlarge or reduce the original image to fit the paper size on the right front corner of the glass. • Clean the scanner glass and make sure that there are printing.
User Guide
Page 27
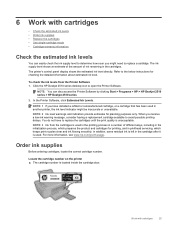
... in another printer, the ink level indicator might need to replace a cartridge. NOTE: 3 Ink from the Printer Software 1. Click the HP Deskjet 2510 series desktop icon to avoid possible printing delays. Work with cartridges • Check the estimated ink levels • Order ink supplies • Replace the cartridges • Use single-cartridge mode •...
... in another printer, the ink level indicator might need to replace a cartridge. NOTE: 3 Ink from the Printer Software 1. Click the HP Deskjet 2510 series desktop icon to avoid possible printing delays. Work with cartridges • Check the estimated ink levels • Order ink supplies • Replace the cartridges • Use single-cartridge mode •...


