Service Manual
Page 54
...been found to be defective again, you may need to replace a Printheads they want to troubleshoot the Carriage Flex Cables or the Carriage PCA. 2-24 hp designjet 4000 series printer service manual System Error Codes System Error: 86:10 Problem Description: Initializing Scan-Axis Motor ... Printhead a third time, it is damaging the Printhead. System Error: 91:02 Problem Description: The HP Instant Support troubleshooting tool has detected that the Carriage Belt is found defective within the warranty period. Corrective Action: In this case, it is correctly installed. ...
...been found to be defective again, you may need to replace a Printheads they want to troubleshoot the Carriage Flex Cables or the Carriage PCA. 2-24 hp designjet 4000 series printer service manual System Error Codes System Error: 86:10 Problem Description: Initializing Scan-Axis Motor ... Printhead a third time, it is damaging the Printhead. System Error: 91:02 Problem Description: The HP Instant Support troubleshooting tool has detected that the Carriage Belt is found defective within the warranty period. Corrective Action: In this case, it is correctly installed. ...
Service Manual
Page 84
..., the Front Panel will display the maximum and minimum length (in the Printer (Encoder Strip, friction, Carriage Belt, Slider Rod, etc...). Check also System Error Code 11:10 (refer to Page 2-7) or System Error Code 01.0:10 (refer to Page 2-24. 11 The ... displayed on troubleshooting this point, the Front Panel will be between 1158629 and 1164616. 4-10 hp designjet 4000 series printer service manual If the answer is No (the Carriage had moved) press Enter. If you select Yes (the Carriage had not moved), the Front Panel will display System Error Code 02:10. This warning means...
..., the Front Panel will display the maximum and minimum length (in the Printer (Encoder Strip, friction, Carriage Belt, Slider Rod, etc...). Check also System Error Code 11:10 (refer to Page 2-7) or System Error Code 01.0:10 (refer to Page 2-24. 11 The ... displayed on troubleshooting this point, the Front Panel will be between 1158629 and 1164616. 4-10 hp designjet 4000 series printer service manual If the answer is No (the Carriage had moved) press Enter. If you select Yes (the Carriage had not moved), the Front Panel will display System Error Code 02:10. This warning means...
Service Manual
Page 85
...results are incorrect, the Front Panel will be displayed on the Front Panel. After applying the Oil, perform the test again. - Check that the Carriage Belt is installed correctly. „ If PWM min diff got is less than 3100 but PWM avg got is less than 31160 then there is a ... obstacle blocking the Scan-Axis path and the Front Panel will display System Error Code 02:10. In this error code, refer to Page 2-4. hp designjet 4000 series printer service manual 4-11 Check that there is completed, OK will display System Error Code 86:10. If there is clean. If the ...
...results are incorrect, the Front Panel will be displayed on the Front Panel. After applying the Oil, perform the test again. - Check that the Carriage Belt is installed correctly. „ If PWM min diff got is less than 3100 but PWM avg got is less than 31160 then there is a ... obstacle blocking the Scan-Axis path and the Front Panel will display System Error Code 02:10. In this error code, refer to Page 2-4. hp designjet 4000 series printer service manual 4-11 Check that there is completed, OK will display System Error Code 86:10. If there is clean. If the ...

Service Manual
Page 135
...: „ Reset ALL the counters related to a Preventive Maintenance Kit (PMK). „ Reset only the counters related to reset the Life Counter of the: - Carriage (Bushing). - Press Enter 2 You will be given an option to either reset the Life Counter for ALL the parts related to a Preventive Maintenance Kit (PMK... allow you will be given an option to reset the Life Counter of this Service Utility is to "Reset Life Counters" and press Enter. hp designjet 4000 series printer service manual 4-61 Service Tests and Utilities 4. Reset Life Counters The purpose of : - Carriage Belt. -
...: „ Reset ALL the counters related to a Preventive Maintenance Kit (PMK). „ Reset only the counters related to reset the Life Counter of the: - Carriage (Bushing). - Press Enter 2 You will be given an option to either reset the Life Counter for ALL the parts related to a Preventive Maintenance Kit (PMK... allow you will be given an option to reset the Life Counter of this Service Utility is to "Reset Life Counters" and press Enter. hp designjet 4000 series printer service manual 4-61 Service Tests and Utilities 4. Reset Life Counters The purpose of : - Carriage Belt. -
Service Manual
Page 232
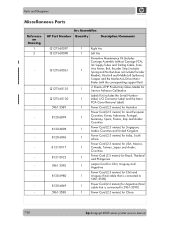
...0922 5961-3590 8120-6980 8120-6869 5961-3588 1 Right Arc 1 Left Arc Preventive Maintenance Kit (Includes Carriage Assembly (without Carriage PCA), Ink Supply Tubes and Trailing Cable, Scan- 1 Axis Motor, Belt, Encoder Strip (includes Spring and Nut but does not include Encoder Reader), Most Left and Middle Left Spittoons...to 5961-3590) 1 Power Cord (2.3 meters) for Argentina (final cable that is connected to 5961-3590) 1 Power Cord (2.5 meters) for China 7-28 hp designjet 4000 series printer service manual Parts and Diagrams Miscellaneous Parts Reference on Drawing 1 2 - - -
...0922 5961-3590 8120-6980 8120-6869 5961-3588 1 Right Arc 1 Left Arc Preventive Maintenance Kit (Includes Carriage Assembly (without Carriage PCA), Ink Supply Tubes and Trailing Cable, Scan- 1 Axis Motor, Belt, Encoder Strip (includes Spring and Nut but does not include Encoder Reader), Most Left and Middle Left Spittoons...to 5961-3590) 1 Power Cord (2.3 meters) for Argentina (final cable that is connected to 5961-3590) 1 Power Cord (2.5 meters) for China 7-28 hp designjet 4000 series printer service manual Parts and Diagrams Miscellaneous Parts Reference on Drawing 1 2 - - -

Service Manual
Page 235
... Supply Station (ISS) 8-40 APS Assembly 8-42 Most Left Spittoons 8-43 Middle Left Spittoons 8-44 Encoder Strip and Encoder Sensor 8-45 Carriage PCA 8-48 Carriage Flex Cables 8-51 Carriage Assembly 8-53 Belt Assembly 8-58 Scan-Axis Motor 8-59 Media-Axis Motor 8-62 Interconnect PCA 8-64 EIO to PCA Interface Card 8-67 Gamut PCI PCA... Lever Assembly 8-106 Media Lever Sensor 8-108 Pinchwheel Assembly 8-111 Center Guide 8-115 Drive Roller 8-118 Right Rollfeed Module Assembly 8-125 Right Spindle Lever 8-128 8 hp designjet 4000 series printer service manual 8-1
... Supply Station (ISS) 8-40 APS Assembly 8-42 Most Left Spittoons 8-43 Middle Left Spittoons 8-44 Encoder Strip and Encoder Sensor 8-45 Carriage PCA 8-48 Carriage Flex Cables 8-51 Carriage Assembly 8-53 Belt Assembly 8-58 Scan-Axis Motor 8-59 Media-Axis Motor 8-62 Interconnect PCA 8-64 EIO to PCA Interface Card 8-67 Gamut PCI PCA... Lever Assembly 8-106 Media Lever Sensor 8-108 Pinchwheel Assembly 8-111 Center Guide 8-115 Drive Roller 8-118 Right Rollfeed Module Assembly 8-125 Right Spindle Lever 8-128 8 hp designjet 4000 series printer service manual 8-1
Service Manual
Page 289
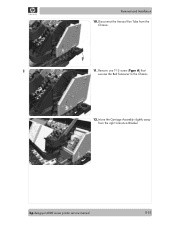
Removal and Installation 10. Move the Carriage Assembly slightly away from the Chassis. 11. Remove one T-15 screw (Type A) that secures the Belt Tensioner to the Chassis. 12. hp designjet 4000 series printer service manual 8-55 Disconnect the Aerosol Fan Tube from the right Scan-Axis Bracket.
Removal and Installation 10. Move the Carriage Assembly slightly away from the Chassis. 11. Remove one T-15 screw (Type A) that secures the Belt Tensioner to the Chassis. 12. hp designjet 4000 series printer service manual 8-55 Disconnect the Aerosol Fan Tube from the right Scan-Axis Bracket.
Service Manual
Page 290
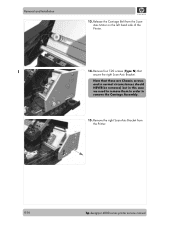
Release the Carriage Belt from the Printer. 8-56 hp designjet 4000 series printer service manual Remove the right Scan-Axis Bracket from the ScanAxis Motor on the left hand side of the Printer. 14. Removal and Installation 13. Note that secure the right Scan-Axis Bracket. Remove four T-20 screws (Type N) that these are Chassis screws and in normal circumstances should NEVER be removed, but in this case we need to remove them in order to remove the Carriage Assembly. 15.
Release the Carriage Belt from the Printer. 8-56 hp designjet 4000 series printer service manual Remove the right Scan-Axis Bracket from the ScanAxis Motor on the left hand side of the Printer. 14. Removal and Installation 13. Note that secure the right Scan-Axis Bracket. Remove four T-20 screws (Type N) that these are Chassis screws and in normal circumstances should NEVER be removed, but in this case we need to remove them in order to remove the Carriage Assembly. 15.
Service Manual
Page 291
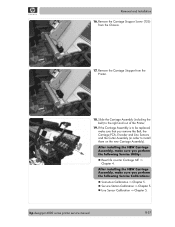
... that you perform the following Service Calibrations: „ Scan-Axis Calibration ⇒ Chapter 5. „ Service Station Calibration ⇒ Chapter 5. „ Line Sensor Calibration ⇒ Chapter 5. hp designjet 4000 series printer service manual 8-57 Slide the Carriage Assembly (including the belt) to be replaced, make sure you perform the following Service Utility: „ Reset life counter...
... that you perform the following Service Calibrations: „ Scan-Axis Calibration ⇒ Chapter 5. „ Service Station Calibration ⇒ Chapter 5. „ Line Sensor Calibration ⇒ Chapter 5. hp designjet 4000 series printer service manual 8-57 Slide the Carriage Assembly (including the belt) to be replaced, make sure you perform the following Service Utility: „ Reset life counter...
Service Manual
Page 292
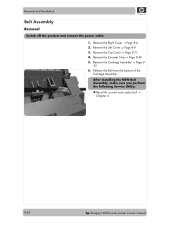
...Strip ⇒ Page 8-45. 5. Release the Belt from the bottom of the Carriage Assembly. Remove the Carriage Assembly ⇒ Page 8- 53. 6. Removal and Installation Belt Assembly Removal Switch off the product and remove ...the power cable. 1. Remove the Left Cover ⇒ Page 8-9. 3. After installing the NEW Belt Assembly, make sure you perform the following Service Utility: „ Reset life counter scan cycles belt ⇒ Chapter 4. 8-58 hp designjet 4000...
...Strip ⇒ Page 8-45. 5. Release the Belt from the bottom of the Carriage Assembly. Remove the Carriage Assembly ⇒ Page 8- 53. 6. Removal and Installation Belt Assembly Removal Switch off the product and remove ...the power cable. 1. Remove the Left Cover ⇒ Page 8-9. 3. After installing the NEW Belt Assembly, make sure you perform the following Service Utility: „ Reset life counter scan cycles belt ⇒ Chapter 4. 8-58 hp designjet 4000...
Service Manual
Page 293
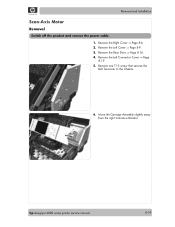
Remove the Left Connector Cover ⇒ Page 8-19 5. Remove one T-15 screw that secures the Belt Tensioner to the Chassis. 6. Remove the Left Cover ⇒ Page 8-9. 3. Move the Carriage Assembly slightly away from the right Scan-Axis Bracket. hp designjet 4000 series printer service manual 8-59 Removal and Installation Scan-Axis Motor Removal Switch off the product and remove the power cable. 1. Remove the Right Cover ⇒ Page 8-6. 2. Remove the Rear Door ⇒ Page 8-16. 4.
Remove the Left Connector Cover ⇒ Page 8-19 5. Remove one T-15 screw that secures the Belt Tensioner to the Chassis. 6. Remove the Left Cover ⇒ Page 8-9. 3. Move the Carriage Assembly slightly away from the right Scan-Axis Bracket. hp designjet 4000 series printer service manual 8-59 Removal and Installation Scan-Axis Motor Removal Switch off the product and remove the power cable. 1. Remove the Right Cover ⇒ Page 8-6. 2. Remove the Rear Door ⇒ Page 8-16. 4.

Service Manual
Page 294
Release the Carriage Belt from the ScanAxis Motor on the chassis. 8-60 hp designjet 4000 series printer service manual Release the Scan-Axis Motor cable from the PrintMech PCA. 9. Removal and Installation 7. Disconnect the Scan-Axis Motor cable from the clips on the left hand side of the Printer. 8.
Release the Carriage Belt from the ScanAxis Motor on the chassis. 8-60 hp designjet 4000 series printer service manual Release the Scan-Axis Motor cable from the PrintMech PCA. 9. Removal and Installation 7. Disconnect the Scan-Axis Motor cable from the clips on the left hand side of the Printer. 8.
Service Manual
Page 365
Preventive Maintenance 9 9 Moisture on the Printer 9-2 Noisy Carriage Bushing 9-2 Belt Swelling 9-2 Cleaning the Printer 9-2 General Cleaning 9-2 Cleaning the Drive Roller and Overdrive 9-3 Cleaning the Center Platen 9-3 Applying Oil to the Overdrive 9-5 Lubricating the Carriage Assembly 9-5 Scheduled Maintenance 9-6 Level of Printer Usage 9-6 hp designjet 4000 series printer service manual 9-1
Preventive Maintenance 9 9 Moisture on the Printer 9-2 Noisy Carriage Bushing 9-2 Belt Swelling 9-2 Cleaning the Printer 9-2 General Cleaning 9-2 Cleaning the Drive Roller and Overdrive 9-3 Cleaning the Center Platen 9-3 Applying Oil to the Overdrive 9-5 Lubricating the Carriage Assembly 9-5 Scheduled Maintenance 9-6 Level of Printer Usage 9-6 hp designjet 4000 series printer service manual 9-1
Service Manual
Page 366
... from the slider path along which the bushing moves. Cleaning intervals are determined by the Printer environment and by the types of the carriage, and from the bushing at the back of Printer supplies used. Use a mild soap and water solution if necessary. To recover from... as a reference, wait until you need to install them in an environment between 20% and 80% relative humidity. Belt Swelling To prevent new belts from moisture condensation, turn the Printer Off, and, using it free of the Printer with a soft lint-free cloth. 9-2 hp designjet 4000 series printer service manual
... from the slider path along which the bushing moves. Cleaning intervals are determined by the Printer environment and by the types of the carriage, and from the bushing at the back of Printer supplies used. Use a mild soap and water solution if necessary. To recover from... as a reference, wait until you need to install them in an environment between 20% and 80% relative humidity. Belt Swelling To prevent new belts from moisture condensation, turn the Printer Off, and, using it free of the Printer with a soft lint-free cloth. 9-2 hp designjet 4000 series printer service manual

Service Manual
Page 370
... the most worn parts of the printer. Level of Printer Usage Normal printer use means 6,000,000 Carriage Cycles (which are located under the Black Printhead Cleaners. 9-6 hp designjet 4000 series printer service manual You must be approximately 5 years before the printer needs maintenance. Under normal usage...8658; Page 8-53). „ Ink Supply Tubes and Trailing Cable (⇒ Page 8-33). „ Scan-Axis Motor (⇒ Page 8-59). „ Belt Assembly (⇒ Page 8-58). „ Most Left Spittoons (⇒ Page 8-43). „ Middle Left Spittoons (⇒ Page 8-44). „ Scraper...
... the most worn parts of the printer. Level of Printer Usage Normal printer use means 6,000,000 Carriage Cycles (which are located under the Black Printhead Cleaners. 9-6 hp designjet 4000 series printer service manual You must be approximately 5 years before the printer needs maintenance. Under normal usage...8658; Page 8-53). „ Ink Supply Tubes and Trailing Cable (⇒ Page 8-33). „ Scan-Axis Motor (⇒ Page 8-59). „ Belt Assembly (⇒ Page 8-58). „ Most Left Spittoons (⇒ Page 8-43). „ Middle Left Spittoons (⇒ Page 8-44). „ Scraper...


