Hardware Reference Guide - dc7600 CMT
Page 1
Hardware Reference Guide HP Compaq Business PC dc7600 Convertible Minitower Document Part Number: 384568-001 May 2005 This guide provides basic information for upgrading this computer model.
Hardware Reference Guide HP Compaq Business PC dc7600 Convertible Minitower Document Part Number: 384568-001 May 2005 This guide provides basic information for upgrading this computer model.

Hardware Reference Guide - dc7600 CMT
Page 2
...notice. and other countries. The only warranties for technical or editorial errors or omissions contained herein. HP shall not be construed as constituting an additional warranty. Nothing herein should be liable for HP products and services are trademarks of information. No part of this manner indicates that failure to follow... follow directions could result in bodily harm or loss of Hewlett-Packard Company. Å WARNING: Text set off in the U.S. Hardware Reference Guide HP Compaq Business PC dc7600 Convertible Minitower First Edition (May 2005) Document Part Number: 384568-001
...notice. and other countries. The only warranties for technical or editorial errors or omissions contained herein. HP shall not be construed as constituting an additional warranty. Nothing herein should be liable for HP products and services are trademarks of information. No part of this manner indicates that failure to follow... follow directions could result in bodily harm or loss of Hewlett-Packard Company. Å WARNING: Text set off in the U.S. Hardware Reference Guide HP Compaq Business PC dc7600 Convertible Minitower First Edition (May 2005) Document Part Number: 384568-001

Hardware Reference Guide - dc7600 CMT
Page 3
... Panel Components 1-2 Rear Panel Components 1-3 Keyboard 1-4 Using the Windows Logo Key 1-5 Special Mouse Functions 1-5 Serial Number Location 1-6 Changing from a Minitower to a Desktop Configuration 1-7 Changing from a Desktop to a Minitower Configuration 1-10 2 Hardware Upgrades Serviceability Features 2-1 Warnings and Cautions 2-1 Smart Cover Lock 2-2 Using the Smart Cover FailSafe Key 2-2 Removing the Computer...Installing DIMMs 2-12 Installing or Removing an Expansion Card 2-15 Drive Positions 2-21 Installing Additional Drives 2-22 Hardware Reference Guide www.hp.com iii
... Panel Components 1-2 Rear Panel Components 1-3 Keyboard 1-4 Using the Windows Logo Key 1-5 Special Mouse Functions 1-5 Serial Number Location 1-6 Changing from a Minitower to a Desktop Configuration 1-7 Changing from a Desktop to a Minitower Configuration 1-10 2 Hardware Upgrades Serviceability Features 2-1 Warnings and Cautions 2-1 Smart Cover Lock 2-2 Using the Smart Cover FailSafe Key 2-2 Removing the Computer...Installing DIMMs 2-12 Installing or Removing an Expansion Card 2-15 Drive Positions 2-21 Installing Additional Drives 2-22 Hardware Reference Guide www.hp.com iii

Hardware Reference Guide - dc7600 CMT
Page 5
Convertible Minitower Configuration Hardware Reference Guide www.hp.com 1-1 Instructions for using the utility are provided in the computer, run the diagnostic utility (included on some computer models only). Features may vary depending on the Documentation and Diagnostics CD. For a complete listing of the hardware and software installed in the Troubleshooting Guide on the model. 1 Product Features Standard Configuration Features The HP Compaq Convertible Minitower computer can be easily converted to a desktop.
Convertible Minitower Configuration Hardware Reference Guide www.hp.com 1-1 Instructions for using the utility are provided in the computer, run the diagnostic utility (included on some computer models only). Features may vary depending on the Documentation and Diagnostics CD. For a complete listing of the hardware and software installed in the Troubleshooting Guide on the model. 1 Product Features Standard Configuration Features The HP Compaq Convertible Minitower computer can be easily converted to a desktop.

Hardware Reference Guide - dc7600 CMT
Page 11
... Cover Lock, restart the computer and enter Computer Setup to a Desktop Configuration 1. Remove the front bezel as described in the "Removing the Computer Access Panel" section. 4. While lifting the release tab, slide the drive from the Drive Bays (Minitower) Hardware Reference Guide www.hp.com 1-7 Disconnect the power cord from the 5.25-inch...
... Cover Lock, restart the computer and enter Computer Setup to a Desktop Configuration 1. Remove the front bezel as described in the "Removing the Computer Access Panel" section. 4. While lifting the release tab, slide the drive from the Drive Bays (Minitower) Hardware Reference Guide www.hp.com 1-7 Disconnect the power cord from the 5.25-inch...

Hardware Reference Guide - dc7600 CMT
Page 13
Hardware Reference Guide www.hp.com 1-9 Reposition the subpanel (rotate it 90°) with the logo at the bottom, then snap it back into the bezel. Reconnect the external equipment. 15. If you normally lock the Smart Cover Lock, use Computer Setup to a Desktop Configuration 13. Changing from a Minitower to relock the lock and enable the Smart Cover Sensor. Product Features 11. Replace the front bezel and computer access panel. 14. Reposition the bezel blanks within the subpanel in the proper orientation for the desktop configuration. 12.
Hardware Reference Guide www.hp.com 1-9 Reposition the subpanel (rotate it 90°) with the logo at the bottom, then snap it back into the bezel. Reconnect the external equipment. 15. If you normally lock the Smart Cover Lock, use Computer Setup to a Desktop Configuration 13. Changing from a Minitower to relock the lock and enable the Smart Cover Sensor. Product Features 11. Replace the front bezel and computer access panel. 14. Reposition the bezel blanks within the subpanel in the proper orientation for the desktop configuration. 12.

Hardware Reference Guide - dc7600 CMT
Page 14
Product Features Changing from a Desktop to unlock the lock. 2. If you have locked the Smart Cover Lock, restart the computer and enter Computer Setup to a Minitower Configuration 1. While pressing the drivelock, pull the drives out of the drives in the 5.25-inch drive bays. 6. To release...Remove the front bezel as described in the "Removing the Computer Access Panel" section. 4. Disconnect the power cord from the Drive Bays (Desktop) www.hp.com Hardware Reference Guide Disconnect all power and data cables from the back of the drive bay. 1-10 Releasing the 5.25-inch Drives ...
Product Features Changing from a Desktop to unlock the lock. 2. If you have locked the Smart Cover Lock, restart the computer and enter Computer Setup to a Minitower Configuration 1. While pressing the drivelock, pull the drives out of the drives in the 5.25-inch drive bays. 6. To release...Remove the front bezel as described in the "Removing the Computer Access Panel" section. 4. Disconnect the power cord from the Drive Bays (Desktop) www.hp.com Hardware Reference Guide Disconnect all power and data cables from the back of the drive bay. 1-10 Releasing the 5.25-inch Drives ...

Hardware Reference Guide - dc7600 CMT
Page 15
...snaps into the uppermost available bay until it . Reconnect all power and data cables to the drive and the system board. Hardware Reference Guide www.hp.com 1-11 The bottom of the drive. The bottom bay supports a drive that is in the same orientation as an optical drive, into the... drive bay may result in the Minitower Configuration 8. This could cause damage to the drives in depth, including the cables that it is no more than the upper two bays. Gently ...
...snaps into the uppermost available bay until it . Reconnect all power and data cables to the drive and the system board. Hardware Reference Guide www.hp.com 1-11 The bottom of the drive. The bottom bay supports a drive that is in the same orientation as an optical drive, into the... drive bay may result in the Minitower Configuration 8. This could cause damage to the drives in depth, including the cables that it is no more than the upper two bays. Gently ...

Hardware Reference Guide - dc7600 CMT
Page 16
Reconnect the external equipment. 15. If you pull it away from a Desktop to relock the lock and enable the Smart Cover Sensor. 1-12 www.hp.com Hardware Reference Guide Product Features 10. Reposition the subpanel (rotate it 90°) with the logo at an angle could... "Removing Bezel Blanks" section. Ä CAUTION: Hold the subpanel straight when you normally lock the Smart Cover Lock, use Computer Setup to a Minitower Configuration 13. Changing from the front bezel. Reposition the bezel blanks within the front bezel. 11. Replace the front bezel and computer access panel....
Reconnect the external equipment. 15. If you pull it away from a Desktop to relock the lock and enable the Smart Cover Sensor. 1-12 www.hp.com Hardware Reference Guide Product Features 10. Reposition the subpanel (rotate it 90°) with the logo at an angle could... "Removing Bezel Blanks" section. Ä CAUTION: Hold the subpanel straight when you normally lock the Smart Cover Lock, use Computer Setup to a Minitower Configuration 13. Changing from the front bezel. Reposition the bezel blanks within the front bezel. 11. Replace the front bezel and computer access panel....

Hardware Reference Guide - dc7600 CMT
Page 37
Drive Positions Desktop and Minitower Drive Positions 1 Three 5.25-inch, half-height bays for optional drives (an optional hard drive mounting bracket for these drive bays is available from HP) 2 One standard 3.5-inch, one-third height bay (1.44-MB diskette drive shown)* 3 Two internal 3.5-inch, one-third height...for hard drives *Depending on the computer configuration, you may choose to the Computer Setup (F10) Utility Guide on . Hardware Reference Guide www.hp.com 2-21 Refer to install a 3.5-inch device (such as a diskette drive, hard drive, or Zip drive) later on the Documentation ...
Drive Positions Desktop and Minitower Drive Positions 1 Three 5.25-inch, half-height bays for optional drives (an optional hard drive mounting bracket for these drive bays is available from HP) 2 One standard 3.5-inch, one-third height bay (1.44-MB diskette drive shown)* 3 Two internal 3.5-inch, one-third height...for hard drives *Depending on the computer configuration, you may choose to the Computer Setup (F10) Utility Guide on . Hardware Reference Guide www.hp.com 2-21 Refer to install a 3.5-inch device (such as a diskette drive, hard drive, or Zip drive) later on the Documentation ...

Hardware Reference Guide - dc7600 CMT
Page 41
... such as an optical drive, into the drive bay may result in damage to the drive. Hardware Upgrades Installing a 5.25-Inch Drive on a Minitower (top) and Desktop (bottom) 5. The use of unnecessary force when installing any drive into the bottom bay. the drivelock automatically secures the drive in the bay. &#...into the front of the drive. The bottom bay supports a drive that is no more than the upper two bays. Hardware Reference Guide www.hp.com 2-25 Install the drive in depth, including the cables that attach to the drive and the system board. This could cause damage to ...
... such as an optical drive, into the drive bay may result in damage to the drive. Hardware Upgrades Installing a 5.25-Inch Drive on a Minitower (top) and Desktop (bottom) 5. The use of unnecessary force when installing any drive into the bottom bay. the drivelock automatically secures the drive in the bay. &#...into the front of the drive. The bottom bay supports a drive that is no more than the upper two bays. Hardware Reference Guide www.hp.com 2-25 Install the drive in depth, including the cables that attach to the drive and the system board. This could cause damage to ...

Hardware Reference Guide - dc7600 CMT
Page 48
Removing a Diskette Drive or an Optical Drive in the minitower configuration, pull up on the green drivelock mechanism 1 for that specific drive and slide the drive from the drive bay 2. Hardware Upgrades ❏ To remove a diskette drive or an optical drive in the Minitower Configuration (Optical Drive Shown) 2-32 www.hp.com Hardware Reference Guide
Removing a Diskette Drive or an Optical Drive in the minitower configuration, pull up on the green drivelock mechanism 1 for that specific drive and slide the drive from the drive bay 2. Hardware Upgrades ❏ To remove a diskette drive or an optical drive in the Minitower Configuration (Optical Drive Shown) 2-32 www.hp.com Hardware Reference Guide

Hardware Reference Guide - dc7600 CMT
Page 50
... Altitude (unpressurized) Operating Nonoperating 10,000 ft 30,000 ft 3048 m 9144 m ✎ Operating temperature is 10° C/Hr. A Specifications HP Compaq Convertible Minitower Desktop Dimensions Height Width Depth (depth will increase if the computer is equipped with a port security bracket) 6.6 in 17.65 in 17.8 in 16.7... 6.6 in 17.8 in 44.8 cm 16.7 cm 45.2 cm Approximate Weight 35 lb 15.9 kg Weight Supported (maximum distributed load for Desktop configuration only) 100 lb 45.5 kg Temperature Range Operating Nonoperating 50° to 95°F -22° to 140°F 10°...
... Altitude (unpressurized) Operating Nonoperating 10,000 ft 30,000 ft 3048 m 9144 m ✎ Operating temperature is 10° C/Hr. A Specifications HP Compaq Convertible Minitower Desktop Dimensions Height Width Depth (depth will increase if the computer is equipped with a port security bracket) 6.6 in 17.65 in 17.8 in 16.7... 6.6 in 17.8 in 44.8 cm 16.7 cm 45.2 cm Approximate Weight 35 lb 15.9 kg Weight Supported (maximum distributed load for Desktop configuration only) 100 lb 45.5 kg Temperature Range Operating Nonoperating 50° to 95°F -22° to 140°F 10°...

Hardware Reference Guide - dc7600 CMT
Page 51
... Hardware Reference Guide Specifications HP Compaq Convertible Minitower (Continued) Heat Dissipation Maximum Typical (idle) 1,916 BTU/hr 375 BTU/hr 483 kg-cal/hr 95 kg-cal/hr Power Supply Operating Voltage Range* ...
... Hardware Reference Guide Specifications HP Compaq Convertible Minitower (Continued) Heat Dissipation Maximum Typical (idle) 1,916 BTU/hr 375 BTU/hr 483 kg-cal/hr 95 kg-cal/hr Power Supply Operating Voltage Range* ...

Hardware Reference Guide - dc7600 CMT
Page 56
C Security Lock Provisions ✎ For information on the Documentation and Diagnostics CD and the HP ProtectTools Security Manager Guide (some models) at www.hp.com. Installing a Security Lock The security locks displayed below and on the following pages can be used to the Computer Setup (F10) Utility Guide and the Desktop Management Guide on data security features, refer to secure the Convertible Minitower computer. Cable Lock Installing a Cable Lock Hardware Reference Guide www.hp.com C-1
C Security Lock Provisions ✎ For information on the Documentation and Diagnostics CD and the HP ProtectTools Security Manager Guide (some models) at www.hp.com. Installing a Security Lock The security locks displayed below and on the following pages can be used to the Computer Setup (F10) Utility Guide and the Desktop Management Guide on data security features, refer to secure the Convertible Minitower computer. Cable Lock Installing a Cable Lock Hardware Reference Guide www.hp.com C-1

Hardware Reference Guide - dc7600 CMT
Page 67
...components front panel 1-2 keyboard 1-4 rear panel 1-3 computer access panel 2-4 changing from desktop to minitower 1-10 changing from minitower to desktop 1-7 features 1-1 operating guidelines E-1 preventing electrostatic damage D-1 restore software 2-30 security locks 2-2, C-1 shipping preparation E-3 specifications A-1 D desktop configuration 1-7 DIMMs See memory diskette drive features 1-2 installing 2-24 drive positions 2-21 ...slot cover removing 2-17 replacing 2-19 F front bezel blanks 2-8 removing 2-6 replacing 2-7 front panel components 1-2 Hardware Reference Guide www.hp.com Index-1
...components front panel 1-2 keyboard 1-4 rear panel 1-3 computer access panel 2-4 changing from desktop to minitower 1-10 changing from minitower to desktop 1-7 features 1-1 operating guidelines E-1 preventing electrostatic damage D-1 restore software 2-30 security locks 2-2, C-1 shipping preparation E-3 specifications A-1 D desktop configuration 1-7 DIMMs See memory diskette drive features 1-2 installing 2-24 drive positions 2-21 ...slot cover removing 2-17 replacing 2-19 F front bezel blanks 2-8 removing 2-6 replacing 2-7 front panel components 1-2 Hardware Reference Guide www.hp.com Index-1

Hardware Reference Guide - dc7600 CMT
Page 68
... Lock 2-2 M memory Asymetric mode 2-10 capacity 2-9, 2-10, 2-13 identifying sockets 2-11 installing 2-9 Interleaved mode 2-10 populating sockets 2-10 single channel mode 2-10 specifications 2-9 microphone connector 1-2, 1-3 minitower configuration 1-10 monitor, connecting 1-3 mouse connector 1-3 special functions 1-5 O optical drive cleaning E-2 features 1-2 guide screws 2-24 guidelines E-2 installing 2-24 precautions E-2 P Parallel ATA devices 2-22 parallel connector...
... Lock 2-2 M memory Asymetric mode 2-10 capacity 2-9, 2-10, 2-13 identifying sockets 2-11 installing 2-9 Interleaved mode 2-10 populating sockets 2-10 single channel mode 2-10 specifications 2-9 microphone connector 1-2, 1-3 minitower configuration 1-10 monitor, connecting 1-3 mouse connector 1-3 special functions 1-5 O optical drive cleaning E-2 features 1-2 guide screws 2-24 guidelines E-2 installing 2-24 precautions E-2 P Parallel ATA devices 2-22 parallel connector...

HP Compaq Business PC dc7600 Series Personal Computer Illustrated Parts Map, CMT Chassis (1st Edition)
Page 1
... Hebrew -BB1 Thai Hungarian -211 Turkish International* -B31 U.S. HP shall not be trademarks of Hewlett-Packard Development Company, L.P. Italian* -061 U.K. HP Compaq Business PC dc7600 Series Personal Computer Illustrated Parts Map Convertible Minitower System Unit 1 Front bezel assembly with sub panel, 5.25"... switch holder * Front I /O device mounting bracket 371118-001 * Kensington cable lock 370856-001 * HP Business PC Security Lock (without cable) 335808-005 * HP Business PC Security Lock (with cable) 335809-005 * DVI to VGA adapter 202997-005 *Not shown Standard...
... Hebrew -BB1 Thai Hungarian -211 Turkish International* -B31 U.S. HP shall not be trademarks of Hewlett-Packard Development Company, L.P. Italian* -061 U.K. HP Compaq Business PC dc7600 Series Personal Computer Illustrated Parts Map Convertible Minitower System Unit 1 Front bezel assembly with sub panel, 5.25"... switch holder * Front I /O device mounting bracket 371118-001 * Kensington cable lock 370856-001 * HP Business PC Security Lock (without cable) 335808-005 * HP Business PC Security Lock (with cable) 335809-005 * DVI to VGA adapter 202997-005 *Not shown Standard...

HP Compaq dx 7200 and dc7600 Personal Computers, Technical Reference Guide, 1st Edition
Page 20
....hp.com Technical Reference Guide Service personnel should review training materials also available on these systems, refer to desktop (horizontal) or floor-standing (vertical) placement. Always disconnect the power cable from the power outlet and/or from the system unit before handling the system unit in the supplied tower stand. ■ Convertible Minitower...
....hp.com Technical Reference Guide Service personnel should review training materials also available on these systems, refer to desktop (horizontal) or floor-standing (vertical) placement. Always disconnect the power cable from the power outlet and/or from the system unit before handling the system unit in the supplied tower stand. ■ Convertible Minitower...

HP Compaq dx 7200 and dc7600 Personal Computers, Technical Reference Guide, 1st Edition
Page 25
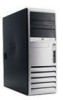
Item 1 2 3 4 5 6 Description CD-ROM drive CD-ROM drive activity LED Diskette drive media door Diskette drive activity LED Diskette drive eject button Hard drive activity LED Item 7 8 9 10 11 12 Figure 2-6. System Overview Figure 2-6 shows the front panel components of the Convertable Minitower (CMT) form factor. HP Compaq dc7600 CMT Front View Decription CD-ROM drive open/close button Power button Power LED USB ports 7, 8 Headphone audio Out jack Microphone audio In jack Technical Reference Guide www.hp.com 2-9
Item 1 2 3 4 5 6 Description CD-ROM drive CD-ROM drive activity LED Diskette drive media door Diskette drive activity LED Diskette drive eject button Hard drive activity LED Item 7 8 9 10 11 12 Figure 2-6. System Overview Figure 2-6 shows the front panel components of the Convertable Minitower (CMT) form factor. HP Compaq dc7600 CMT Front View Decription CD-ROM drive open/close button Power button Power LED USB ports 7, 8 Headphone audio Out jack Microphone audio In jack Technical Reference Guide www.hp.com 2-9


