Notebook PC User Guide - Windows 7
Page 8
... ...61 Replacing a drive in the primary hard drive bay 62 Replacing a drive in the secondary hard drive bay 65 7 External devices ...68 Using a USB device ...68 Connecting a USB device 68 Removing a USB device ...68 Using an eSATA device ...69 Connecting an eSATA device 69 Removing an eSATA device 69 8 External media cards ...71 Using Digital Media Slot cards ...71 Inserting a digital card ...71 Removing a digital card ...72 9 Memory modules ...73 10 Security ...77 Protecting the computer ...77 Using passwords ...78 Setting passwords in Windows 78 Setting passwords in Setup Utility 79...
... ...61 Replacing a drive in the primary hard drive bay 62 Replacing a drive in the secondary hard drive bay 65 7 External devices ...68 Using a USB device ...68 Connecting a USB device 68 Removing a USB device ...68 Using an eSATA device ...69 Connecting an eSATA device 69 Removing an eSATA device 69 8 External media cards ...71 Using Digital Media Slot cards ...71 Inserting a digital card ...71 Removing a digital card ...72 9 Memory modules ...73 10 Security ...77 Protecting the computer ...77 Using passwords ...78 Setting passwords in Windows 78 Setting passwords in Setup Utility 79...

Notebook PC User Guide - Windows 7
Page 17
Connect optional USB devices. Flashing-Accessing the optical drive. The security cable is parked. Right-side components Item Description 1 Power light 2 Hard Disk Drive light 3 USB ports (2) 4 Optical Drive light 5 Optical drive 6 AC Adapter light 7 Power connector 8 Security Cable slot Left-side components Function ● On-The computer is on select models, writes to optical discs. ● On-The computer is connected to external power. ● Off-The computer is not connected to act as a deterrent, but might not prevent the computer...
Connect optional USB devices. Flashing-Accessing the optical drive. The security cable is parked. Right-side components Item Description 1 Power light 2 Hard Disk Drive light 3 USB ports (2) 4 Optical Drive light 5 Optical drive 6 AC Adapter light 7 Power connector 8 Security Cable slot Left-side components Function ● On-The computer is on select models, writes to optical discs. ● On-The computer is connected to external power. ● Off-The computer is not connected to act as a deterrent, but might not prevent the computer...
Notebook PC User Guide - Windows 7
Page 18
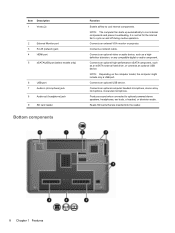
... operation. Produces sound when connected to cool internal components and prevent overheating. Connects an external VGA monitor or projector. Connects an optional USB device. Connects an optional computer headset microphone, stereo array microphone, monarural microphone. Reads SD cards that are inserted into the reader. 8 Chapter 1 Features Connects an optional video or audio device, such as an eSATA external hard drive, or connects an optional USB device. Connects a network cable. Item Description 1 Vents (2) 2 External Monitor port 3 RJ-45 (network) jack 4 HDMI...
... operation. Produces sound when connected to cool internal components and prevent overheating. Connects an external VGA monitor or projector. Connects an optional USB device. Connects an optional computer headset microphone, stereo array microphone, monarural microphone. Reads SD cards that are inserted into the reader. 8 Chapter 1 Features Connects an optional video or audio device, such as an eSATA external hard drive, or connects an optional USB device. Connects a network cable. Item Description 1 Vents (2) 2 External Monitor port 3 RJ-45 (network) jack 4 HDMI...
Notebook PC User Guide - Windows 7
Page 31
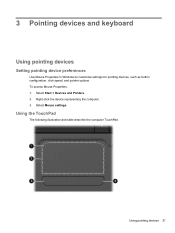
3 Pointing devices and keyboard Using pointing devices Setting pointing device preferences Use Mouse Properties in Windows to customize settings for pointing devices, such as button configuration, click speed, and pointer options. Right-click the device representing the computer. 3. To access Mouse Properties: 1. Using the TouchPad The following illustration and table describe the computer TouchPad. Select Mouse settings. Using pointing devices 21 Select Start > Devices and Printers. 2.
3 Pointing devices and keyboard Using pointing devices Setting pointing device preferences Use Mouse Properties in Windows to customize settings for pointing devices, such as button configuration, click speed, and pointer options. Right-click the device representing the computer. 3. To access Mouse Properties: 1. Using the TouchPad The following illustration and table describe the computer TouchPad. Select Mouse settings. Using pointing devices 21 Select Start > Devices and Printers. 2.

Notebook PC User Guide - Windows 7
Page 46
... the HDMI port, you need an HDMI cable (purchased separately), available from most electronic retailers. To connect a video or audio device to the computer. Press the Switch Screen Image key to switch the image between the display devices connected to the HDMI port: 1. Right-click the Speakers icon in the notification area at the far right of the taskbar. d. Click OK. Click Set Default. Connect one HDMI device connected to the HDMI port, while simultaneously supporting an...
... the HDMI port, you need an HDMI cable (purchased separately), available from most electronic retailers. To connect a video or audio device to the computer. Press the Switch Screen Image key to switch the image between the display devices connected to the HDMI port: 1. Right-click the Speakers icon in the notification area at the far right of the taskbar. d. Click OK. Click Set Default. Connect one HDMI device connected to the HDMI port, while simultaneously supporting an...
Notebook PC User Guide - Windows 7
Page 48
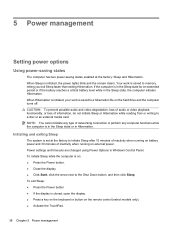
... power lights blink and the screen clears. Your work is closed, open the display. ● Press a key on the keyboard or button on the remote control (select models only). ● Activate the TouchPad. 38 Chapter 5 Power management When Sleep is in the Sleep state or in Hibernation. To exit Sleep: ● Press the Power button ● If the display is saved to a disc or an external media card. 5 Power management Setting power options Using power-saving states The computer has two power-saving states enabled at...
... power lights blink and the screen clears. Your work is closed, open the display. ● Press a key on the keyboard or button on the remote control (select models only). ● Activate the TouchPad. 38 Chapter 5 Power management When Sleep is in the Sleep state or in Hibernation. To exit Sleep: ● Press the Power button ● If the display is saved to a disc or an external media card. 5 Power management Setting power options Using power-saving states The computer has two power-saving states enabled at...
Notebook PC User Guide - Windows 7
Page 51
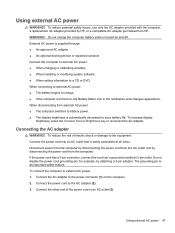
... to battery power. ● The display brightness is turned on, the Battery Meter icon in the notification area changes appearance. When disconnecting from external AC power: ● The computer switches to save battery life. The grounding pin is supplied through: ● An approved AC adapter ● An optional docking device or expansion product Connect the computer to external AC power: ● When charging or calibrating a battery. ● When installing or...
... to battery power. ● The display brightness is turned on, the Battery Meter icon in the notification area changes appearance. When disconnecting from external AC power: ● The computer switches to save battery life. The grounding pin is supplied through: ● An approved AC adapter ● An optional docking device or expansion product Connect the computer to external AC power: ● When charging or calibrating a battery. ● When installing or...

Notebook PC User Guide - Windows 7
Page 55
... cooler than room temperature. Maximum discharge time gradually shortens, as the battery storage capacity naturally degrades. The battery charges whether the computer is off. To maximize battery discharge time: ● Lower the brightness on battery power. Maximizing battery discharge time Battery discharge time varies depending on the features used while on the display. ● Check the Power saver setting in use before turning on board aircraft.
... cooler than room temperature. Maximum discharge time gradually shortens, as the battery storage capacity naturally degrades. The battery charges whether the computer is off. To maximize battery discharge time: ● Lower the brightness on battery power. Maximizing battery discharge time Battery discharge time varies depending on the features used while on the display. ● Check the Power saver setting in use before turning on board aircraft.
Notebook PC User Guide - Windows 7
Page 57
... display settings to external power until the battery is off the display settings listed in use, but do not shut down the computer. Change the On battery setting to an external power source. j. Click Save changes. 3. To discharge the battery: a. Do not calibrate a new battery. Connect the computer to an AC adapter, optional power adapter, optional expansion product, or optional docking device, and then connect the adapter or device to Never. Disable Hibernation and Sleep. or - f. b. Fully charge the battery. b. To disable Hibernation and Sleep...
... display settings to external power until the battery is off the display settings listed in use, but do not shut down the computer. Change the On battery setting to an external power source. j. Click Save changes. 3. To discharge the battery: a. Do not calibrate a new battery. Connect the computer to an AC adapter, optional power adapter, optional expansion product, or optional docking device, and then connect the adapter or device to Never. Disable Hibernation and Sleep. or - f. b. Fully charge the battery. b. To disable Hibernation and Sleep...
Notebook PC User Guide - Windows 7
Page 61
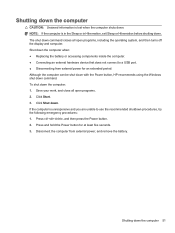
... and you are unable to a USB port. ● Disconnecting from external power, and remove the battery. Shut down . Click Start. 3. If the computer is in the Sleep or in Hibernation, exit Sleep or Hibernation before shutting down the computer when: ● Replacing the battery or accessing components inside the computer. ● Connecting an external hardware device that does not connect to use the recommended shutdown procedures, try the...
... and you are unable to a USB port. ● Disconnecting from external power, and remove the battery. Shut down . Click Start. 3. If the computer is in the Sleep or in Hibernation, exit Sleep or Hibernation before shutting down the computer when: ● Replacing the battery or accessing components inside the computer. ● Connecting an external hardware device that does not connect to use the recommended shutdown procedures, try the...
Notebook PC User Guide - Windows 7
Page 95
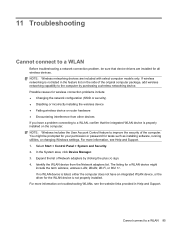
... Help and Support. Select Start > Control Panel > System and Security. 2. The listing for wireless connection problems include: ● Changing the network configuration (SSID or security) ● Disabling or incorrectly installing the wireless device ● Failing wireless device or router hardware ● Encountering interference from the Network adapters list. For more information on troubleshooting WLANs, see Help and Support. 1. Expand the list of the original computer package, add wireless networking capability to a WLAN, confirm that device drivers are included...
... Help and Support. Select Start > Control Panel > System and Security. 2. The listing for wireless connection problems include: ● Changing the network configuration (SSID or security) ● Disabling or incorrectly installing the wireless device ● Failing wireless device or router hardware ● Encountering interference from the Network adapters list. For more information on troubleshooting WLANs, see Help and Support. 1. Expand the list of the original computer package, add wireless networking capability to a WLAN, confirm that device drivers are included...
Notebook PC User Guide - Windows 7
Page 102
... -screen instructions. 92 Chapter 11 Troubleshooting This feature automatically checks for and installs updates for software and driver downloads, type the computer model number in the Search box, press enter, and then follow the instructions provided. NOTE: If you have not previously set up Windows Update, a prompt appears asking you want a specific SoftPaq, enter the SoftPaq number in the search box, and then press the enter key. - Click the option for the Windows operating...
... -screen instructions. 92 Chapter 11 Troubleshooting This feature automatically checks for and installs updates for software and driver downloads, type the computer model number in the Search box, press enter, and then follow the instructions provided. NOTE: If you have not previously set up Windows Update, a prompt appears asking you want a specific SoftPaq, enter the SoftPaq number in the search box, and then press the enter key. - Click the option for the Windows operating...
Notebook PC User Guide - Windows 7
Page 108
... network administrator before installing any software updates, especially system BIOS updates. Access the updates on the system ROM. NOTE: The computer system BIOS is connected to improve the security of the software provided with the hardware devices, and provides for data transfer among hardware devices, including the time and date. To update the software: 1. You might be prompted for your permission or password for tasks such as installing software, running utilities, or changing Windows settings. B Software updates Updated...
... network administrator before installing any software updates, especially system BIOS updates. Access the updates on the system ROM. NOTE: The computer system BIOS is connected to improve the security of the software provided with the hardware devices, and provides for data transfer among hardware devices, including the time and date. To update the software: 1. You might be prompted for your permission or password for tasks such as installing software, running utilities, or changing Windows settings. B Software updates Updated...
Notebook PC User Guide - Windows 7
Page 109
... battery power, docked in Windows) or by opening Setup Utility. If Setup Utility does not open with the system information displayed, use the arrow keys to the hard drive. Updating the BIOS To update the BIOS, first determine what BIOS version you are already in an optional docking device, or connected to the hard drive. Follow the instructions on the computer, you need this path when you currently have and then download and install the new BIOS. Do not download or install a BIOS update...
... battery power, docked in Windows) or by opening Setup Utility. If Setup Utility does not open with the system information displayed, use the arrow keys to the hard drive. Updating the BIOS To update the BIOS, first determine what BIOS version you are already in an optional docking device, or connected to the hard drive. Follow the instructions on the computer, you need this path when you currently have and then download and install the new BIOS. Do not download or install a BIOS update...
Notebook PC User Guide - Windows 7
Page 110
... software and driver downloads, type the computer model number in the Search box, press the enter key, and then follow the on the hard drive that appear on the screen reports a successful installation, delete the downloaded file from the models listed. 4. If you want a specific SoftPaq, enter the SoftPaq number in the Search box, and then press the enter key. - Click your country or region. 2. If no instructions appear: 1. Using the hard drive path...
... software and driver downloads, type the computer model number in the Search box, press the enter key, and then follow the on the hard drive that appear on the screen reports a successful installation, delete the downloaded file from the models listed. 4. If you want a specific SoftPaq, enter the SoftPaq number in the Search box, and then press the enter key. - Click your country or region. 2. If no instructions appear: 1. Using the hard drive path...

Notebook PC User Guide - Windows 7
Page 113
... document. ● Back up your information to disc. ● Store personal files in the Documents library and periodically back up this folder. ● Back up templates stored in their associated programs. ● Save customized settings in the computer. Using Windows Backup and Restore To create a backup using them to an optional external hard drive, a network drive, or discs. ● When backing up your information 103 Display the screen. 2.
... document. ● Back up your information to disc. ● Store personal files in the Documents library and periodically back up this folder. ● Back up templates stored in their associated programs. ● Save customized settings in the computer. Using Windows Backup and Restore To create a backup using them to an optional external hard drive, a network drive, or discs. ● When backing up your information 103 Display the screen. 2.
Notebook PC User Guide - Windows 7
Page 117
... keys adjusting volume 25 audio CD, DVD, or BD controls 25 decrease screen brightness 25 Help and Support 25 increase screen brightness 25 muting speaker sound 25 switching screen image 25 using 25 volume 31 wireless 26 administrator password creating 79 entering 80 managing 79 airport security devices 52 antennas 10 antivirus software 81 applications key, Windows 6 audio devices, connecting external 34 audio features 34 audio functions, checking 34 audio-in (microphone) jack 30 audio-out (headphone) jacks 30 AutoPlay 56 B backing up customized window, toolbar, and menu bar settings...
... keys adjusting volume 25 audio CD, DVD, or BD controls 25 decrease screen brightness 25 Help and Support 25 increase screen brightness 25 muting speaker sound 25 switching screen image 25 using 25 volume 31 wireless 26 administrator password creating 79 entering 80 managing 79 airport security devices 52 antennas 10 antivirus software 81 applications key, Windows 6 audio devices, connecting external 34 audio features 34 audio functions, checking 34 audio-in (microphone) jack 30 audio-out (headphone) jacks 30 AutoPlay 56 B backing up customized window, toolbar, and menu bar settings...
Notebook PC User Guide - Windows 7
Page 118
..., installing 63 secondary, installing 66 hard drive self test 97 HDMI port 35 HDMI port, identifying 8 HDMI, connecting 35 headphone (audio-out) jacks 30 headphones 30 Help and Support key 25 Hibernation exiting 39 initiated during critical battery level 46 initiating 39 high-definition devices, connecting 35 hotkeys description 26 using 26 HP MediaSmart, starting 33 HP Mobile Broadband Module serial number label 12 hubs 68 I icons Connection Manager 13 network 13, 86 wired network 13 wireless 13 integrated webcam light, identifying...
..., installing 63 secondary, installing 66 hard drive self test 97 HDMI port 35 HDMI port, identifying 8 HDMI, connecting 35 headphone (audio-out) jacks 30 headphones 30 Help and Support key 25 Hibernation exiting 39 initiated during critical battery level 46 initiating 39 high-definition devices, connecting 35 hotkeys description 26 using 26 HP MediaSmart, starting 33 HP Mobile Broadband Module serial number label 12 hubs 68 I icons Connection Manager 13 network 13, 86 wired network 13 wireless 13 integrated webcam light, identifying...

Notebook PC User Guide - Windows 7
Page 119
... 55 removing 58 optical drive 7, 53, 60 P passwords administrator 79 power-on 80 set in Setup Utility 79 set in Windows 78 performing a recovery 105 pinching TouchPad gesture 23 pointing devices, setting preferences 21 ports eSATA/USB 8 external monitor 8 HDMI 8, 35 USB 7, 8, 68 ports, external monitor 35 power connecting 41 conserving 48 power button, identifying 5 power connector, identifying 7 power cord, identifying 11 power lights, identifying 4 power-on password creating 80 entering 80 managing 80 primary hard drive bay, identifying 9 primary hard drive, replacing 62 Product Key 12...
... 55 removing 58 optical drive 7, 53, 60 P passwords administrator 79 power-on 80 set in Setup Utility 79 set in Windows 78 performing a recovery 105 pinching TouchPad gesture 23 pointing devices, setting preferences 21 ports eSATA/USB 8 external monitor 8 HDMI 8, 35 USB 7, 8, 68 ports, external monitor 35 power connecting 41 conserving 48 power button, identifying 5 power connector, identifying 7 power cord, identifying 11 power lights, identifying 4 power-on password creating 80 entering 80 managing 80 primary hard drive bay, identifying 9 primary hard drive, replacing 62 Product Key 12...
Notebook PC User Guide - Windows 7
Page 120
... optical disc tray 88 optical drive detection 88 Windows drivers 92 turning off the computer 51 U unresponsive system 51 USB cable, connecting 68 USB devices connecting 68 description 68 removing 68 USB hubs 68 USB ports, identifying 7, 8, 68 using Setup Utility 94 using system restore 104 V vents, identifying 9 video, using 35 Virtualization Technology 96 volume adjust 31 keys 31 mute 31 volume keys, identifying 25 volume mute light, identifying 4 W webcam 9, 30 webcam light 30 webcam, using 37 Windows applications key, identifying 6 Windows logo key, identifying 6 Windows, passwords set in...
... optical disc tray 88 optical drive detection 88 Windows drivers 92 turning off the computer 51 U unresponsive system 51 USB cable, connecting 68 USB devices connecting 68 description 68 removing 68 USB hubs 68 USB ports, identifying 7, 8, 68 using Setup Utility 94 using system restore 104 V vents, identifying 9 video, using 35 Virtualization Technology 96 volume adjust 31 keys 31 mute 31 volume keys, identifying 25 volume mute light, identifying 4 W webcam 9, 30 webcam light 30 webcam, using 37 Windows applications key, identifying 6 Windows logo key, identifying 6 Windows, passwords set in...


