
Diagnostic Codes
Page 1
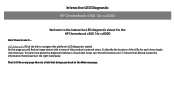
...it ... To identify the location of the LEDs for the HP Chromebook x360 14c-cc0000 Here's how to use it ! Interactive LED Diagnostic HP Chromebook x360 14c-cc0000 Welcome to the interactive LED diagnostic viewer for each LED, hover over the information icon ( i ) above the LED and review the information that view. LED Diagnostic (Click the link... viewer with a menu of each view, simply click that presents in the right-hand pane. To learn more about the diagnostic behavior of this page you back to navigate this platform's LED diagnostic states) On this product's external views.
...it ... To identify the location of the LEDs for the HP Chromebook x360 14c-cc0000 Here's how to use it ! Interactive LED Diagnostic HP Chromebook x360 14c-cc0000 Welcome to the interactive LED diagnostic viewer for each LED, hover over the information icon ( i ) above the LED and review the information that view. LED Diagnostic (Click the link... viewer with a menu of each view, simply click that presents in the right-hand pane. To learn more about the diagnostic behavior of this page you back to navigate this platform's LED diagnostic states) On this product's external views.

Maintenance and Service Guide
Page 6
... Component replacement procedures ...23 Preparation for disassembly ...23 Bottom cover ...23 Battery ...25 Solid-state drive ...26 Speakers ...27 Touchpad ...28 Fingerprint reader (select products only 29 Fan ...30 Heat sink ...31 I/O board ...32 System board ...33 Camera privacy switch ...36 Display assembly ...36 Keyboard with top cover ...42 6 Backing up, resetting, and recovering ...43 Backing up ...43 Resetting ...43 Recovering ...43 Installing the Chromebook Recovery Utility 44 Creating recovery media ...44 Recovering the Chrome operating system 44 Setting...
... Component replacement procedures ...23 Preparation for disassembly ...23 Bottom cover ...23 Battery ...25 Solid-state drive ...26 Speakers ...27 Touchpad ...28 Fingerprint reader (select products only 29 Fan ...30 Heat sink ...31 I/O board ...32 System board ...33 Camera privacy switch ...36 Display assembly ...36 Keyboard with top cover ...42 6 Backing up, resetting, and recovering ...43 Backing up ...43 Resetting ...43 Recovering ...43 Installing the Chromebook Recovery Utility 44 Creating recovery media ...44 Recovering the Chrome operating system 44 Setting...
Maintenance and Service Guide
Page 9
.... Table 1-1 Product components and their descriptions Category Description Product Name HP Chromebook x360 14c Model number: 14c-cc0xxx Processors Intel® processors Intel Core™ i5-1135G7 ...touch screen Memory Onboard, nonupgradeable DDR4-3200, dual channel support Supports the following configurations: ● 16 GB ● 8 GB Primary storage Solid-state drive, M.2, 2230, PCIe, NVMe 256 GB 128 GB Audio and video Bang & Olufsen HD Audio Dual speakers HP Wide Vision Camera, 720p by 30 frames per second Dual array digital microphone with appropriate software...
.... Table 1-1 Product components and their descriptions Category Description Product Name HP Chromebook x360 14c Model number: 14c-cc0xxx Processors Intel® processors Intel Core™ i5-1135G7 ...touch screen Memory Onboard, nonupgradeable DDR4-3200, dual channel support Supports the following configurations: ● 16 GB ● 8 GB Primary storage Solid-state drive, M.2, 2230, PCIe, NVMe 256 GB 128 GB Audio and video Bang & Olufsen HD Audio Dual speakers HP Wide Vision Camera, 720p by 30 frames per second Dual array digital microphone with appropriate software...

Maintenance and Service Guide
Page 11
... remove a card: ▲ Press in on the card until it from the memory card reader. NOTE: For more information about your components, where they are located, and how they work. Insert the card into the memory card reader, and then press in Sleep mode. Hold the card label-side up, with the pen. NOTE: Use a standard USB Type-A charging cable or cable adapter (purchased separately) when charging a small external device. ● White: The AC adapter is connected...
... remove a card: ▲ Press in on the card until it from the memory card reader. NOTE: For more information about your components, where they are located, and how they work. Insert the card into the memory card reader, and then press in Sleep mode. Hold the card label-side up, with the pen. NOTE: Use a standard USB Type-A charging cable or cable adapter (purchased separately) when charging a small external device. ● White: The AC adapter is connected...

Maintenance and Service Guide
Page 12
... needed , charging the computer battery. - Also connects an optional headset microphone. This jack does not support optional standalone microphones. and - To reduce the risk of the computer. NOTE: Use a standard USB Type-C charging cable or cable adapter (purchased separately) when charging a small external device. - For additional safety information, see the Regulatory, Safety, and Environmental Notices. and - WARNING! Table 2-1 Right-side components and their descriptions Component (1) USB Type-C® power connector and SuperSpeed port Description Connects...
... needed , charging the computer battery. - Also connects an optional headset microphone. This jack does not support optional standalone microphones. and - To reduce the risk of the computer. NOTE: Use a standard USB Type-C charging cable or cable adapter (purchased separately) when charging a small external device. - For additional safety information, see the Regulatory, Safety, and Environmental Notices. and - WARNING! Table 2-1 Right-side components and their descriptions Component (1) USB Type-C® power connector and SuperSpeed port Description Connects...

Maintenance and Service Guide
Page 20
... the LED/fan cable and M47339-001 for the USB/DisplayPort cable. (8) Solid-state drive, 128 GB (M.2, 2230) NOTE: The solid-state drive thermal pad is available as spare part number M47345-001. M11040-005 (9) SSD cover not available as a spare part (10) Fingerprint reader module (includes cable) M47332-001 (11) Touchpad NOTE: The touchpad cable is available as spare part number M47338-001. includes replacement thermal material) NOTE: System board repair support kit...
... the LED/fan cable and M47339-001 for the USB/DisplayPort cable. (8) Solid-state drive, 128 GB (M.2, 2230) NOTE: The solid-state drive thermal pad is available as spare part number M47345-001. M11040-005 (9) SSD cover not available as a spare part (10) Fingerprint reader module (includes cable) M47332-001 (11) Touchpad NOTE: The touchpad cable is available as spare part number M47338-001. includes replacement thermal material) NOTE: System board repair support kit...

Maintenance and Service Guide
Page 28
... disinfecting high-touch, external surfaces on your device and unplug the power cord and other connected external devices. Discard the gloves after each cleaning. IMPORTANT: Keep liquids away from the top of the display to components, never clean a product while it can cause damage to clean the surfaces with any petroleum-based materials, such as wireless keyboards. Remove any installed batteries from your...
... disinfecting high-touch, external surfaces on your device and unplug the power cord and other connected external devices. Discard the gloves after each cleaning. IMPORTANT: Keep liquids away from the top of the display to components, never clean a product while it can cause damage to clean the surfaces with any petroleum-based materials, such as wireless keyboards. Remove any installed batteries from your...
Maintenance and Service Guide
Page 30
... then press enter. 4. Go to open. 2. Type the serial number, product number, or product name to go /techcenter/pcdiags. 2. Select Authorized service providers. Search collect Chrome device logs. Place the cursor over Support resources to http://www.hp.com/go to view technical bulletins. Near the bottom of the window, select Notebook PCs, and the select your location. 22 Chapter 4 Removal and replacement procedures preliminary...
... then press enter. 4. Go to open. 2. Type the serial number, product number, or product name to go /techcenter/pcdiags. 2. Select Authorized service providers. Search collect Chrome device logs. Place the cursor over Support resources to http://www.hp.com/go to view technical bulletins. Near the bottom of the window, select Notebook PCs, and the select your location. 22 Chapter 4 Removal and replacement procedures preliminary...
Maintenance and Service Guide
Page 31
... or void the warranty. Make special note of your computer. See Removal and replacement procedures preliminary requirements on -screen instructions. Disconnect all external devices from the computer by an authorized service provider. Bottom cover To remove the bottom cover, use these procedures. NOTE: Details about supported parts for your computer, go to http://partsurfer.hp.com, select your computer, including model, serial number, product key, and length of warranty...
... or void the warranty. Make special note of your computer. See Removal and replacement procedures preliminary requirements on -screen instructions. Disconnect all external devices from the computer by an authorized service provider. Bottom cover To remove the bottom cover, use these procedures. NOTE: Details about supported parts for your computer, go to http://partsurfer.hp.com, select your computer, including model, serial number, product key, and length of warranty...

Maintenance and Service Guide
Page 47
... the touch board (3), and then remove the cable from the end of the panel (4). 8. Rotate the board off the panel (3). Disconnect the display cable from the clips in the bottom of the board (1). If you need to remove the camera module: a. If you need to remove it from the display: a. The touch control board is available as spare part number M50421-001. 9. Use a flat tool to lift up evenly across the camera module to remove the touch control board...
... the touch board (3), and then remove the cable from the end of the panel (4). 8. Rotate the board off the panel (3). Disconnect the display cable from the clips in the bottom of the board (1). If you need to remove the camera module: a. If you need to remove it from the display: a. The touch control board is available as spare part number M50421-001. 9. Use a flat tool to lift up evenly across the camera module to remove the touch control board...
Maintenance and Service Guide
Page 51
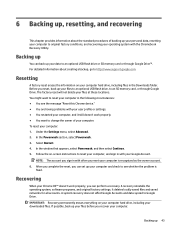
... your files to an optional USB flash drive, to http://www.support.google.com. NOTE: The account you reset your computer is fixed. 6 Backing up, resetting, and recovering This chapter provides information about creating a backup, go to an SD memory card, or through Google Drive™. Backing up You can perform a recovery. To reset your downloaded files. Under the Settings menu, select Advanced. 2. A recovery reinstalls the operating system, software programs, and original factory settings.
... your files to an optional USB flash drive, to http://www.support.google.com. NOTE: The account you reset your computer is fixed. 6 Backing up, resetting, and recovering This chapter provides information about creating a backup, go to an SD memory card, or through Google Drive™. Backing up You can perform a recovery. To reset your downloaded files. Under the Settings menu, select Advanced. 2. A recovery reinstalls the operating system, software programs, and original factory settings.

Maintenance and Service Guide
Page 52
... external devices connected to recover the Chrome operating system on your computer using the recovery media that were installed at the factory. All data is complete. To create recovery media: 1. Select the Launcher icon, and then select All Apps. 3. NOTE: All data and partitions on your recovery media will be plugged into your computer, plug in the power cord, and then turn on -screen instructions. Do not remove the USB flash drive or SD memory card...
... external devices connected to recover the Chrome operating system on your computer using the recovery media that were installed at the factory. All data is complete. To create recovery media: 1. Select the Launcher icon, and then select All Apps. 3. NOTE: All data and partitions on your recovery media will be plugged into your computer, plug in the power cord, and then turn on -screen instructions. Do not remove the USB flash drive or SD memory card...
Maintenance and Service Guide
Page 55
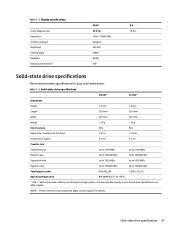
... 1,000,215,216 Operating temperature 0°C to 70°C (32°F to 158°F) *1 GB = 1 billion bytes when referring to hard drive storage capacity. Table 7-2 Display specifications Active diagonal size Resolution Surface treatment Brightness Viewing angle Backlight Display panel interface Metric 35.6 cm 1920 × 1080 (FHD) Antiglare 250 nits UWVA WLED eDP U.S. 14.0 in Solid-state drive specifications This section provides...
... 1,000,215,216 Operating temperature 0°C to 70°C (32°F to 158°F) *1 GB = 1 billion bytes when referring to hard drive storage capacity. Table 7-2 Display specifications Active diagonal size Resolution Surface treatment Brightness Viewing angle Backlight Display panel interface Metric 35.6 cm 1920 × 1080 (FHD) Antiglare 250 nits UWVA WLED eDP U.S. 14.0 in Solid-state drive specifications This section provides...

Maintenance and Service Guide
Page 59
... A AC adapter light 3, 5 AC adapters, spare part numbers 13 action keys identifying 8 audio-in (microphone) jack, identifying 4 audio-out (headphone) jack, identifying 4 B backing up 43 battery light 3, 5 Bluetooth label 9 bottom cover removal 23 spare part number 23 buttons power 5 C camera 6 identifying 6 camera light, identifying 6 camera module illustrated 12 spare part number 12 camera privacy switch removal 36 spare part number 36 camera privacy switch, identifying 5 caring for your computer 19 cautions electrostatic discharge 15, 16 Chromebook Recovery Utility, installing 44 cleaning...
... A AC adapter light 3, 5 AC adapters, spare part numbers 13 action keys identifying 8 audio-in (microphone) jack, identifying 4 audio-out (headphone) jack, identifying 4 B backing up 43 battery light 3, 5 Bluetooth label 9 bottom cover removal 23 spare part number 23 buttons power 5 C camera 6 identifying 6 camera light, identifying 6 camera module illustrated 12 spare part number 12 camera privacy switch removal 36 spare part number 36 camera privacy switch, identifying 5 caring for your computer 19 cautions electrostatic discharge 15, 16 Chromebook Recovery Utility, installing 44 cleaning...

Maintenance and Service Guide
Page 60
...set requirements 48 power cords, spare part numbers 13 power light, identifying 5 product description keyboard 2 pointing device 2 ports 2 product name and number, computer 9 R recovery media creating 44 erase 45 recovery, performing 43 regulatory information regulatory label 9 wireless certification labels 9 removal and replacement procedures 23 solid-state drive 26 resetting 43 rubber feet removal 23 spare part number 23 S Screw Kit, spare part number 13 search key, identifying 8 serial number, computer 9 service labels, locating 9 solid-state drive removal and replacement 26 specifications...
...set requirements 48 power cords, spare part numbers 13 power light, identifying 5 product description keyboard 2 pointing device 2 ports 2 product name and number, computer 9 R recovery media creating 44 erase 45 recovery, performing 43 regulatory information regulatory label 9 wireless certification labels 9 removal and replacement procedures 23 solid-state drive 26 resetting 43 rubber feet removal 23 spare part number 23 S Screw Kit, spare part number 13 search key, identifying 8 serial number, computer 9 service labels, locating 9 solid-state drive removal and replacement 26 specifications...
Part Locator
Page 1
... large icons of each of the external views of the replaceable parts for the HP Chromebook x360 14c-cc0000 Here's how to use it ! To view a specific view in the list. To view a specific part and its location in the product, click the part name in greater detail, simply click that brings you back to either the External Views or the Parts List, enabling you to navigate to whatever...
... large icons of each of the external views of the replaceable parts for the HP Chromebook x360 14c-cc0000 Here's how to use it ! To view a specific view in the list. To view a specific part and its location in the product, click the part name in greater detail, simply click that brings you back to either the External Views or the Parts List, enabling you to navigate to whatever...

User Guide
Page 7
... in Sleep mode. Table 1-1 Right-side components and their descriptions Component (1) Magnetic pen attachment area (2) Memory card reader (3) USB SuperSpeed port (4) AC adapter and battery light Description Holds an optional pen. Connects a USB device, provides high-speed data transfer, and (for select products) charges small devices (such as a smartphone) when the computer is on the right side of the computer. Reads optional memory cards that store, manage, share, or access information...
... in Sleep mode. Table 1-1 Right-side components and their descriptions Component (1) Magnetic pen attachment area (2) Memory card reader (3) USB SuperSpeed port (4) AC adapter and battery light Description Holds an optional pen. Connects a USB device, provides high-speed data transfer, and (for select products) charges small devices (such as a smartphone) when the computer is on the right side of the computer. Reads optional memory cards that store, manage, share, or access information...

User Guide
Page 21
...'t work properly. ● You want to reset your computer is fixed. Recovering When your computer hard drive, including files in with the Chromebook Recovery Utility. A system recovery does not affect Google Accounts and data synced to Google Drive. Backing up your computer. The factory reset will not delete your computer: 1. A recovery reinstalls the operating system, software programs, and original factory settings. It deletes locally saved files and saved networks...
...'t work properly. ● You want to reset your computer is fixed. Recovering When your computer hard drive, including files in with the Chromebook Recovery Utility. A system recovery does not affect Google Accounts and data synced to Google Drive. Backing up your computer. The factory reset will not delete your computer: 1. A recovery reinstalls the operating system, software programs, and original factory settings. It deletes locally saved files and saved networks...

User Guide
Page 22
... operating system and software programs that has internet access. Do not remove the USB flash drive or SD memory card until the process is missing or damaged" screen. Disconnect any computer. Select the Launcher icon, and then select All Apps. 3. To enter recovery mode, press and hold the esc+f3 keys, and then press the power button. Creating recovery media You can install this utility from the Apps list, and follow the on-screen instructions...
... operating system and software programs that has internet access. Do not remove the USB flash drive or SD memory card until the process is missing or damaged" screen. Disconnect any computer. Select the Launcher icon, and then select All Apps. 3. To enter recovery mode, press and hold the esc+f3 keys, and then press the power button. Creating recovery media You can install this utility from the Apps list, and follow the on-screen instructions...

User Guide
Page 33
... 23 J jacks audio-in (microphone) 2 audio-out (headphone) 2 K keys action 7 esc 6, 7 search 7 L labels Bluetooth 8 regulatory 8 serial number 8 service 8 wireless certification 8 WLAN 8 lights AC adapter and battery 1, 3 camera 4 power 3 M magnetic pen attachment area, identifying 1 memory card reader, identifying 1 microphone (audio-in) jack, identifying 2 mute action key 7 O operating environment 20 P ports USB SuperSpeed 1 USB Type-C power connector and SuperSpeed port 2 power button, identifying 3 power light, identifying 3 printing 14 product name and number, computer 8 R recovery media...
... 23 J jacks audio-in (microphone) 2 audio-out (headphone) 2 K keys action 7 esc 6, 7 search 7 L labels Bluetooth 8 regulatory 8 serial number 8 service 8 wireless certification 8 WLAN 8 lights AC adapter and battery 1, 3 camera 4 power 3 M magnetic pen attachment area, identifying 1 memory card reader, identifying 1 microphone (audio-in) jack, identifying 2 mute action key 7 O operating environment 20 P ports USB SuperSpeed 1 USB Type-C power connector and SuperSpeed port 2 power button, identifying 3 power light, identifying 3 printing 14 product name and number, computer 8 R recovery media...


