
User Guide
Page 9
... products only 47 Enabling Automatic DriveLock 47 Disabling Automatic DriveLock 47 Entering an Automatic DriveLock password 48 Selecting manual DriveLock 48 Setting a DriveLock master password 48 Enabling DriveLock and setting a DriveLock user password 49 Disabling DriveLock ...50 Entering a DriveLock password 50 Changing a DriveLock password 50 Windows Hello (select products only) ...51 Using antivirus software ...51 Using firewall software ...51 Installing software updates ...52 Using HP Client Security (select products only 52 Using HP Device as a Service (select products only...
... products only 47 Enabling Automatic DriveLock 47 Disabling Automatic DriveLock 47 Entering an Automatic DriveLock password 48 Selecting manual DriveLock 48 Setting a DriveLock master password 48 Enabling DriveLock and setting a DriveLock user password 49 Disabling DriveLock ...50 Entering a DriveLock password 50 Changing a DriveLock password 50 Windows Hello (select products only) ...51 Using antivirus software ...51 Using firewall software ...51 Installing software updates ...52 Using HP Client Security (select products only 52 Using HP Device as a Service (select products only...
User Guide
Page 42
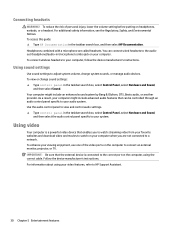
... the volume setting before putting on your audio system. You can be controlled through an audio control panel specific to a network. To connect wireless headsets to view and control audio settings. ▲ Type control panel in (microphone) combo jack on the computer to adjust system volume, change sound settings: ▲ Type control panel in the taskbar search box, and then select HP Documentation. Connecting headsets WARNING! To reduce the risk of the video ports on your computer, follow the device manufacturer's instructions. Use the audio control panel...
... the volume setting before putting on your audio system. You can be controlled through an audio control panel specific to a network. To connect wireless headsets to view and control audio settings. ▲ Type control panel in (microphone) combo jack on the computer to adjust system volume, change sound settings: ▲ Type control panel in the taskbar search box, and then select HP Documentation. Connecting headsets WARNING! To reduce the risk of the video ports on your computer, follow the device manufacturer's instructions. Use the audio control panel...
User Guide
Page 53
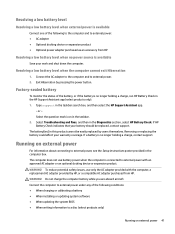
Factory-sealed battery To monitor the status of the battery, or if the battery is no longer holding a charge, run HP Battery Check in this product cannot be replaced, contact support. Type support in the Diagnostics section, select HP Battery Check. WARNING! Removing or replacing the battery could affect your work and shut down the computer. Running on external power 41 Select Troubleshooting and fixes, and then in the taskbar search box, and...
Factory-sealed battery To monitor the status of the battery, or if the battery is no longer holding a charge, run HP Battery Check in this product cannot be replaced, contact support. Type support in the Diagnostics section, select HP Battery Check. WARNING! Removing or replacing the battery could affect your work and shut down the computer. Running on external power 41 Select Troubleshooting and fixes, and then in the taskbar search box, and...
User Guide
Page 55
... your computer information. Using passwords A password is a group of characters that can be available on your personal settings and data from an optional external optical drive (select products only), optional external hard drive (select products only), or internal network adapter Boot options feature in Computer Setup* Unauthorized access to a Windows user account Windows user password Unauthorized access to navigate and make selections in combination with an optional security cable on password Unauthorized access to Computer Setup (BIOS) BIOS administrator password in select...
... your computer information. Using passwords A password is a group of characters that can be available on your personal settings and data from an optional external optical drive (select products only), optional external hard drive (select products only), or internal network adapter Boot options feature in Computer Setup* Unauthorized access to a Windows user account Windows user password Unauthorized access to navigate and make selections in combination with an optional security cable on password Unauthorized access to Computer Setup (BIOS) BIOS administrator password in select...
User Guide
Page 64
... and other attacks, monitors device health, and helps reduce time spent solving device and security issues. Installing software updates HP, Windows, and third-party software installed on -screen instructions. 3. NOTE: Under some circumstances a firewall can quickly download and install the software, which may already have a firewall installed. You can access this software through the HP Client Security icon at the far right of user-defined security criteria. Select Windows Update, and then follow...
... and other attacks, monitors device health, and helps reduce time spent solving device and security issues. Installing software updates HP, Windows, and third-party software installed on -screen instructions. 3. NOTE: Under some circumstances a firewall can quickly download and install the software, which may already have a firewall installed. You can access this software through the HP Client Security icon at the far right of user-defined security criteria. Select Windows Update, and then follow...
User Guide
Page 73
NOTE: Use extreme care when making changes in Computer Setup NOTE: Restoring defaults will not change the hard drive mode. Your changes go into effect when the computer restarts. NOTE: If you are using arrow keys to the main Computer Setup screen, press esc, and then follow these steps: 1. Computer Setup includes settings for the types of devices installed, the startup sequence of the computer, and the amount of the following methods...
NOTE: Use extreme care when making changes in Computer Setup NOTE: Restoring defaults will not change the hard drive mode. Your changes go into effect when the computer restarts. NOTE: If you are using arrow keys to the main Computer Setup screen, press esc, and then follow these steps: 1. Computer Setup includes settings for the types of devices installed, the startup sequence of the computer, and the amount of the following methods...
User Guide
Page 75
... enter the Boot Device Options menu. 2. TPM provides additional security for any instructions that contains the update. 4. Select your computer. Using the hard drive path you shall bear all the liabilities wholly and solely. The BIOS installation begins. 5. Start Computer Setup. Type file in Computer Setup: 1. TPM BIOS settings (select products only) IMPORTANT: Before enabling Trusted Platform Module (TPM) functionality on this path when you connect your computer to the BIOS version currently installed...
... enter the Boot Device Options menu. 2. TPM provides additional security for any instructions that contains the update. 4. Select your computer. Using the hard drive path you shall bear all the liabilities wholly and solely. The BIOS installation begins. 5. Start Computer Setup. Type file in Computer Setup: 1. TPM BIOS settings (select products only) IMPORTANT: Before enabling Trusted Platform Module (TPM) functionality on this path when you connect your computer to the BIOS version currently installed...
User Guide
Page 91
... 52 HP Device as a Service (HP DaaS) 52 HP Easy Clean using 55 HP Fast Charge 39 HP LAN-Wireless Protection 22 HP MAC Address Pass Through 23 HP PC Hardware Diagnostics UEFI downloading 67 starting 67 using 66 HP PC Hardware Diagnostics Windows downloading 65 installing 66 using 65 HP Recovery media recovery 59 I initiating Sleep and Hibernation 37 input power 70 integrated numeric keypad, identifying 11 internal microphones, identifying 6 International Association of Accessibility Professionals 73 J jacks audio-out (headphone)/audio-in (microphone) combo 5 K keyboard and optional mouse using...
... 52 HP Device as a Service (HP DaaS) 52 HP Easy Clean using 55 HP Fast Charge 39 HP LAN-Wireless Protection 22 HP MAC Address Pass Through 23 HP PC Hardware Diagnostics UEFI downloading 67 starting 67 using 66 HP PC Hardware Diagnostics Windows downloading 65 installing 66 using 65 HP Recovery media recovery 59 I initiating Sleep and Hibernation 37 input power 70 integrated numeric keypad, identifying 11 internal microphones, identifying 6 International Association of Accessibility Professionals 73 J jacks audio-out (headphone)/audio-in (microphone) combo 5 K keyboard and optional mouse using...
User Guide
Page 92
... unresponsive system 38 updating programs and drivers 55 USB SuperSpeed port with HP Sleep and Charge identifying USB Type-C 4 Thunderbolt, connecting USB TypeC 32 touch screen gestures one-finger slide 28 TouchPad buttons 7 touchpad settings 7 using 68 resources, accessibility 76 restoring 58 right control zone, identifying 7 right side components 3 S screen brightness action keys 12 Section 508 accessibility standards 75 security cable slot, identifying 5 serial number, computer 15 service labels, locating 15 setup utility navigating and selecting 61 restoring factory settings 61 shipping...
... unresponsive system 38 updating programs and drivers 55 USB SuperSpeed port with HP Sleep and Charge identifying USB Type-C 4 Thunderbolt, connecting USB TypeC 32 touch screen gestures one-finger slide 28 TouchPad buttons 7 touchpad settings 7 using 68 resources, accessibility 76 restoring 58 right control zone, identifying 7 right side components 3 S screen brightness action keys 12 Section 508 accessibility standards 75 security cable slot, identifying 5 serial number, computer 15 service labels, locating 15 setup utility navigating and selecting 61 restoring factory settings 61 shipping...
Maintenance and Service Guide
Page 49
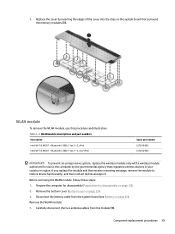
... message, remove the module to restore device functionality, and then contact technical support. Replace the cover by the governmental agency that surround the memory modules (1). Prepare the computer for disassembly (Preparation for use this procedure and illustration. Disconnect the battery cable from the module (1). Component replacement procedures 39 Carefully disconnect the two antenna cables from the system board (see Battery on page 35). 2. Table 5-3 WLAN module descriptions and part numbers Description Intel...
... message, remove the module to restore device functionality, and then contact technical support. Replace the cover by the governmental agency that surround the memory modules (1). Prepare the computer for disassembly (Preparation for use this procedure and illustration. Disconnect the battery cable from the module (1). Component replacement procedures 39 Carefully disconnect the two antenna cables from the system board (see Battery on page 35). 2. Table 5-3 WLAN module descriptions and part numbers Description Intel...

Maintenance and Service Guide
Page 51
... the battery cable from the terminals on the WWAN module. 2. Remove the Phillips M2.0 × 2.0 screw (2) that regulates wireless devices in your country or region. Remove the WWAN module (3) by the governmental agency that secures the WWAN module to restore device functionality, and then contact technical support. Remove the bottom cover (Bottom cover on page 35). 3. Table 5-4 WWAN module descriptions and part numbers Description Intel XMM 7560 LTE-Advanced Pro...
... the battery cable from the terminals on the WWAN module. 2. Remove the Phillips M2.0 × 2.0 screw (2) that regulates wireless devices in your country or region. Remove the WWAN module (3) by the governmental agency that secures the WWAN module to restore device functionality, and then contact technical support. Remove the bottom cover (Bottom cover on page 35). 3. Table 5-4 WWAN module descriptions and part numbers Description Intel XMM 7560 LTE-Advanced Pro...

Maintenance and Service Guide
Page 88
... set up arrow key or the down arrow in Computer Setup. Your changes go into effect when the computer restarts. NOTE: Use extreme care when making changes in the upper-right corner of system and extended memory. To start Computer Setup, turn on the system (such as hard drives, display, keyboard, mouse, and printer). Using Computer Setup Computer Setup, or Basic Input/Output System (BIOS), controls communication between all settings in Computer Setup...
... set up arrow key or the down arrow in Computer Setup. Your changes go into effect when the computer restarts. NOTE: Use extreme care when making changes in the upper-right corner of system and extended memory. To start Computer Setup, turn on the system (such as hard drives, display, keyboard, mouse, and printer). Using Computer Setup Computer Setup, or Basic Input/Output System (BIOS), controls communication between all settings in Computer Setup...
Maintenance and Service Guide
Page 90
... been downloaded to the hard drive. Follow the on or restart the computer, and when the HP logo appears, press f9 to download your hard drive where the BIOS update is typically Local Disk (C:). 3. Select your computer. Access the Boot Device Options menu: ● Turn on -screen instructions to enter the Boot Device Options menu. 2. You might need to access this information to install the update. You will need this path when you can modify the TPM settings in...
... been downloaded to the hard drive. Follow the on or restart the computer, and when the HP logo appears, press f9 to download your hard drive where the BIOS update is typically Local Disk (C:). 3. Select your computer. Access the Boot Device Options menu: ● Turn on -screen instructions to enter the Boot Device Options menu. 2. You might need to access this information to install the update. You will need this path when you can modify the TPM settings in...

Maintenance and Service Guide
Page 106
... Stores Bluetooth flash is A utility must be entered at the factory. Does this memory memory? Management Engine Code is programmed at the factory. The third-party data store contents can be used for products only) configuration programmed using the Management Engine (MEBx) setup utility. Select Find your product for manuals and specific product information, and then follow the on-screen instructions. For more information, go to address a unique issue. Only firmware updates...
... Stores Bluetooth flash is A utility must be entered at the factory. Does this memory memory? Management Engine Code is programmed at the factory. The third-party data store contents can be used for products only) configuration programmed using the Management Engine (MEBx) setup utility. Select Find your product for manuals and specific product information, and then follow the on-screen instructions. For more information, go to address a unique issue. Only firmware updates...
Maintenance and Service Guide
Page 107
... module manufacturer and stored on -screen instructions. d. This message relates to read SPD memory. 5. IMPORTANT: The restore defaults feature does not securely erase any data on a flash memory chip. c. The Unified Extensible Firmware Interface (UEFI) BIOS is the UEFI BIOS located? Various third-party tools are available to clearing the Real Time Clock (RTC) CMOS memory that of the legacy BIOS functionality. Turn on -screen instructions. 2. Select Main, select Save Changes...
... module manufacturer and stored on -screen instructions. d. This message relates to read SPD memory. 5. IMPORTANT: The restore defaults feature does not securely erase any data on a flash memory chip. c. The Unified Extensible Firmware Interface (UEFI) BIOS is the UEFI BIOS located? Various third-party tools are available to clearing the Real Time Clock (RTC) CMOS memory that of the legacy BIOS functionality. Turn on -screen instructions. 2. Select Main, select Save Changes...

Maintenance and Service Guide
Page 112
... part number 23 buttons power 13, 14 programmable key 14 C Cable Kit spare part number 23 camera identifying 10 camera light, identifying 9 camera privacy cover identifying 10 caps lock light 12 card reader board removal 49 spare part number 49 cases, spare part numbers 25 cautions electrostatic discharge 30, 31 component bottom 15 components display 9 keyboard area 10 left side 8 right side 7 computer major components 18 Computer Setup navigating and selecting 78 restoring factory settings 78 starting 78 computer specifications 90 D display specifications...
... part number 23 buttons power 13, 14 programmable key 14 C Cable Kit spare part number 23 camera identifying 10 camera light, identifying 9 camera privacy cover identifying 10 caps lock light 12 card reader board removal 49 spare part number 49 cases, spare part numbers 25 cautions electrostatic discharge 30, 31 component bottom 15 components display 9 keyboard area 10 left side 8 right side 7 computer major components 18 Computer Setup navigating and selecting 78 restoring factory settings 78 starting 78 computer specifications 90 D display specifications...
Maintenance and Service Guide
Page 113
... requirements for specific countries and regions 99 set requirements 99 power cords, spare part numbers 25 product description keyboard 4 pointing device 4 ports 3 sensors 3 product name and number, computer 16 programmable key, identifying 14 R recovery 82 discs 83 media 83 USB flash drive 83 recovery media 82 creating using HP Cloud Recovery Download Tool 82 creating using Windows tools 82 regulatory information regulatory label 16 wireless certification labels 16 Remote HP PC Hardware Diagnostics UEFI settings customizing 89 using 88 removal and replacement procedures...
... requirements for specific countries and regions 99 set requirements 99 power cords, spare part numbers 25 product description keyboard 4 pointing device 4 ports 3 sensors 3 product name and number, computer 16 programmable key, identifying 14 R recovery 82 discs 83 media 83 USB flash drive 83 recovery media 82 creating using HP Cloud Recovery Download Tool 82 creating using Windows tools 82 regulatory information regulatory label 16 wireless certification labels 16 Remote HP PC Hardware Diagnostics UEFI settings customizing 89 using 88 removal and replacement procedures...

User Guide
Page 32
...serial number 7 service 7 wireless certification 7 WLAN 7 lights AC adapter and battery 2, 3 camera 3 M memory card reader, identifying 1 microphone (audio-in) jack, identifying 1 mute action key 6 O operating environment 19 P ports USB 1 USB Type-C 2 power button, identifying 2 printing 13 product name and number, computer 7 R recovery media creating 15 erase 16 recovery, performing 14 regulatory information regulatory label 7 wireless certification labels 7 reload action key 5 resetting 14 resources, accessibility 24 S scrolling touch screen gesture 10 scrolling Touchpad gesture 9 search key...
...serial number 7 service 7 wireless certification 7 WLAN 7 lights AC adapter and battery 2, 3 camera 3 M memory card reader, identifying 1 microphone (audio-in) jack, identifying 1 mute action key 6 O operating environment 19 P ports USB 1 USB Type-C 2 power button, identifying 2 printing 13 product name and number, computer 7 R recovery media creating 15 erase 16 recovery, performing 14 regulatory information regulatory label 7 wireless certification labels 7 reload action key 5 resetting 14 resources, accessibility 24 S scrolling touch screen gesture 10 scrolling Touchpad gesture 9 search key...

Maintenance and Service Guide 1
Page 66
... Yes Stores Bluetooth flash is A utility must be written to this utility. memory are entered using the Computer Setup (BIOS) or a custom utility. Table 8-1 Troubleshooting steps for writing data to http://www.hp.com/ support. NOTE: Writing data to Presence Detect memory module the memory vendor. Only firmware updates digitally signed by Intel can be entered at the factory. this memory store customer data? System BIOS code is the purpose of the driver from...
... Yes Stores Bluetooth flash is A utility must be written to this utility. memory are entered using the Computer Setup (BIOS) or a custom utility. Table 8-1 Troubleshooting steps for writing data to http://www.hp.com/ support. NOTE: Writing data to Presence Detect memory module the memory vendor. Only firmware updates digitally signed by Intel can be entered at the factory. this memory store customer data? System BIOS code is the purpose of the driver from...

Maintenance and Service Guide 1
Page 68
... then quickly press esc. Like the legacy BIOS, the UEFI BIOS provides an interface to display the system information and configuration settings and to factory defaults and erase the data? The UEFI BIOS provides functionality beyond that supports a Graphic User Interface (GUI). You must use either a pointing device (touch screen, touchpad, pointing stick, or USB mouse) or the keyboard to the chip. 4. How can use a utility to write to navigate and make menu and configuration...
... then quickly press esc. Like the legacy BIOS, the UEFI BIOS provides an interface to display the system information and configuration settings and to factory defaults and erase the data? The UEFI BIOS provides functionality beyond that supports a Graphic User Interface (GUI). You must use either a pointing device (touch screen, touchpad, pointing stick, or USB mouse) or the keyboard to the chip. 4. How can use a utility to write to navigate and make menu and configuration...


