
Maintenance and Service Guide
Page 2
... such products and services. The information contained herein is to return the entire unused product (hardware and software) within 14 days for technical or editorial errors or omissions contained herein. Then select Manuals. To access the latest user guides, go to http://www.hp.com/support, and follow the instructions to change without notice. First Edition: September 2021 Document Part Number: M90122-001 Product...
... such products and services. The information contained herein is to return the entire unused product (hardware and software) within 14 days for technical or editorial errors or omissions contained herein. Then select Manuals. To access the latest user guides, go to http://www.hp.com/support, and follow the instructions to change without notice. First Edition: September 2021 Document Part Number: M90122-001 Product...

Maintenance and Service Guide
Page 5
Preparation for disassembly ...21 Bottom cover...21 Battery ...23 Speakers ...23 System board ...24 Heat sink ...26 Display assembly...27 Touchpad cable ...33 Touchpad ...34 Connector board cable...36 Connector board ...36 6 Specifications...38 Computer specifications...38 29.6 cm (11.6 in) display specifications...39 7 Power cord set requirements ...40 Requirements for all countries...40 Requirements for specific countries and regions...40 8 Recycling ...43 Index...44 v
Preparation for disassembly ...21 Bottom cover...21 Battery ...23 Speakers ...23 System board ...24 Heat sink ...26 Display assembly...27 Touchpad cable ...33 Touchpad ...34 Connector board cable...36 Connector board ...36 6 Specifications...38 Computer specifications...38 29.6 cm (11.6 in) display specifications...39 7 Power cord set requirements ...40 Requirements for all countries...40 Requirements for specific countries and regions...40 8 Recycling ...43 Index...44 v

Maintenance and Service Guide
Page 6
... Description Product Name HP Chromebook™ 11.6 inch Notebook Computer Processor Chipset Model number: 11a-ne0xxx Mediatek Arm Cortex-A MT8183 2.0 GHz processor (eight cores) Mediatek MT6358 PMIC Graphics Display Memory Mediatek integrated unified memory architecture (UMA) internal graphics 29.6 cm (11.6 in (microphone) combo jack USB® Type-C power connector and port (right side) USB port with 2 antenna Media card reader Ports HP MultiFormat microSD media card reader supporting microSD™, SDHC™, SDXC™ Push-push insertion/removal Hot plug/unplug...
... Description Product Name HP Chromebook™ 11.6 inch Notebook Computer Processor Chipset Model number: 11a-ne0xxx Mediatek Arm Cortex-A MT8183 2.0 GHz processor (eight cores) Mediatek MT6358 PMIC Graphics Display Memory Mediatek integrated unified memory architecture (UMA) internal graphics 29.6 cm (11.6 in (microphone) combo jack USB® Type-C power connector and port (right side) USB port with 2 antenna Media card reader Ports HP MultiFormat microSD media card reader supporting microSD™, SDHC™, SDXC™ Push-push insertion/removal Hot plug/unplug...

Maintenance and Service Guide
Page 8
and - NOTE: Use a standard USB Type-C charging cable or cable adapter (purchased separately) when charging a small external device. Connects a USB device, provides data transfer, and (for select products) charges small devices (such as a smartphone) when the computer is not charging. Connects an AC adapter that has a USB Type-C connector, supplying power to identify the components on or in Sleep mode. Components 3 Table 2-1 Right-side components and their descriptions Component (1) AC adapter and battery light (2) USB Type-C power connector and port Description...
and - NOTE: Use a standard USB Type-C charging cable or cable adapter (purchased separately) when charging a small external device. Connects a USB device, provides data transfer, and (for select products) charges small devices (such as a smartphone) when the computer is not charging. Connects an AC adapter that has a USB Type-C connector, supplying power to identify the components on or in Sleep mode. Components 3 Table 2-1 Right-side components and their descriptions Component (1) AC adapter and battery light (2) USB Type-C power connector and port Description...

Maintenance and Service Guide
Page 21
.... 16 Chapter 4 Removal and replacement procedures preliminary requirements This software disables devices such as wireless keyboards. Use the following ways: ● Select the Start menu, and then select HP Easy Clean. - Enabling HP Easy Clean (select products only) HP Easy Clean helps you to help prevent the spread of your device continues to clean dirt and debris from items such as the keyboard, touch screen, and touchpad for the...
.... 16 Chapter 4 Removal and replacement procedures preliminary requirements This software disables devices such as wireless keyboards. Use the following ways: ● Select the Start menu, and then select HP Easy Clean. - Enabling HP Easy Clean (select products only) HP Easy Clean helps you to help prevent the spread of your device continues to clean dirt and debris from items such as the keyboard, touch screen, and touchpad for the...

Maintenance and Service Guide
Page 22
... the bottom. Start with any flexible cables, like power cord, keyboard cable, and USB cables. 6. Finish with the display (if applicable). This solution is also known as gasoline, paint thinner, benzene, or toluene. If liquid makes its way inside your computer on page 16, Caring for recommended steps to clean the high-touch, external surfaces on after you remove the gloves. IMPORTANT...
... the bottom. Start with any flexible cables, like power cord, keyboard cable, and USB cables. 6. Finish with the display (if applicable). This solution is also known as gasoline, paint thinner, benzene, or toluene. If liquid makes its way inside your computer on page 16, Caring for recommended steps to clean the high-touch, external surfaces on after you remove the gloves. IMPORTANT...

Maintenance and Service Guide
Page 23
... conveyors made of the product. Accessing support information Use this information to the bottom. product. Wipe carefully in one direction, and move from assemblies in static-safe tubes, bags, or boxes. ● Protect ESD-sensitive parts and assemblies with a disinfectant. As with any flexible cables, like power cord, keyboard cable, and USB cables. 6. Do not use an ionizer to sun or moisture...
... conveyors made of the product. Accessing support information Use this information to the bottom. product. Wipe carefully in one direction, and move from assemblies in static-safe tubes, bags, or boxes. ● Protect ESD-sensitive parts and assemblies with a disinfectant. As with any flexible cables, like power cord, keyboard cable, and USB cables. 6. Do not use an ionizer to sun or moisture...
Maintenance and Service Guide
Page 24
... press enter. 4. Place the cursor over Support resources to display more options. 3. Type the serial number, product number, or product name to go /techcenter/pcdiags. 2. Repair professionals 5. Place the cursor over Problem solving to display more options. 3. Immediately and repeatedly press esc when the power button light turns white. Press f10 to view technical bulletins. Search collect Chrome device logs. Technical bulletins To locate technical bulletins: 1. Select Authorized service...
... press enter. 4. Place the cursor over Support resources to display more options. 3. Type the serial number, product number, or product name to go /techcenter/pcdiags. 2. Repair professionals 5. Place the cursor over Problem solving to display more options. 3. Immediately and repeatedly press esc when the power button light turns white. Press f10 to view technical bulletins. Search collect Chrome device logs. Technical bulletins To locate technical bulletins: 1. Select Authorized service...
Maintenance and Service Guide
Page 26
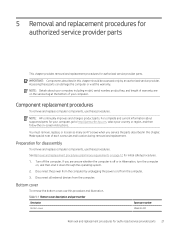
... Removal and replacement procedures for authorized service provider parts. If you service the parts described in this chapter should be accessed only by unplugging the power cord from the computer. 3. Disconnect all external devices from the computer by an authorized service provider. NOTE: HP continually improves and changes product parts. Component replacement procedures To remove and replace computer components, use this chapter. See Removal and replacement procedures preliminary requirements on -screen instructions...
... Removal and replacement procedures for authorized service provider parts. If you service the parts described in this chapter should be accessed only by unplugging the power cord from the computer. 3. Disconnect all external devices from the computer by an authorized service provider. NOTE: HP continually improves and changes product parts. Component replacement procedures To remove and replace computer components, use this chapter. See Removal and replacement procedures preliminary requirements on -screen instructions...
Maintenance and Service Guide
Page 29
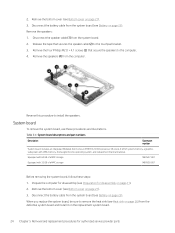
... cover on page 21). 3. Remove the bottom cover (see Preparation for authorized service provider parts Remove the bottom cover (see Battery on page 21). 2. Remove the four Phillips M2.0 × 4.1 screws (3) that secures the speaker cable (2) to remove the heat sink (see Battery on page 21). 3. Disconnect the battery cable from the defective system board and install it on the replacement system board. 24 Chapter 5 Removal and replacement procedures for disassembly...
... cover on page 21). 3. Remove the bottom cover (see Preparation for authorized service provider parts Remove the bottom cover (see Battery on page 21). 2. Remove the four Phillips M2.0 × 4.1 screws (3) that secures the speaker cable (2) to remove the heat sink (see Battery on page 21). 3. Disconnect the battery cable from the defective system board and install it on the replacement system board. 24 Chapter 5 Removal and replacement procedures for disassembly...

Maintenance and Service Guide
Page 30
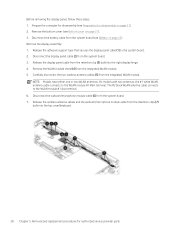
... keyboard cable from the system board. 6. The system board I /O bracket (2). System board 25 Release the ZIF connector (8) to the system board. 2. NOTE: Models have either one or two WLAN antennas. Carefully disconnect the two wireless antenna cables (4) from the system board. 3. Disconnect the display panel cable (2) from the integrated WLAN module. Disconnect the webcam/microphone module cable (5) from the system board. 9. Remove the system board I /O bracket is connected, and then disconnect the touchpad cable...
... keyboard cable from the system board. 6. The system board I /O bracket (2). System board 25 Release the ZIF connector (8) to the system board. 2. NOTE: Models have either one or two WLAN antennas. Carefully disconnect the two wireless antenna cables (4) from the system board. 3. Disconnect the display panel cable (2) from the integrated WLAN module. Disconnect the webcam/microphone module cable (5) from the system board. 9. Remove the system board I /O bracket is connected, and then disconnect the touchpad cable...
Maintenance and Service Guide
Page 33
... the two wireless antenna cables (5) from the system board. 3. The #2 black WLAN antenna cable connects to the system board. 2. Disconnect the battery cable from the system board (see Bottom cover on page 21). 2. NOTE: Models have either one or two WLAN antennas. Release the wireless antenna cables and the webcam/microphone module cable from the retention clip (3) built into the top cover/keyboard. 28 Chapter 5 Removal and replacement procedures for disassembly on page...
... the two wireless antenna cables (5) from the system board. 3. The #2 black WLAN antenna cable connects to the system board. 2. Disconnect the battery cable from the system board (see Bottom cover on page 21). 2. NOTE: Models have either one or two WLAN antennas. Release the wireless antenna cables and the webcam/microphone module cable from the retention clip (3) built into the top cover/keyboard. 28 Chapter 5 Removal and replacement procedures for disassembly on page...

Maintenance and Service Guide
Page 49
..., 13 preventing damage 12-14 esc key, identifying 5 G graphics, product description 1 grounding methods 12-14 guidelines packaging 12, 18 transporting 12, 18 workstation 12 H hard drive product description 1 specifications 38 headphone (audio-out) jack 4 heat sink illustrated 9 removal 26 spare part number 9, 26 hinge illustrated 9 removal 31 spare part number 9, 31 I illustrated parts catalog 7 internal microphones 5 J jacks audio-in (microphone) 4 audio-out (headphone) 4 K keyboard product description 2 keys esc 5 L lights AC adapter 3 battery 3 camera 5 44 Index
..., 13 preventing damage 12-14 esc key, identifying 5 G graphics, product description 1 grounding methods 12-14 guidelines packaging 12, 18 transporting 12, 18 workstation 12 H hard drive product description 1 specifications 38 headphone (audio-out) jack 4 heat sink illustrated 9 removal 26 spare part number 9, 26 hinge illustrated 9 removal 31 spare part number 9, 31 I illustrated parts catalog 7 internal microphones 5 J jacks audio-in (microphone) 4 audio-out (headphone) 4 K keyboard product description 2 keys esc 5 L lights AC adapter 3 battery 3 camera 5 44 Index

Maintenance and Service Guide
Page 50
...1 microphone (audio-in) jack 4 model name 1 O operating system, product description 2 P packaging guidelines 12, 18 pointing device, product description 2 ports product description 1 USB port with HP Sleep and Charge 4 USB Type-C power 3 power cord requirements for all countries 40 requirements for specific countries and regions 40 set requirements 40 power cords, spare part numbers 11 power requirements, product description 2 primary storage product description 1 processor product description 1 product description audio 1 chipset 1 display panel 1 graphics 1 hard drive 1 keyboard 2 media card...
...1 microphone (audio-in) jack 4 model name 1 O operating system, product description 2 P packaging guidelines 12, 18 pointing device, product description 2 ports product description 1 USB port with HP Sleep and Charge 4 USB Type-C power 3 power cord requirements for all countries 40 requirements for specific countries and regions 40 set requirements 40 power cords, spare part numbers 11 power requirements, product description 2 primary storage product description 1 processor product description 1 product description audio 1 chipset 1 display panel 1 graphics 1 hard drive 1 keyboard 2 media card...

User Guide
Page 4
...screen ...8 Using touchpad and touch screen gestures ...8 Tap ...8 Scrolling (touchpad only)...8 One-finger scrolling (touch screen only) ...9 One-finger swipe (touch screen only) ...9 Two-finger pinch zoom (touch screen only)...10 3 Power and battery ...11 Factory-sealed battery ...11 Charging the battery...11 4 Printing...12 Printing with Google Chrome inOS printing solution ...12 Printing from Google Chrome...12 5 Backing up, resetting, and recovering ...13 Backing up...13 Resetting...13 Recovering ...13 Installing the Chromebook Recovery Utility...14 Creating recovery media...14 Recovering...
...screen ...8 Using touchpad and touch screen gestures ...8 Tap ...8 Scrolling (touchpad only)...8 One-finger scrolling (touch screen only) ...9 One-finger swipe (touch screen only) ...9 Two-finger pinch zoom (touch screen only)...10 3 Power and battery ...11 Factory-sealed battery ...11 Charging the battery...11 4 Printing...12 Printing with Google Chrome inOS printing solution ...12 Printing from Google Chrome...12 5 Backing up, resetting, and recovering ...13 Backing up...13 Resetting...13 Recovering ...13 Installing the Chromebook Recovery Utility...14 Creating recovery media...14 Recovering...

User Guide
Page 6
... descriptions Component (1) AC adapter and battery light (2) USB Type-C® power connector and port (3) Audio-out (headphone)/Audio-in Sleep mode. WARNING! This chapter provides details about your components, where they are located, and how they work. and - This jack does not support optional standalone microphones. 1 Components Your computer features top-rated components. Right Use the illustration and table to the computer and, if needed, charging the computer battery. - To reduce...
... descriptions Component (1) AC adapter and battery light (2) USB Type-C® power connector and port (3) Audio-out (headphone)/Audio-in Sleep mode. WARNING! This chapter provides details about your components, where they are located, and how they work. and - This jack does not support optional standalone microphones. 1 Components Your computer features top-rated components. Right Use the illustration and table to the computer and, if needed, charging the computer battery. - To reduce...

User Guide
Page 18
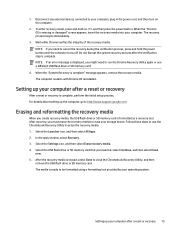
... optional USB flash drive, to an SD memory card, or through Google Drive™. To reset your computer, and it still doesn't work properly, you can perform a recovery. A recovery reinstalls the operating system, software programs, and original factory settings. Select Restart. 4. 5 Backing up, resetting, and recovering This chapter provides information about creating a backup, go to http://www.support.google.com. Resetting A factory reset erases the information on -screen instructions to Google Drive. After you complete the reset...
... optional USB flash drive, to an SD memory card, or through Google Drive™. To reset your computer, and it still doesn't work properly, you can perform a recovery. A recovery reinstalls the operating system, software programs, and original factory settings. Select Restart. 4. 5 Backing up, resetting, and recovering This chapter provides information about creating a backup, go to http://www.support.google.com. Resetting A factory reset erases the information on -screen instructions to Google Drive. After you complete the reset...

User Guide
Page 19
... recovery media is created, so back up all files from the device before you need the following prerequisites: ● A USB flash drive or SD memory card with internet access. Recovering the Chrome operating system Use these instructions to the computer. ● Computer AC adapter. If this message is missing or damaged" screen displaying on your computer. Turn on the computer, press and hold the esc+f3 keys, and then press the power button...
... recovery media is created, so back up all files from the device before you need the following prerequisites: ● A USB flash drive or SD memory card with internet access. Recovering the Chrome operating system Use these instructions to the computer. ● Computer AC adapter. If this message is missing or damaged" screen displaying on your computer. Turn on the computer, press and hold the esc+f3 keys, and then press the power button...
User Guide
Page 20
... recovery After a reset or recovery is displayed, you need to run the Chrome Recovery Utility again or use the Chromebook Recovery Utility to cancel the recovery during the verification process, press and hold esc+f3, and then press the power button. For details about setting up your storage device. After recovery, you create recovery media, the USB flash drive or SD memory card is erased, select Done to http://www.support.google.com. After the recovery media is formatted...
... recovery After a reset or recovery is displayed, you need to run the Chrome Recovery Utility again or use the Chromebook Recovery Utility to cancel the recovery during the verification process, press and hold esc+f3, and then press the power button. For details about setting up your storage device. After recovery, you create recovery media, the USB flash drive or SD memory card is erased, select Done to http://www.support.google.com. After the recovery media is formatted...
User Guide
Page 30
... adapter and battery 1 camera 3 M microphone (audio-in) jack, identifying 1 mute action key 6 O operating environment 18 P ports USB port with HP Sleep and Charge 2 USB Type-C power connector and port 1 power connector identifying USB Type-C 1 printing 12 product name and number, computer 6 R recovery media creating 14 erase 15 recovery, performing 13 regulatory information regulatory label 6 wireless certification labels 6 reload action key 5 resetting 13 resources, accessibility 23 S scrolling touch screen gesture 9 scrolling Touchpad gesture 8 Section 508 accessibility standards 22 serial...
... adapter and battery 1 camera 3 M microphone (audio-in) jack, identifying 1 mute action key 6 O operating environment 18 P ports USB port with HP Sleep and Charge 2 USB Type-C power connector and port 1 power connector identifying USB Type-C 1 printing 12 product name and number, computer 6 R recovery media creating 14 erase 15 recovery, performing 13 regulatory information regulatory label 6 wireless certification labels 6 reload action key 5 resetting 13 resources, accessibility 23 S scrolling touch screen gesture 9 scrolling Touchpad gesture 8 Section 508 accessibility standards 22 serial...


