
CQ1859, CQ1859e, and CQ1859s LCD Monitors User Guide
Page 5
Table of contents 1 Product Features CQ1859, CQ1859e, and CQ1859s LCD Monitors 1 2 Safety and Maintenance Guidelines Important Safety Information ...2 Maintenance Guidelines ...3 Cleaning the Monitor ...3 Shipping the Monitor ...3 3 Setting Up the Monitor Installing the Monitor Stand ...4 Rear Components ...5 Connecting the Cables ...6 Adjusting the Monitor Stand ...7 Turning on the Monitor ...7 Locating the Rating Labels ...8 Installing a Cable Lock ...8 4 Operating the Monitor Software and Utilities ...9 The Information File ...9 The...
Table of contents 1 Product Features CQ1859, CQ1859e, and CQ1859s LCD Monitors 1 2 Safety and Maintenance Guidelines Important Safety Information ...2 Maintenance Guidelines ...3 Cleaning the Monitor ...3 Shipping the Monitor ...3 3 Setting Up the Monitor Installing the Monitor Stand ...4 Rear Components ...5 Connecting the Cables ...6 Adjusting the Monitor Stand ...7 Turning on the Monitor ...7 Locating the Rating Labels ...8 Installing a Cable Lock ...8 4 Operating the Monitor Software and Utilities ...9 The Information File ...9 The...

CQ1859, CQ1859e, and CQ1859s LCD Monitors User Guide
Page 7
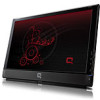
...9679; Internal speakers with European Union CE Directives ENWW CQ1859, CQ1859e, and CQ1859s LCD Monitors 1 1 Product Features CQ1859, CQ1859e, and CQ1859s LCD Monitors The LCD (liquid crystal display) monitors have an active matrix, thin-film transistor (TFT...) panel. includes custom scaling for maximum image size while preserving original aspect ratio ● Wide viewing angle to allow viewing from a sitting or standing...
...9679; Internal speakers with European Union CE Directives ENWW CQ1859, CQ1859e, and CQ1859s LCD Monitors 1 1 Product Features CQ1859, CQ1859e, and CQ1859s LCD Monitors The LCD (liquid crystal display) monitors have an active matrix, thin-film transistor (TFT...) panel. includes custom scaling for maximum image size while preserving original aspect ratio ● Wide viewing angle to allow viewing from a sitting or standing...
CQ1859, CQ1859e, and CQ1859s LCD Monitors User Guide
Page 9
Do not walk on the cord. ● Keep the monitor in a well-ventilated area, away from excessive light, heat or moisture. ● When removing the monitor stand, you must not be blocked or covered. CAUTION: Spray the cleaner onto a cloth and use the damp cloth to rest on a...or service provider. ● Use only a power source and connection appropriate for ventilation. Disconnect the monitor by wiping the screen and the cabinet with a "burned-in image" are not covered under the HP warranty. ● Slots and openings in the cabinet are covered in use cleaners that are provided ...
Do not walk on the cord. ● Keep the monitor in a well-ventilated area, away from excessive light, heat or moisture. ● When removing the monitor stand, you must not be blocked or covered. CAUTION: Spray the cleaner onto a cloth and use the damp cloth to rest on a...or service provider. ● Use only a power source and connection appropriate for ventilation. Disconnect the monitor by wiping the screen and the cabinet with a "burned-in image" are not covered under the HP warranty. ● Slots and openings in the cabinet are covered in use cleaners that are provided ...

CQ1859, CQ1859e, and CQ1859s LCD Monitors User Guide
Page 10
...: Do not touch the surface of the stand. Assemble the monitor stand by a dry, clean cloth. 2. Lift the monitor panel from its normal condition. 1. 3 Setting Up the Monitor To set up the monitor, ensure that the power is turned off to its box and place it face down ... covered by snapping the top of the backplate into the cylindrical portion of the LCD panel. Figure 3-1 Assembling the Monitor Stand 4 Chapter 3 Setting Up the Monitor ENWW If this occurs the screen will not recover to the monitor, computer system, and other attached devices, then follow the instructions below.
...: Do not touch the surface of the stand. Assemble the monitor stand by a dry, clean cloth. 2. Lift the monitor panel from its normal condition. 1. 3 Setting Up the Monitor To set up the monitor, ensure that the power is turned off to its box and place it face down ... covered by snapping the top of the backplate into the cylindrical portion of the LCD panel. Figure 3-1 Assembling the Monitor Stand 4 Chapter 3 Setting Up the Monitor ENWW If this occurs the screen will not recover to the monitor, computer system, and other attached devices, then follow the instructions below.
CQ1859, CQ1859e, and CQ1859s LCD Monitors User Guide
Page 11
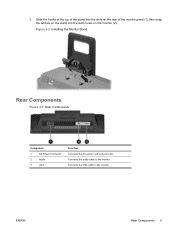
Connects the VGA cable to the monitor. Figure 3-2 Installing the Monitor Stand Rear Components Figure 3-3 Rear Components Component 1 AC Power Connector 2 Audio 3 VGA Function Connects the AC power cord to the monitor. 3. Slide the hooks at the top of the stand into the slots on the rear of the monitor panel (1) then snap the latches on the stand into the latch holes on the monitor (2). Connects the audio cable to the monitor. ENWW Rear Components 5
Connects the VGA cable to the monitor. Figure 3-2 Installing the Monitor Stand Rear Components Figure 3-3 Rear Components Component 1 AC Power Connector 2 Audio 3 VGA Function Connects the AC power cord to the monitor. 3. Slide the hooks at the top of the stand into the slots on the rear of the monitor panel (1) then snap the latches on the stand into the latch holes on the monitor (2). Connects the audio cable to the monitor. ENWW Rear Components 5

CQ1859, CQ1859e, and CQ1859s LCD Monitors User Guide
Page 12
...outlet that no one end of the cable to an electrical wall outlet. Do not pull on the monitor's stand, if desired. 2. Connecting the Cables 1. Connect one may accidentally step on the monitor and connect the other end of the VGA signal cable to the VGA connector on or trip over ...from the equipment by unplugging the power cord from the electrical outlet, grasp the cord by the plug. 6 Chapter 3 Setting Up the Monitor ENWW Place the monitor in a convenient, well-ventilated location near the computer. Connect one end of electric shock or damage to an audio output connector on power...
...outlet that no one end of the cable to an electrical wall outlet. Do not pull on the monitor's stand, if desired. 2. Connecting the Cables 1. Connect one may accidentally step on the monitor and connect the other end of the VGA signal cable to the VGA connector on or trip over ...from the equipment by unplugging the power cord from the electrical outlet, grasp the cord by the plug. 6 Chapter 3 Setting Up the Monitor ENWW Place the monitor in a convenient, well-ventilated location near the computer. Connect one end of electric shock or damage to an audio output connector on power...

CQ1859, CQ1859e, and CQ1859s LCD Monitors User Guide
Page 13
... monitor to turn off the monitor when it is a condition that may occur on monitors... that display the same static image on screen for a prolonged period of time.* To avoid burn-in image damage on the monitor screen, you should always activate a screen saver application or turn it on . 2. Monitors... with a "burned-in the OSD menu. CAUTION: Burn-in image damage may occur on , a Monitor... the Monitor Stand You can disable the power LED in image" are not covered under the HP warranty....
... monitor to turn off the monitor when it is a condition that may occur on monitors... that display the same static image on screen for a prolonged period of time.* To avoid burn-in image damage on the monitor screen, you should always activate a screen saver application or turn it on . 2. Monitors... with a "burned-in the OSD menu. CAUTION: Burn-in image damage may occur on , a Monitor... the Monitor Stand You can disable the power LED in image" are not covered under the HP warranty....


