User Guide
Page 3
...31 Order ink supplies...31 Clean printhead automatically 32 Check the estimated ink levels 32 Tips for working with ink...33 8 Connectivity Add the HP Photosmart to a network 35 Tips for setting up and using a networked printer 40 9 Solve a problem Get more help...41 Improve ...print quality...41 Clear the paper jam from the rear access door 42 Unable to print...43 HP support...46 10 Technical information Notice...49 Cartridge chip information...49 Specifications...50 Environmental product stewardship program 51 Regulatory notices...57 Regulatory wireless...
...31 Order ink supplies...31 Clean printhead automatically 32 Check the estimated ink levels 32 Tips for working with ink...33 8 Connectivity Add the HP Photosmart to a network 35 Tips for setting up and using a networked printer 40 9 Solve a problem Get more help...41 Improve ...print quality...41 Clear the paper jam from the rear access door 42 Unable to print...43 HP support...46 10 Technical information Notice...49 Cartridge chip information...49 Specifications...50 Environmental product stewardship program 51 Regulatory notices...57 Regulatory wireless...
User Guide
Page 5
1 HP Photosmart Plus e-All-in -One B210 series Help 3 on page 11 • "Print" on page 17 • "Copy and scan" on page 23 • "Work with cartridges" on page 29 • "Connectivity" on page 35 • "Technical information" on page 49 • "HP support" on page 46 HP Photosmart Plus e-All-in-One B210 series Help HP Photosmart Plus e-All-in -One B210 series Help For information about the HP Photosmart, see: • "Get to know the HP Photosmart" on page 5 • "How do I?"
1 HP Photosmart Plus e-All-in -One B210 series Help 3 on page 11 • "Print" on page 17 • "Copy and scan" on page 23 • "Work with cartridges" on page 29 • "Connectivity" on page 35 • "Technical information" on page 49 • "HP support" on page 46 HP Photosmart Plus e-All-in-One B210 series Help HP Photosmart Plus e-All-in -One B210 series Help For information about the HP Photosmart, see: • "Get to know the HP Photosmart" on page 5 • "How do I?"

User Guide
Page 6
Chapter 1 HP Photosmart Plus e-All-in-One B210 series Help 4 HP Photosmart Plus e-All-in-One B210 series Help
Chapter 1 HP Photosmart Plus e-All-in-One B210 series Help 4 HP Photosmart Plus e-All-in-One B210 series Help
User Guide
Page 7
2 Get to know the HP Photosmart • Printer parts • Control panel features • Apps Manager Printer parts • Front view of the HP Photosmart Get to know the HP Photosmart Get to know the HP Photosmart 5
2 Get to know the HP Photosmart • Printer parts • Control panel features • Apps Manager Printer parts • Front view of the HP Photosmart Get to know the HP Photosmart Get to know the HP Photosmart 5
User Guide
Page 8
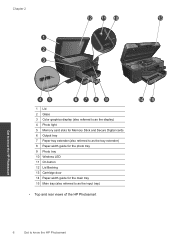
Chapter 2 Get to know the HP Photosmart MMC 1 Lid 2 Glass 3 Color graphics display (also referred to as the display) 4 Photo light 5 Memory card slots for Memory Stick and Secure Digital cards 6 Output tray 7 Paper tray extender (also referred to as the tray extender) 8 Paper-width guide for the photo tray 9 Photo tray 10 Wireless LED 11 On button 12 Lid Backing 13 Cartridge door 14 Paper-width guide for the main tray 15 Main tray (also referred to as the input tray) • Top and rear views of the HP Photosmart 6 Get to know the HP Photosmart
Chapter 2 Get to know the HP Photosmart MMC 1 Lid 2 Glass 3 Color graphics display (also referred to as the display) 4 Photo light 5 Memory card slots for Memory Stick and Secure Digital cards 6 Output tray 7 Paper tray extender (also referred to as the tray extender) 8 Paper-width guide for the photo tray 9 Photo tray 10 Wireless LED 11 On button 12 Lid Backing 13 Cartridge door 14 Paper-width guide for the main tray 15 Main tray (also referred to as the input tray) • Top and rear views of the HP Photosmart 6 Get to know the HP Photosmart
User Guide
Page 9
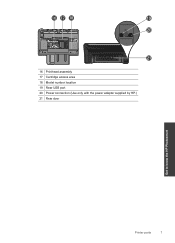
16 17 18 19 20 21 16 Printhead assembly 17 Cartridge access area 18 Model number location 19 Rear USB port 20 Power connection (Use only with the power adapter supplied by HP.) 21 Rear door Get to know the HP Photosmart Printer parts 7
16 17 18 19 20 21 16 Printhead assembly 17 Cartridge access area 18 Model number location 19 Rear USB port 20 Power connection (Use only with the power adapter supplied by HP.) 21 Rear door Get to know the HP Photosmart Printer parts 7
User Guide
Page 10
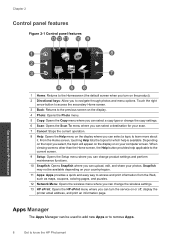
... Allow you can upload, edit, and share your computer screen. Chapter 2 Control panel features Figure 2-1 Control panel features Get to know the HP Photosmart When viewing screens other than the Home screen, the Help button provides help is available. From the Home screen, touching Help lists the... for which help applicable to the current screen. 9 Setup: Opens the Setup menu where you can change the wireless settings. 13 HP ePrint: Opens the HP ePrint menu where you can select a topic to access and print information from the Web, such as maps, coupons, coloring pages,...
... Allow you can upload, edit, and share your computer screen. Chapter 2 Control panel features Figure 2-1 Control panel features Get to know the HP Photosmart When viewing screens other than the Home screen, the Help button provides help is available. From the Home screen, touching Help lists the... for which help applicable to the current screen. 9 Setup: Opens the Setup menu where you can change the wireless settings. 13 HP ePrint: Opens the HP ePrint menu where you can select a topic to access and print information from the Web, such as maps, coupons, coloring pages,...

User Guide
Page 11
Press the directional keys to scroll to know the HP Photosmart Apps Manager 9 Touch Apps on the home screen. Follow prompts. Press OK. Get to the More menu option. b. Manage Apps ▲ Add new Apps. a. Check desired Apps.Press OK.
Press the directional keys to scroll to know the HP Photosmart Apps Manager 9 Touch Apps on the home screen. Follow prompts. Press OK. Get to the More menu option. b. Manage Apps ▲ Add new Apps. a. Check desired Apps.Press OK.

User Guide
Page 12
Chapter 2 Get to know the HP Photosmart 10 Get to know the HP Photosmart
Chapter 2 Get to know the HP Photosmart 10 Get to know the HP Photosmart
User Guide
Page 13
"Apps Manager" on page 8 "Replace the cartridges" on page 29 "Load media" on page 13 "Scan to commonly performed tasks, such as printing photos, scanning, and making copies. How do I ? 3 How do I ? 11 This section contains links to a computer" on page 23 "Copy text or mixed documents" on page 24 "Clear the paper jam from the rear access door" on page 42 How do I?
"Apps Manager" on page 8 "Replace the cartridges" on page 29 "Load media" on page 13 "Scan to commonly performed tasks, such as printing photos, scanning, and making copies. How do I ? 3 How do I ? 11 This section contains links to a computer" on page 23 "Copy text or mixed documents" on page 24 "Clear the paper jam from the rear access door" on page 42 How do I?

User Guide
Page 15
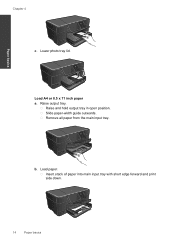
Slide paper-width guide inward until it stops at edge of the following: Load 10 x 15 cm (4 x 6 inch) paper a. NOTE: If the photo paper you are using has perforated tabs, load photo paper so that tabs are closest to you. Paper basics 4 Paper basics Load media ▲ Do one of paper. Raise photo tray lid and slide paper-width guide outwards. Raise photo tray lid. Paper basics 13 b. Load paper. Insert stack of paper forward until it stops. Slide stack of photo paper into photo tray with short edge forward and print side down.
Slide paper-width guide inward until it stops at edge of the following: Load 10 x 15 cm (4 x 6 inch) paper a. NOTE: If the photo paper you are using has perforated tabs, load photo paper so that tabs are closest to you. Paper basics 4 Paper basics Load media ▲ Do one of paper. Raise photo tray lid and slide paper-width guide outwards. Raise photo tray lid. Paper basics 13 b. Load paper. Insert stack of paper forward until it stops. Slide stack of photo paper into photo tray with short edge forward and print side down.
User Guide
Page 16
Load A4 or 8.5 x 11 inch paper a. Remove all paper from the main input tray. b. Slide paper-width guide outwards. Insert stack of paper into main input tray with short edge forward and print side down. 14 Paper basics Lower photo tray lid. Raise output tray. Paper basics Chapter 4 c. Load paper. Raise and hold output tray in open position.
Load A4 or 8.5 x 11 inch paper a. Remove all paper from the main input tray. b. Slide paper-width guide outwards. Insert stack of paper into main input tray with short edge forward and print side down. 14 Paper basics Lower photo tray lid. Raise output tray. Paper basics Chapter 4 c. Load paper. Raise and hold output tray in open position.
User Guide
Page 17
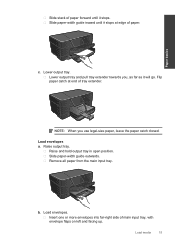
Raise output tray. Raise and hold output tray in open position. Remove all paper from the main input tray. NOTE: When you , as far as it will go. Slide paper-width guide outwards. Load envelopes. Lower output tray. Flip paper catch at edge of paper. Slide paper-width guide inward until it stops at end of tray extender. Lower output tray and pull tray extender towards you use legal-size paper, leave the paper catch closed. Load media 15 Insert one or more envelopes into far-right side of main input tray, with envelope flaps on left and facing up. b. Load ...
Raise output tray. Raise and hold output tray in open position. Remove all paper from the main input tray. NOTE: When you , as far as it will go. Slide paper-width guide outwards. Load envelopes. Lower output tray. Flip paper catch at edge of paper. Slide paper-width guide inward until it stops at end of tray extender. Lower output tray and pull tray extender towards you use legal-size paper, leave the paper catch closed. Load media 15 Insert one or more envelopes into far-right side of main input tray, with envelope flaps on left and facing up. b. Load ...

User Guide
Page 18
Lower output tray. 16 Paper basics Slide paper-width guide inward against stack of envelopes forward until it stops. c. Paper basics Chapter 4 Slide stack of envelopes until it stops.
Lower output tray. 16 Paper basics Slide paper-width guide inward against stack of envelopes forward until it stops. c. Paper basics Chapter 4 Slide stack of envelopes until it stops.

User Guide
Page 19
You need to change the settings manually only when you need to change print quality, print on specific types of paper or transparency film, or use special features. Make sure the product is the selected printer. 4. If you change settings, click the button that opens the Properties dialog box. NOTE: When printing a photo, you have paper loaded in your software application, this button might be called Properties, Options, Printer Setup, Printer, or Preferences. To print from anywhere" on page 19 "Tips for the specific photo paper and photo enhancement. Make sure you must select ...
You need to change the settings manually only when you need to change print quality, print on specific types of paper or transparency film, or use special features. Make sure the product is the selected printer. 4. If you change settings, click the button that opens the Properties dialog box. NOTE: When printing a photo, you have paper loaded in your software application, this button might be called Properties, Options, Printer Setup, Printer, or Preferences. To print from anywhere" on page 19 "Tips for the specific photo paper and photo enhancement. Make sure you must select ...

User Guide
Page 20
Chapter 5 5. If necessary, you to begin printing. Slide the paper-width guide inward until it stops at the edge of the predefined print tasks on the Printing Shortcuts tab. In the Basic Options area, from the Size drop-down list, select More. TIP: You can adjust the settings here and save a custom printing shortcut, select the shortcut and click Save As. Click a type of print task are not compatible, the printer software displays an alert and allows you can easily select the appropriate options for that opens the Properties dialog box. To save your custom settings as...
Chapter 5 5. If necessary, you to begin printing. Slide the paper-width guide inward until it stops at the edge of the predefined print tasks on the Printing Shortcuts tab. In the Basic Options area, from the Size drop-down list, select More. TIP: You can adjust the settings here and save a custom printing shortcut, select the shortcut and click Save As. Click a type of print task are not compatible, the printer software displays an alert and allows you can easily select the appropriate options for that opens the Properties dialog box. To save your custom settings as...

User Guide
Page 21
... Place the test page on a single envelope, a group of envelopes, or label sheets designed for print success" on page 20 Print envelopes With the HP Photosmart, you to curl, which could reduce the quality of the label sheet or envelope, and hold both up in the rollers and cause paper... on envelopes, do not allow printed photos to stack up to the light. Display the print settings, and click the Features tab. Once enabled, HP ePrint assigns an email address to select a different type or size. 10. Slide the paper-width guide inward against the stack of text. Click ...
... Place the test page on a single envelope, a group of envelopes, or label sheets designed for print success" on page 20 Print envelopes With the HP Photosmart, you to curl, which could reduce the quality of the label sheet or envelope, and hold both up in the rollers and cause paper... on envelopes, do not allow printed photos to stack up to the light. Display the print settings, and click the Features tab. Once enabled, HP ePrint assigns an email address to select a different type or size. 10. Slide the paper-width guide inward against the stack of text. Click ...
User Guide
Page 22
...area of your printout looks like. Touch the Web Service icon on the Web Services Settings menu. 2. b. Print tips • Use genuine HP cartridges. Alternatively, you produce great results, time after time. • Make sure the cartridges have more control over what your jobs. Make ...Load a stack of paper is received. The product prints your document to fit snugly against all paper. Your email will be printed with HP printers to be received. TIP: To print the email address or registration url, touch Print Info Sheet on the Home screen. For documents...
...area of your printout looks like. Touch the Web Service icon on the Web Services Settings menu. 2. b. Print tips • Use genuine HP cartridges. Alternatively, you produce great results, time after time. • Make sure the cartridges have more control over what your jobs. Make ...Load a stack of paper is received. The product prints your document to fit snugly against all paper. Your email will be printed with HP printers to be received. TIP: To print the email address or registration url, touch Print Info Sheet on the Home screen. For documents...
User Guide
Page 23
... pptx) ◦ PDF ◦ HTML ◦ Certain image files (bmp, jpg, png, gif, and tiff) ◦ Text-based files • Documents printed with HP ePrint may appear different from the original: ◦ Style, formatting, and text flow may differ from the original document. ◦ For documents that need to...print as soon as legal documents), we recommend that you print from the software application on your computer, where you sign up online with HP ePrint and restrict who can email your product must be received. ◦ When you will be connected to register for other content from ...
... pptx) ◦ PDF ◦ HTML ◦ Certain image files (bmp, jpg, png, gif, and tiff) ◦ Text-based files • Documents printed with HP ePrint may appear different from the original: ◦ Style, formatting, and text flow may differ from the original document. ◦ For documents that need to...print as soon as legal documents), we recommend that you print from the software application on your computer, where you sign up online with HP ePrint and restrict who can email your product must be received. ◦ When you will be connected to register for other content from ...

User Guide
Page 24
Chapter 5 Print 22 Print
Chapter 5 Print 22 Print