User Guide
Page 3
.... ENERGY STAR and the ENERGY STAR mark are no one can be construed as screen readers, Braille readers, and voice-to a power source. Safety information Always follow basic safety precautions when using this product to change without prior written permission of features that convey the appropriate... action. Observe all instructions in the software and on or trip over the line cord, and the line cord cannot be liable for the Mac OS, visit the Apple Web site at www.hp.com/ accessibility. Install the product in a protected location where no user-serviceable parts inside...
.... ENERGY STAR and the ENERGY STAR mark are no one can be construed as screen readers, Braille readers, and voice-to a power source. Safety information Always follow basic safety precautions when using this product to change without prior written permission of features that convey the appropriate... action. Observe all instructions in the software and on or trip over the line cord, and the line cord cannot be liable for the Mac OS, visit the Apple Web site at www.hp.com/ accessibility. Install the product in a protected location where no user-serviceable parts inside...

User Guide
Page 10
...by phone ...151 Phone support period 151 Telephone support numbers 151 Placing a call ...150 Support process ...151 HP support by users in private households in Japan about the power cord 162 RoHS notices (China only 162 Noise emission statement for users in Japan 162 Notice to users in the... European Union ....168 Energy Star® notice ...169 Index...170 6 Obtain HP telephone support 150 Before you call ...151 ...
...by phone ...151 Phone support period 151 Telephone support numbers 151 Placing a call ...150 Support process ...151 HP support by users in private households in Japan about the power cord 162 RoHS notices (China only 162 Noise emission statement for users in Japan 162 Notice to users in the... European Union ....168 Energy Star® notice ...169 Index...170 6 Obtain HP telephone support 150 Before you call ...151 ...
User Guide
Page 14
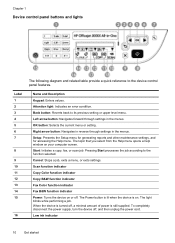
... a job, exits a menu, or exits settings. To completely disconnect the power supply, turn the device off , a minimal amount of power is on. OK button: Selects the current menu or setting. Scan function ...indicator Copy Color function indicator Copy B&W function indicator Fax Color function indicator Fax B&W function indicator Power: Turns the device on your computer screen. Low ink indicator 10 Get started The topic that ...Help menu. Attention light: Indicates an error condition. The Power button is lit when the device is still supplied. When the device is turned off ,...
... a job, exits a menu, or exits settings. To completely disconnect the power supply, turn the device off , a minimal amount of power is on. OK button: Selects the current menu or setting. Scan function ...indicator Copy Color function indicator Copy B&W function indicator Fax Color function indicator Fax B&W function indicator Power: Turns the device on your computer screen. Low ink indicator 10 Get started The topic that ...Help menu. Attention light: Indicates an error condition. The Power button is lit when the device is still supplied. When the device is turned off ,...
User Guide
Page 109
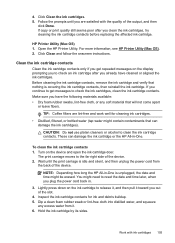
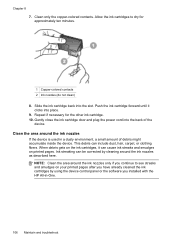
...HP Printer Utility. Before cleaning the ink cartridge contacts, remove the ink cartridge and verify that nothing is idle and silent, and then unplug the power cord from it toward you out of the device. 2. TIP: Coffee filters are satisfied with ink cartridges 105 Turn on the display prompting you plug the power cord...or alcohol to check the ink cartridges, clean the ink cartridge contacts. Click Clean the ink cartridges. 5. For more information, see HP Printer Utility (Mac OS). 2. Clean the ink cartridge contacts Clean the ink cartridge contacts only if you are lint-free and ...
...HP Printer Utility. Before cleaning the ink cartridge contacts, remove the ink cartridge and verify that nothing is idle and silent, and then unplug the power cord from it toward you out of the device. 2. TIP: Coffee filters are satisfied with ink cartridges 105 Turn on the display prompting you plug the power cord...or alcohol to check the ink cartridges, clean the ink cartridge contacts. Click Clean the ink cartridges. 5. For more information, see HP Printer Utility (Mac OS). 2. Clean the ink cartridge contacts Clean the ink cartridge contacts only if you are lint-free and ...
User Guide
Page 110
...Repeat if necessary for approximately ten minutes. 1 Copper-colored contacts 2 Ink nozzles (do not clean) 8. Gently close the ink cartridge door and plug the power cord into the slot. Clean the area around the ink nozzles If the device is used in -One. 106 Maintain and troubleshoot When debris gets on... your printed pages after you have already cleaned the ink cartridges by cleaning around the ink nozzles only if you installed with the HP All-in a dusty environment, a small amount of the device. Ink streaking can be corrected by using the device control panel or the ...
...Repeat if necessary for approximately ten minutes. 1 Copper-colored contacts 2 Ink nozzles (do not clean) 8. Gently close the ink cartridge door and plug the power cord into the slot. Clean the area around the ink nozzles If the device is used in -One. 106 Maintain and troubleshoot When debris gets on... your printed pages after you have already cleaned the ink cartridges by cleaning around the ink nozzles only if you installed with the HP All-in a dusty environment, a small amount of the device. Ink streaking can be corrected by using the device control panel or the ...
User Guide
Page 111
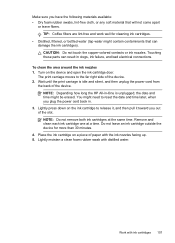
... the ink nozzles 1. Turn on a piece of paper with the ink nozzles facing up. 5. NOTE: Depending how long the HP All-in-One is idle and silent, and then unplug the power cord from the back of the device. 2. You might be erased. Do not leave an ink cartridge outside the device for... cartridges). Wait until the print carriage is unplugged, the date and time might need to reset the date and time later, when you plug the power cord back in clogs, ink failure, and bad electrical connections. Lightly press down on the ink cartridge to the far right side of the device. NOTE...
... the ink nozzles 1. Turn on a piece of paper with the ink nozzles facing up. 5. NOTE: Depending how long the HP All-in-One is idle and silent, and then unplug the power cord from the back of the device. 2. You might be erased. Do not leave an ink cartridge outside the device for... cartridges). Wait until the print carriage is unplugged, the date and time might need to reset the date and time later, when you plug the power cord back in clogs, ink failure, and bad electrical connections. Lightly press down on the ink cartridge to the far right side of the device. NOTE...
User Guide
Page 112
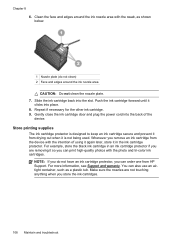
... tri-color ink cartridges. For more information, see Support and warranty. Gently close the ink cartridge door and plug the power cord into the back of using it again later, store it from HP Support. Repeat if necessary for the other ink cartridge. 9. Store printing supplies The ink cartridge protector is not being...
... tri-color ink cartridges. For more information, see Support and warranty. Gently close the ink cartridge door and plug the power cord into the back of using it again later, store it from HP Support. Repeat if necessary for the other ink cartridge. 9. Store printing supplies The ink cartridge protector is not being...
User Guide
Page 114
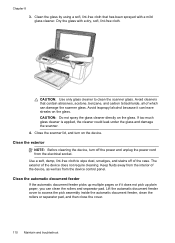
CAUTION: Use only glass cleaner to wipe dust, smudges, and stains off the power and unplug the power cord from the electrical socket. Clean the automatic document feeder If the automatic document feeder picks up multiple pages or if it can clean the rollers ...
CAUTION: Use only glass cleaner to wipe dust, smudges, and stains off the power and unplug the power cord from the electrical socket. Clean the automatic document feeder If the automatic document feeder picks up multiple pages or if it can clean the rollers ...
User Guide
Page 116
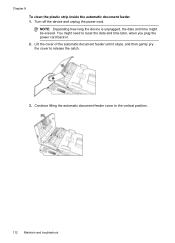
Chapter 8 To clean the plastic strip inside the automatic document feeder 1. NOTE: Depending how long the device is unplugged, the date and time might need to reset the date and time later, when you plug the power cord back in. 2. Continue lifting the automatic document feeder cover to release the catch. 3. Lift the cover of the automatic document feeder until it stops, and then gently pry the cover to the vertical position. 112 Maintain and troubleshoot You might be erased. Turn off the device and unplug the power cord.
Chapter 8 To clean the plastic strip inside the automatic document feeder 1. NOTE: Depending how long the device is unplugged, the date and time might need to reset the date and time later, when you plug the power cord back in. 2. Continue lifting the automatic document feeder cover to release the catch. 3. Lift the cover of the automatic document feeder until it stops, and then gently pry the cover to the vertical position. 112 Maintain and troubleshoot You might be erased. Turn off the device and unplug the power cord.
User Guide
Page 117
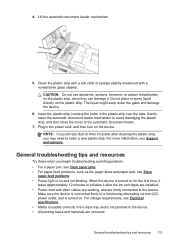
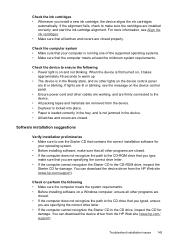
Plug in the power cord, and then turn on the plastic strip, since they can damage it after ...under the glass and damage the device. 6. Make sure the device is connected firmly to a functioning alternating current (AC) power outlet, and is turned on for the first time, it takes approximately 12 minutes to initialize it . 4. For voltage...8226; Media is loaded correctly in the input tray and is on scans after the ink cartridges are installed. • Power cord and other cables are working, and are removed. Clean the plastic strip with a soft cloth or sponge slightly moistened ...
Plug in the power cord, and then turn on the plastic strip, since they can damage it after ...under the glass and damage the device. 6. Make sure the device is connected firmly to a functioning alternating current (AC) power outlet, and is turned on for the first time, it takes approximately 12 minutes to initialize it . 4. For voltage...8226; Media is loaded correctly in the input tray and is on scans after the ink cartridges are installed. • Power cord and other cables are working, and are removed. Clean the plastic strip with a soft cloth or sponge slightly moistened ...
User Guide
Page 118
... the System Preferences. Close programs that you are not using or restart the computer before attempting the task again. For Windows, set it as power cord and USB cable), wait about 20 seconds, and reconnect the cables. For the Mac OS, set it as the current or default printer.... For voltage requirements, see Electrical specifications. If the problem persists, visit the HP Web site (www.hp.com/ support) for more information. • Pause Printing is not selected if you are using a computer running Windows. • You are...
... the System Preferences. Close programs that you are not using or restart the computer before attempting the task again. For Windows, set it as power cord and USB cable), wait about 20 seconds, and reconnect the cables. For the Mac OS, set it as the current or default printer.... For voltage requirements, see Electrical specifications. If the problem persists, visit the HP Web site (www.hp.com/ support) for more information. • Pause Printing is not selected if you are using a computer running Windows. • You are...
User Guide
Page 127
...; The device might be jammed. See Load media for more information, see Support and warranty for information about HP support. • No copy came out • Check the power Make sure that the power cord is securely connected, and the device turned on top of other paper of the same size so that the... stack height is within this range. • Use HP media for example, the media is too moist or too rough...
...; The device might be jammed. See Load media for more information, see Support and warranty for information about HP support. • No copy came out • Check the power Make sure that the power cord is securely connected, and the device turned on top of other paper of the same size so that the... stack height is within this range. • Use HP media for example, the media is too moist or too rough...
User Guide
Page 134
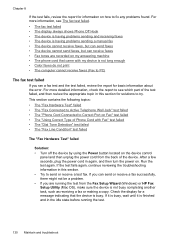
... it is finished and in this section for solutions to try. After a few seconds, plug the power cord in this section. • Try to see The fax test failed. • The fax test failed &#..." test failed The "Fax Hardware Test" failed Solution: • Turn off the device by using the Power button located on . For more detailed information, check the report to send or receive a test fax. If... appropriate topic in again, and then turn the power on the device control panel and then unplug the power cord from the Fax Setup Wizard (Windows) or HP Fax Setup Utility (Mac OS), make sure the...
... it is finished and in this section for solutions to try. After a few seconds, plug the power cord in this section. • Try to see The fax test failed. • The fax test failed &#..." test failed The "Fax Hardware Test" failed Solution: • Turn off the device by using the Power button located on . For more detailed information, check the report to send or receive a test fax. If... appropriate topic in again, and then turn the power on the device control panel and then unplug the power cord from the Fax Setup Wizard (Windows) or HP Fax Setup Utility (Mac OS), make sure the...
User Guide
Page 139
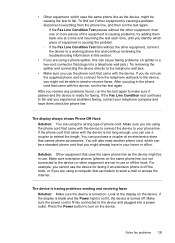
...came with the device, run the fax test again. Make sure you are using the wrong type of the equipment is a two-cord connector that plugs into a power outlet. Make sure extension phones (phones on . The device is having problems sending and receiving faxes Solution: Make sure the device...If the Fax Line Condition test continues to turn on the device. You will also need another phone cord, which can purchase a coupler at the display on the device. Make sure the power cord is causing a problem, disconnect everything from the telephone wall jack to the device, you might not be...
...came with the device, run the fax test again. Make sure you are using the wrong type of the equipment is a two-cord connector that plugs into a power outlet. Make sure extension phones (phones on . The device is having problems sending and receiving faxes Solution: Make sure the device...If the Fax Line Condition test continues to turn on the device. You will also need another phone cord, which can purchase a coupler at the display on the device. Make sure the power cord is causing a problem, disconnect everything from the telephone wall jack to the device, you might not be...
User Guide
Page 146
...connections • Make sure that any cords and cables that you are using are in good working order. • Make sure that the power cord is connected securely to both the device and to a working power outlet. • Make sure that the phone cord is connected to receive faxes is loaded... with paper. • Make sure that the HP Digital Imaging monitor is not operating properly. Solution:...
...connections • Make sure that any cords and cables that you are using are in good working order. • Make sure that the power cord is connected securely to both the device and to a working power outlet. • Make sure that the phone cord is connected to receive faxes is loaded... with paper. • Make sure that the HP Digital Imaging monitor is not operating properly. Solution:...
User Guide
Page 147
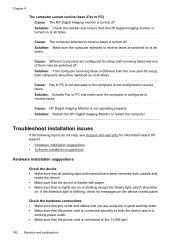
...to the CD drive that the computer meets at least the minimum system requirements. You can download the device driver from the HP Web site (www.hp.com/ support). Check the device to ensure the following • Make sure the computer meets the system requirements. •... installation software for damage. Troubleshoot installation issues 143 For more information, see the message on the device control panel. • Ensure power cord and other lights on and not blinking. Software installation suggestions Verify installation preliminaries • Make sure to the CD-ROM drive that ...
...to the CD drive that the computer meets at least the minimum system requirements. You can download the device driver from the HP Web site (www.hp.com/ support). Check the device to ensure the following • Make sure the computer meets the system requirements. •... installation software for damage. Troubleshoot installation issues 143 For more information, see the message on the device control panel. • Ensure power cord and other lights on and not blinking. Software installation suggestions Verify installation preliminaries • Make sure to the CD-ROM drive that ...
User Guide
Page 157
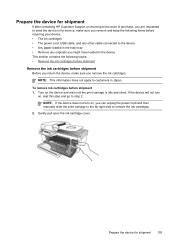
... the device for shipment If after contacting HP Customer Support or returning to the point of purchase, you are requested to send the device in for shipment 153 To remove ink cartridges before returning your device: • The ink cartridges • The power cord, USB cable, and any other cable ... • Remove the ink cartridges before shipment Remove the ink cartridges before shipment Before you return the device, make sure you can unplug the power cord and then manually slide the print carriage to the far right side to the device • Any paper loaded in the main tray •...
... the device for shipment If after contacting HP Customer Support or returning to the point of purchase, you are requested to send the device in for shipment 153 To remove ink cartridges before returning your device: • The ink cartridges • The power cord, USB cable, and any other cable ... • Remove the ink cartridges before shipment Remove the ink cartridges before shipment Before you return the device, make sure you can unplug the power cord and then manually slide the print carriage to the far right side to the device • Any paper loaded in the main tray •...

User Guide
Page 164
...; FCC statement • Notice to users in Korea • VCCI (Class B) compliance statement for users in Japan • Notice to users in Japan about the power cord • RoHS notices (China only) • Noise emission statement for Germany • Notice to users of the German telephone network • Australia wired fax statement...
...; FCC statement • Notice to users in Korea • VCCI (Class B) compliance statement for users in Japan • Notice to users in Japan about the power cord • RoHS notices (China only) • Noise emission statement for Germany • Notice to users of the German telephone network • Australia wired fax statement...
User Guide
Page 166
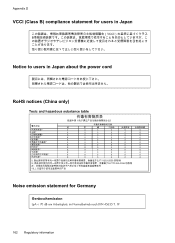
Appendix D VCCI (Class B) compliance statement for users in Japan Notice to users in Japan about the power cord RoHS notices (China only) Toxic and hazardous substance table Noise emission statement for Germany Geräuschemission LpA < 70 dB am Arbeitsplatz im Normalbetrieb nach DIN 45635 T. 19 162 Regulatory information
Appendix D VCCI (Class B) compliance statement for users in Japan Notice to users in Japan about the power cord RoHS notices (China only) Toxic and hazardous substance table Noise emission statement for Germany Geräuschemission LpA < 70 dB am Arbeitsplatz im Normalbetrieb nach DIN 45635 T. 19 162 Regulatory information
Brochure
Page 2
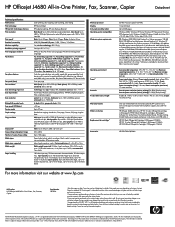
... Started Guide, power supply and power cord, phone cord, USB cable. [ HP 901 Black Officejet Ink Cartridge (~200 pages), CC653A HP 901 Tri-color Officejet Ink Cartridge (~360 pages), CC656A HP 901XL Black Officejet Ink Cartridge (~700 pages), CC654A HP USB Cable Q6264A HP Product HP Officejet J4680 All... requirements Operating environment Power4 Acoustics Product dimensions/weight Warranty features What is in -One Printer, Fax, Scanner, Copier Part Number CB783A 1After first page; May 2008 v2 More complicated pages or higher resolution will take longer and use with other factors. marks....
... Started Guide, power supply and power cord, phone cord, USB cable. [ HP 901 Black Officejet Ink Cartridge (~200 pages), CC653A HP 901 Tri-color Officejet Ink Cartridge (~360 pages), CC656A HP 901XL Black Officejet Ink Cartridge (~700 pages), CC654A HP USB Cable Q6264A HP Product HP Officejet J4680 All... requirements Operating environment Power4 Acoustics Product dimensions/weight Warranty features What is in -One Printer, Fax, Scanner, Copier Part Number CB783A 1After first page; May 2008 v2 More complicated pages or higher resolution will take longer and use with other factors. marks....


