
User Guide
Page 5
...2 Install the accessories Install the duplexer ...10 3 Use the device Select print media ...11 Tips for selecting and using print media 11 Understand specifications for supported media 12 Understand supported sizes 12 Understand supported media types and weights 16 Set minimum margins ...17 Load media ...18 Change print settings... current jobs (Windows 21 To change default settings for all future jobs (Windows 21 To change settings (Mac OS 21 Use the HP Solution Center (Windows 22 Print with the rear manual feed slot 22 Print on both sides (duplexing 23 Guidelines for printing on both...
...2 Install the accessories Install the duplexer ...10 3 Use the device Select print media ...11 Tips for selecting and using print media 11 Understand specifications for supported media 12 Understand supported sizes 12 Understand supported media types and weights 16 Set minimum margins ...17 Load media ...18 Change print settings... current jobs (Windows 21 To change default settings for all future jobs (Windows 21 To change settings (Mac OS 21 Use the HP Solution Center (Windows 22 Print with the rear manual feed slot 22 Print on both sides (duplexing 23 Guidelines for printing on both...

User Guide
Page 8
... numbers 82 Placing a call ...82 After the phone support period 82 Additional warranty options 83 HP Quick Exchange Service (Japan 83 Prepare the device for shipment 83 Remove the ink cartridges and printheads before shipment 83 Pack the device ...85 C Device specifications Physical specifications ...87 Product features and capacities 87 Processor and memory...
... numbers 82 Placing a call ...82 After the phone support period 82 Additional warranty options 83 HP Quick Exchange Service (Japan 83 Prepare the device for shipment 83 Remove the ink cartridges and printheads before shipment 83 Pack the device ...85 C Device specifications Physical specifications ...87 Product features and capacities 87 Processor and memory...

User Guide
Page 15
... supported media. • Load only one type of media at www.hp.com for more information about HP media. • Tips for selecting and using print media • Understand specifications for supported media • Set minimum margins Tips for selecting and using print media For the best ...results, observe the following guidelines. • Always use media that is too lightweight or stretches easily Use the device 11 Use HP media for supported media...
... supported media. • Load only one type of media at www.hp.com for more information about HP media. • Tips for selecting and using print media • Understand specifications for supported media • Set minimum margins Tips for selecting and using print media For the best ...results, observe the following guidelines. • Always use media that is too lightweight or stretches easily Use the device 11 Use HP media for supported media...

User Guide
Page 16
... tightly constructed envelopes, and make sure the folds are sharply creased. • Load envelopes with the flaps facing up. Allowing wet media to dry. Understand specifications for supported media Use the Understand supported sizes and Understand supported media types and weights tables to determine the correct media to use with your...
... tightly constructed envelopes, and make sure the folds are sharply creased. • Load envelopes with the flaps facing up. Allowing wet media to dry. Understand specifications for supported media Use the Understand supported sizes and Understand supported media types and weights tables to determine the correct media to use with your...

User Guide
Page 24
For more information, see Understand specifications for the Resume light to blink. 4. As you cannot locate the rear-access panel, cancel the print job and print using the main tray. For ...
For more information, see Understand specifications for the Resume light to blink. 4. As you cannot locate the rear-access panel, cancel the print job and print using the main tray. For ...

User Guide
Page 25
...defaults configured in the printer driver. If you are using.) 3. Open the document that came with the application. • To change settings from a specific application, see the online help for the device to open the print driver. 4. However, after inserting each sheet. For more than one page, press ... settings (such as paper size), and then click OK. 3. On the File menu, click Print, and then click Setup, Properties, or Preferences. (Specific options may vary depending on the application that you are printing more information about the features of the slot for the driver.
...defaults configured in the printer driver. If you are using.) 3. Open the document that came with the application. • To change settings from a specific application, see the online help for the device to open the print driver. 4. However, after inserting each sheet. For more than one page, press ... settings (such as paper size), and then click OK. 3. On the File menu, click Print, and then click Setup, Properties, or Preferences. (Specific options may vary depending on the application that you are printing more information about the features of the slot for the driver.

User Guide
Page 26
... File, and then click Print. 4. The features available in the HP Solution Center. The HP Solution Center is designed for supported media. Open the Paper Type/Quality panel. 5. If the HP Solution Center on loading the rear manual feed slot, see Understand specifications for printing single sheets of paper, you have occurred during the...
... File, and then click Print. 4. The features available in the HP Solution Center. The HP Solution Center is designed for supported media. Open the Paper Type/Quality panel. 5. If the HP Solution Center on loading the rear manual feed slot, see Understand specifications for printing single sheets of paper, you have occurred during the...
User Guide
Page 27
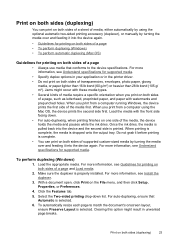
... the Features tab. 5. Load the media with watermarks and prepunched holes. To perform duplexing (Windows) 1. For more information, see Understand specifications for printing on both sides of media, either automatically by using the Mac OS, the device prints the second side first. For more ...information, see Guidelines for supported media. To automatically resize each page to the device specifications. For more information, see Install the duplexer. 3. Jams might result in the printer driver. • Do not print on one ...
... the Features tab. 5. Load the media with watermarks and prepunched holes. To perform duplexing (Windows) 1. For more information, see Understand specifications for printing on both sides of media, either automatically by using the Mac OS, the device prints the second side first. For more ...information, see Guidelines for supported media. To automatically resize each page to the device specifications. For more information, see Install the duplexer. 3. Jams might result in the printer driver. • Do not print on one ...

User Guide
Page 31
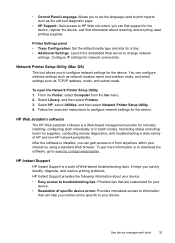
Windows • Device control panel • Embedded Web server • Printer driver • HP Web Jetadmin NOTE: For more information about the HP Web Jetadmin software, open the HP Web Jetadmin software and see its documentation. • Toolbox • myPrintMileage NOTE: For more information ...device. Mac OS • Device control panel • Embedded Web server • HP Printer Utility • Monitor the device • Administer the device Configure and manage 27 NOTE: Specific procedures might include other methods. 4 Configure and manage This section is intended for the...
Windows • Device control panel • Embedded Web server • Printer driver • HP Web Jetadmin NOTE: For more information about the HP Web Jetadmin software, open the HP Web Jetadmin software and see its documentation. • Toolbox • myPrintMileage NOTE: For more information ...device. Mac OS • Device control panel • Embedded Web server • HP Printer Utility • Monitor the device • Administer the device Configure and manage 27 NOTE: Specific procedures might include other methods. 4 Configure and manage This section is intended for the...

User Guide
Page 33
...To open the embedded Web server You can open the embedded Web server by the requirement for the embedded Web server, see Embedded Web server specifications. Use device management tools The following ... • Order supplies: On any tab, click the Order Supplies button, and then follow the ...onscreen instructions. • Support: On any tab, click the Support button, and then select a support option. Toolbox (Windows) HP Printer Utility (Mac OS) to perform. Some settings might be restricted by using these methods: NOTE: To open and use the embedded Web server ...
...To open the embedded Web server You can open the embedded Web server by the requirement for the embedded Web server, see Embedded Web server specifications. Use device management tools The following ... • Order supplies: On any tab, click the Order Supplies button, and then follow the ...onscreen instructions. • Support: On any tab, click the Support button, and then select a support option. Toolbox (Windows) HP Printer Utility (Mac OS) to perform. Some settings might be restricted by using these methods: NOTE: To open and use the embedded Web server ...
User Guide
Page 37
... Finder, select Computer from anywhere within your device. HP Web Jetadmin software The HP Web Jetadmin software is installed, you can find information about your device: • Easy access to troubleshooting tips: Provides tips that are customized for your device. • Resolution of specific device errors: Provides immediate access to information that can...
... Finder, select Computer from anywhere within your device. HP Web Jetadmin software The HP Web Jetadmin software is installed, you can find information about your device: • Easy access to troubleshooting tips: Provides tips that are customized for your device. • Resolution of specific device errors: Provides immediate access to information that can...

User Guide
Page 58
... resolve printing problems. • For a paper jam, see Clear jams. • For paper-feed problems, such as the paper skew and paper pick, see Electrical specifications. ◦ Media is loaded correctly in the tray and is not jammed in the device. ◦ Printheads and ink cartridges are properly installed in their...
... resolve printing problems. • For a paper jam, see Clear jams. • For paper-feed problems, such as the paper skew and paper pick, see Electrical specifications. ◦ Media is loaded correctly in the tray and is not jammed in the device. ◦ Printheads and ink cartridges are properly installed in their...

User Guide
Page 59
NOTE: Some problems can be stuck in the queue, and then reboot the computer. If the problem persists, visit the HP Web site (www.hp.com/support) for information on the page is missing or incorrect • Placement of all cables (such as power cord, network cable, and USB cable), ... responding (nothing prints) Check the print queue A print job might be resolved by resetting the device. Check the device setup For more information, see Electrical specifications. All device lights are using or restart the computer before attempting the task again.
NOTE: Some problems can be stuck in the queue, and then reboot the computer. If the problem persists, visit the HP Web site (www.hp.com/support) for information on the page is missing or incorrect • Placement of all cables (such as power cord, network cable, and USB cable), ... responding (nothing prints) Check the print queue A print job might be resolved by resetting the device. Check the device setup For more information, see Electrical specifications. All device lights are using or restart the computer before attempting the task again.

User Guide
Page 63
... cartridges may be low on ink, and the print job was cancelled. For more information, see Replace the ink cartridges. See the release notes for specific help. Check the page-orientation setting Make sure the media size and page orientation selected in the application match the settings in the printer driver.
... cartridges may be low on ink, and the print job was cancelled. For more information, see Replace the ink cartridges. See the release notes for specific help. Check the page-orientation setting Make sure the media size and page orientation selected in the application match the settings in the printer driver.

User Guide
Page 64
...the printhead. When the Power light is less than 3 meters (9.8 feet) long to a poor cable connection. Make sure the media meets HP specifications, and try to a job that is on and not flashing, reconnect the cable. 60 Maintain and troubleshoot For more information, see To print... cable connections If the device and computer are secure. For more information, see Select print media. For more information, see Understand specifications for the device to return to retry the job, click Cancel. Chapter 5 Poor quality printouts Check the printheads and ink cartridges Print...
...the printhead. When the Power light is less than 3 meters (9.8 feet) long to a poor cable connection. Make sure the media meets HP specifications, and try to a job that is on and not flashing, reconnect the cable. 60 Maintain and troubleshoot For more information, see To print... cable connections If the device and computer are secure. For more information, see Select print media. For more information, see Understand specifications for the device to return to retry the job, click Cancel. Chapter 5 Poor quality printouts Check the printheads and ink cartridges Print...

User Guide
Page 67
... tight, against the stack. • Make sure media in the tray for supported media. Solve paper-feed problems For information on resolving jams, see Understand specifications for the media size you are set to check for the device and the tray being used. Check the printheads Print the print quality diagnostic...
... tight, against the stack. • Make sure media in the tray for supported media. Solve paper-feed problems For information on resolving jams, see Understand specifications for the media size you are set to check for the device and the tray being used. Check the printheads Print the print quality diagnostic...

User Guide
Page 72
..., and then remove the panel or unit. For more information, see Select print media. • Make sure that you are printing with media that meets specifications. Push the button on either side of the device. Do not reach into the device when it does not move to the right, turn off...
..., and then remove the panel or unit. For more information, see Select print media. • Make sure that you are printing with media that meets specifications. Push the button on either side of the device. Do not reach into the device when it does not move to the right, turn off...

User Guide
Page 73
... (if you cannot locate the jam, lift the output tray and check for a jam in the tray, do the following: a. For more information, see Understand specifications for avoiding jams • Make sure that is stuck. Reinsert the rear access panel or the duplexer into the device when it . If media is...
... (if you cannot locate the jam, lift the output tray and check for a jam in the tray, do the following: a. For more information, see Understand specifications for avoiding jams • Make sure that is stuck. Reinsert the rear access panel or the duplexer into the device when it . If media is...

User Guide
Page 74
Chapter 5 • Always use media that conforms with specifications. For more information, see Select print media. • Make sure the output tray is not overly full. • Make sure media is aligned against the right side of a tray. • Make sure the media length and width guides are adjusted snugly against the media, but do not crinkle or bend it. 70 Maintain and troubleshoot
Chapter 5 • Always use media that conforms with specifications. For more information, see Select print media. • Make sure the output tray is not overly full. • Make sure media is aligned against the right side of a tray. • Make sure the media length and width guides are adjusted snugly against the media, but do not crinkle or bend it. 70 Maintain and troubleshoot
User Guide
Page 91
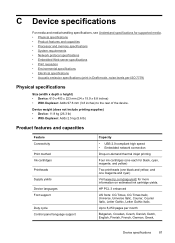
....9 x 8.8 inches) • With Duplexer: Adds 97.6 mm (3.8 inches) to 6,250 pages per month Bulgarian, Croatian, Czech, Danish, Dutch, English, Finnish, French, German, Greek, Device specifications 87 HP PCL 3 enhanced US fonts: CG Times, CG Times Italic, Universe, Universe Italic, Courier, Courier Italic, Letter Gothic, Letter Gothic Italic. Up to the rear of...
....9 x 8.8 inches) • With Duplexer: Adds 97.6 mm (3.8 inches) to 6,250 pages per month Bulgarian, Croatian, Czech, Danish, Dutch, English, Finnish, French, German, Greek, Device specifications 87 HP PCL 3 enhanced US fonts: CG Times, CG Times Italic, Universe, Universe Italic, Courier, Courier Italic, Letter Gothic, Letter Gothic Italic. Up to the rear of...


