User Guide
Page 29
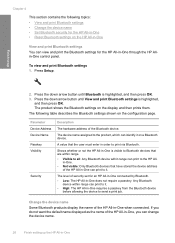
... topics: • View and print Bluetooth settings • Change the device name • Set Bluetooth security for the HP All-in-One • Reset Bluetooth settings on the HP All-in-One View and print Bluetooth settings You can print to it. A value that have stored the device address of the...name displayed as the name of security set for an HP All-in-One connected by Bluetooth. • Low: The HP All-in-One does not require a passkey. To view and print Bluetooth settings 1. Press Setup. Press the down arrow button until View and print Bluetooth settings is highlighted, and then...
... topics: • View and print Bluetooth settings • Change the device name • Set Bluetooth security for the HP All-in-One • Reset Bluetooth settings on the HP All-in-One View and print Bluetooth settings You can print to it. A value that have stored the device address of the...name displayed as the name of security set for an HP All-in-One connected by Bluetooth. • Low: The HP All-in-One does not require a passkey. To view and print Bluetooth settings 1. Press Setup. Press the down arrow button until View and print Bluetooth settings is highlighted, and then...
User Guide
Page 31
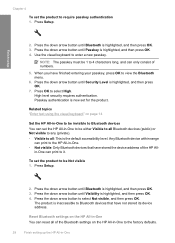
Press OK to enter a new passkey. Press the down arrow button to select Not visible, and then press OK. Reset Bluetooth settings on the HP All-in-One to it. Finish setup 2. NOTE: The passkey must be Not visible 1. When you have not stored its device address. Related topics "Enter ...High. Any Bluetooth device within range can print to the HP All-in -One can print to the factory defaults. 28 Finish setting up the HP All-in -One You can reset all : This is highlighted, and then press OK. 3. Press the down arrow button until Passkey is now set the product to be 1...
Press OK to enter a new passkey. Press the down arrow button to select Not visible, and then press OK. Reset Bluetooth settings on the HP All-in-One to it. Finish setup 2. NOTE: The passkey must be Not visible 1. When you have not stored its device address. Related topics "Enter ...High. Any Bluetooth device within range can print to the HP All-in -One can print to the factory defaults. 28 Finish setting up the HP All-in -One You can reset all : This is highlighted, and then press OK. 3. Press the down arrow button until Passkey is now set the product to be 1...
User Guide
Page 32
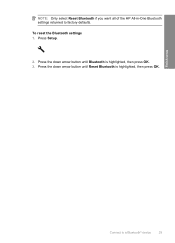
Press the down arrow button until Reset Bluetooth is highlighted, then press OK. 3. Press the down arrow button until Bluetooth is highlighted, then press OK. Press Setup. 2. NOTE: Only select Reset Bluetooth if you want all of the HP All-in-One Bluetooth settings returned to a Bluetooth® device 29 Finish setup Connect to factory defaults. To reset the Bluetooth settings 1.
Press the down arrow button until Reset Bluetooth is highlighted, then press OK. 3. Press the down arrow button until Bluetooth is highlighted, then press OK. Press Setup. 2. NOTE: Only select Reset Bluetooth if you want all of the HP All-in-One Bluetooth settings returned to a Bluetooth® device 29 Finish setup Connect to factory defaults. To reset the Bluetooth settings 1.
User Guide
Page 123
... movement from the product when you turn it on. • Solution 1: Make sure you use the power cord that came with the product • Solution 2: Reset the product • Solution 3: Press the On button more slowly • Solution 4: Contact HP to replace the power supply • Solution 5: Contact...
... movement from the product when you turn it on. • Solution 1: Make sure you use the power cord that came with the product • Solution 2: Reset the product • Solution 3: Press the On button more slowly • Solution 4: Contact HP to replace the power supply • Solution 5: Contact...
User Guide
Page 124
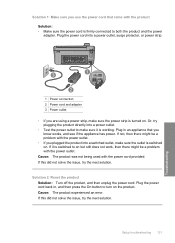
... outlet, make sure the outlet is switched on . If not, then there might be a problem with the power cord provided. Setup troubleshooting 121 Troubleshooting Solution 2: Reset the product Solution: Turn off the product, and then unplug the power cord. Cause: The product experienced an error. Plug the power cord back in... work, then there might be a problem with the product Solution: • Make sure the power cord is working. Plug in , and then press the On button to on the product.
... outlet, make sure the outlet is switched on . If not, then there might be a problem with the power cord provided. Setup troubleshooting 121 Troubleshooting Solution 2: Reset the product Solution: Turn off the product, and then unplug the power cord. Cause: The product experienced an error. Plug the power cord back in... work, then there might be a problem with the product Solution: • Make sure the power cord is working. Plug in , and then press the On button to on the product.
User Guide
Page 130
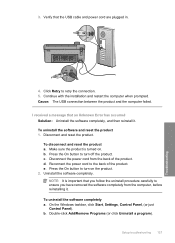
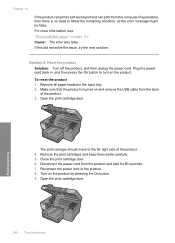
...carefully to ensure you have removed the software completely from the back of the product. Uninstall the software completely. Disconnect and reset the product. Press the On button to retry the connection. 5. To uninstall the software completely a. b. Disconnect the power cord from the computer, before ...in. 4. Reconnect the power cord to turn off the product. Click Retry to turn on . c. 3. To disconnect and reset the product a. Press the On button to the back of the product. On the Windows taskbar, click Start, Settings, Control Panel, (or just Control Panel). ...
...carefully to ensure you have removed the software completely from the back of the product. Uninstall the software completely. Disconnect and reset the product. Press the On button to retry the connection. 5. To uninstall the software completely a. b. Disconnect the power cord from the computer, before ...in. 4. Reconnect the power cord to turn off the product. Click Retry to turn on . c. 3. To disconnect and reset the product a. Press the On button to the back of the product. On the Windows taskbar, click Start, Settings, Control Panel, (or just Control Panel). ...
User Guide
Page 154
... the product is not responding Try the following solutions to your computer • Solution 10: Reset the product Solution 1: Turn on the product Solution: Look at the On light located on ...application. If this did not solve the issue, try the next solution. Press the On button to the product and plugged into a power outlet. TIP: You can set the product ... 8: Make sure the print carriage can move freely • Solution 9: Check the connection from a non-HP software application produced unexpected results. Solution 2: Load paper in the input tray Solution: Load paper in order...
... the product is not responding Try the following solutions to your computer • Solution 10: Reset the product Solution 1: Turn on the product Solution: Look at the On light located on ...application. If this did not solve the issue, try the next solution. Press the On button to the product and plugged into a power outlet. TIP: You can set the product ... 8: Make sure the print carriage can move freely • Solution 9: Check the connection from a non-HP software application produced unexpected results. Solution 2: Load paper in the input tray Solution: Load paper in order...
User Guide
Page 157
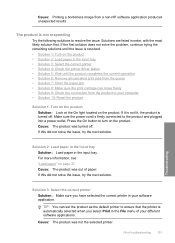
...corrupt. Solution 2: Print a previously saved version of the document that is resolved. • Solution 1: Reset the product • Solution 2: Print a previously saved version of the document Solution 1: Reset the product Solution: Turn off the product, and then unplug the power cord. Cause: The document ...was no available memory in , and then press the On button to resolve the issue. The product prints meaningless characters ...
...corrupt. Solution 2: Print a previously saved version of the document that is resolved. • Solution 1: Reset the product • Solution 2: Print a previously saved version of the document Solution 1: Reset the product Solution: Turn off the product, and then unplug the power cord. Cause: The document ...was no available memory in , and then press the On button to resolve the issue. The product prints meaningless characters ...
User Guide
Page 160
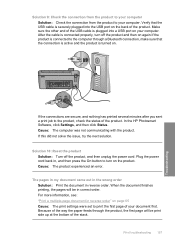
Solution 10: Reset the product Solution: Turn off the product and then on the product. Cause: The product experienced an error. The pages in my document came out in the wrong order Solution: Print the document in , and then press the On button to print the first page of your computer. ... active and the product is connected to the product, check the status of the product. Plug the power cord back in reverse order. In the HP Photosmart Software, click Settings, and then click Status. If this did not solve the issue, try the next solution. Solution 9: Check the connection from ...
Solution 10: Reset the product Solution: Turn off the product and then on the product. Cause: The product experienced an error. The pages in my document came out in the wrong order Solution: Print the document in , and then press the On button to print the first page of your computer. ... active and the product is connected to the product, check the status of the product. Plug the power cord back in reverse order. In the HP Photosmart Software, click Settings, and then click Status. If this did not solve the issue, try the next solution. Solution 9: Check the connection from ...
User Guide
Page 189
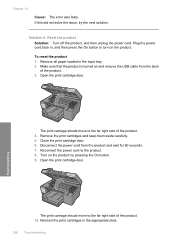
...to the far right side of the product. 3. Remove all paper loaded in the appropriate slots. 186 Troubleshooting Turn on the product. Solution 6: Reset the product Solution: Turn off the product, and then unplug the power cord. Close the print cartridge door. 6. Reconnect the power cord to ...turn on the product by pressing the On button. 9. Remove the print cartridges and keep them aside carefully. 5. Chapter 14 Cause: The error was false. Plug the power cord back in, ...
...to the far right side of the product. 3. Remove all paper loaded in the appropriate slots. 186 Troubleshooting Turn on the product. Solution 6: Reset the product Solution: Turn off the product, and then unplug the power cord. Close the print cartridge door. 6. Reconnect the power cord to ...turn on the product by pressing the On button. 9. Remove the print cartridges and keep them aside carefully. 5. Chapter 14 Cause: The error was false. Plug the power cord back in, ...
User Guide
Page 209
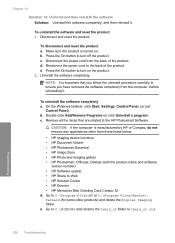
... turn off the product. On the Windows taskbar, click Start, Settings, Control Panel, (or just Control Panel). c. To uninstall the software and reset the product 1. Press the On button to the HP Photosmart Software. d. Double-click Add/Remove Programs (or click Uninstall a program). Reconnect the power cord to twain_32 old. 206 Troubleshooting Troubleshooting b. e. Remove...
... turn off the product. On the Windows taskbar, click Start, Settings, Control Panel, (or just Control Panel). c. To uninstall the software and reset the product 1. Press the On button to the HP Photosmart Software. d. Double-click Add/Remove Programs (or click Uninstall a program). Reconnect the power cord to twain_32 old. 206 Troubleshooting Troubleshooting b. e. Remove...
User Guide
Page 251
... print cartridge door. Remove the print cartridges and keep them aside carefully. 5. Troubleshooting 248 Troubleshooting Turn on page 114 Cause: The error was false. Solution 6: Reset the product Solution: Turn off the product, and then unplug the power cord. The print carriage should move to follow the remaining solutions, as the... turn on the product. If this did not solve the issue, try the next solution. Remove all paper loaded in , and then press the On button to the product. 8. For more information, see: "Print a self-test report" on the product by pressing the On...
... print cartridge door. Remove the print cartridges and keep them aside carefully. 5. Troubleshooting 248 Troubleshooting Turn on page 114 Cause: The error was false. Solution 6: Reset the product Solution: Turn off the product, and then unplug the power cord. The print carriage should move to follow the remaining solutions, as the... turn on the product. If this did not solve the issue, try the next solution. Remove all paper loaded in , and then press the On button to the product. 8. For more information, see: "Print a self-test report" on the product by pressing the On...
User Guide
Page 273
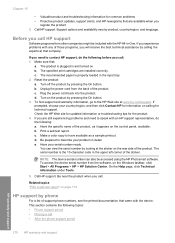
... programs, you call . c. Reset the product: a. To find support and warranty information, go to speak with any of the product, as a sample printout. Before you will receive the best technical assistance by pressing the On button. 3. d. On the Help ... in -One. Chapter 15 • Valuable product and troubleshooting information for common problems • Proactive product updates, support alerts, and HP newsgrams that are installed correctly. Make sure that: a. Unplug the power cord from other companies might be accessed using the HP Photosmart software. ...
... programs, you call . c. Reset the product: a. To find support and warranty information, go to speak with any of the product, as a sample printout. Before you will receive the best technical assistance by pressing the On button. 3. d. On the Help ... in -One. Chapter 15 • Valuable product and troubleshooting information for common problems • Proactive product updates, support alerts, and HP newsgrams that are installed correctly. Make sure that: a. Unplug the power cord from other companies might be accessed using the HP Photosmart software. ...


