Basics Guide
Page 3
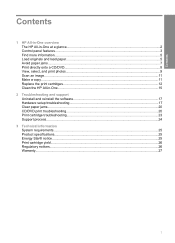
Contents Contents 1 HP All-in-One overview The HP All-in-One at a glance...2 Control panel features...3 Find more information...5 Load originals and load paper...5 Avoid paper jams...7 Print directly onto a CD/DVD...8 View, select, and print photos...9 Scan an image...11 Make a copy...11 Replace the print cartridges...12 Clean the HP All-in-One...15 2 Troubleshooting and support Uninstall and reinstall the software 17 Hardware setup troubleshooting 17 Clear paper jams...20 CD/DVD print troubleshooting 20 Print cartridge troubleshooting 23 Support process...24 3 Technical information ...
Contents Contents 1 HP All-in-One overview The HP All-in-One at a glance...2 Control panel features...3 Find more information...5 Load originals and load paper...5 Avoid paper jams...7 Print directly onto a CD/DVD...8 View, select, and print photos...9 Scan an image...11 Make a copy...11 Replace the print cartridges...12 Clean the HP All-in-One...15 2 Troubleshooting and support Uninstall and reinstall the software 17 Hardware setup troubleshooting 17 Clear paper jams...20 CD/DVD print troubleshooting 20 Print cartridge troubleshooting 23 Support process...24 3 Technical information ...
Basics Guide
Page 4
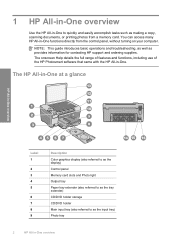
... Main input tray (also referred to quickly and easily accomplish tasks such as making a copy, scanning documents, or printing photos from the control panel, without turning on your computer. You can access many HP All-in-One functions directly from a memory card. 1 HP All-in-One overview Use the HP All-in-One to as the input tray) Photo tray 2 HP All-in -One. NOTE: This guide introduces basic operations and troubleshooting, as well as provides information for contacting HP support and...
... Main input tray (also referred to quickly and easily accomplish tasks such as making a copy, scanning documents, or printing photos from the control panel, without turning on your computer. You can access many HP All-in-One functions directly from a memory card. 1 HP All-in-One overview Use the HP All-in-One to as the input tray) Photo tray 2 HP All-in -One. NOTE: This guide introduces basic operations and troubleshooting, as well as provides information for contacting HP support and...
Basics Guide
Page 5
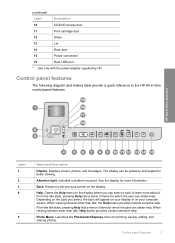
..., pressing Help lists a menu of items for more about it. HP All-in -One control panel features. (continued) Label Description 10 CD/DVD access door 11 Print cartridge door 12 Glass 13 Lid 14 Rear door 15 Power connection* 16 Rear USB port * Use only with the power adapter supplied by HP. Attention light: Indicates a problem occurred. Depending on the display. When viewing screens other than Idle, the Help button provides context sensitive help . Photo Menu...
..., pressing Help lists a menu of items for more about it. HP All-in -One control panel features. (continued) Label Description 10 CD/DVD access door 11 Print cartridge door 12 Glass 13 Lid 14 Rear door 15 Power connection* 16 Rear USB port * Use only with the power adapter supplied by HP. Attention light: Indicates a problem occurred. Depending on the display. When viewing screens other than Idle, the Help button provides context sensitive help . Photo Menu...
Basics Guide
Page 6
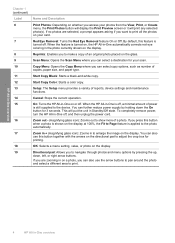
... the photo currently shown on the display. Start Copy Color: Starts a color copy. Cancel: Stops the current operation. Scan Menu: Opens the Scan Menu where you to show more of reports, device settings and maintenance functions. Zoom out - (magnifying glass icon): Zooms out to navigate through photos and menu options by holding down , left, or right arrow buttons. OK: Selects a menu setting, value, or photo on the display. Start Copy Black: Starts a black-and-white copy. When the feature is turned off , and then unplug the power cord...
... the photo currently shown on the display. Start Copy Color: Starts a color copy. Cancel: Stops the current operation. Scan Menu: Opens the Scan Menu where you to show more of reports, device settings and maintenance functions. Zoom out - (magnifying glass icon): Zooms out to navigate through photos and menu options by holding down , left, or right arrow buttons. OK: Selects a menu setting, value, or photo on the display. Start Copy Black: Starts a black-and-white copy. When the feature is turned off , and then unplug the power cord...
Basics Guide
Page 7
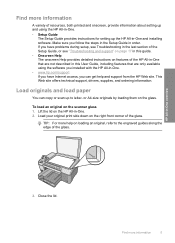
... 5 Lift the lid on loading an original, refer to letter- Make sure you can copy or scan up the HP All-in this User Guide, including features that are not described in this guide. • Onscreen Help The onscreen Help provides detailed instructions on page 17 in -One and installing software. or A4-size originals by loading them on the scanner glass 1. Load your original print side down on the right...
... 5 Lift the lid on loading an original, refer to letter- Make sure you can copy or scan up the HP All-in this User Guide, including features that are not described in this guide. • Onscreen Help The onscreen Help provides detailed instructions on page 17 in -One and installing software. or A4-size originals by loading them on the scanner glass 1. Load your original print side down on the right...
Basics Guide
Page 8
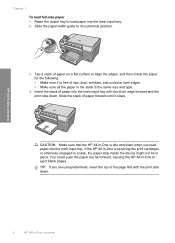
... until it is the same size and type. 4. Slide the paper-width guide to eject blank pages. You could push the paper too far forward, causing the HP All-in-One to its outermost position. 3. CAUTION: Make sure that the HP All-in-One is servicing the print cartridges or otherwise engaged in a task, the paper stop inside the device might not be in -One overview Insert the stack...
... until it is the same size and type. 4. Slide the paper-width guide to eject blank pages. You could push the paper too far forward, causing the HP All-in-One to its outermost position. 3. CAUTION: Make sure that the HP All-in-One is servicing the print cartridges or otherwise engaged in a task, the paper stop inside the device might not be in -One overview Insert the stack...
Basics Guide
Page 9
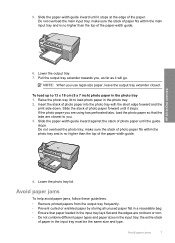
... guide inward until it stops at the edge of photo paper into the photo tray with the short edge forward and the print side down. HP All-in the input tray must be the same size and type. Insert the stack of the paper. Lower the photo tray lid. Lower the output tray. 7. Do not overload the photo tray; Pull the output tray extender towards you are using has perforated tabs, load the photo paper...
... guide inward until it stops at the edge of photo paper into the photo tray with the short edge forward and the print side down. HP All-in the input tray must be the same size and type. Insert the stack of the paper. Lower the photo tray lid. Lower the output tray. 7. Do not overload the photo tray; Pull the output tray extender towards you are using has perforated tabs, load the photo paper...
Basics Guide
Page 13
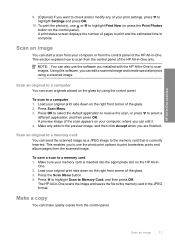
... projects using the control panel. Press the Scan Menu button. 4. A print status screen displays the number of your memory card is currently inserted. This enables you to use the software you installed with the HP All-in-One to scan images. Using this software, you can make quality copies from the scanned image. Make any of pages to print and the estimated time to highlight Print Now (or press the Print Photos button on the HP All-in- HP All-in-One overview 9. (Optional) If you want to check and...
... projects using the control panel. Press the Scan Menu button. 4. A print status screen displays the number of your memory card is currently inserted. This enables you to use the software you installed with the HP All-in-One to scan images. Using this software, you can make quality copies from the scanned image. Make any of pages to print and the estimated time to highlight Print Now (or press the Print Photos button on the HP All-in- HP All-in-One overview 9. (Optional) If you want to check and...
Basics Guide
Page 14
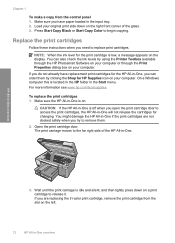
... paper loaded in the input tray. 2. If you can also check the ink levels by clicking the Shop for the print cartridge is located in the HP folder in -One overview 3. On a Windows computer this is low, a message appears on your computer or through the HP Photosmart Software on your computer. Load your computer. You might damage the HP All-in-One if the print cartridges are replacing the tri-color print cartridge, remove the print cartridge from the control panel...
... paper loaded in the input tray. 2. If you can also check the ink levels by clicking the Shop for the print cartridge is located in the HP folder in -One overview 3. On a Windows computer this is low, a message appears on your computer or through the HP Photosmart Software on your computer. Load your computer. You might damage the HP All-in-One if the print cartridges are replacing the tri-color print cartridge, remove the print cartridge from the control panel...
Basics Guide
Page 15
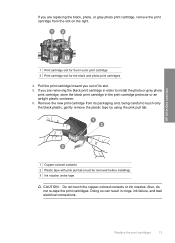
Replace the print cartridges 13 HP All-in clogs, ink failure, and bad electrical connections. Remove the new print cartridge from the slot on the right. 1 Print cartridge slot for the tri-color print cartridge 2 Print cartridge slot for the black and photo print cartridges 4. Also, do not re-tape the print cartridges. Doing so can result in -One overview 1 Copper-colored contacts 2 Plastic tape with pink pull tab (must be removed before installing) 3 Ink nozzles under tape CAUTION...
Replace the print cartridges 13 HP All-in clogs, ink failure, and bad electrical connections. Remove the new print cartridge from the slot on the right. 1 Print cartridge slot for the tri-color print cartridge 2 Print cartridge slot for the black and photo print cartridges 4. Also, do not re-tape the print cartridges. Doing so can result in -One overview 1 Copper-colored contacts 2 Plastic tape with pink pull tab (must be removed before installing) 3 Ink nozzles under tape CAUTION...
Basics Guide
Page 16
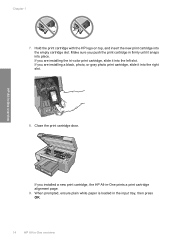
If you push the print cartridge in -One prints a print cartridge alignment page. 9. When prompted, ensure plain white paper is loaded in the input tray, then press OK. 14 HP All-in -One overview If you are installing the tri-color print cartridge, slide it snaps into the right slot. 8. Make sure you are installing a black, photo, or gray photo print cartridge, slide it into place. If you installed a new print cartridge, the HP All-in firmly until it into the...
If you push the print cartridge in -One prints a print cartridge alignment page. 9. When prompted, ensure plain white paper is loaded in the input tray, then press OK. 14 HP All-in -One overview If you are installing the tri-color print cartridge, slide it snaps into the right slot. 8. Make sure you are installing a black, photo, or gray photo print cartridge, slide it into place. If you installed a new print cartridge, the HP All-in firmly until it into the...
Basics Guide
Page 17
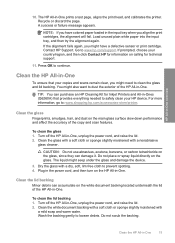
... your copies and scans remain clear, you have a defective sensor or print cartridge. CAUTION: Do not use abrasives, acetone, benzene, or carbon tetrachloride on the glass. Wash the backing gently to continue. The HP All-in -One. Load unused plain white paper into the input tray, and then try the alignment again. Clean the glass Fingerprints, smudges, hair, and dust on calling for Inkjet Printers and...
... your copies and scans remain clear, you have a defective sensor or print cartridge. CAUTION: Do not use abrasives, acetone, benzene, or carbon tetrachloride on the glass. Wash the backing gently to continue. The HP All-in -One. Load unused plain white paper into the input tray, and then try the alignment again. Clean the glass Fingerprints, smudges, hair, and dust on calling for Inkjet Printers and...
Basics Guide
Page 19
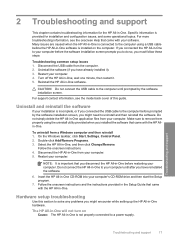
... connect the USB cable to solve any problems you have already installed it . 5. Double-click Add/Remove Programs. 3. Disconnect the HP All-in -One software is connected to uninstall and then reinstall the software. Restart your computer. 4. Hardware setup troubleshooting Use this guide. Turn off the HP All-in -One CD-ROM into your computer. For support contact information, see the onscreen Help that came with the HP All-in -One. On the Windows taskbar, click Start, Settings, Control Panel...
... connect the USB cable to solve any problems you have already installed it . 5. Double-click Add/Remove Programs. 3. Disconnect the HP All-in -One software is connected to uninstall and then reinstall the software. Restart your computer. 4. Hardware setup troubleshooting Use this guide. Turn off the HP All-in -One CD-ROM into your computer. For support contact information, see the onscreen Help that came with the HP All-in -One. On the Windows taskbar, click Start, Settings, Control Panel...
Basics Guide
Page 20
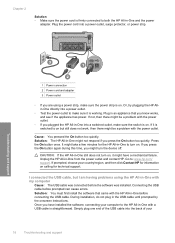
... there might turn the device off. If you press the On button again during this time, you might be a problem with the power outlet. • If you plugged the HP All-in -One still does not turn on . Connecting the USB cable before the software was installed. Cause: You pressed the On button too quickly. Press the On button once. I am having problems using a power strip, make sure it is working. It...
... there might turn the device off. If you press the On button again during this time, you might be a problem with the power outlet. • If you plugged the HP All-in -One still does not turn on . Connecting the USB cable before the software was installed. Cause: You pressed the On button too quickly. Press the On button once. I am having problems using a power strip, make sure it is working. It...
Basics Guide
Page 21
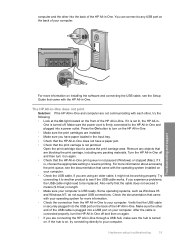
... into the USB port on . Some operating systems, such as Windows 95 and Windows NT, do not support USB connections. Check the documentation that the USB cable is not jammed. Press the On button to turn the HP All-in -One print queue is not paused (Windows) or stopped (Mac). Verify that came with your operating system for more information about accessing the print queue, see if the USB cable works. After the cable is USB ready. Hardware setup troubleshooting 19...
... into the USB port on . Some operating systems, such as Windows 95 and Windows NT, do not support USB connections. Check the documentation that the USB cable is not jammed. Press the On button to turn the HP All-in -One print queue is not paused (Windows) or stopped (Mac). Verify that came with your operating system for more information about accessing the print queue, see if the USB cable works. After the cable is USB ready. Hardware setup troubleshooting 19...
Basics Guide
Page 22
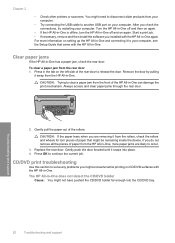
.... Start a print job. • If necessary, remove and then install the software you installed with the HP All-in -One. Always access and clear paper jams through the rear door. 2. Replace the rear door. Remove the door by pulling it away from your computer. • Try connecting the USB cable to your computer, see the Setup Guide that came with the HP All-in -One and connecting it snaps into the CD/DVD tray...
.... Start a print job. • If necessary, remove and then install the software you installed with the HP All-in -One. Always access and clear paper jams through the rear door. 2. Replace the rear door. Remove the door by pulling it away from your computer. • Try connecting the USB cable to your computer, see the Setup Guide that came with the HP All-in -One and connecting it snaps into the CD/DVD tray...

Basics Guide
Page 24
... the design you are printing is not sufficient space behind the HP All-in-One. Load the new disc onto the CD/DVD holder with the printable side up to the white lines on the tray and try your contents again onto a new disc. Change the software settings accordingly to center and size your content onto the CD/DVD, you are loading a regular-size (120 mm) CD...
... the design you are printing is not sufficient space behind the HP All-in-One. Load the new disc onto the CD/DVD holder with the printable side up to the white lines on the tray and try your contents again onto a new disc. Change the software settings accordingly to center and size your content onto the CD/DVD, you are loading a regular-size (120 mm) CD...
Basics Guide
Page 25
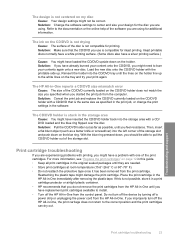
.... Inkjet printable discs normally have a white printing surface. (Some discs also have a silver printing surface.) Cause: You might need to the documentation or the online help of the CD/DVD currently loaded on the holder. Load the new disc onto the CD/DVD holder with the printable side up to center and size your print again. Print cartridge troubleshooting If you do not remove the print cartridges from the print cartridge. Troubleshooting and support Print cartridge troubleshooting...
.... Inkjet printable discs normally have a white printing surface. (Some discs also have a silver printing surface.) Cause: You might need to the documentation or the online help of the CD/DVD currently loaded on the holder. Load the new disc onto the CD/DVD holder with the printable side up to center and size your print again. Print cartridge troubleshooting If you do not remove the print cartridges from the print cartridge. Troubleshooting and support Print cartridge troubleshooting...
Basics Guide
Page 26
... support phone numbers, see the printed documentation that came with the HP All-in -One 3. It is available to qualified online support specialists • Software and driver updates for the HP All-in-One • Valuable HP All-in print quality. HP online support is the fastest source for up-to-date device information and expert assistance and includes the following features: • Fast access to all HP customers. Support options and availability vary by device...
... support phone numbers, see the printed documentation that came with the HP All-in -One 3. It is available to qualified online support specialists • Software and driver updates for the HP All-in-One • Valuable HP All-in print quality. HP online support is the fastest source for up-to-date device information and expert assistance and includes the following features: • Fast access to all HP customers. Support options and availability vary by device...
Basics Guide
Page 27
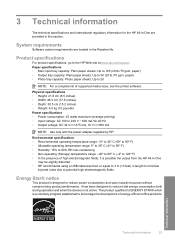
...; Output voltage: DC 32 V===375 mA, 16 V===500 mA NOTE: Use only with the power adapter supplied by HP. It has been designed to reduce total energy consumption both during operation and when the device is a voluntary program established to 125 (20 lb./75 gsm. Paper specifications • Main input tray capacity: Plain paper sheets: Up to encourage the development of supported media sizes...
...; Output voltage: DC 32 V===375 mA, 16 V===500 mA NOTE: Use only with the power adapter supplied by HP. It has been designed to reduce total energy consumption both during operation and when the device is a voluntary program established to 125 (20 lb./75 gsm. Paper specifications • Main input tray capacity: Plain paper sheets: Up to encourage the development of supported media sizes...


