Setup Poster
Page 1
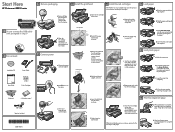
...next step to the left. b. Raise the output and photo trays together. c. Do not touch the copper colored contacts. Insert plain white paper into the device, as shown. 8 Print the alignment page e. a. b. Hold the printhead upright, as shown. Lower the printhead into the main tray ... against the photo paper. Close the ink cartridge access door. After the alignment page is printed, alignment is complete, press OK to turn on the printer or other surface. Start Here HP Photosmart B8500 series 1 Do not connect the USB cable until it off. Remove all tape from...
...next step to the left. b. Raise the output and photo trays together. c. Do not touch the copper colored contacts. Insert plain white paper into the device, as shown. 8 Print the alignment page e. a. b. Hold the printhead upright, as shown. Lower the printhead into the main tray ... against the photo paper. Close the ink cartridge access door. After the alignment page is printed, alignment is complete, press OK to turn on the printer or other surface. Start Here HP Photosmart B8500 series 1 Do not connect the USB cable until it off. Remove all tape from...

Setup Poster
Page 2
...then wait for the desktop to many features of the features using your HP Photosmart software program is not included. Follow the onscreen instructions to print the photo. b. Press the Print Photos button on your computer, you can try out any of your ...appears. English © 2008 Hewlett-Packard Development Company, L.P. Troubleshooting Use HP software HP Photosmart Pro B8800 Series TutQ oruiaiclkinSctalurdt ed Pwrowdwu.chtpi.nco[cmo/usnutrpyp]ort **XXXXXXXXXXXXXX-X--XX XXXXX XXXXXXXX** © 2007 HPDC Print a photo from a memory card Problem: (Windows only) The Microsoft...
...then wait for the desktop to many features of the features using your HP Photosmart software program is not included. Follow the onscreen instructions to print the photo. b. Press the Print Photos button on your computer, you can try out any of your ...appears. English © 2008 Hewlett-Packard Development Company, L.P. Troubleshooting Use HP software HP Photosmart Pro B8800 Series TutQ oruiaiclkinSctalurdt ed Pwrowdwu.chtpi.nco[cmo/usnutrpyp]ort **XXXXXXXXXXXXXX-X--XX XXXXX XXXXXXXX** © 2007 HPDC Print a photo from a memory card Problem: (Windows only) The Microsoft...

Creative Guide
Page 4
Start HP Photosmart Essential, and then click Create . 2. Choose a design for a few minutes before binding, to allow the colors to fully develop. 3 Click . 3. Click a text area on a photo to move, scale, or rotate it. 8. Click on a page to add captions....Select the desired print settings, and then click Print. * HP Photo Books provide an attractive way to display your photo book. 9. Select the photos you can insert into HP Photo Books*, or into the printer. 11. Click Create to save your photo pages. Available online at www.hp.com in several colors. Choose a ...
Start HP Photosmart Essential, and then click Create . 2. Choose a design for a few minutes before binding, to allow the colors to fully develop. 3 Click . 3. Click a text area on a photo to move, scale, or rotate it. 8. Click on a page to add captions....Select the desired print settings, and then click Print. * HP Photo Books provide an attractive way to display your photo book. 9. Select the photos you can insert into HP Photo Books*, or into the printer. 11. Click Create to save your photo pages. Available online at www.hp.com in several colors. Choose a ...
Creative Guide
Page 5
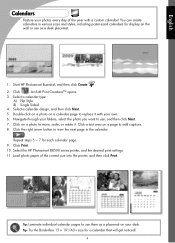
... create calendars in the calendar. ArcSoft Print Creations™ opens. 3. Click the right arrow button to add captions. 8. Repeat steps 5 − 7 for a calendar that will get noticed! 4 Tip: Laminate individual calendar pages to replace it . Start HP Photosmart Essential, and then click Create . ... as a desk placemat. 1. Navigate through your photos every day of the correct size into the printer, and then click Print. Select the HP Photosmart B8500 series printer, and the desired print settings. 11. Load photo paper of the year with your desk. B) Single Sided. 4. Click...
... create calendars in the calendar. ArcSoft Print Creations™ opens. 3. Click the right arrow button to add captions. 8. Repeat steps 5 − 7 for a calendar that will get noticed! 4 Tip: Laminate individual calendar pages to replace it . Start HP Photosmart Essential, and then click Create . ... as a desk placemat. 1. Navigate through your photos every day of the correct size into the printer, and then click Print. Select the HP Photosmart B8500 series printer, and the desired print settings. 11. Load photo paper of the year with your desk. B) Single Sided. 4. Click...

Creative Guide
Page 6
... to use a piece of clear vinyl material (available at the top center of the placemat. • Commonly-available fabric placemats in other languages. 1. Laminate the printed pages. Select the HP Photosmart B8500 series printer, and set the paper size to protect your prints. English Placemats Add to the fun of the festivities for your placemat. 6.
... to use a piece of clear vinyl material (available at the top center of the placemat. • Commonly-available fabric placemats in other languages. 1. Laminate the printed pages. Select the HP Photosmart B8500 series printer, and set the paper size to protect your prints. English Placemats Add to the fun of the festivities for your placemat. 6.

Creative Guide
Page 7
Click . Click the arrow buttons to add custom text and click Print. 8. Start HP Photosmart Essential, and then click Create . 2. Select a card design, and then click Next. 5. Select the HP Photosmart B8500 series printer, and set the paper size. 9. More card designs are available in English only. Choose a card category on a photo placeholder to ...in the software! 6 Navigate through your special photos and a personalized message. Double-click on the left pane of the correct size into the printer, and then click Print. ArcSoft Print Creations™ opens. 3.
Click . Click the arrow buttons to add custom text and click Print. 8. Start HP Photosmart Essential, and then click Create . 2. Select a card design, and then click Next. 5. Select the HP Photosmart B8500 series printer, and set the paper size. 9. More card designs are available in English only. Choose a card category on a photo placeholder to ...in the software! 6 Navigate through your special photos and a personalized message. Double-click on the left pane of the correct size into the printer, and then click Print. ArcSoft Print Creations™ opens. 3.

Creative Guide
Page 8
Press OK again to modify, and press OK. 3. More frame designs are available on the control panel and then press OK to print. Select a frame, and then press OK. 7. Select View , then navigate to the photo you want to display the Photo Options menu. 4. Insert a memory card containing your photo with a decorative border that sets it apart. Select Edit Photo, and then press OK. 5. English Frames Frame your photos into the printer. 2. Each frame is available in a landscape and a portrait version. 1. Press on the printer! 7 Select Add Frame, and then press OK. 6.
Press OK again to modify, and press OK. 3. More frame designs are available on the control panel and then press OK to print. Select a frame, and then press OK. 7. Select View , then navigate to the photo you want to display the Photo Options menu. 4. Insert a memory card containing your photo with a decorative border that sets it apart. Select Edit Photo, and then press OK. 5. English Frames Frame your photos into the printer. 2. Each frame is available in a landscape and a portrait version. 1. Press on the printer! 7 Select Add Frame, and then press OK. 6.

Creative Guide
Page 9
...The recommended number of pages if desired, and then press OK to leave out the cover page. 6. English Album Pages Print eye-catching album pages directly from the printer control panel. Press OK to select the photo. 7. You can then bind multiple album pages to continue. 9. Press ...prompted, select a page orientation and then press OK. 5. This option enables you select more photos than will fit on one page, the printer will create the best looking album is displayed. I want to include in your photos into an attractive layout. Change the number of pages that ...
...The recommended number of pages if desired, and then press OK to leave out the cover page. 6. English Album Pages Print eye-catching album pages directly from the printer control panel. Press OK to select the photo. 7. You can then bind multiple album pages to continue. 9. Press ...prompted, select a page orientation and then press OK. 5. This option enables you select more photos than will fit on one page, the printer will create the best looking album is displayed. I want to include in your photos into an attractive layout. Change the number of pages that ...

Creative Guide
Page 10
... into the main tray. 2. Original Black & White Sepia Antique 9 English Printable School Papers Ran out of a photo by applying a color effect. 1. You can print notebook papers in narrow, wide, or child rule from the HP Photosmart B8500 series printer and save a trip to the store. Select View , then navigate to the photo you want to...
... into the main tray. 2. Original Black & White Sepia Antique 9 English Printable School Papers Ran out of a photo by applying a color effect. 1. You can print notebook papers in narrow, wide, or child rule from the HP Photosmart B8500 series printer and save a trip to the store. Select View , then navigate to the photo you want to...

Creative Guide
Page 28
www.hp.com Printed in [country]. Imprimé en [pays]. © 2008 Hewlett-Packard Development Company, L.P. *CB981-90037* *CB981-90037* CB981-90037
www.hp.com Printed in [country]. Imprimé en [pays]. © 2008 Hewlett-Packard Development Company, L.P. *CB981-90037* *CB981-90037* CB981-90037
User Guide
Page 4
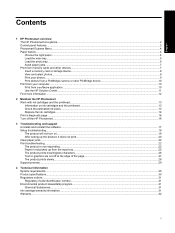
......8 View and select photos...8 Print your photos...9 Print photos from a PictBridge camera or other PictBridge device 10 Print from your computer...10 Print from a software application...10 Use the HP Solution Center...11 Find more information...12 2 Maintain the HP Photosmart Work with ink cartridges and the... ink cartridges and the printhead...13 Check the estimated ink levels...13 Replace the ink cartridges...14 Print a diagnostic page...16 Turn off the HP Photosmart...16 3 Troubleshooting and support Uninstall and reinstall the software...17 Setup troubleshooting...18 The product will...
......8 View and select photos...8 Print your photos...9 Print photos from a PictBridge camera or other PictBridge device 10 Print from your computer...10 Print from a software application...10 Use the HP Solution Center...11 Find more information...12 2 Maintain the HP Photosmart Work with ink cartridges and the... ink cartridges and the printhead...13 Check the estimated ink levels...13 Replace the ink cartridges...14 Print a diagnostic page...16 Turn off the HP Photosmart...16 3 Troubleshooting and support Uninstall and reinstall the software...17 Setup troubleshooting...18 The product will...

User Guide
Page 6
...Attention light: Indicates a problem occurred. If you access your photos from the View, Print, or Create menu, the Print Photos button will display the Print Preview screen or it . On: Turns the HP Photosmart on whether you press this button together with your card or storage device. The ...screens other than Idle, the Help button provides context sensitive help is present. Print Photos: Depending on or off . If no photos are zooming in on , the HP Photosmart automatically corrects red eye coloring in to enlarge the image on the directional pad to learn more about it ...
...Attention light: Indicates a problem occurred. If you access your photos from the View, Print, or Create menu, the Print Photos button will display the Print Preview screen or it . On: Turns the HP Photosmart on whether you press this button together with your card or storage device. The ...screens other than Idle, the Help button provides context sensitive help is present. Print Photos: Depending on or off . If no photos are zooming in on , the HP Photosmart automatically corrects red eye coloring in to enlarge the image on the directional pad to learn more about it ...

User Guide
Page 7
... on a memory card. To access the onscreen Help, see the onscreen Help. When you view, edit, and print photos on page 12. • Save: Lets you save photos from 7.6 x 12.7 cm to 33 x... envelopes. Press OK to highlight the option, and then press OK. Paper basics The HP Photosmart printer supports paper sizes ranging from the memory card directly to the computer. CAUTION: Do not... and type of available HP inkjet paper, or to purchase supplies, go to: • www.hpshopping.com (U.S.) • www.hp.com/eur/hpoptions (Europe) 4 HP Photosmart overview For more information on...
... on a memory card. To access the onscreen Help, see the onscreen Help. When you view, edit, and print photos on page 12. • Save: Lets you save photos from 7.6 x 12.7 cm to 33 x... envelopes. Press OK to highlight the option, and then press OK. Paper basics The HP Photosmart printer supports paper sizes ranging from the memory card directly to the computer. CAUTION: Do not... and type of available HP inkjet paper, or to purchase supplies, go to: • www.hpshopping.com (U.S.) • www.hp.com/eur/hpoptions (Europe) 4 HP Photosmart overview For more information on...

User Guide
Page 8
...print High quality, long lasting prints and enlargements Printhead alignment Casual photos from these high-quality HP photo papers. To load the main tray 1. English • www.hp.com/jp/supply_inkjet (Japan) • www.hp.com/paper (Asia/Pacific) To get the best and longest-lasting results from the printer..., choose from e-mail and the Web Text documents, draft versions, and test pages Use this paper or media HP Advanced Photo ...available in all countries/regions or in every paper size.) Plain paper HP Everyday Photo paper or plain paper Plain paper Load the main tray ...
...print High quality, long lasting prints and enlargements Printhead alignment Casual photos from these high-quality HP photo papers. To load the main tray 1. English • www.hp.com/jp/supply_inkjet (Japan) • www.hp.com/paper (Asia/Pacific) To get the best and longest-lasting results from the printer..., choose from e-mail and the Web Text documents, draft versions, and test pages Use this paper or media HP Advanced Photo ...available in all countries/regions or in every paper size.) Plain paper HP Everyday Photo paper or plain paper Plain paper Load the main tray ...
User Guide
Page 9
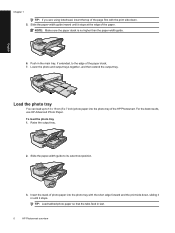
...paper-width guide to 13 x 18 cm (5 x 7 inch) photo paper into the photo tray with the print side down , sliding it in until it stops. Lower the photo and output trays together, and then extend the... output tray. For the best results, use HP Advanced Photo Paper. TIP: Load tabbed photo paper so that the tabs feed in the main tray, ... If you are using letterhead, insert the top of the page first with the short edge forward and the print side down . 5. Load the photo tray You can load up to its outermost position. 3. Insert the ...
...paper-width guide to 13 x 18 cm (5 x 7 inch) photo paper into the photo tray with the print side down , sliding it in until it stops. Lower the photo and output trays together, and then extend the... output tray. For the best results, use HP Advanced Photo Paper. TIP: Load tabbed photo paper so that the tabs feed in the main tray, ... If you are using letterhead, insert the top of the page first with the short edge forward and the print side down . 5. Load the photo tray You can load up to its outermost position. 3. Insert the ...

User Guide
Page 10
...not force paper too far forward in the input tray lays flat and the edges are recommended for the product. When you print from a digital camera, the printer uses the settings that you lower the output tray completely, or the photo tray may not work correctly. Make sure you selected...For more than the paper-width guide. 5. Avoid paper jams To help avoid paper jams, follow these guidelines. • Remove printed papers from memory cards and other devices The HP Photosmart is connected to a computer with memory card slots and a front USB port that are not bent or torn. • If ...
...not force paper too far forward in the input tray lays flat and the edges are recommended for the product. When you print from a digital camera, the printer uses the settings that you lower the output tray completely, or the photo tray may not work correctly. Make sure you selected...For more than the paper-width guide. 5. Avoid paper jams To help avoid paper jams, follow these guidelines. • Remove printed papers from memory cards and other devices The HP Photosmart is connected to a computer with memory card slots and a front USB port that are not bent or torn. • If ...

User Guide
Page 11
...1. NOTE: The product only recognizes the JPG and TIF file formats on your photos. Chapter 1 Insert a memory card or storage device The HP Photosmart supports memory cards and storage devices as described below. CAUTION: Do not insert more than one memory card at a time. Each type of ...memory card can view your memory card or storage device before or while printing them. Picture Card type M, xD-Picture Card type H, Secure Digital (SD), Secure Digital Mini (adapter required), SD micro (or Transflash), Secure...
...1. NOTE: The product only recognizes the JPG and TIF file formats on your photos. Chapter 1 Insert a memory card or storage device The HP Photosmart supports memory cards and storage devices as described below. CAUTION: Do not insert more than one memory card at a time. Each type of ...memory card can view your memory card or storage device before or while printing them. Picture Card type M, xD-Picture Card type H, Secure Digital (SD), Secure Digital Mini (adapter required), SD micro (or Transflash), Secure...

User Guide
Page 12
... panel). Insert the memory card or connect the photo storage device. The Photosmart Express menu appears, with the most recent photo shown on the control panel twice. 1. English View Print Create Save 3. The total number of your photos TIP: To print a single borderless 10 x 15 cm (4 x 6 inch) photo on 10 x 15 cm (4 x 6 inch...
... panel). Insert the memory card or connect the photo storage device. The Photosmart Express menu appears, with the most recent photo shown on the control panel twice. 1. English View Print Create Save 3. The total number of your photos TIP: To print a single borderless 10 x 15 cm (4 x 6 inch) photo on 10 x 15 cm (4 x 6 inch...

User Guide
Page 13
... the back) to be used with any software application that came with the camera. Print from a software application To print from the printer (using the USB cable that came with your software application, click Print. 10 HP Photosmart overview For more information. Before printing from your camera to select a photo, and then press OK. 5. See the camera...
... the back) to be used with any software application that came with the camera. Print from a software application To print from the printer (using the USB cable that came with your software application, click Print. 10 HP Photosmart overview For more information. Before printing from your camera to select a photo, and then press OK. 5. See the camera...
User Guide
Page 14
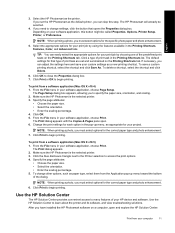
... of the predefined print tasks on a computer, open . 6. Use the HP Solution Center to begin printing. Select the HP Photosmart as appropriate for each option in your computer 11 The HP Photosmart will already be called Properties, Options, Printer Setup, Printer, or Preferences. To print from a software application.... 4. Change the print settings for your software application, this step. To print from a software application (Mac OS X v10.4) 1. From the File menu in the pop-up menu toward the bottom of print task in the Printing Shortcuts, Features, Color, and Advanced tabs....
... of the predefined print tasks on a computer, open . 6. Use the HP Solution Center to begin printing. Select the HP Photosmart as appropriate for each option in your computer 11 The HP Photosmart will already be called Properties, Options, Printer Setup, Printer, or Preferences. To print from a software application.... 4. Change the print settings for your software application, this step. To print from a software application (Mac OS X v10.4) 1. From the File menu in the pop-up menu toward the bottom of print task in the Printing Shortcuts, Features, Color, and Advanced tabs....


