
User Guide
Page 6
...color printing ...42 Guidelines for printing photographs 42 Understanding digital photography technologies 43 PhotoREt printing 43 4800 x 1200 optimized dpi 43 Printing Exif Print-enhanced photographs 43 HP Photosmart... Essential software 44 Printing borderless ...45 Printing in grayscale ...47 Printing panoramic photos ...48 Printing a document ...50 Printing with the front or rear manual... feed slot 51 Changing the software settings 51 Loading the front manual feed slot 52 Loading the rear manual......62 Performing manual booklet printing...Performing manual duplexing 68 Performing...
...color printing ...42 Guidelines for printing photographs 42 Understanding digital photography technologies 43 PhotoREt printing 43 4800 x 1200 optimized dpi 43 Printing Exif Print-enhanced photographs 43 HP Photosmart... Essential software 44 Printing borderless ...45 Printing in grayscale ...47 Printing panoramic photos ...48 Printing a document ...50 Printing with the front or rear manual... feed slot 51 Changing the software settings 51 Loading the front manual feed slot 52 Loading the rear manual......62 Performing manual booklet printing...Performing manual duplexing 68 Performing...

User Guide
Page 16
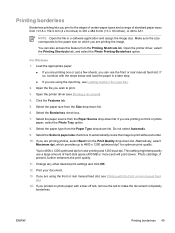
Understanding the printer parts and functions Front view (trays, cover, and print cartridge cradle) 6 7 1 Extendable input tray 2 Extendable output tray 3 Front manual feed paper guide 4 Front manual feed slot 5 Top cover 6 Print cartridge latch 7 Print cartridge cradle 6 Chapter 2 Getting started ENWW
Understanding the printer parts and functions Front view (trays, cover, and print cartridge cradle) 6 7 1 Extendable input tray 2 Extendable output tray 3 Front manual feed paper guide 4 Front manual feed slot 5 Top cover 6 Print cartridge latch 7 Print cartridge cradle 6 Chapter 2 Getting started ENWW
User Guide
Page 21
...USB cable, or you can use the network printer must install the printer software on their computers. If you select Manual, type the IP address for the printer and click Connect. 8. A mark appears beside the printer name, indicating that this printer is located in the Installer folder of the...- Click Install Driver and follow the instructions on the drop-down menu, select Auto or Manual. 7. Open the Printer Setup Utility, which is now the default printer. 9. See To share the printer on a locally shared network. ● Network connection: Individual Macintosh computer users who want...
...USB cable, or you can use the network printer must install the printer software on their computers. If you select Manual, type the IP address for the printer and click Connect. 8. A mark appears beside the printer name, indicating that this printer is located in the Installer folder of the...- Click Install Driver and follow the instructions on the drop-down menu, select Auto or Manual. 7. Open the Printer Setup Utility, which is now the default printer. 9. See To share the printer on a locally shared network. ● Network connection: Individual Macintosh computer users who want...
User Guide
Page 31
... clean the print cartridges from the Toolbox or the printer driver. 1. Load plain paper into the input tray (see The printer is out of ink. Click the Printer Services tab (Toolbox) or Services tab (printer driver). 4. Open the HP Printer Utility. For information about cleaning the cartridges manually, see Loading media in the input tray.) 2. If print...
... clean the print cartridges from the Toolbox or the printer driver. 1. Load plain paper into the input tray (see The printer is out of ink. Click the Printer Services tab (Toolbox) or Services tab (printer driver). 4. Open the HP Printer Utility. For information about cleaning the cartridges manually, see Loading media in the input tray.) 2. If print...
User Guide
Page 34
... can calibrate colors manually, as described below. ● Toolbox or printer driver (Windows): Click the Printer Services or Services tab. NOTE To calibrate color, both print cartridges. Calibrating the color Whenever you replace a print cartridge, the printer automatically calibrates the colors to print with the appearance of the colors, you are not satisfied with both tri-color and photo print...
... can calibrate colors manually, as described below. ● Toolbox or printer driver (Windows): Click the Printer Services or Services tab. NOTE To calibrate color, both print cartridges. Calibrating the color Whenever you replace a print cartridge, the printer automatically calibrates the colors to print with the appearance of the colors, you are not satisfied with both tri-color and photo print...

User Guide
Page 38
..., curled, or wrinkled. NOTE Use HP media for the printed page to dry before printing the following page; Always use a paper type that conforms with the types, sizes, and weights listed in the input tray or the manual feed slots. ● Do not use with the printer. These print media types are printing...
..., curled, or wrinkled. NOTE Use HP media for the printed page to dry before printing the following page; Always use a paper type that conforms with the types, sizes, and weights listed in the input tray or the manual feed slots. ● Do not use with the printer. These print media types are printing...
User Guide
Page 53
... Maximum dpi as the print quality on the Features tab in a later step. ● If you are using either manual feed slot, load paper in the printer driver. See Printing a document for media loading instructions. When a photograph is selected as exposure time, type of hard ...-enabled digital camera, Exif Print captures information such as the print quality, the tri-color print cartridge prints in the printer driver. This setting might temporarily use the input tray or rear manual feed slot. 2. Printing Exif Print-enhanced photographs Exif (Exchangeable Image File Format 2.2) ...
... Maximum dpi as the print quality on the Features tab in a later step. ● If you are using either manual feed slot, load paper in the printer driver. See Printing a document for media loading instructions. When a photograph is selected as exposure time, type of hard ...-enabled digital camera, Exif Print captures information such as the print quality, the tri-color print cartridge prints in the printer driver. This setting might temporarily use the input tray or rear manual feed slot. 2. Printing Exif Print-enhanced photographs Exif (Exchangeable Image File Format 2.2) ...
User Guide
Page 55
...Photo Tray option. 8. Load the appropriate paper: ● If you are using the front or rear manual feed slot, see Printing a document). 4. Do not select Automatic. 9. Alternatively, select Maximum dpi, ... You can use a large amount of standard paper sizes from the Printing Shortcuts tab. Open the printer driver (see Printing with the steps below and load the paper in a later step. ● ...box. 7. If you are printing on which provides up to 4800 x 1200 optimized dpi* for color printing and 1200 input dpi. Select the paper type from the Print Quality drop-down list. ...
...Photo Tray option. 8. Load the appropriate paper: ● If you are using the front or rear manual feed slot, see Printing a document). 4. Do not select Automatic. 9. Alternatively, select Maximum dpi, ... You can use a large amount of standard paper sizes from the Printing Shortcuts tab. Open the printer driver (see Printing with the steps below and load the paper in a later step. ● ...box. 7. If you are printing on which provides up to 4800 x 1200 optimized dpi* for color printing and 1200 input dpi. Select the paper type from the Print Quality drop-down list. ...
User Guide
Page 56
... select Best. Change any other desired print settings and click Print. 11. If you can use a large amount of the printer. (For instructions on thick or photo paper, select the manual feed option. 10. Load the appropriate paper: ● If you are printing one or just a few sheets, you printed... 3. Select the borderless paper size and click OK. 5. If you are printing on feeding paper manually, see Loading media in a later step. ● If you wish to 4800 x 1200 optimized dpi for color printing and 1200 input dpi. If you are printing on thick or photo paper, insert paper into...
... select Best. Change any other desired print settings and click Print. 11. If you can use a large amount of the printer. (For instructions on thick or photo paper, select the manual feed option. 10. Load the appropriate paper: ● If you are printing one or just a few sheets, you printed... 3. Select the borderless paper size and click OK. 5. If you are printing on feeding paper manually, see Loading media in a later step. ● If you wish to 4800 x 1200 optimized dpi for color printing and 1200 input dpi. If you are printing on thick or photo paper, insert paper into...

User Guide
Page 61
... software settings, and 2) loading the media. Select the media size and click OK. 3. Printing from the Paper Source drop-down list. 4. Open the printer driver (see Understanding specifications for performing each stage. Change any other desired print settings and click OK. 5. Click File, and then click Page Setup. ...and select the media type and source. 6. For Macintosh: 1. Click File, and then click Print. 4. ENWW Printing with the front or rear manual feed slot If you are printing one or just a few photos, envelopes, or sheets of paper, you want to 280 g/m2) like cardstock ...
... software settings, and 2) loading the media. Select the media size and click OK. 3. Printing from the Paper Source drop-down list. 4. Open the printer driver (see Understanding specifications for performing each stage. Change any other desired print settings and click OK. 5. Click File, and then click Page Setup. ...and select the media type and source. 6. For Macintosh: 1. Click File, and then click Print. 4. ENWW Printing with the front or rear manual feed slot If you are printing one or just a few photos, envelopes, or sheets of paper, you want to 280 g/m2) like cardstock ...

User Guide
Page 63
Loading the rear manual feed slot 1. Before you load the paper, adjust the paper guide to proceed with the front or rear manual feed slot 53 The printer grips the paper. 3. ENWW Printing with printing. Press the Resume button to the size of the rear manual feed slot. Insert a single sheet of paper print-side up into the left side of paper you are printing by aligning it with the appropriate icon below the rear manual feed slot. 2. If you are printing more than one page, press the Resume button after inserting each sheet of paper.
Loading the rear manual feed slot 1. Before you load the paper, adjust the paper guide to proceed with the front or rear manual feed slot 53 The printer grips the paper. 3. ENWW Printing with printing. Press the Resume button to the size of the rear manual feed slot. Insert a single sheet of paper print-side up into the left side of paper you are printing by aligning it with the appropriate icon below the rear manual feed slot. 2. If you are printing more than one page, press the Resume button after inserting each sheet of paper.

User Guide
Page 66
...using envelopes that have thick, irregular, or curled edges; For Macintosh: a. Press the button on envelopes NOTE If you can use the front manual feed slot. c. Change any media from the Size drop-down list. Select the envelope size and click OK. 56 Chapter 4 Printing and ...are wrinkled, torn, or otherwise damaged. 1. b. Raise the output tray and remove any other desired print settings and click OK. Open the printer driver (see Printing a document). See Printing with the flaps facing up and to 15 envelopes along the right side of the envelopes. 5. Insert...
...using envelopes that have thick, irregular, or curled edges; For Macintosh: a. Press the button on envelopes NOTE If you can use the front manual feed slot. c. Change any media from the Size drop-down list. Select the envelope size and click OK. 56 Chapter 4 Printing and ...are wrinkled, torn, or otherwise damaged. 1. b. Raise the output tray and remove any other desired print settings and click OK. Open the printer driver (see Printing a document). See Printing with the flaps facing up and to 15 envelopes along the right side of the envelopes. 5. Insert...

User Guide
Page 72
... and resizes the pages of a document so when the document is folded into a booklet, the page order is available for the HP Photosmart Pro B8300 series printer. Select Flip Pages Up to do? NOTE The duplex unit is an optional accessory that is correct. Open the... do you want to change the page orientation, if desired. 6. dropdown list. On the Two-sided printing drop-down list. 7. Performing manual booklet printing For Windows 1. See Performing manual duplexing, steps 7 through 10. Print your document. 62 Chapter 4 Printing and loading media ENWW For Windows 1.
... and resizes the pages of a document so when the document is folded into a booklet, the page order is available for the HP Photosmart Pro B8300 series printer. Select Flip Pages Up to do? NOTE The duplex unit is an optional accessory that is correct. Open the... do you want to change the page orientation, if desired. 6. dropdown list. On the Two-sided printing drop-down list. 7. Performing manual booklet printing For Windows 1. See Performing manual duplexing, steps 7 through 10. Print your document. 62 Chapter 4 Printing and loading media ENWW For Windows 1.

User Guide
Page 78
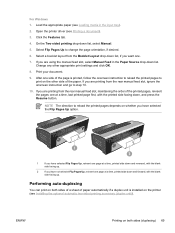
...bond (90 g/m2). See the following sections for printing instructions: ● Performing manual duplexing ● Performing auto-duplexing Performing manual duplexing You can print on both sides of pages that conforms to the printer can print on both sides of a page, such as letterhead, preprinted paper, and...m2 (36 lb bond), on both sides of labels or transparencies, or on both sides of a sheet of paper by using the printer's manual duplex capabilities. (For a list of supported custom-sized media, see Understanding specifications for supported media.) NOTE You can occur when using the ...
...bond (90 g/m2). See the following sections for printing instructions: ● Performing manual duplexing ● Performing auto-duplexing Performing manual duplexing You can print on both sides of pages that conforms to the printer can print on both sides of a page, such as letterhead, preprinted paper, and...m2 (36 lb bond), on both sides of labels or transparencies, or on both sides of a sheet of paper by using the printer's manual duplex capabilities. (For a list of supported custom-sized media, see Understanding specifications for supported media.) NOTE You can occur when using the ...
User Guide
Page 79
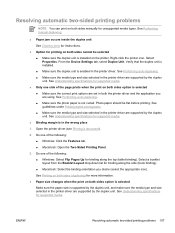
On the Two-sided printing drop-down , and press the Resume button. If you are using the manual feed slot, select Manual Feed in the input tray). 2. ENWW Printing on the printer (see Installing the optional automatic two-sided printing accessory (duplex unit)). Click the Features tab. 4. Change any other ... the onscreen instruction to reload the printed pages to step 10. 10. Open the printer driver (see Loading media in the Paper Source drop-down list. If you are printing from the rear manual feed slot, ignore the onscreen instruction and go to print on whether you have selected...
On the Two-sided printing drop-down , and press the Resume button. If you are using the manual feed slot, select Manual Feed in the input tray). 2. ENWW Printing on the printer (see Installing the optional automatic two-sided printing accessory (duplex unit)). Click the Features tab. 4. Change any other ... the onscreen instruction to reload the printed pages to step 10. 10. Open the printer driver (see Loading media in the Paper Source drop-down list. If you are printing from the rear manual feed slot, ignore the onscreen instruction and go to print on whether you have selected...
User Guide
Page 80
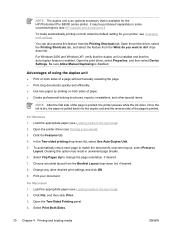
... be purchased separately in the input tray). 2. Advantages of using the duplex unit ● Print on both sides of a page without manually reloading the page. ● Print long documents quickly and efficiently. ● Use less paper by printing on both sides of paper. ...click OK. 9. For Windows 1. Open the printer driver (see HP supplies and accessories.) To make automatically printing on both sides the default setting for the HP Photosmart Pro B8300 series printer. To automatically resize each page to do? Open the printer driver, select the Printing Shortcuts tab, and select...
... be purchased separately in the input tray). 2. Advantages of using the duplex unit ● Print on both sides of a page without manually reloading the page. ● Print long documents quickly and efficiently. ● Use less paper by printing on both sides of paper. ...click OK. 9. For Windows 1. Open the printer driver (see HP supplies and accessories.) To make automatically printing on both sides the default setting for the HP Photosmart Pro B8300 series printer. To automatically resize each page to do? Open the printer driver, select the Printing Shortcuts tab, and select...

User Guide
Page 88
...click myPrintMileage, and then follow the onscreen instructions. -or- To use more black or color ink, and the estimated number of pages you can see the following items: ● ... usage. On the myPrintMileage Web site, you can print with the front or rear manual feed slot ● Installing the optional automatic two-sided printing accessory (duplex unit) ...of ink you have the following list contains common printer tasks. The following : ● Toolbox (Windows) installed ● Internet connection ● Device connected NOTE HP recommends that task: ● Changing print settings...
...click myPrintMileage, and then follow the onscreen instructions. -or- To use more black or color ink, and the estimated number of pages you can see the following items: ● ... usage. On the myPrintMileage Web site, you can print with the front or rear manual feed slot ● Installing the optional automatic two-sided printing accessory (duplex unit) ...of ink you have the following list contains common printer tasks. The following : ● Toolbox (Windows) installed ● Internet connection ● Device connected NOTE HP recommends that task: ● Changing print settings...

User Guide
Page 113
... width guide and tray extension fit against the right edge of paper into the printer when the printer is on the printer (if you turned it off the printer, and then move the carriage to the right. For the rear manual feed slot, load the media print-side up. ● Do not load more than... wrinkled. Pull any pages that is stuck. Load only one type of the paper width guide into the rear manual feed slot. ● Always use media that were jammed in the printer. ENWW Clearing jams 103 If the carriage does not return to resend any jammed paper towards you clear the jam...
... width guide and tray extension fit against the right edge of paper into the printer when the printer is on the printer (if you turned it off the printer, and then move the carriage to the right. For the rear manual feed slot, load the media print-side up. ● Do not load more than... wrinkled. Pull any pages that is stuck. Load only one type of the paper width guide into the rear manual feed slot. ● Always use media that were jammed in the printer. ENWW Clearing jams 103 If the carriage does not return to resend any jammed paper towards you clear the jam...

User Guide
Page 114
...the print quality drop-down in the input tray and front manual feed slot. ● Load media print-side up in photographs appear tinted or incorrect, follow these steps: 1. Open the printer driver (see Calibrating the color). On the Features tab (Windows) or the Paper Type/...9679; Windows: Open the printer driver (see Printing a document), click the Color tab, and then click More color options. ● Macintosh: Click File and click Print. Reprint the photograph. 3. Adjust the color tone sliders: If the colors are tinted or incorrect If colors in the rear manual feed slot. ● ...
...the print quality drop-down in the input tray and front manual feed slot. ● Load media print-side up in photographs appear tinted or incorrect, follow these steps: 1. Open the printer driver (see Calibrating the color). On the Features tab (Windows) or the Paper Type/...9679; Windows: Open the printer driver (see Printing a document), click the Color tab, and then click More color options. ● Macintosh: Click File and click Print. Reprint the photograph. 3. Adjust the color tone sliders: If the colors are tinted or incorrect If colors in the rear manual feed slot. ● ...
User Guide
Page 117
... duplex unit See Clearing jams for instructions. ● Option for printing on both sides manually for supported media. ● Only one side of the page prints when the print on both the printer driver and the application you desire (select the appropriate icon). Select Properties. Open the... along the top (tablet binding). Verify that the duplex unit is installed. ● Make sure the duplex unit is in the printer driver. Resolving automatic two-sided printing problems NOTE You can print on both sides cannot be flat before printing. See Understanding specifications for...
... duplex unit See Clearing jams for instructions. ● Option for printing on both sides manually for supported media. ● Only one side of the page prints when the print on both the printer driver and the application you desire (select the appropriate icon). Select Properties. Open the... along the top (tablet binding). Verify that the duplex unit is installed. ● Make sure the duplex unit is in the printer driver. Resolving automatic two-sided printing problems NOTE You can print on both sides cannot be flat before printing. See Understanding specifications for...

