
User Guide
Page 10
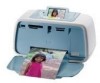
Control panel buttons and indicator lights Figure 2-2 Control panel The HP Photosmart at a glance Figure 2-1 Printer parts Label 1 2 3 4 Description Control panel: Control the basic functions of the printer from here. Power cord connection: Connect the power cord here. Output tray (closed): Open this port to connect the printer to print, insert a memory card, connect a compatible digital camera, or access the print cartridge area. The HP Photosmart at a glance 9 USB port: Use this to a computer using the supplied USB cable.
Control panel buttons and indicator lights Figure 2-2 Control panel The HP Photosmart at a glance Figure 2-1 Printer parts Label 1 2 3 4 Description Control panel: Control the basic functions of the printer from here. Power cord connection: Connect the power cord here. Output tray (closed): Open this port to connect the printer to print, insert a memory card, connect a compatible digital camera, or access the print cartridge area. The HP Photosmart at a glance 9 USB port: Use this to a computer using the supplied USB cable.

Basics Guide
Page 14
...-2121 (North America), 120 Vac (±10%) 60 Hz (±3 Hz) HP Part # 0957-2120 (Rest of world), 100-240 Vac (±10%) 50/60 Hz (±3 Hz) Media sizes Photo paper 10 x 15 cm (4 x 6 inches) Photo paper ... photo paper, maximum thickness 292 µm (11.5 mil) per sheet 10 sheets of 10 x 30 cm (4 x 12 inches) photo paper for panoramic printing English 14 HP Photosmart A520 series
...-2121 (North America), 120 Vac (±10%) 60 Hz (±3 Hz) HP Part # 0957-2120 (Rest of world), 100-240 Vac (±10%) 50/60 Hz (±3 Hz) Media sizes Photo paper 10 x 15 cm (4 x 6 inches) Photo paper ... photo paper, maximum thickness 292 µm (11.5 mil) per sheet 10 sheets of 10 x 30 cm (4 x 12 inches) photo paper for panoramic printing English 14 HP Photosmart A520 series


