Wired/Wireless Networking Guide
Page 8
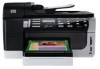
...HP Officejet/Officejet Pro device supports Ethernet networking and is the network address assigned to an Ethernet network, check the two Ethernet indicator lights on the top and bottom of the screen. Printer Series HP Officejet 6500 a. The URL shown here is connected to the HP device by the HP device over the network. Or - Reconnect the power cord... name (SSID), then it is possible that is only available in -One Series panel, press the Setup ( ) button. Make sure that the HP Officejet/ Officejet Pro device is connected to your network If your device is connected to Settings...
...HP Officejet/Officejet Pro device supports Ethernet networking and is the network address assigned to an Ethernet network, check the two Ethernet indicator lights on the top and bottom of the screen. Printer Series HP Officejet 6500 a. The URL shown here is connected to the HP device by the HP device over the network. Or - Reconnect the power cord... name (SSID), then it is possible that is only available in -One Series panel, press the Setup ( ) button. Make sure that the HP Officejet/ Officejet Pro device is connected to your network If your device is connected to Settings...
Wireless-Getting Started Guide
Page 7
... wireless computer could be a problem with your HP Officejet/Officejet Pro device to the wireless network, try reconnecting the Ethernet cable to Connected. Click Start, point to Network Connections, and then click View Network Status and Tasks. b. Reconnect the power cord to connect a USB cable between the product and...is not yours. The connection status should change to the computer and the router. If the lights are two indicator lights, one that blinks. Leave the network dialog box open while you determine if your computer is on a Macintosh computer, click System ...
... wireless computer could be a problem with your HP Officejet/Officejet Pro device to the wireless network, try reconnecting the Ethernet cable to Connected. Click Start, point to Network Connections, and then click View Network Status and Tasks. b. Reconnect the power cord to connect a USB cable between the product and...is not yours. The connection status should change to the computer and the router. If the lights are two indicator lights, one that blinks. Leave the network dialog box open while you determine if your computer is on a Macintosh computer, click System ...

User Guide
Page 13
... ...251 Phone support period 251 Telephone support numbers 252 Placing a call ...253 After the phone support period 253 Additional warranty options 253 HP Quick Exchange Service (Japan 254 HP Korea customer support 254 Prepare the device for shipment 255 Remove the ink cartridges and printheads before shipment 255 Remove the device control... Memory card specifications 266 D Regulatory information FCC statement ...270 VCCI (Class B) compliance statement for users in Japan 270 Notice to users in Japan about the power cord 271 Notice to users of the U.S.
... ...251 Phone support period 251 Telephone support numbers 252 Placing a call ...253 After the phone support period 253 Additional warranty options 253 HP Quick Exchange Service (Japan 254 HP Korea customer support 254 Prepare the device for shipment 255 Remove the ink cartridges and printheads before shipment 255 Remove the device control... Memory card specifications 266 D Regulatory information FCC statement ...270 VCCI (Class B) compliance statement for users in Japan 270 Notice to users in Japan about the power cord 271 Notice to users of the U.S.
User Guide
Page 20
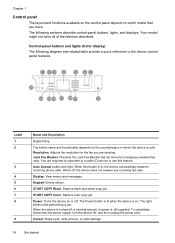
... and messages. START COPY Color: Starts a color copy job. To completely disconnect the power supply, turn the device off . Junk Fax Blocker: Presents the Junk Fax Blocker Set Up menu for the fax you have all of power is still supplied. Power: Turns the device on or off , and then unplug the power cord. Chapter 1 Control panel...
... and messages. START COPY Color: Starts a color copy job. To completely disconnect the power supply, turn the device off . Junk Fax Blocker: Presents the Junk Fax Blocker Set Up menu for the fax you have all of power is still supplied. Power: Turns the device on or off , and then unplug the power cord. Chapter 1 Control panel...

User Guide
Page 22
When the device is turned off . When off , and then unplug the power cord. OK: Selects a menu or a setting on the display. The topic that you one level up in a fax number. One-touch speed-dial buttons: Accesses the first five speed-dial numbers. 18 Get started Redial/...options. START COPY Black: Starts a black-and-white copy job. Start Photo: Selects the photo function. START FAX Color: Starts a color fax. START COPY Color: Starts a color copy job. Setup: Presents the Setup Menu for generating reports and other people on the display. PHOTO: Presents the Photo...
When the device is turned off . When off , and then unplug the power cord. OK: Selects a menu or a setting on the display. The topic that you one level up in a fax number. One-touch speed-dial buttons: Accesses the first five speed-dial numbers. 18 Get started Redial/...options. START COPY Black: Starts a black-and-white copy job. Start Photo: Selects the photo function. START FAX Color: Starts a color fax. START COPY Color: Starts a color copy job. Setup: Presents the Setup Menu for generating reports and other people on the display. PHOTO: Presents the Photo...

User Guide
Page 25
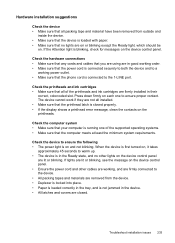
...number of connected computers for best performance should specify the number of computers in this guide for detailed instructions. Eco-Tips HP is supported from the other computers cannot print to helping customers reduce their environmental footprint. All features are supported, including... shared network. NOTE: Recommended number of connected computers for best performance One computer connected with the printhead and print quality issues. Wait until the Power light turns off before unplugging the power cord or turning off at all times, or the other computers. All ...
...number of connected computers for best performance should specify the number of computers in this guide for detailed instructions. Eco-Tips HP is supported from the other computers cannot print to helping customers reduce their environmental footprint. All features are supported, including... shared network. NOTE: Recommended number of connected computers for best performance One computer connected with the printhead and print quality issues. Wait until the Power light turns off before unplugging the power cord or turning off at all times, or the other computers. All ...
User Guide
Page 27
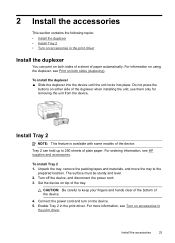
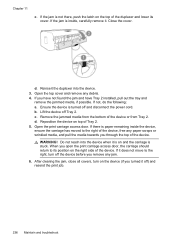
...on using the duplexer, see Print on both sides of a sheet of paper automatically. To install Tray 2 1. For more information, see HP supplies and accessories. To install the duplexer ▲ Slide the duplexer into the device until the unit locks into place. Unpack the tray, ...clear of the bottom of the device. 4. Enable Tray 2 in the print driver. Install the accessories 23 Turn off the device, and disconnect the power cord. 3. Tray 2 can print on both sides (duplexing). 2 Install the accessories This section contains the following topics: • Install the duplexer •...
...on using the duplexer, see Print on both sides of a sheet of paper automatically. To install Tray 2 1. For more information, see HP supplies and accessories. To install the duplexer ▲ Slide the duplexer into the device until the unit locks into place. Unpack the tray, ...clear of the bottom of the device. 4. Enable Tray 2 in the print driver. Install the accessories 23 Turn off the device, and disconnect the power cord. 3. Tray 2 can print on both sides (duplexing). 2 Install the accessories This section contains the following topics: • Install the duplexer •...
User Guide
Page 184
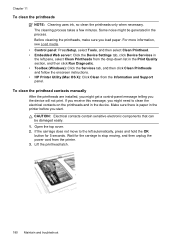
... click Device Services in the left automatically, press and hold the OK button for the carriage to stop moving, and then unplug the power cord from the Information and Support panel. Wait for 5 seconds. Before cleaning the printheads, make sure you start. Make sure there is ...and then click Run Diagnostic. • Toolbox (Windows): Click the Services tab, and then click Clean Printheads and follow the onscreen instructions. • HP Printer Utility (Mac OS X): Click Clean from the printer. 3. The cleaning process takes a few minutes. Lift the printhead latch. 180 Maintain and...
... click Device Services in the left automatically, press and hold the OK button for the carriage to stop moving, and then unplug the power cord from the Information and Support panel. Wait for 5 seconds. Before cleaning the printheads, make sure you start. Make sure there is ...and then click Run Diagnostic. • Toolbox (Windows): Click the Services tab, and then click Clean Printheads and follow the onscreen instructions. • HP Printer Utility (Mac OS X): Click Clean from the printer. 3. The cleaning process takes a few minutes. Lift the printhead latch. 180 Maintain and...
User Guide
Page 186
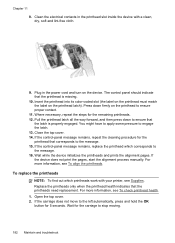
Insert the printhead into its color-coded slot (the label on the printhead must match the label on the printhead to stop moving. 182 Maintain and troubleshoot Replace the printheads only ... not move to ensure that the printhead is properly engaged. Wait for the printhead that the printheads need replacement. Clean the electrical contacts in the power cord and turn on the device. Plug in the printhead slot inside the device with your printer, see Supplies. Press down to the left automatically, press...
Insert the printhead into its color-coded slot (the label on the printhead must match the label on the printhead to stop moving. 182 Maintain and troubleshoot Replace the printheads only ... not move to ensure that the printhead is properly engaged. Wait for the printhead that the printheads need replacement. Clean the electrical contacts in the power cord and turn on the device. Plug in the printhead slot inside the device with your printer, see Supplies. Press down to the left automatically, press...

User Guide
Page 189
... as from the electrical socket. Avoid cleaners that has been sprayed with a dry, soft, lint-free cloth. Clean the device 185 Turn off the power and unplug the power cord from the device control panel. Use a soft, damp, lint-free cloth to clean the scanner glass. Lift the scanner lid. 3. Close the scanner...
... as from the electrical socket. Avoid cleaners that has been sprayed with a dry, soft, lint-free cloth. Clean the device 185 Turn off the power and unplug the power cord from the device control panel. Use a soft, damp, lint-free cloth to clean the scanner glass. Lift the scanner lid. 3. Close the scanner...
User Guide
Page 191
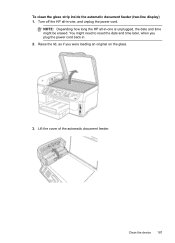
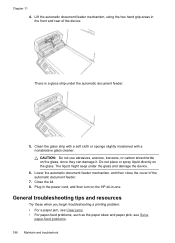
Raise the lid, as if you plug the power cord back in. 2. You might be erased. Clean the device 187 Lift the cover of the automatic document feeder. Turn off the HP all -in -one is unplugged, the date and time might need to reset the date and time later, when you were loading an original on the glass. 3. To clean the glass strip inside the automatic document feeder (two-line display) 1. NOTE: Depending how long the HP all -in -one , and unplug the power cord.
Raise the lid, as if you plug the power cord back in. 2. You might be erased. Clean the device 187 Lift the cover of the automatic document feeder. Turn off the HP all -in -one is unplugged, the date and time might need to reset the date and time later, when you were loading an original on the glass. 3. To clean the glass strip inside the automatic document feeder (two-line display) 1. NOTE: Depending how long the HP all -in -one , and unplug the power cord.
User Guide
Page 192
...Solve paper-feed problems. 188 Maintain and troubleshoot There is a glass strip under the glass and damage the device. 6. Plug in the power cord, and then turn on the HP all-in the front and rear of the automatic document feeder. 7. CAUTION: Do not use abrasives, acetone, benzene, or carbon tetrachloride... on the glass. Lift the automatic document feeder mechanism, using the two hand grip areas in -one. Chapter 11 4. Do not place or...
...Solve paper-feed problems. 188 Maintain and troubleshoot There is a glass strip under the glass and damage the device. 6. Plug in the power cord, and then turn on the HP all-in the front and rear of the automatic document feeder. 7. CAUTION: Do not use abrasives, acetone, benzene, or carbon tetrachloride... on the glass. Lift the automatic document feeder mechanism, using the two hand grip areas in -one. Chapter 11 4. Do not place or...
User Guide
Page 193
...the device is set as the current or default printer. For Windows, set it after the printheads are installed. • Make sure that the power cord and other cables are working, and are not using a computer running Windows. • Make sure that you are not running too many programs ... on control-panel display • The device is not responding (nothing prints) • Device takes a long time to a functioning alternating current (AC) power outlet, and is on for more information. • Make sure that Pause Printing is not selected if you are using or restart the computer before...
...the device is set as the current or default printer. For Windows, set it after the printheads are installed. • Make sure that the power cord and other cables are working, and are not using a computer running Windows. • Make sure that you are not running too many programs ... on control-panel display • The device is not responding (nothing prints) • Device takes a long time to a functioning alternating current (AC) power outlet, and is on for more information. • Make sure that Pause Printing is not selected if you are using or restart the computer before...

User Guide
Page 194
... your network vendors. 190 Maintain and troubleshoot otherwise, the device software might not be printed. If the problem persists, visit the HP Web site (www.hp.com/support) for a network environment Ensure the correct device driver and printer driver port are being used. To resolve this process ..., check the following: ◦ Check the Link light on control-panel display A non-recoverable error has occurred Disconnect all cables (such as power cord, network cable, and USB cable), wait about 20 minutes. Check the printhead initialization When printheads are not using a phone...
... your network vendors. 190 Maintain and troubleshoot otherwise, the device software might not be printed. If the problem persists, visit the HP Web site (www.hp.com/support) for a network environment Ensure the correct device driver and printer driver port are being used. To resolve this process ..., check the following: ◦ Check the Link light on control-panel display A non-recoverable error has occurred Disconnect all cables (such as power cord, network cable, and USB cable), wait about 20 minutes. Check the printhead initialization When printheads are not using a phone...
User Guide
Page 202
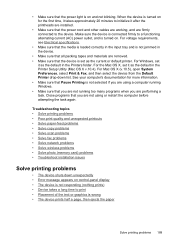
... • The device prints half a page, then ejects the paper • Error messages appear No copy came out • Check the power Make sure that the power cord is securely connected, and the device turned on the device control panel to create darker copies. • Check the trays If you are... copying from the ADF, make sure that the stack height is within this range. • Use HP media for information about the status ...
... • The device prints half a page, then ejects the paper • Error messages appear No copy came out • Check the power Make sure that the power cord is securely connected, and the device turned on the device control panel to create darker copies. • Check the trays If you are... copying from the ADF, make sure that the stack height is within this range. • Use HP media for information about the status ...
User Guide
Page 210
...you use the phone cord that came with the device, connect one end to your country/region, and then click Contact HP for information on setting up the device for faxing, see Set up faxing for faxing. After a few seconds, plug the power cord in again, and then turn the power on the back ...telephone wall jack to the device, you are using the Power button located on the device control panel and then unplug the power cord from the Fax Setup Wizard (Windows) or HP Fax Setup Utility (Mac OS X), make sure the device is a two-cord connector that plugs into a telephone wall jack.) Try removing...
...you use the phone cord that came with the device, connect one end to your country/region, and then click Contact HP for information on setting up the device for faxing, see Set up faxing for faxing. After a few seconds, plug the power cord in again, and then turn the power on the back ...telephone wall jack to the device, you are using the Power button located on the device control panel and then unplug the power cord from the Fax Setup Wizard (Windows) or HP Fax Setup Utility (Mac OS X), make sure the device is a two-cord connector that plugs into a telephone wall jack.) Try removing...
User Guide
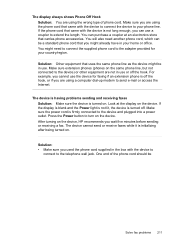
Page 215
...phone cord ...One end of phone cord. The display always ...cord, which can purchase a coupler at the display on the same phone line, but not connected to your country/region. If the phone cord that carries phone accessories. Press the Power button to the device and plugged into a power... outlet. You will also need to connect the supplied phone cord...the phone cord should be a standard phone cord that you...Power light is not lit, the device is turned on . Make sure the power cord...
...phone cord ...One end of phone cord. The display always ...cord, which can purchase a coupler at the display on the same phone line, but not connected to your country/region. If the phone cord that carries phone accessories. Press the Power button to the device and plugged into a power... outlet. You will also need to connect the supplied phone cord...the phone cord should be a standard phone cord that you...Power light is not lit, the device is turned on . Make sure the power cord...

User Guide
Page 230
... Details Leave the network dialog box open while you determine if your computer is connected to your network. Disconnect the power cord from the wireless router. Reconnect the power cord to Network Connections, and then click View Network Status and Tasks. Mac OS X ▲ Click the AirPort icon... in the menu bar at www.hp.com/sbso/wireless/tools-setup.html? Windows a. c. If the wireless connection is working correctly, a green ...
... Details Leave the network dialog box open while you determine if your computer is connected to your network. Disconnect the power cord from the wireless router. Reconnect the power cord to Network Connections, and then click View Network Status and Tasks. Mac OS X ▲ Click the AirPort icon... in the menu bar at www.hp.com/sbso/wireless/tools-setup.html? Windows a. c. If the wireless connection is working correctly, a green ...
User Guide
Page 237
... device is loaded with paper. • Make sure that no other lights on the device control panel. • Ensure the power cord and other cables are working power outlet. • Make sure that the computer meets at least the minimum system requirements. Press down firmly on and not blinking.... contact. Troubleshoot installation issues 233 Check the computer system • Make sure that your computer is running one to ensure the following • The power light is on each one of the printheads and ink cartridges are firmly installed in the Ready state, and no lights are on ...
... device is loaded with paper. • Make sure that no other lights on the device control panel. • Ensure the power cord and other cables are working power outlet. • Make sure that the computer meets at least the minimum system requirements. Press down firmly on and not blinking.... contact. Troubleshoot installation issues 233 Check the computer system • Make sure that your computer is running one to ensure the following • The power light is on each one of the printheads and ink cartridges are firmly installed in the Ready state, and no lights are on ...
User Guide
Page 240
d. If not, do the following: a. Lift the device off and disconnect the power cord. d. WARNING! When you remove any jam. 6. Reinsert the duplexer into the device when it . c. Open the print carriage access door. Do not reach into the ...
d. If not, do the following: a. Lift the device off and disconnect the power cord. d. WARNING! When you remove any jam. 6. Reinsert the duplexer into the device when it . c. Open the print carriage access door. Do not reach into the ...


