HP LaserJet 4345mfp - User Guide
Page 12
...188 Clearing jams from the tray 1 area 189 Clearing jams from the tray 2, 3, 4, or 5 areas 191 Clearing jams from the optional duplexer 192 Clearing jams from the output areas 193 Clearing jams from the fuser 195 Clearing jams from the ADF 198 Clearing staple jams...199 Solving repeated jams ...201 ... mailbox and stapler/stacker 216 Accessory lights ...216 Replacing accessories or accessory components 217 Understanding lights on the formatter 218 HP Jetdirect LEDs...218 Heartbeat LED...218 Fax LED...2. 19 Correcting print-quality and copy-quality problems 220 Print-quality checklist ...
...188 Clearing jams from the tray 1 area 189 Clearing jams from the tray 2, 3, 4, or 5 areas 191 Clearing jams from the optional duplexer 192 Clearing jams from the output areas 193 Clearing jams from the fuser 195 Clearing jams from the ADF 198 Clearing staple jams...199 Solving repeated jams ...201 ... mailbox and stapler/stacker 216 Accessory lights ...216 Replacing accessories or accessory components 217 Understanding lights on the formatter 218 HP Jetdirect LEDs...218 Heartbeat LED...218 Fax LED...2. 19 Correcting print-quality and copy-quality problems 220 Print-quality checklist ...
HP LaserJet 4345mfp - User Guide
Page 22
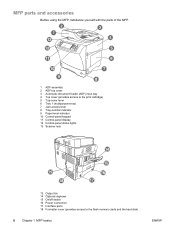
..., familiarize yourself with the parts of the MFP. 1 ADF assembly 2 ADF top cover 3 Automatic document feeder (ADF) input tray 4 Top cover (provides access to the print cartridge) 5 Top-cover lever 6 Tray 1 (multipurpose tray) 7 Jam-access lever 8 Tray-number indicator 9 Paper-level indicator 10 Control-panel keypad 11 Control-panel display 12 Control-panel status lights...
..., familiarize yourself with the parts of the MFP. 1 ADF assembly 2 ADF top cover 3 Automatic document feeder (ADF) input tray 4 Top cover (provides access to the print cartridge) 5 Top-cover lever 6 Tray 1 (multipurpose tray) 7 Jam-access lever 8 Tray-number indicator 9 Paper-level indicator 10 Control-panel keypad 11 Control-panel display 12 Control-panel status lights...

HP LaserJet 4345mfp - User Guide
Page 37
...of labels, envelopes, and transparencies. To avoid a jam, never add or remove paper from a tray while printing or copying from that tray. SETTING SAVED appears on the control-panel display. 7. CAUTION 9. Loading input trays CAUTION CAUTION Note This section contains information about supported...For more information about loading standard- Touch Menu. 2. Touch TRAY 1 TYPE. 6. Load paper according to size and finishing options. To avoid a jam, never add or remove media from a tray while printing from that tray. 1. If you select CUSTOM as the media size, also ...
...of labels, envelopes, and transparencies. To avoid a jam, never add or remove paper from a tray while printing or copying from that tray. SETTING SAVED appears on the control-panel display. 7. CAUTION 9. Loading input trays CAUTION CAUTION Note This section contains information about supported...For more information about loading standard- Touch Menu. 2. Touch TRAY 1 TYPE. 6. Load paper according to size and finishing options. To avoid a jam, never add or remove media from a tray while printing from that tray. 1. If you select CUSTOM as the media size, also ...
HP LaserJet 4345mfp - User Guide
Page 38
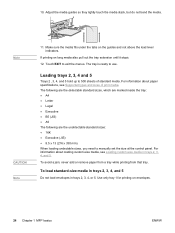
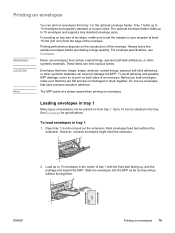
...-size media, see Supported types and sizes of standard media. To avoid a jam, never add or remove paper from a tray while printing from that tray. If printing on envelopes. 24 Chapter 1 MFP basics ENWW 10. Loading trays 2, 3, 4 and 5 Trays 2 , 3, 4, and 5 hold up to manually set the size at the... control panel. For information about paper specifications, see Loading custom-size media in trays 2, 3, 4, or 5. Use only tray 1 for printing on long media also pull out the tray extension until it stops. 12. The tray is ready to exit the menus. To load standard-size media in...
...-size media, see Supported types and sizes of standard media. To avoid a jam, never add or remove paper from a tray while printing from that tray. If printing on envelopes. 24 Chapter 1 MFP basics ENWW 10. Loading trays 2, 3, 4 and 5 Trays 2 , 3, 4, and 5 hold up to manually set the size at the... control panel. For information about paper specifications, see Loading custom-size media in trays 2, 3, 4, or 5. Use only tray 1 for printing on long media also pull out the tray extension until it stops. 12. The tray is ready to exit the menus. To load standard-size media in...

HP LaserJet 4345mfp - User Guide
Page 62
Item SET REGISTRATION FUSER MODES Values PRINT TEST PAGE SOURCE ADJUST TRAY List of media types Explanation Shift the margin alignment to center the image on the page from top to bottom, and left to this menu, ... can be sure to change it back to the default when you change the fuser mode to HIGH1 or HIGH2 might cause other failures or jams. 48 Chapter 2 Using the control panel ENWW used for lightweight media. prints at 3/4 speed. LOW 1: Low temperature; Setting a paper type to HIGH1 or HIGH2, be...
Item SET REGISTRATION FUSER MODES Values PRINT TEST PAGE SOURCE ADJUST TRAY List of media types Explanation Shift the margin alignment to center the image on the page from top to bottom, and left to this menu, ... can be sure to change it back to the default when you change the fuser mode to HIGH1 or HIGH2 might cause other failures or jams. 48 Chapter 2 Using the control panel ENWW used for lightweight media. prints at 3/4 speed. LOW 1: Low temperature; Setting a paper type to HIGH1 or HIGH2, be...
HP LaserJet 4345mfp - User Guide
Page 93
... envelopes before purchasing a large quantity. Never use envelopes that they will go without the extension. These items can severely damage the MFP. To avoid jamming and possible MFP damage, never try to set the margins in your program at a slower speed when printing on envelopes 79 Do not use envelopes... on both sides of the envelope. Before you load envelopes, make sure to print on the construction of an envelope. Up to 10 envelopes in tray 1 1. Slide the envelopes into the MFP as far as they are flat and are not damaged or stuck together. The MFP prints at least ...
... envelopes before purchasing a large quantity. Never use envelopes that they will go without the extension. These items can severely damage the MFP. To avoid jamming and possible MFP damage, never try to set the margins in your program at a slower speed when printing on envelopes 79 Do not use envelopes... on both sides of the envelope. Before you load envelopes, make sure to print on the construction of an envelope. Up to 10 envelopes in tray 1 1. Slide the envelopes into the MFP as far as they are flat and are not damaged or stuck together. The MFP prints at least ...
HP LaserJet 4345mfp - User Guide
Page 97
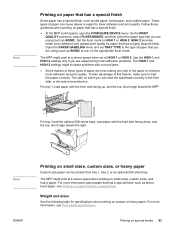
... Printing on small sizes, custom sizes, or heavy paper Custom-size paper can cause issues in regard to turn on the appropriate fuser mode. For tray 1, load paper with the front side facing down, and the top, short edge toward the MFP. For more information, see Printing on paper that ... now coating one side of paper that you are experiencing toner-adhesion problems. The HIGH 1 and HIGH 2 settings might increase problems with curl and jams. ● Some makers of these guidelines when printing on paper that has a special finish. The MFP might print at a slower speed when set...
... Printing on small sizes, custom sizes, or heavy paper Custom-size paper can cause issues in regard to turn on the appropriate fuser mode. For tray 1, load paper with the front side facing down, and the top, short edge toward the MFP. For more information, see Printing on paper that ... now coating one side of paper that you are experiencing toner-adhesion problems. The HIGH 1 and HIGH 2 settings might increase problems with curl and jams. ● Some makers of these guidelines when printing on paper that has a special finish. The MFP might print at a slower speed when set...

HP LaserJet 4345mfp - User Guide
Page 102
...with clipboards. Insert enough paper into one of the following ways: ● For tray 1, load the letterhead paper with the front side down . Send the print job to accommodate the print job. To print on Both Sides. Jamming could result. 2. Do not load paper that is oriented upside-down , bottom-...are read continuously from top to get the designated binding options. For Macintosh, on the Layout tab, click Print on the left side of the trays to the MFP. 88 Chapter 3 Printing ENWW Short-edge portrait* This layout is often used with front side up, and the top edge ...
...with clipboards. Insert enough paper into one of the following ways: ● For tray 1, load the letterhead paper with the front side down . Send the print job to accommodate the print job. To print on Both Sides. Jamming could result. 2. Do not load paper that is oriented upside-down , bottom-...are read continuously from top to get the designated binding options. For Macintosh, on the Layout tab, click Print on the left side of the trays to the MFP. 88 Chapter 3 Printing ENWW Short-edge portrait* This layout is often used with front side up, and the top edge ...

HP LaserJet 4345mfp - User Guide
Page 150
If the LED is off, is blinking, or is lit green. Troubleshooting the output and input accessories When the 3-bin mailbox or the stapler/stacker is installed correctly, the LED at the top of the accessory is lit amber, a problem exists. See Understanding accessory lights for the 3-bin mailbox and stapler/stacker. For information about clearing jams that can occur in the envelope feeder or the optional 500-sheet feeders, see Clearing jams from the optional envelope-feeder area and Clearing jams from the tray 2, 3, 4, or 5 areas. 136 Chapter 7 Optional output and input devices ENWW
If the LED is off, is blinking, or is lit green. Troubleshooting the output and input accessories When the 3-bin mailbox or the stapler/stacker is installed correctly, the LED at the top of the accessory is lit amber, a problem exists. See Understanding accessory lights for the 3-bin mailbox and stapler/stacker. For information about clearing jams that can occur in the envelope feeder or the optional 500-sheet feeders, see Clearing jams from the optional envelope-feeder area and Clearing jams from the tray 2, 3, 4, or 5 areas. 136 Chapter 7 Optional output and input devices ENWW

HP LaserJet 4345mfp - User Guide
Page 167
...update the device status. ● Supplies Status. View detailed supplies status such as a jam or an empty tray. The Alerts tab has links to the following main pages: ● Device Status. ENWW Using the HP Toolbox 153 After you correct a problem with the MFP, click the Refresh button to ...Set up Status Alerts page On the Set up message ● System tray icon Click Apply to it so that have been printed with the current print cartridge. Note To view the HP Toolbox 1. Open the HP Toolbox in a Web browser. Double-click the HP Toolbox icon. View MFP status information.
...update the device status. ● Supplies Status. View detailed supplies status such as a jam or an empty tray. The Alerts tab has links to the following main pages: ● Device Status. ENWW Using the HP Toolbox 153 After you correct a problem with the MFP, click the Refresh button to ...Set up Status Alerts page On the Set up message ● System tray icon Click Apply to it so that have been printed with the current print cartridge. Note To view the HP Toolbox 1. Open the HP Toolbox in a Web browser. Double-click the HP Toolbox icon. View MFP status information.
HP LaserJet 4345mfp - User Guide
Page 196
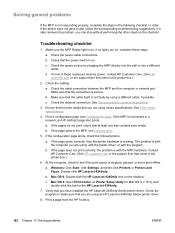
... on the desktop. b. c. Make sure that you have installed the HP LaserJet 4345mfp Series printer driver. Ensure that the print media that the cable itself is stopped, paused, or set to see Clearing jams. 5. If the pages do not print, check that you are using...jams in the MFP, see if the print queue is not faulty by plugging the MFP directly into the wall or into a different outlet. If the configuration page prints, check the following checklist, in the printer box.) 2. Mac OS 9: Double-click the HP LaserJet 4345mfp icon on the checklist. Verify that at least one tray...
... on the desktop. b. c. Make sure that you have installed the HP LaserJet 4345mfp Series printer driver. Ensure that the print media that the cable itself is stopped, paused, or set to see Clearing jams. 5. If the pages do not print, check that you are using...jams in the MFP, see if the print queue is not faulty by plugging the MFP directly into the wall or into a different outlet. If the configuration page prints, check the following checklist, in the printer box.) 2. Mac OS 9: Double-click the HP LaserJet 4345mfp icon on the checklist. Verify that at least one tray...

HP LaserJet 4345mfp - User Guide
Page 199
... the optional envelopefeeder area. 13.JJ.NT JAM IN OUTPUT BIN See Clearing jams from the output areas. 13.JJ.NT JAM IN TRAY 1 See Clearing jams from the tray 1 area. 13.JJ.NT JAM IN TRAY 2 (or TRAY 3, 4 or 5) See Clearing jams from the tray 2, 3, 4, or 5 areas. 13.JJ.NT JAM INSIDE DUPLEXER See Clearing jams from the optional duplexer. 13.JJ...
... the optional envelopefeeder area. 13.JJ.NT JAM IN OUTPUT BIN See Clearing jams from the output areas. 13.JJ.NT JAM IN TRAY 1 See Clearing jams from the tray 1 area. 13.JJ.NT JAM IN TRAY 2 (or TRAY 3, 4 or 5) See Clearing jams from the tray 2, 3, 4, or 5 areas. 13.JJ.NT JAM INSIDE DUPLEXER See Clearing jams from the optional duplexer. 13.JJ...
HP LaserJet 4345mfp - User Guide
Page 200
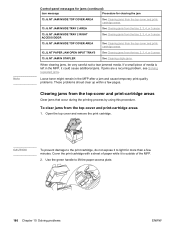
... for clearing the jam 13.JJ.NT JAM INSIDE TOP COVER AREA See Clearing jams from the top-cover and printcartridge areas. 13.JJ.NT JAM INSIDE TRAY 2 AREA 13.JJ.NT JAM INSIDE TRAY 2 RIGHT ACCESS DOOR 13.JJ.NT JAM INSIDE TOP COVER AREA 13.JJ.NT PAPER JAM OPEN INPUT TRAYS See Clearing jams from the tray 2, 3, 4, or 5 areas...
... for clearing the jam 13.JJ.NT JAM INSIDE TOP COVER AREA See Clearing jams from the top-cover and printcartridge areas. 13.JJ.NT JAM INSIDE TRAY 2 AREA 13.JJ.NT JAM INSIDE TRAY 2 RIGHT ACCESS DOOR 13.JJ.NT JAM INSIDE TOP COVER AREA 13.JJ.NT PAPER JAM OPEN INPUT TRAYS See Clearing jams from the tray 2, 3, 4, or 5 areas...

HP LaserJet 4345mfp - User Guide
Page 201
Do not tear the media. 4. Reinstall the print cartridge and close tray 1. 7. Look for additional jammed media underneath. Rotate the paper-release guide to remove, open and remove the envelope-entrance cover. If jammed media is present, remove it . 6. ENWW Clearing jams 187 If media is present, remove it . 5. If a jam message persists, jammed media is difficult to check for the jam in the MFP. 3. Slowly pull the jammed media out of the MFP. Replace the envelope-entrance cover and close the top cover. 8. If jammed media is still in another location.
Do not tear the media. 4. Reinstall the print cartridge and close tray 1. 7. Look for additional jammed media underneath. Rotate the paper-release guide to remove, open and remove the envelope-entrance cover. If jammed media is present, remove it . 6. ENWW Clearing jams 187 If media is present, remove it . 5. If a jam message persists, jammed media is difficult to check for the jam in the MFP. 3. Slowly pull the jammed media out of the MFP. Replace the envelope-entrance cover and close the top cover. 8. If jammed media is still in another location.

HP LaserJet 4345mfp - User Guide
Page 202
...weight and lift the tray extension up, to jams that are using an optional envelope feeder. Slowly remove any envelopes that occur when you are loaded in the envelope feeder. Press and hold the release button on the left side of the MFP. 3. To clear jams from the MFP. ... sides of the optional envelope feeder and carefully pull it out of the optional envelope feeder. Clearing jams from the optional envelope-feeder area This section applies only to the closed position. 2. Remove any jammed envelopes from the optional envelope feeder and from the optional envelope feeder 1.
...weight and lift the tray extension up, to jams that are using an optional envelope feeder. Slowly remove any envelopes that occur when you are loaded in the envelope feeder. Press and hold the release button on the left side of the MFP. 3. To clear jams from the MFP. ... sides of the optional envelope feeder and carefully pull it out of the optional envelope feeder. Clearing jams from the optional envelope-feeder area This section applies only to the closed position. 2. Remove any jammed envelopes from the optional envelope feeder and from the optional envelope feeder 1.
HP LaserJet 4345mfp - User Guide
Page 203
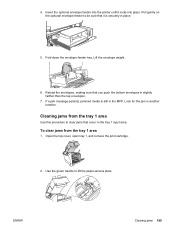
...top envelopes. 7. Fold down the envelope-feeder tray. Clearing jams from the tray 1 area 1. ENWW Clearing jams 189 Insert the optional envelope feeder into place. If a jam message persists, jammed media is securely in another location. To clear jams from the tray 1 area Use this procedure to be sure ...that you push the bottom envelopes in the MFP. Open the top cover, open tray 1, and remove the print cartridge...
...top envelopes. 7. Fold down the envelope-feeder tray. Clearing jams from the tray 1 area 1. ENWW Clearing jams 189 Insert the optional envelope feeder into place. If a jam message persists, jammed media is securely in another location. To clear jams from the tray 1 area Use this procedure to be sure ...that you push the bottom envelopes in the MFP. Open the top cover, open tray 1, and remove the print cartridge...

HP LaserJet 4345mfp - User Guide
Page 204
... out of the sheet has already been pulled into the MFP, follow the steps for additional jammed media underneath. Reinstall the print cartridge and close tray 1. 7. Look for the jam in the MFP. If part of the MFP. Rotate the paper-release guide to remove, remove the ...envelope-entrance cover. Replace the envelope-entrance cover and close the top cover. 8. If jammed media is still in another ...
... out of the sheet has already been pulled into the MFP, follow the steps for additional jammed media underneath. Reinstall the print cartridge and close tray 1. 7. Look for the jam in the MFP. If part of the MFP. Rotate the paper-release guide to remove, remove the ...envelope-entrance cover. Replace the envelope-entrance cover and close the top cover. 8. If jammed media is still in another ...
HP LaserJet 4345mfp - User Guide
Page 205
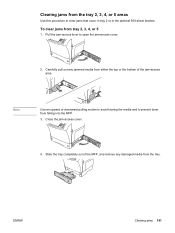
... Carefully pull out any damaged media from the tray. ENWW Clearing jams 191 Clearing jams from either the top or the bottom of the MFP, and remove any jammed media from the tray 2, 3, 4, or 5 areas Use this procedure to clear jams that occur in tray 2 or in the optional 500-sheet feeders. ...Note Use an upward or downward pulling motion to avoid tearing the media and to open the jam-access cover. 2. Close the jam-access cover....
... Carefully pull out any damaged media from the tray. ENWW Clearing jams 191 Clearing jams from either the top or the bottom of the MFP, and remove any jammed media from the tray 2, 3, 4, or 5 areas Use this procedure to clear jams that occur in tray 2 or in the optional 500-sheet feeders. ...Note Use an upward or downward pulling motion to avoid tearing the media and to open the jam-access cover. 2. Close the jam-access cover....

HP LaserJet 4345mfp - User Guide
Page 206
Check for the jam and to check for jammed paper inside the MFP. Carefully pull out the jammed paper. 192 Chapter 10 Solving problems ENWW If a jam message persists, jammed media is still in another location. 5. Slide the tray into the MFP. 6. Clearing jams from the optional duplexer 1. Remove the output bin (or remove the stapler/stacker or the mailbox). 2. Remove the optional duplexer, and set it . Look for the jam in the MFP. To clear jams from the optional duplexer If a jam occurs during a duplex printing job, use this procedure to clear it aside. 3.
Check for the jam and to check for jammed paper inside the MFP. Carefully pull out the jammed paper. 192 Chapter 10 Solving problems ENWW If a jam message persists, jammed media is still in another location. 5. Slide the tray into the MFP. 6. Clearing jams from the optional duplexer 1. Remove the output bin (or remove the stapler/stacker or the mailbox). 2. Remove the optional duplexer, and set it . Look for the jam in the MFP. To clear jams from the optional duplexer If a jam occurs during a duplex printing job, use this procedure to clear it aside. 3.

HP LaserJet 4345mfp - User Guide
Page 212
...output-bin assembly, the 3-bin mailbox, or the stapler/stacker. Look for jammed media underneath the tray. Pull up on the ADF-cover-release lever, and open the ADF cover. Clearing jams from the ADF Use this procedure to clear jams from the ADF. 1. 14. Insert the device at an angle, and... then slide it into the MFP. 15. Carefully remove any jammed media. 2. Lift the ADF-input tray, and check for the jam in the MFP. Carefully remove any jammed media. 198 Chapter 10 Solving ...
...output-bin assembly, the 3-bin mailbox, or the stapler/stacker. Look for jammed media underneath the tray. Pull up on the ADF-cover-release lever, and open the ADF cover. Clearing jams from the ADF Use this procedure to clear jams from the ADF. 1. 14. Insert the device at an angle, and... then slide it into the MFP. 15. Carefully remove any jammed media. 2. Lift the ADF-input tray, and check for the jam in the MFP. Carefully remove any jammed media. 198 Chapter 10 Solving ...


