HP 2510p Hard Drive Replacement - Compaq Business Notebook
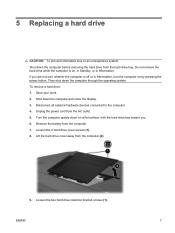
HP 2510p Hard Drive Replacement
Related Manual Pages


Related Videos

Add 2nd Hard Drive to HP Compaq 2510p Laptop
Duration: 2:20
Total Views: 23,019
Duration: 2:20
Total Views: 23,019
Similar Questions

Hp2510p Cd Rom Stops When Hard Drive Is Attached
(Posted by hecto987 9 years ago)

Hp 2540p Hard Drive Replacement How To
(Posted by thSchum 10 years ago)

How To Install Windows In Elitebook 2760p After Hard Drive Replacement
(Posted by joelliem 10 years ago)
Pavillion Dv6 3267 Hard Drive Replacement
How do I know what size of hard drive to get.
How do I know what size of hard drive to get.
(Posted by karilivingston 10 years ago)