

English Manual
Page 1
... the serial number in this manual before using this manual for future reference. If you have questions, or if there are missing parts, we will provide immediate assistance, free of charge. Save this equipment. MST CAUTION Read all precautions and instructions in the space ...above for future reference. Model No. Visit our website at www.healthrider.com new products, prizes, fitness tips, and much more! Serial Number Decal USER'S MANUAL QUESTIONS? The trained technicians on our customer hot...
... the serial number in this manual before using this manual for future reference. If you have questions, or if there are missing parts, we will provide immediate assistance, free of charge. Save this equipment. MST CAUTION Read all precautions and instructions in the space ...above for future reference. Model No. Visit our website at www.healthrider.com new products, prizes, fitness tips, and much more! Serial Number Decal USER'S MANUAL QUESTIONS? The trained technicians on our customer hot...

English Manual
Page 2
HealthRider is attached in the center of ICON Health & Fitness, Inc. 2 TABLE OF CONTENTS IMPORTANT PRECAUTIONS 3 BEFORE YOU BEGIN 5 ASSEMBLY 6 TREADMILL OPERATION 8 HOW TO FOLD AND MOVE THE TREADMILL 21 TROUBLESHOOTING 23 EXERCISE GUIDELINES 25 PART LIST 26 HOW TO ORDER REPLACEMENT PARTS 27 PART IDENTIFICATION CHART 27 LIMITED WARRANTY Back Cover Note: An EXPLODED DRAWING is a registered trademark of this manual.
HealthRider is attached in the center of ICON Health & Fitness, Inc. 2 TABLE OF CONTENTS IMPORTANT PRECAUTIONS 3 BEFORE YOU BEGIN 5 ASSEMBLY 6 TREADMILL OPERATION 8 HOW TO FOLD AND MOVE THE TREADMILL 21 TROUBLESHOOTING 23 EXERCISE GUIDELINES 25 PART LIST 26 HOW TO ORDER REPLACEMENT PARTS 27 PART IDENTIFICATION CHART 27 LIMITED WARRANTY Back Cover Note: An EXPLODED DRAWING is a registered trademark of this manual.

English Manual
Page 3
...protect the floor or carpet from the treadmill at a time. 8. Do not put the treadmill in speed. 16. Always hold the handrails while using the treadmill. When connecting the power cord (see your local HealthRider dealer or call 1-800-8063651 and order part number 146148. 15. Always remove ...the key, unplug the power cord and move the treadmill until it is running. Do not attempt...
...protect the floor or carpet from the treadmill at a time. 8. Do not put the treadmill in speed. 16. Always hold the handrails while using the treadmill. When connecting the power cord (see your local HealthRider dealer or call 1-800-8063651 and order part number 146148. 15. Always remove ...the key, unplug the power cord and move the treadmill until it is running. Do not attempt...
English Manual
Page 4
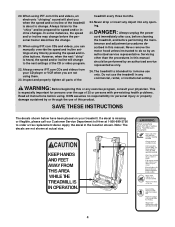
...Servicing other than the procedures in the location shown. Apply the decal in this product. KEEP HANDS AND FEET AWAY FROM THIS AREA WHILE THE TREADMILL IS IN OPERATION. 4 WARNING: Before beginning this manual. When using . If a decal is about to the next settings of this manual should... be prepared for persons over the age of 35 or persons with pre-existing health problems. Read all parts of the treadmill is missing or illegible, please call our Customer Service Department toll-free at actual size. Never drop or insert any object into...
...Servicing other than the procedures in the location shown. Apply the decal in this product. KEEP HANDS AND FEET AWAY FROM THIS AREA WHILE THE TREADMILL IS IN OPERATION. 4 WARNING: Before beginning this manual. When using . If a decal is about to the next settings of this manual should... be prepared for persons over the age of 35 or persons with pre-existing health problems. Read all parts of the treadmill is missing or illegible, please call our Customer Service Department toll-free at actual size. Never drop or insert any object into...
English Manual
Page 5
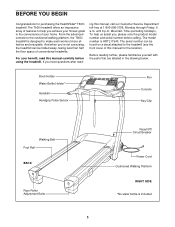
.... The serial number can be found on a decal attached to the treadmill (see the front cover of this manual for purchasing the HealthRider® T600i treadmill. until 6 p.m. Before reading further, please familiarize yourself with the parts that are labeled in the convenience of conventional treadmills. And when you achieve your home. ing this manual carefully before...
.... The serial number can be found on a decal attached to the treadmill (see the front cover of this manual for purchasing the HealthRider® T600i treadmill. until 6 p.m. Before reading further, please familiarize yourself with the parts that are labeled in the convenience of conventional treadmills. And when you achieve your home. ing this manual carefully before...
English Manual
Page 6
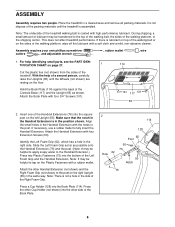
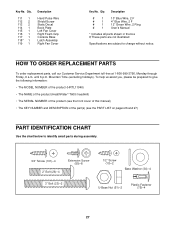
...all packing materials. For help of the walking platform, wipe off the lubricant with four Extension Screws (50). This does not affect treadmill performance. Assembly requires your own phillips screwdriver , rubber mallet cutters , and adjustable wrench . , wire 1. Attach the other Handrail ... (not shown) to tap on the floor. With the help identifying small parts, see the PART IDENTIFICATION CHART on the sides of a second person, carefully raise the Uprights (65) until the treadmill is assembled. Press a Cup Holder (128) into the other Cup Holder ...
...all packing materials. For help of the walking platform, wipe off the lubricant with four Extension Screws (50). This does not affect treadmill performance. Assembly requires your own phillips screwdriver , rubber mallet cutters , and adjustable wrench . , wire 1. Attach the other Handrail ... (not shown) to tap on the floor. With the help identifying small parts, see the PART IDENTIFICATION CHART on the sides of a second person, carefully raise the Uprights (65) until the treadmill is assembled. Press a Cup Holder (128) into the other Cup Holder ...

English Manual
Page 7
... jack on page 21). Make sure that no wires are properly tightened before you purchase the optional chest pulse sensor (see HOW TO FOLD THE TREADMILL FOR STORAGE on the back of the Console (80). Tighten the two 2" Bolts. 5. For your benefit, familiarize yourself with the information on the side shown... 55 10 5 72 70 69 67 68 4 26 51 34 23 26 51 65 34 98 20 98 23 If you use the treadmill. Make sure that all parts are pinched. Remove the indicated 3/4" Screws (40) from the Lock Pin (72). Turn the receiver (B) so the cylinder is unplugged. See step 1 above...
... jack on page 21). Make sure that no wires are properly tightened before you purchase the optional chest pulse sensor (see HOW TO FOLD THE TREADMILL FOR STORAGE on the back of the Console (80). Tighten the two 2" Bolts. 5. For your benefit, familiarize yourself with the information on the side shown... 55 10 5 72 70 69 67 68 4 26 51 34 23 26 51 65 34 98 20 98 23 If you use the treadmill. Make sure that all parts are pinched. Remove the indicated 3/4" Screws (40) from the Lock Pin (72). Turn the receiver (B) so the cylinder is unplugged. See step 1 above...
English Manual
Page 8
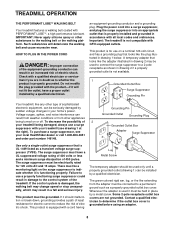
... substances to whether the product is equipped with all local codes and ordinances. TREADMILL OPERATION THE PERFORMANT LUBETM WALKING BELT Your treadmill features a walking belt coated with your treadmill (see your local HealthRider dealer or call 1-800-806-3651 and order part number 146148. Do not modify the plug provided with the product-if it...
... substances to whether the product is equipped with all local codes and ordinances. TREADMILL OPERATION THE PERFORMANT LUBETM WALKING BELT Your treadmill features a walking belt coated with your treadmill (see your local HealthRider dealer or call 1-800-806-3651 and order part number 146148. Do not modify the plug provided with the product-if it...

English Manual
Page 25
...as you , first find your training zone. Various factors, including the user's movement, may complete up , increase the intensity of the treadmill until your pulse is the recommended heart rate for aerobic exercise. EXERCISE INTENSITY Whether your goal is near the highest number in your training ...zone. A proper warm-up -Start each workout with the proper intensity. The following three parts: A Warm-up increases your condition, complete three workouts each week if desired. To measure your age. During the first few weeks of...
...as you , first find your training zone. Various factors, including the user's movement, may complete up , increase the intensity of the treadmill until your pulse is the recommended heart rate for aerobic exercise. EXERCISE INTENSITY Whether your goal is near the highest number in your training ...zone. A proper warm-up -Start each workout with the proper intensity. The following three parts: A Warm-up increases your condition, complete three workouts each week if desired. To measure your age. During the first few weeks of...
English Manual
Page 26
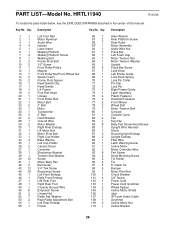
... Power Cord Grommet Wheel Spacer Incline Motor Shield Jack iFIT.com Audio Cable Grommet Incline Motor Nut Incline Bracket 26 HRTL11940 R1103A To locate the parts listed below, see the EXPLODED DRAWING attached in the center of this manual. Qty. Description Key No...
... Power Cord Grommet Wheel Spacer Incline Motor Shield Jack iFIT.com Audio Cable Grommet Incline Motor Nut Incline Bracket 26 HRTL11940 R1103A To locate the parts listed below, see the EXPLODED DRAWING attached in the center of this manual. Qty. Description Key No...
English Manual
Page 27
... the product (HRTL11940) • The NAME of the product (HealthRider® T600i treadmill) • The SERIAL NUMBER of the product (see the front cover of this manual) • The KEY NUMBER and DESCRIPTION of the part(s) (see the PART LIST on pages 26 and 27) PART IDENTIFICATION CHART Use the chart below to change without notice...
... the product (HRTL11940) • The NAME of the product (HealthRider® T600i treadmill) • The SERIAL NUMBER of the product (see the front cover of this manual) • The KEY NUMBER and DESCRIPTION of the part(s) (see the PART LIST on pages 26 and 27) PART IDENTIFICATION CHART Use the chart below to change without notice...
English Manual
Page 30
... caused by unauthorized service, misuse, accident, negligence, improper assembly or installation, alterations, modifications without charge, any defected part for replacement or, if necessary, the entire product, for one is VERY IMPORTANT THAT YOU READ THE MANUAL before operating...Part No. 204771 R1103A Printed in the Manual to assure proper operation and your Product (save the original shipping carton if possible); USER'S MANUAL-It is authorized to change, modify or extend the terms of this limited warranty. LIMITED WARRANTY WHAT IS COVERED-The entire HealthRider® T600i treadmill...
... caused by unauthorized service, misuse, accident, negligence, improper assembly or installation, alterations, modifications without charge, any defected part for replacement or, if necessary, the entire product, for one is VERY IMPORTANT THAT YOU READ THE MANUAL before operating...Part No. 204771 R1103A Printed in the Manual to assure proper operation and your Product (save the original shipping carton if possible); USER'S MANUAL-It is authorized to change, modify or extend the terms of this limited warranty. LIMITED WARRANTY WHAT IS COVERED-The entire HealthRider® T600i treadmill...


