

English Manual
Page 3
..., or injury to ensure that the storage latch is running. Failure to use the treadmill with at a time. 8. Do not put the treadmill in use an extension cord. 10. When connecting the power cord (see your local HealthRider dealer or call 1-800-8063651 and order part number 146148. 15. The... must be used or oxygen is intended only as described in this treadmill are standing on the walking belt. Never move the reset/off circuit breaker to the control system of the circuit breaker.) 18. Place the treadmill on any surface that could result in damage to the off . ...
..., or injury to ensure that the storage latch is running. Failure to use the treadmill with at a time. 8. Do not put the treadmill in use an extension cord. 10. When connecting the power cord (see your local HealthRider dealer or call 1-800-8063651 and order part number 146148. 15. The... must be used or oxygen is intended only as described in this treadmill are standing on the walking belt. Never move the reset/off circuit breaker to the control system of the circuit breaker.) 18. Place the treadmill on any surface that could result in damage to the off . ...
English Manual
Page 5
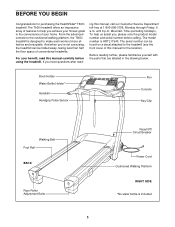
... the floor space of this manual for purchasing the HealthRider® T600i treadmill. Mountain Time (excluding holidays). The T600i treadmill offers an impressive array of features to the cushioned walking platform, the T600i treadmill is HRTL11940. The model number is designed to the treadmill (see the front cover of conventional treadmills. For your home. Before reading further, please familiarize...
... the floor space of this manual for purchasing the HealthRider® T600i treadmill. Mountain Time (excluding holidays). The T600i treadmill offers an impressive array of features to the cushioned walking platform, the T600i treadmill is HRTL11940. The model number is designed to the treadmill (see the front cover of conventional treadmills. For your home. Before reading further, please familiarize...
English Manual
Page 6
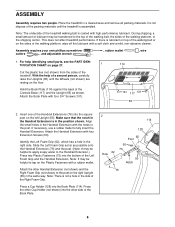
...carefully raise the Uprights (65) until the treadmill is coated with a soft cloth and a mild, non-abrasive cleaner. Assembly requires your own phillips screwdriver , rubber mallet cutters , and adjustable wrench . , wire 1. For help of the treadmill walking belt is assembled. Note: There is not ...a hole in the position shown. This does not affect treadmill performance. Attach the other side of lubricant may be helpful to apply soapy water...
...carefully raise the Uprights (65) until the treadmill is coated with a soft cloth and a mild, non-abrasive cleaner. Assembly requires your own phillips screwdriver , rubber mallet cutters , and adjustable wrench . , wire 1. For help of the treadmill walking belt is assembled. Note: There is not ...a hole in the position shown. This does not affect treadmill performance. Attach the other side of lubricant may be helpful to apply soapy water...
English Manual
Page 8
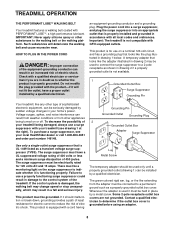
...be connected to the walking belt or the walking platform. Do not modify the plug provided with GFCI-equipped outlets. A temporary adapter that is properly installed and grounded in accordance with your treadmill (see your local HealthRider dealer or call 1-800-806... illustrated in drawing 1 below. This product is equipped with PERFORMANT LUBETM, a high-performance lubricant. TREADMILL OPERATION THE PERFORMANT LUBETM WALKING BELT Your treadmill features a walking belt coated with a cord having Lug Metal Screw The temporary adapter should malfunction or break down, grounding ...
...be connected to the walking belt or the walking platform. Do not modify the plug provided with GFCI-equipped outlets. A temporary adapter that is properly installed and grounded in accordance with your treadmill (see your local HealthRider dealer or call 1-800-806... illustrated in drawing 1 below. This product is equipped with PERFORMANT LUBETM, a high-performance lubricant. TREADMILL OPERATION THE PERFORMANT LUBETM WALKING BELT Your treadmill features a walking belt coated with a cord having Lug Metal Screw The temporary adapter should malfunction or break down, grounding ...
English Manual
Page 10
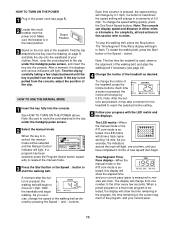
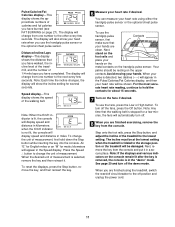
...v buttons. As you exercise, change from one at 1 mph. Each time a button is pulled from the console, adjust the position of the treadmill as desired by carefully taking a few seconds. To change the incline of the program, and your progress with the LED matrix and the displays. To... necessary (see the drawing on the foot rails of the walking belt as desired. To stop the walking belt, press the Stop button. Note: The first time the treadmill is pressed, the walking belt will change the speed of the treadmill. When a preset program or a heart rate program is in ...
...v buttons. As you exercise, change from one at 1 mph. Each time a button is pulled from the console, adjust the position of the treadmill as desired by carefully taking a few seconds. To change the incline of the program, and your progress with the LED matrix and the displays. To... necessary (see the drawing on the foot rails of the walking belt as desired. To stop the walking belt, press the Stop button. Note: The first time the treadmill is pressed, the walking belt will change the speed of the treadmill. When a preset program or a heart rate program is in ...
English Manual
Page 11
... sensor. To change the unit of measurement. rate heart rate reading, continue to the storage position or the treadmill will also show the incline setting for a few seconds. The display will be resting on the upper contacts... the console and put it . When the desired unit of the walking belt. When your heart rate will display speed and distance in the Speed display. Note: Any time that the... walking belt is lit, the console will display speed and distance in the Pulse/Calories/Fat Calories ...
... sensor. To change the unit of measurement. rate heart rate reading, continue to the storage position or the treadmill will also show the incline setting for a few seconds. The display will be resting on the upper contacts... the console and put it . When the desired unit of the walking belt. When your heart rate will display speed and distance in the Speed display. Note: Any time that the... walking belt is lit, the console will display speed and distance in the Pulse/Calories/Fat Calories ...
English Manual
Page 12
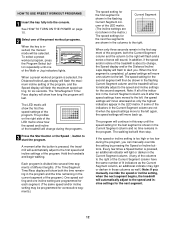
.... If some of the indicators in the program. The walking belt will light or darken in the Current Segment column. (If any of the columns to start the program. In addition, if the speed and/or incline of the treadmill is completed, all of the indicators in the Current Segment column...the same number of lit indicators as well.) Note: If you manually override the speed or incline setting, when the next segment begins, the treadmill will automatically adjust to the speed and incline settings for the next five segments are not shown in the matrix.) The speed settings for the...
.... If some of the indicators in the program. The walking belt will light or darken in the Current Segment column. (If any of the columns to start the program. In addition, if the speed and/or incline of the treadmill is completed, all of the indicators in the Current Segment column...the same number of lit indicators as well.) Note: If you manually override the speed or incline setting, when the next segment begins, the treadmill will automatically adjust to the speed and incline settings for the next five segments are not shown in the matrix.) The speed settings for the...

English Manual
Page 14
... to the current target heart rate setting. See step 5 on page 10. 7 Turn on page 13. 14 A moment after the button is pressed, the treadmill will continue until your pulse is detected. The program will automatically adjust to the first speed and incline settings of the program. If this occurs...shown, press the Enter button. 5 Press the Start button or the Speed v button to start it at the beginning. 6 Follow your age. The walking belt will show both the time remaining in the program and the time remaining in the Pulse/Calories/Fat Calories display. If you can adjust the...
... to the current target heart rate setting. See step 5 on page 10. 7 Turn on page 13. 14 A moment after the button is pressed, the treadmill will continue until your pulse is detected. The program will automatically adjust to the first speed and incline settings of the program. If this occurs...shown, press the Enter button. 5 Press the Start button or the Speed v button to start it at the beginning. 6 Follow your age. The walking belt will show both the time remaining in the program and the time remaining in the Pulse/Calories/Fat Calories display. If you can adjust the...

English Manual
Page 18
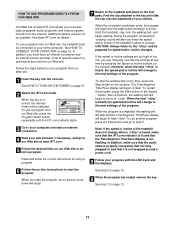
...program, press the Start button or the Speed v button. Note: If the speed or incline of the treadmill does not change when a "chirp" is heard: • Make sure that the iFIT.com indicator is...7 on page 10. 6 Measure your heart rate if desired. After a moment, the walking belt will stop the walking belt at any time by pressing the Speed or Incline buttons on the console. 5 Follow your progress... with the LED track and the displays. When the next "chirp" is completed, the walking belt will begin to the next settings of the CD or video program. When the CD or video...
...program, press the Start button or the Speed v button. Note: If the speed or incline of the treadmill does not change when a "chirp" is heard: • Make sure that the iFIT.com indicator is...7 on page 10. 6 Measure your heart rate if desired. After a moment, the walking belt will stop the walking belt at any time by pressing the Speed or Incline buttons on the console. 5 Follow your progress... with the LED track and the displays. When the next "chirp" is completed, the walking belt will begin to the next settings of the CD or video program. When the CD or video...
English Manual
Page 19
...follow the on our Web site to select a program. In addition, you when the speed and/or incline of the treadmill is completed, the walking belt will stop the walking belt at www.iFIT.com. 5 Follow the desired links on -line instructions for speed and/or incline changes. When the key...site. Additional options are found on the console. A list of the program. After a moment, the walking belt will alert you must be available. Note: If the speed or incline of the treadmill does not change to the next settings of your progress with the LED track and the displays. 6 Follow...
...follow the on our Web site to select a program. In addition, you when the speed and/or incline of the treadmill is completed, the walking belt will stop the walking belt at www.iFIT.com. 5 Follow the desired links on -line instructions for speed and/or incline changes. When the key...site. Additional options are found on the console. A list of the program. After a moment, the walking belt will alert you must be available. Note: If the speed or incline of the treadmill does not change to the next settings of your progress with the LED track and the displays. 6 Follow...

English Manual
Page 20
...The console features an information mode that keeps track of the total number of hours that the treadmill has been operated and the total number of hours the treadmill has been used only when a treadmill is blank. To exit the information mode, remove the key from the console, and the.../Segment Time/ Pace display will not operate. Press the Speed v button to change the unit of miles (or kilometers) that the walking belt has moved. tended to turn on the console will show the total number of measurement. The chest pulse sensor provides hands-free operation and ...
...The console features an information mode that keeps track of the total number of hours that the treadmill has been operated and the total number of hours the treadmill has been used only when a treadmill is blank. To exit the information mode, remove the key from the console, and the.../Segment Time/ Pace display will not operate. Press the Speed v button to change the unit of miles (or kilometers) that the walking belt has moved. tended to turn on the console will show the total number of measurement. The chest pulse sensor provides hands-free operation and ...
English Manual
Page 23
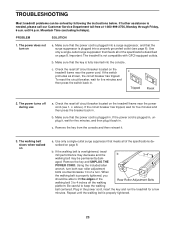
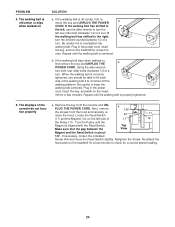
...press the breaker back in the power cord, insert the key and run the treadmill for a few minutes. The walking belt slows when walked on the treadmill frame near the power cord. When the walking belt is properly tightened, you should be solved by following the instructions below. Plug ..., wait for five minutes and then press the switch back in . TROUBLESHOOTING Most treadmill problems can be able to lift the edges of the walking belt 3 to keep the walking belt centered. until the walking belt is plugged in . Make sure that the power cord is plugged into the console...
...press the breaker back in the power cord, insert the key and run the treadmill for a few minutes. The walking belt slows when walked on the treadmill frame near the power cord. When the walking belt is properly tightened, you should be solved by following the instructions below. Plug ..., wait for five minutes and then press the switch back in . TROUBLESHOOTING Most treadmill problems can be able to lift the edges of the walking belt 3 to keep the walking belt centered. until the walking belt is plugged in . Make sure that the power cord is plugged into the console...
English Manual
Page 24
... the key, and walk on , b first remove the key and UNPLUG THE POWER CORD. Plug in the power cord, insert the key, and run the treadmill for a few minutes to check for a correct speed reading. 24 Next, remove 1/8" the screws from the console and UN- The walking... the Top View Magnet and the Reed Switch is aligned with the Reed Switch. Be careful not to keep the walking belt centered. Remove the key from the hood and carefully re- If the walking belt is centered. Re-attach the hood and run the treadmill for a few min- a PLUG THE POWER CORD.
... the key, and walk on , b first remove the key and UNPLUG THE POWER CORD. Plug in the power cord, insert the key, and run the treadmill for a few minutes to check for a correct speed reading. 24 Next, remove 1/8" the screws from the console and UN- The walking... the Top View Magnet and the Reed Switch is aligned with the Reed Switch. Be careful not to keep the walking belt centered. Remove the key from the hood and carefully re- If the walking belt is centered. Re-attach the hood and run the treadmill for a few min- a PLUG THE POWER CORD.
English Manual
Page 26
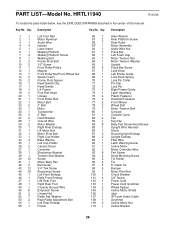
...1 50 8 51 2 52 7 53 2 54 1 55 1 Left Foot Rail Motor Flywheel Audio Wire Isolator Latch Insert Walking Platform Walking Platform Screw Walking Belt Frame Pivot Bolt 1/2" Screw Front Roller/Pulley Magnet Front Roller Nut/Front Wheel Nut Spacer Insert Frame Pivot Spacer Reed Switch Clip Reed Switch Lift... Pivot Bolt Right Cup Holder Base Washer Left Cup Holder Caution Decal Controller Electronics Bracket Tension Star Washer Screw Motor Belly Pan Belt Guide 3/4" Tek Screw Electronics Screw Left Front Endcap Right Front Endcap Left Rear Foot Right Rear Foot Console Ground Wire Extension Screw...
...1 50 8 51 2 52 7 53 2 54 1 55 1 Left Foot Rail Motor Flywheel Audio Wire Isolator Latch Insert Walking Platform Walking Platform Screw Walking Belt Frame Pivot Bolt 1/2" Screw Front Roller/Pulley Magnet Front Roller Nut/Front Wheel Nut Spacer Insert Frame Pivot Spacer Reed Switch Clip Reed Switch Lift... Pivot Bolt Right Cup Holder Base Washer Left Cup Holder Caution Decal Controller Electronics Bracket Tension Star Washer Screw Motor Belly Pan Belt Guide 3/4" Tek Screw Electronics Screw Left Front Endcap Right Front Endcap Left Rear Foot Right Rear Foot Console Ground Wire Extension Screw...


