

English Manual
Page 2
¨ TABLE OF CONTENTS IMPORTANT PRECAUTIONS 3 BEFORE YOU BEGIN 5 ASSEMBLY 6 OPERATION AND ADJUSTMENT 7 HOW TO FOLD AND MOVE THE TREADMILL 21 TROUBLE-SHOOTING AND MAINTENANCE 22 CONDITIONING GUIDELINES 24 PART LIST 26 HOW TO ORDER REPLACEMENT PARTS Back Cover FULL 90 DAY WARRANTY Back Cover Note: An EXPLODED DRAWING is a registered trademark of this manual. Please save the EXPLODED DRAWING for future reference. HealthRider¨ is attached in the center of ICON Health & Fitness, Inc. 2
¨ TABLE OF CONTENTS IMPORTANT PRECAUTIONS 3 BEFORE YOU BEGIN 5 ASSEMBLY 6 OPERATION AND ADJUSTMENT 7 HOW TO FOLD AND MOVE THE TREADMILL 21 TROUBLE-SHOOTING AND MAINTENANCE 22 CONDITIONING GUIDELINES 24 PART LIST 26 HOW TO ORDER REPLACEMENT PARTS Back Cover FULL 90 DAY WARRANTY Back Cover Note: An EXPLODED DRAWING is a registered trademark of this manual. Please save the EXPLODED DRAWING for future reference. HealthRider¨ is attached in the center of ICON Health & Fitness, Inc. 2

English Manual
Page 3
... 45 pounds (20 kg) in use the treadmill with eight feet of 12 and pets away from damage, place a mat under the age of clearance behind it is not in order to maintain your HealthRider dealer or call 1-800-366-7278 and order part number 14657. 11. Athletic support clothes are ...the on any surface that all times. Exercises using the treadmill. Do not operate the treadmill where aerosol products are adequately informed of the on page 5 for the location of all parts of carrying 15 or more amps. Never start the treadmill while you are recommended for 120 volts AC and 15 ...
... 45 pounds (20 kg) in use the treadmill with eight feet of 12 and pets away from damage, place a mat under the age of clearance behind it is not in order to maintain your HealthRider dealer or call 1-800-366-7278 and order part number 14657. 11. Athletic support clothes are ...the on any surface that all times. Exercises using the treadmill. Do not operate the treadmill where aerosol products are adequately informed of the on page 5 for the location of all parts of carrying 15 or more amps. Never start the treadmill while you are recommended for 120 volts AC and 15 ...
English Manual
Page 5
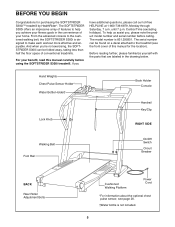
...with the parts that are labeled in the convenience of features to make each workout more effective and enjoyable. BEFORE YOU BEGIN Congratulations for the location). If you , please note the product model number and serial number before using the SOFTSTRIDER S300i treadmill. Hand ...The serial number can be found on a decal attached to the treadmill (see page 20. The SOFTSTRIDER S300i offers an impressive array of your benefit, read this manual for purchasing the SOFTSTRIDER S300iª treadmill by HealthRider¨. From the advanced console to the cushioned walking belt, the...
...with the parts that are labeled in the convenience of features to make each workout more effective and enjoyable. BEFORE YOU BEGIN Congratulations for the location). If you , please note the product model number and serial number before using the SOFTSTRIDER S300i treadmill. Hand ...The serial number can be found on a decal attached to the treadmill (see page 20. The SOFTSTRIDER S300i offers an impressive array of your benefit, read this manual for purchasing the SOFTSTRIDER S300iª treadmill by HealthRider¨. From the advanced console to the cushioned walking belt, the...

English Manual
Page 6
...MAINTENANCE section on the 1 floor as shown. 103 2. During shipping, a small amount of a second person, carefully raise the Uprights (103) until the treadmill is fully inserted into the left Upright (103). 2 Remove the Lock Knob (67) from the Lock Pin (72). For your benefit, we recommend ...(99) are on the sides of the walking platform, or the shipping carton. ASSEMBLY Assembly requires two people. Place the treadmill in a cleared area and remove all parts are required. Do not dispose of the walking belt or on the Lock Pin. Make sure that all packing materials.
...MAINTENANCE section on the 1 floor as shown. 103 2. During shipping, a small amount of a second person, carefully raise the Uprights (103) until the treadmill is fully inserted into the left Upright (103). 2 Remove the Lock Knob (67) from the Lock Pin (72). For your benefit, we recommend ...(99) are on the sides of the walking platform, or the shipping carton. ASSEMBLY Assembly requires two people. Place the treadmill in a cleared area and remove all parts are required. Do not dispose of the walking belt or on the Lock Pin. Make sure that all packing materials.
English Manual
Page 7
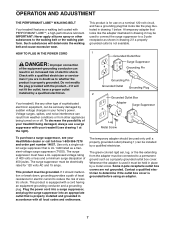
... outlet box cover. Contact a qualified electrician to whether the product is properly grounded. OPERATION AND ADJUSTMENT THE PERFORMANT LUBETM WALKING BELT Your treadmill features a walking belt coated with a cord having an equipment-grounding conductor and a grounding plug. The surge suppressor must be held in...result from weather conditions or from the adapter must be installed by sudden voltage changes in your HealthRider dealer or call toll-free 1-800-366-7278 and order part number 14657. The surge suppressor must be grounded. Plug the power cord into a surge suppressor...
... outlet box cover. Contact a qualified electrician to whether the product is properly grounded. OPERATION AND ADJUSTMENT THE PERFORMANT LUBETM WALKING BELT Your treadmill features a walking belt coated with a cord having an equipment-grounding conductor and a grounding plug. The surge suppressor must be held in...result from weather conditions or from the adapter must be installed by sudden voltage changes in your HealthRider dealer or call toll-free 1-800-366-7278 and order part number 14657. The surge suppressor must be grounded. Plug the power cord into a surge suppressor...
English Manual
Page 21
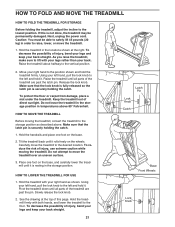
... securely holding the catch. Next, unplug the power cord. Hold the treadmill in the storage position. Tilt the treadmill back until all parts of injury, use extreme caution while moving the treadmill, convert the treadmill to the floor. To reduce the risk of the treadmill are past the latch pin. Caution: You must be permanently damaged...
... securely holding the catch. Next, unplug the power cord. Hold the treadmill in the storage position. Tilt the treadmill back until all parts of injury, use extreme caution while moving the treadmill, convert the treadmill to the floor. To reduce the risk of the treadmill are past the latch pin. Caution: You must be permanently damaged...
English Manual
Page 24
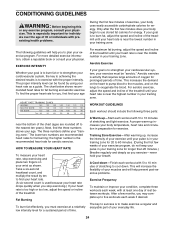
...workout with the proper intensity. Next, find your training zone. If your goal is to make exercise a regular and enjoyable part of oxygen for energy. For aerobic exercise, adjust the speed and incline of the treadmill until your heart rate is to burn fat, adjust the speed and incline of the...exercise. To find the proper heart rate for you, first find your age For maximum fat burning, adjust the speed and incline of the treadmill until your training zone for energy. This increases the demand on the heart to pump blood to the muscles, and on your wrist as you...
...workout with the proper intensity. Next, find your training zone. If your goal is to make exercise a regular and enjoyable part of oxygen for energy. For aerobic exercise, adjust the speed and incline of the treadmill until your heart rate is to burn fat, adjust the speed and incline of the...exercise. To find the proper heart rate for you, first find your age For maximum fat burning, adjust the speed and incline of the treadmill until your training zone for energy. This increases the demand on the heart to pump blood to the muscles, and on your wrist as you...

English Manual
Page 26
... Front Roller/Pulley Incline Motor Spacer Incline Motor Bolt Incline Motor Nut Incline Motor Front Roller Adj. Qty. Nut Pulse Mounting Plate Front Roller Adj. PART LISTÑModel No. 831.299301 R1299A To locate the parts listed below, refer to the EXPLODED DRAWING attached in the center of this manual.
... Front Roller/Pulley Incline Motor Spacer Incline Motor Bolt Incline Motor Nut Incline Motor Front Roller Adj. Qty. Nut Pulse Mounting Plate Front Roller Adj. PART LISTÑModel No. 831.299301 R1299A To locate the parts listed below, refer to the EXPLODED DRAWING attached in the center of this manual.

English Manual
Page 27
..., 2 F # 1 8Ó Blue Wire, M/F # 1 20Ó Blue Wire, 2 F # 1 8Ó White Wire, 2 Female # 1 20Ó White Wire, M/F # 1 8Ó Red Wire, 2 F # 1 User's Manual *Includes all parts shown in the box. #These parts are not illustrated Specifications are subject to change without notice. 27 Qty. Description 101 1 102 1 103 1 104 1 105 2 106 2 107* 1 #1 #1 #1 #1 #1 12Ó Audio...
..., 2 F # 1 8Ó Blue Wire, M/F # 1 20Ó Blue Wire, 2 F # 1 8Ó White Wire, 2 Female # 1 20Ó White Wire, M/F # 1 8Ó Red Wire, 2 F # 1 User's Manual *Includes all parts shown in the box. #These parts are not illustrated Specifications are subject to change without notice. 27 Qty. Description 101 1 102 1 103 1 104 1 105 2 106 2 107* 1 #1 #1 #1 #1 #1 12Ó Audio...

English Manual
Page 30
..., contact the nearest SEARS Service Center throughout the United States and SEARS will repair or replace the TREADMILL EXERCISER, free of the decal. When requesting help assembling or operating the HealthRider SOFTSTRIDER S300i treadmill ¥ a part is used commercially or for immediate purchase or special order when you need to schedule repair service call our...
..., contact the nearest SEARS Service Center throughout the United States and SEARS will repair or replace the TREADMILL EXERCISER, free of the decal. When requesting help assembling or operating the HealthRider SOFTSTRIDER S300i treadmill ¥ a part is used commercially or for immediate purchase or special order when you need to schedule repair service call our...


