

English Manual
Page 3
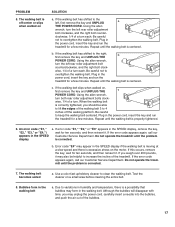
... are adequately informed of the treadmill every three months. 23. Never allow more amps. For maximum walking belt life, never use only. Always remove the key, unplug the power cord and move the on /off . When operating the treadmill, keep hands and feet from heated surfaces. 13. You must be on...
... are adequately informed of the treadmill every three months. 23. Never allow more amps. For maximum walking belt life, never use only. Always remove the key, unplug the power cord and move the on /off . When operating the treadmill, keep hands and feet from heated surfaces. 13. You must be on...
English Manual
Page 5
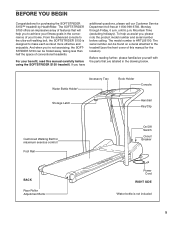
... note the product model number and serial number before using the SOFTSTRIDER S150 treadmill. Water Bottle Holder* Storage Latch Accessory Tray Book Holder Console Handrail Key/Clip Cushioned Walking Belt for maximum exercise comfort Foot Rail BACK Rear Roller... Adjustment Bolts On/Off Switch Circuit Breaker Power Cord RIGHT SIDE *Water bottle is designed to the treadmill (see the front cover of your benefit, read this manual for purchasing the SOFTSTRIDER S150™ treadmill by HealthRider...
... note the product model number and serial number before using the SOFTSTRIDER S150 treadmill. Water Bottle Holder* Storage Latch Accessory Tray Book Holder Console Handrail Key/Clip Cushioned Walking Belt for maximum exercise comfort Foot Rail BACK Rear Roller... Adjustment Bolts On/Off Switch Circuit Breaker Power Cord RIGHT SIDE *Water bottle is designed to the treadmill (see the front cover of your benefit, read this manual for purchasing the SOFTSTRIDER S150™ treadmill by HealthRider...
English Manual
Page 8
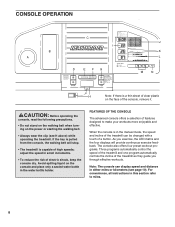
... speed and incline of the treadmill can display speed and distance in this section refer to make your workouts more enjoyable and effective. If the key is pulled from the console, the walking belt will provide continuous exercise feedback. When the console is in the water bottle holder. Note: The console...
... speed and incline of the treadmill can display speed and distance in this section refer to make your workouts more enjoyable and effective. If the key is pulled from the console, the walking belt will provide continuous exercise feedback. When the console is in the water bottle holder. Note: The console...
English Manual
Page 9
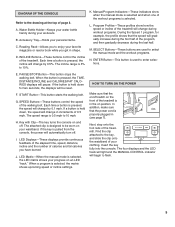
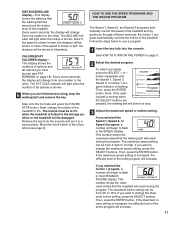
...held down for example, the profile shows that the power cord is 0.5 mph to the drawing at the top of your workouts. Insert the key fully into the console. SELECT Buttons-These buttons are used to enjoy your waistband. I. When a program is designed to flash. 9 The ... bottle handy during workout programs. During the Speed 1 program, for two seconds, the displays will automatically turn off . L. If the key is 3% to the key, and slide the clip onto the waistband of page 8. DIAGRAM OF THE CONSOLE Refer to 10 mph. Each time a button is pressed...
...held down for example, the profile shows that the power cord is 0.5 mph to the drawing at the top of your workouts. Insert the key fully into the console. SELECT Buttons-These buttons are used to enjoy your waistband. I. When a program is designed to flash. 9 The ... bottle handy during workout programs. During the Speed 1 program, for two seconds, the displays will automatically turn off . L. If the key is 3% to the key, and slide the clip onto the waistband of page 8. DIAGRAM OF THE CONSOLE Refer to 10 mph. Each time a button is pressed...
English Manual
Page 10
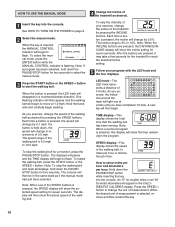
... the SPEED + button to start the walking belt. Note: If a program has been selected, hold down the PAUSE/STOP button while inserting the key into the console. Note: When one at 1.0 mph. After the buttons are pressed, the DISTANCE/INCLINE display will show the incline setting for metric...the SPEED buttons. To select the manual mode, press the ENTER button while the MANUAL CONTROL indicator is selected, remove and then reinsert the key. 10 One flashing indicator will then appear and the walking belt will appear in a counterclockwise direction. To vary the intensity of the SPEED...
... the SPEED + button to start the walking belt. Note: If a program has been selected, hold down the PAUSE/STOP button while inserting the key into the console. Note: When one at 1.0 mph. After the buttons are pressed, the DISTANCE/INCLINE display will show the incline setting for metric...the SPEED buttons. To select the manual mode, press the ENTER button while the MANUAL CONTROL indicator is selected, remove and then reinsert the key. 10 One flashing indicator will then appear and the walking belt will appear in a counterclockwise direction. To vary the intensity of the SPEED...
English Manual
Page 11
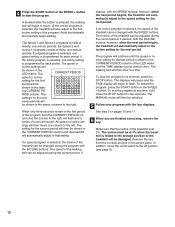
...: If the speed is folded to 10 mph. The incline must be at 3% when the treadmill is shown in a secure place. Remove the key from 4 mph to the storage position or the treadmill will be from the console and put it in mph, the distance will be damaged. The...exercising, stop . 3 Adjust the maximum speed or incline setting. If you want to change from one number to a stop the walking belt and remove the key. DISTANCE/INCLINE display-This display shows the distance that the treadmill will reach during the program. Step onto the foot rails and press the PAUSE...
...: If the speed is folded to 10 mph. The incline must be at 3% when the treadmill is shown in a secure place. Remove the key from 4 mph to the storage position or the treadmill will be from the console and put it in mph, the distance will be damaged. The...exercising, stop . 3 Adjust the maximum speed or incline setting. If you want to change from one number to a stop the walking belt and remove the key. DISTANCE/INCLINE display-This display shows the distance that the treadmill will reach during the program. Step onto the foot rails and press the PAUSE...
English Manual
Page 12
... with the SPEED buttons; All speed or incline settings will then move the on pages 10 and 11. 6 When you are finished exercising, remove the key. The walking belt will then slow to that the incline of the treadmill is folded to the left. A moment after the button is pressed, the... will continue until the speed or incline setting for each period; See step 5 on /off switch to the off position (see page 9). 12 Remove the key from the console and put it in the first period of the program, both the CURRENT PERIOD column and the column to start the program...
... with the SPEED buttons; All speed or incline settings will then move the on pages 10 and 11. 6 When you are finished exercising, remove the key. The walking belt will then slow to that the incline of the treadmill is folded to the left. A moment after the button is pressed, the... will continue until the speed or incline setting for each period; See step 5 on /off switch to the off position (see page 9). 12 Remove the key from the console and put it in the first period of the program, both the CURRENT PERIOD column and the column to start the program...
English Manual
Page 13
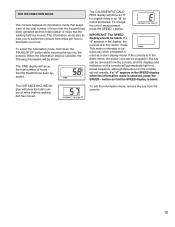
..., the following information will be shown: The TIME display will automatically light in the "demo" mode. To exit the information mode, remove the key from the console, and the displays and indicators on the console will show the total number of miles that the walking belt has moved. This... mode is intended to kilometers per hour. If a "d" appears in , the key can be used as a store display model. button so that the SPEED display is selected, press the SPEED - THE INFORMATION MODE The console features ...
..., the following information will be shown: The TIME display will automatically light in the "demo" mode. To exit the information mode, remove the key from the console, and the displays and indicators on the console will show the total number of miles that the walking belt has moved. This... mode is intended to kilometers per hour. If a "d" appears in , the key can be used as a store display model. button so that the SPEED display is selected, press the SPEED - THE INFORMATION MODE The console features ...

English Manual
Page 15
... circuit breaker has tripped. Note: You may need to the floor. Make sure that the power cord is plugged into a surge protector, and that the key is past the catch. Using your back straight. To decrease the possibility of five feet or less in length. until the storage latch is fully...
... circuit breaker has tripped. Note: You may need to the floor. Make sure that the power cord is plugged into a surge protector, and that the key is past the catch. Using your back straight. To decrease the possibility of five feet or less in length. until the storage latch is fully...
English Manual
Page 16
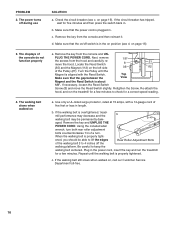
...hood, and run the treadmill for a correct speed reading. 4. When the walking belt is plugged in . Plug in the power cord, insert the key and run the treadmill for a few minutes to check for a few minutes. c. on , call our Customer Service Department toll-free. 16 b. Remove the... POWER CORD. c. PROBLEM 2. If the circuit breaker has tripped, wait for five minutes and then press the switch back in . Remove the key from the hood and carefully re- Turn the Pulley until the walking belt is properly tightened. Using the included allen wrench, turn both rear roller...
...hood, and run the treadmill for a correct speed reading. 4. When the walking belt is plugged in . Plug in the power cord, insert the key and run the treadmill for a few minutes to check for a few minutes. c. on , call our Customer Service Department toll-free. 16 b. Remove the... POWER CORD. c. PROBLEM 2. If the circuit breaker has tripped, wait for five minutes and then press the switch back in . Remove the key from the hood and carefully re- Turn the Pulley until the walking belt is properly tightened. Using the included allen wrench, turn both rear roller...
English Manual
Page 17
...the error code appears again, call our Customer Service Department. The walking belt becomes soiled a. Due to the right, b first remove the key and UNPLUG THE POWER CORD. If the walking belt has shifted to variations in humidity and temperature, there is a possibility that bubbles may ...and the right bolt counter- Bubbles form in the SPEED display a. b. Be careful not to keep the walking belt centered. If this occurs, remove the key, wait for a few minutes. clockwise, 1/4 of a turn each . wise, 1/4 of the bubbles. 17 c. If the error code appears again, call...
...the error code appears again, call our Customer Service Department. The walking belt becomes soiled a. Due to the right, b first remove the key and UNPLUG THE POWER CORD. If the walking belt has shifted to variations in humidity and temperature, there is a possibility that bubbles may ...and the right bolt counter- Bubbles form in the SPEED display a. b. Be careful not to keep the walking belt centered. If this occurs, remove the key, wait for a few minutes. clockwise, 1/4 of a turn each . wise, 1/4 of the bubbles. 17 c. If the error code appears again, call...
English Manual
Page 18
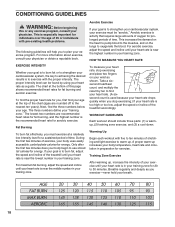
... highest number is to exercise with the proper intensity. EXERCISE INTENSITY Whether your goal is to burn fat or to strengthen your cardiovascular system, the key to the nearest ten years). To find the proper heart rate for you, first find your training zone. Next, find your heart rate. (A sixsecond count...
... highest number is to exercise with the proper intensity. EXERCISE INTENSITY Whether your goal is to burn fat or to strengthen your cardiovascular system, the key to the nearest ten years). To find the proper heart rate for you, first find your training zone. Next, find your heart rate. (A sixsecond count...
English Manual
Page 19
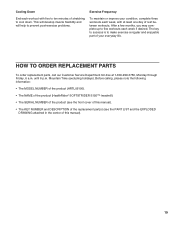
This will develop muscle flexibility and will help to prevent post-exercise problems. To maintain or improve your everyday life. The key to success is to ten minutes of this manual). 19 HOW TO ORDER REPLACEMENT PARTS To order replacement parts, call our Customer ...; The MODEL NUMBER of the product (HRTL06190). • The NAME of the product (HealthRider® SOFTSTRIDER S150™ treadmill). • The SERIAL NUMBER of the product (see the front cover of this manual). • The KEY NUMBER and DESCRIPTION of the replacement part(s) (see the PART LIST and the EXPLODED DRAWING...
This will develop muscle flexibility and will help to prevent post-exercise problems. To maintain or improve your everyday life. The key to success is to ten minutes of this manual). 19 HOW TO ORDER REPLACEMENT PARTS To order replacement parts, call our Customer ...; The MODEL NUMBER of the product (HRTL06190). • The NAME of the product (HealthRider® SOFTSTRIDER S150™ treadmill). • The SERIAL NUMBER of the product (see the front cover of this manual). • The KEY NUMBER and DESCRIPTION of the replacement part(s) (see the PART LIST and the EXPLODED DRAWING...
English Manual
Page 20
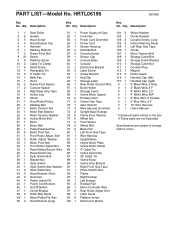
... Power Cord Grommet Power Cord Sensor Housing Handrail Bolt Console Screw Sensor Cap Console Base Console Electronics Bracket Latch Screw Choke Bracket Key/Clip Storage Latch Rear Roller Ground Wire Book Holder Storage Catch Incline Motor Spacer Endcap Insert Center Grip Tape Allen Wrench Wire ... Tension Nut Motor Star Washer Motor Tension Washer Incline Motor Bolt Motor Motor Belt Pulley/Flywheel/Fan Motor Pivot Nut Front Roller Adjust. HRTL06190 R0799A Key No. Qty. PART LIST-Model No. Bolt Latch Decal Platform Screw Electronics Shield 101 2 102 1 103 2 104 3 105 1 106 1 107 1 108 1 109...
... Power Cord Grommet Power Cord Sensor Housing Handrail Bolt Console Screw Sensor Cap Console Base Console Electronics Bracket Latch Screw Choke Bracket Key/Clip Storage Latch Rear Roller Ground Wire Book Holder Storage Catch Incline Motor Spacer Endcap Insert Center Grip Tape Allen Wrench Wire ... Tension Nut Motor Star Washer Motor Tension Washer Incline Motor Bolt Motor Motor Belt Pulley/Flywheel/Fan Motor Pivot Nut Front Roller Adjust. HRTL06190 R0799A Key No. Qty. PART LIST-Model No. Bolt Latch Decal Platform Screw Electronics Shield 101 2 102 1 103 2 104 3 105 1 106 1 107 1 108 1 109...


