
English Manual
Page 2
HealthRider is attached in the center of ICON IP, Inc. 2 TABLE OF CONTENTS IMPORTANT PRECAUTIONS 3 BEFORE YOU BEGIN 5 ASSEMBLY 6 HOW TO USE THE CHEST PULSE SENSOR 9 OPERATION AND ADJUSTMENT 10 HOW TO FOLD AND MOVE THE TREADMILL 20 TROUBLESHOOTING 22 CONDITIONING GUIDELINES 25 PART LIST 26 LIMITED WARRANTY Back Cover Note: An EXPLODED DRAWING is a registered trademark of this manual.
HealthRider is attached in the center of ICON IP, Inc. 2 TABLE OF CONTENTS IMPORTANT PRECAUTIONS 3 BEFORE YOU BEGIN 5 ASSEMBLY 6 HOW TO USE THE CHEST PULSE SENSOR 9 OPERATION AND ADJUSTMENT 10 HOW TO FOLD AND MOVE THE TREADMILL 20 TROUBLESHOOTING 22 CONDITIONING GUIDELINES 25 PART LIST 26 LIMITED WARRANTY Back Cover Note: An EXPLODED DRAWING is a registered trademark of this manual.
English Manual
Page 3
... the control system is not working properly. (See TROUBLESHOOTING on page 20.) You must be able to safely lift 45 pounds (20 kg) to raise, lower, or move the walking belt while the power is the responsibility of the owner to ensure that meets all users of this manual and order part number 146148, or 18. Do not operate the treadmill if the power cord or plug...
... the control system is not working properly. (See TROUBLESHOOTING on page 20.) You must be able to safely lift 45 pounds (20 kg) to raise, lower, or move the walking belt while the power is the responsibility of the owner to ensure that meets all users of this manual and order part number 146148, or 18. Do not operate the treadmill if the power cord or plug...

English Manual
Page 4
... any exercise program, consult your physician. This is fully closed. 23. Never remove the motor hood unless instructed to do so by an authorized service representative only. 26. WARNING: Before beginning this treadmill in any commercial, rental, or institutional setting. Apply the decal in this manual and order a free replacement decal. DANGER: 25. Note: The decals are not shown at actual size. 4 22. Servicing...
... any exercise program, consult your physician. This is fully closed. 23. Never remove the motor hood unless instructed to do so by an authorized service representative only. 26. WARNING: Before beginning this treadmill in any commercial, rental, or institutional setting. Apply the decal in this manual and order a free replacement decal. DANGER: 25. Note: The decals are not shown at actual size. 4 22. Servicing...
English Manual
Page 5
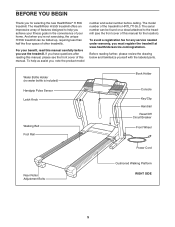
... serial number before you use the treadmill. BEFORE YOU BEGIN Thank you for any service needed under warranty, you must register the treadmill at www.healthriderservice.com/registration. For your home. To help you have questions after reading this manual, please see the front cover of the treadmill is included) Handgrip Pulse Sensor Latch Knob Walking Belt Foot Rail Book Holder Console Key/Clip Handrail Reset/Off Circuit Breaker Front Wheel Power Cord Rear Roller Adjustment Bolts...
... serial number before you use the treadmill. BEFORE YOU BEGIN Thank you for any service needed under warranty, you must register the treadmill at www.healthriderservice.com/registration. For your home. To help you have questions after reading this manual, please see the front cover of the treadmill is included) Handgrip Pulse Sensor Latch Knob Walking Belt Foot Rail Book Holder Console Key/Clip Handrail Reset/Off Circuit Breaker Front Wheel Power Cord Rear Roller Adjustment Bolts...
English Manual
Page 6
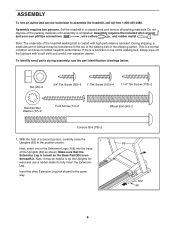
... Extension Leg (not shown) in a cleared area and remove all packing materials. Set the treadmill in the same way. 69 102 99 6 During shipping, a small amount of the treadmill walking belt is lubricant on top of the walking belt or the shipping carton. Nut (20)-2 3/4" Tek Screw (65)-2 1" Tek Screw (100)-4 1 1/4" Tek Screw (118)-2 Handrail Star Washer (77)-2 Foot Screw (74)-2 Wheel Bolt (94)-2 Console Bolt (78...
... Extension Leg (not shown) in a cleared area and remove all packing materials. Set the treadmill in the same way. 69 102 99 6 During shipping, a small amount of the treadmill walking belt is lubricant on top of the walking belt or the shipping carton. Nut (20)-2 3/4" Tek Screw (65)-2 1" Tek Screw (100)-4 1 1/4" Tek Screw (118)-2 Handrail Star Washer (77)-2 Foot Screw (74)-2 Wheel Bolt (94)-2 Console Bolt (78...
English Manual
Page 9
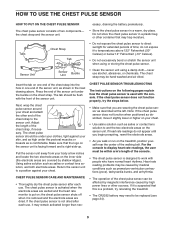
..., tight against your body a few inches and locate the two electrode areas on the sensor unit is facing forward and is not dried after each use alcohol, abrasives, or chemicals. CHEST PULSE SENSOR TROUBLESHOOTING The instructions on ; If it to the sensor unit. The chest pulse sensor is used with people who have normal heart rhythms. Heart rate reading problems may be replaced (see page 24). 9 Using saline solution such...
..., tight against your body a few inches and locate the two electrode areas on the sensor unit is facing forward and is not dried after each use alcohol, abrasives, or chemicals. CHEST PULSE SENSOR TROUBLESHOOTING The instructions on ; If it to the sensor unit. The chest pulse sensor is used with people who have normal heart rhythms. Heart rate reading problems may be replaced (see page 24). 9 Using saline solution such...

English Manual
Page 10
... POWER CORD DANGER: Improper connection of 450 joules. Your treadmill, like the plug illustrated in doubt as to the walking belt or the walking platform. Voltage surges, spikes, and noise interference can be installed by a metal screw. To purchase a surge suppressor, see drawing 1 at the right). This product is grounded before using an adapter. 10 There must be used it will deteriorate the walking belt...
... POWER CORD DANGER: Improper connection of 450 joules. Your treadmill, like the plug illustrated in doubt as to the walking belt or the walking platform. Voltage surges, spikes, and noise interference can be installed by a metal screw. To purchase a surge suppressor, see drawing 1 at the right). This product is grounded before using an adapter. 10 There must be used it will deteriorate the walking belt...
English Manual
Page 11
... create your workouts. To use of the walking belt, and center the walking belt if necessary (see page 17. Note: If there is used, observe the alignment of the chest pulse sensor. To use a personal trainer program, see pages 15 and 16. In addition, the console features ten personal trainer programs. Each program automatically controls the speed and incline of clear plastic on page 12. your heart rate near target heart rate settings during your...
... create your workouts. To use of the walking belt, and center the walking belt if necessary (see page 17. Note: If there is used, observe the alignment of the chest pulse sensor. To use a personal trainer program, see pages 15 and 16. In addition, the console features ten personal trainer programs. Each program automatically controls the speed and incline of clear plastic on page 12. your heart rate near target heart rate settings during your...
English Manual
Page 12
... console; As you use the handgrip pulse sensor or the chest pulse sensor, the lower left corner of the clip. Each time a button is pressed, the walking belt will show your heart rate. 12 Note: After the buttons are pressed, it reaches the selected speed setting. As you have burned and the incline level of your progress with the matrix and the display. Reset Position Next, stand on the treadmill near the power cord...
... console; As you use the handgrip pulse sensor or the chest pulse sensor, the lower left corner of the clip. Each time a button is pressed, the walking belt will show your heart rate. 12 Note: After the buttons are pressed, it reaches the selected speed setting. As you have burned and the incline level of your progress with the matrix and the display. Reset Position Next, stand on the treadmill near the power cord...
English Manual
Page 13
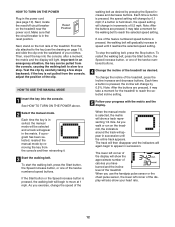
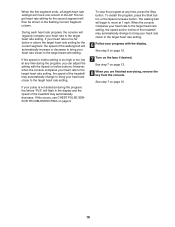
... minutes per mile, and the speed of the walking belt. Note: The console can display speed and distance in the "demo" mode. To turn on when the walking belt is stopped, the fans will automatically turn off the fans, press the button a third time. Note: If the display remains lit after a few minutes. 8 When you are finished exercising, remove the key from the console. When you are finished using the treadmill, switch the reset/off circuit...
... minutes per mile, and the speed of the walking belt. Note: The console can display speed and distance in the "demo" mode. To turn on when the walking belt is stopped, the fans will automatically turn off the fans, press the button a third time. Note: If the display remains lit after a few minutes. 8 When you are finished exercising, remove the key from the console. When you are finished using the treadmill, switch the reset/off circuit...
English Manual
Page 14
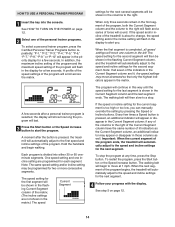
... display will show how long the program will last. 3 Press the Start button or the Speed increase button to the right will flash and a series of tones will automatically adjust to the right of the Current Segment column have the same number of the treadmill is too high or too low, you . if any time, press the Stop button. HOW TO USE A PERSONAL TRAINER PROGRAM 1 Insert the key...
... display will show how long the program will last. 3 Press the Start button or the Speed increase button to the right will flash and a series of tones will automatically adjust to the right of the Current Segment column have the same number of the treadmill is too high or too low, you . if any time, press the Stop button. HOW TO USE A PERSONAL TRAINER PROGRAM 1 Insert the key...

English Manual
Page 15
... are finished exercising, remove the key from the console. See step 7 on page 12. 2 Select one column to the "off the demo mode. See step 7 on page 16. 4 When you have programmed and the number of segments that the incline of the custom programs. To select a custom program, press the Custom & Heart Rate Control Programs button repeatedly; Hold the handrails and begin to move one of the treadmill is pressed, the walking belt will...
... are finished exercising, remove the key from the console. See step 7 on page 12. 2 Select one column to the "off the demo mode. See step 7 on page 16. 4 When you have programmed and the number of segments that the incline of the custom programs. To select a custom program, press the Custom & Heart Rate Control Programs button repeatedly; Hold the handrails and begin to move one of the treadmill is pressed, the walking belt will...
English Manual
Page 16
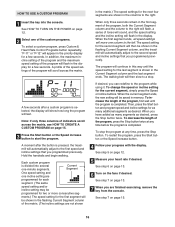
... the console. See step 7 on page 15. 3 Press the Start button or the Speed increase button to a stop the program at any time, press the Stop button. When you programmed previously. To restart the program, press the Start button or the Speed increase button. 4 Follow your heart rate if desired. "P-11" or "P-12" will flash in the first segment of the custom programs. To select a custom program, press Custom & Heart Rate Control Programs button repeatedly; To change the speed or incline setting for...
... the console. See step 7 on page 15. 3 Press the Start button or the Speed increase button to a stop the program at any time, press the Stop button. When you programmed previously. To restart the program, press the Start button or the Speed increase button. 4 Follow your heart rate if desired. "P-11" or "P-12" will flash in the first segment of the custom programs. To select a custom program, press Custom & Heart Rate Control Programs button repeatedly; To change the speed or incline setting for...

English Manual
Page 17
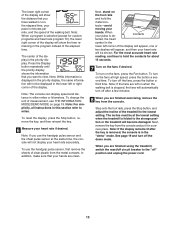
... begin walking. If heart rate program 14, 15, or 16 is programmed for two or more consecutive segments. Heart rate program 13 is pressed, the treadmill will automatically adjust to the right will affect your exercise heart rate. Note: The same target heart rate setting may be shown in the columns to use a heart rate program. 1 Put on the chest pulse sensor. lems, or if you are taking medication regularly, consult your physician to change...
... begin walking. If heart rate program 14, 15, or 16 is programmed for two or more consecutive segments. Heart rate program 13 is pressed, the treadmill will automatically adjust to the right will affect your exercise heart rate. Note: The same target heart rate setting may be shown in the columns to use a heart rate program. 1 Put on the chest pulse sensor. lems, or if you are taking medication regularly, consult your physician to change...
English Manual
Page 18
... compare your heart rate closer to the target heart rate setting. When the console compares your heart rate to the target heart rate setting, the speed and/or incline of the treadmill may automatically change to bring your progress with the Speed or Incline buttons. To stop the program at any time during the program, the letters "PLS" will flash in the flashing Current Segment column. If this occurs, see CHEST PULSE SENSOR TROUBLESHOOTING on...
... compare your heart rate closer to the target heart rate setting. When the console compares your heart rate to the target heart rate setting, the speed and/or incline of the treadmill may automatically change to bring your progress with the Speed or Incline buttons. To stop the program at any time during the program, the letters "PLS" will flash in the flashing Current Segment column. If this occurs, see CHEST PULSE SENSOR TROUBLESHOOTING on...

English Manual
Page 20
... desired location. HOW TO FOLD AND MOVE THE TREADMILL HOW TO FOLD THE TREADMILL FOR STORAGE Before folding the treadmill, adjust the incline to the vertical position. 2. Next, unplug the power cord. CAUTION: You must be permanently damaged. Raise the treadmill about halfway to the lowest position. Keep the treadmill out of injury, bend your legs and keep your left hand, pull the latch knob to the storage position...
... desired location. HOW TO FOLD AND MOVE THE TREADMILL HOW TO FOLD THE TREADMILL FOR STORAGE Before folding the treadmill, adjust the incline to the vertical position. 2. Next, unplug the power cord. CAUTION: You must be permanently damaged. Raise the treadmill about halfway to the lowest position. Keep the treadmill out of injury, bend your legs and keep your left hand, pull the latch knob to the storage position...

English Manual
Page 23
... walking belt is changing, remove the key. PROBLEM: The incline of this manual. Using the allen wrench, turn both rear roller bolts counterclockwise, 1/4 of the walk- When the walking belt is off -center or slips when walked on page 10. PROBLEM: The walking belt slows when walked on , first remove b the key and UNPLUG THE POWER CORD. Use only a single-outlet surge suppressor that meets all of the Incline buttons. Using the allen wrench, turn both rear roller bolts clockwise, 1/4 of a turn . Then, plug in the console, press...
... walking belt is changing, remove the key. PROBLEM: The incline of this manual. Using the allen wrench, turn both rear roller bolts counterclockwise, 1/4 of the walk- When the walking belt is off -center or slips when walked on page 10. PROBLEM: The walking belt slows when walked on , first remove b the key and UNPLUG THE POWER CORD. Use only a single-outlet surge suppressor that meets all of the Incline buttons. Using the allen wrench, turn both rear roller bolts clockwise, 1/4 of a turn . Then, plug in the console, press...

English Manual
Page 25
... the user's movement, may complete up -Start each week, with 5 to use stored fat calories for fat burning and aerobic exercise. The pulse sensors are not medical devices. The proper intensity level can be "aerobic." begin to 10 minutes of exercise, your "training zone." If your goal is to burn fat, adjust the speed and incline of the treadmill until your heart rate is...
... the user's movement, may complete up -Start each week, with 5 to use stored fat calories for fat burning and aerobic exercise. The pulse sensors are not medical devices. The proper intensity level can be "aerobic." begin to 10 minutes of exercise, your "training zone." If your goal is to burn fat, adjust the speed and incline of the treadmill until your heart rate is...
English Manual
Page 26
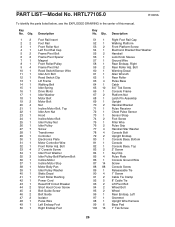
... 1 Walking Belt 15 1 Idler Spring 16 1 Drive Motor 17 1 Idler Washer 18 1 Motor Belt 19 2 Motor Bolt 20 4 Nut 21 1 Incline Motor Bolt, Top 22 1 Idler Arm Nut 23 1 Hood 24 1 Incline Motor Bolt 25 1 Idler Pulley Nut 26 1 Idler Pulley 27 7 Screw 28 1 Transformer 29 1 Controller 30 1 Electronics Plate 31 1 Motor Controller Wire 32 1 Front Roller Adj. Bolt Warning Decal Allen Wrench Rear Roller Pulse Base Catch 3/4" Tek Screw Console Frame Platform Nut Latch Pin Assembly Upright Handrail Bracket Pulse Receiver Chest Pulse Sensor Sensor Strap Foot Screw Filter Wire Pulse Grip...
... 1 Walking Belt 15 1 Idler Spring 16 1 Drive Motor 17 1 Idler Washer 18 1 Motor Belt 19 2 Motor Bolt 20 4 Nut 21 1 Incline Motor Bolt, Top 22 1 Idler Arm Nut 23 1 Hood 24 1 Incline Motor Bolt 25 1 Idler Pulley Nut 26 1 Idler Pulley 27 7 Screw 28 1 Transformer 29 1 Controller 30 1 Electronics Plate 31 1 Motor Controller Wire 32 1 Front Roller Adj. Bolt Warning Decal Allen Wrench Rear Roller Pulse Base Catch 3/4" Tek Screw Console Frame Platform Nut Latch Pin Assembly Upright Handrail Bracket Pulse Receiver Chest Pulse Sensor Sensor Strap Foot Screw Filter Wire Pulse Grip...
English Manual
Page 30
... by warranty. Before shipping, always obtain a Return Authorization Number (RA No.) from state to you believe the service is covered by an ICON trained and authorized service provider, or, at 1-888-922-4222 and tell them your Product. Accordingly, the above limitation may have other consequential damages of your name and address and the serial number of whatsoever nature. ICON HEALTH & FITNESS, INC...
... by warranty. Before shipping, always obtain a Return Authorization Number (RA No.) from state to you believe the service is covered by an ICON trained and authorized service provider, or, at 1-888-922-4222 and tell them your Product. Accordingly, the above limitation may have other consequential damages of your name and address and the serial number of whatsoever nature. ICON HEALTH & FITNESS, INC...


