

English Manual
Page 2
HealthRider is attached in the center of ICON IP, Inc. 2 TABLE OF CONTENTS IMPORTANT PRECAUTIONS 3 BEFORE YOU BEGIN 5 ASSEMBLY 6 HOW TO USE THE CHEST PULSE SENSOR 9 OPERATION AND ADJUSTMENT 10 HOW TO FOLD AND MOVE THE TREADMILL 20 TROUBLESHOOTING 22 CONDITIONING GUIDELINES 25 PART LIST 26 LIMITED WARRANTY Back Cover Note: An EXPLODED DRAWING is a registered trademark of this manual.
HealthRider is attached in the center of ICON IP, Inc. 2 TABLE OF CONTENTS IMPORTANT PRECAUTIONS 3 BEFORE YOU BEGIN 5 ASSEMBLY 6 HOW TO USE THE CHEST PULSE SENSOR 9 OPERATION AND ADJUSTMENT 10 HOW TO FOLD AND MOVE THE TREADMILL 20 TROUBLESHOOTING 22 CONDITIONING GUIDELINES 25 PART LIST 26 LIMITED WARRANTY Back Cover Note: An EXPLODED DRAWING is a registered trademark of this manual.
English Manual
Page 3
... page 10. Keep children under the treadmill. 4. Do not wear loose clothes that meets all times. 7. When connecting the power cord (see your local HealthRider dealer or call the tollfree telephone number on each side. Use only a single-outlet surge suppressor that could result in a garage or ... damage to the control system of the owner to raise, lower, or move the treadmill until it is properly assembled. (See ASSEMBLY on page 6, and HOW TO FOLD AND MOVE THE TREADMILL on page 22 if the treadmill is not working properly.) 15. see page 10), plug the power cord into a ...
... page 10. Keep children under the treadmill. 4. Do not wear loose clothes that meets all times. 7. When connecting the power cord (see your local HealthRider dealer or call the tollfree telephone number on each side. Use only a single-outlet surge suppressor that could result in a garage or ... damage to the control system of the owner to raise, lower, or move the treadmill until it is properly assembled. (See ASSEMBLY on page 6, and HOW TO FOLD AND MOVE THE TREADMILL on page 22 if the treadmill is not working properly.) 15. see page 10), plug the power cord into a ...

English Manual
Page 4
... the location shown. Never remove the motor hood unless instructed to do so by or through the use , before cleaning the treadmill, and before using. When folding or moving the treadmill, make sure that the storage latch is especially important for personal injury or property damage sustained by an authorized service representative. DANGER...
... the location shown. Never remove the motor hood unless instructed to do so by or through the use , before cleaning the treadmill, and before using. When folding or moving the treadmill, make sure that the storage latch is especially important for personal injury or property damage sustained by an authorized service representative. DANGER...
English Manual
Page 5
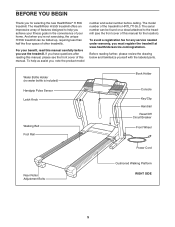
.../Off Circuit Breaker Front Wheel Power Cord Rear Roller Adjustment Bolts Cushioned Walking Platform RIGHT SIDE 5 The HealthRider H 550i treadmill offers an impressive array of features designed to the treadmill (see the front cover of this manual. BEFORE YOU BEGIN Thank you , note the product model... number and serial number before you 're not exercising, the unique H 550i treadmill can be folded up, requiring less than half the floor space of other treadmills. Water ...
.../Off Circuit Breaker Front Wheel Power Cord Rear Roller Adjustment Bolts Cushioned Walking Platform RIGHT SIDE 5 The HealthRider H 550i treadmill offers an impressive array of features designed to the treadmill (see the front cover of this manual. BEFORE YOU BEGIN Thank you , note the product model... number and serial number before you 're not exercising, the unique H 550i treadmill can be folded up, requiring less than half the floor space of other treadmills. Water ...
English Manual
Page 8
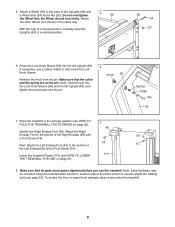
... in the same way. Attach a Wheel (95) to fully insert the Lock Knob Sleeve. 6 Knob 56 Remove the knob from damage, place a mat under the treadmill. 8 Make sure that the collar and the spring are properly tightened before you use a rubber mallet to the base of the Uprights (69) with a Foot..., attach the Left Endcap Foot (49) to the bottom of a second person, carefully raise the Uprights (69) to adjust the walking belt (see HOW TO FOLD THE TREADMILL FOR STORAGE on page 20). 7 49 Identify the Right Endcap Foot (50). Press the Lock Knob Sleeve (56) into the Lock Knob Sleeve (56...
... in the same way. Attach a Wheel (95) to fully insert the Lock Knob Sleeve. 6 Knob 56 Remove the knob from damage, place a mat under the treadmill. 8 Make sure that the collar and the spring are properly tightened before you use a rubber mallet to the base of the Uprights (69) with a Foot..., attach the Left Endcap Foot (49) to the bottom of a second person, carefully raise the Uprights (69) to adjust the walking belt (see HOW TO FOLD THE TREADMILL FOR STORAGE on page 20). 7 49 Identify the Right Endcap Foot (50). Press the Lock Knob Sleeve (56) into the Lock Knob Sleeve (56...
English Manual
Page 13
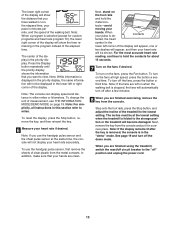
...mode. To reset the display, press the Stop button, remove the key, and then reinsert the key. 6 Measure your hands are finished using the treadmill, switch the reset/off after the key is removed, the console is the priority display. Note: If you use the handgrip pulse sensor, first ... adjust the incline of the treadmill to view. Press the Display button repeatedly until the priority display shows the information that you are clean. Note: For simplicity, all instructions in this section refer to hold the metal con- tacts-avoid moving your pulse is folded to the "off the fans...
...mode. To reset the display, press the Stop button, remove the key, and then reinsert the key. 6 Measure your hands are finished using the treadmill, switch the reset/off after the key is removed, the console is the priority display. Note: If you use the handgrip pulse sensor, first ... adjust the incline of the treadmill to view. Press the Display button repeatedly until the priority display shows the information that you are clean. Note: For simplicity, all instructions in this section refer to hold the metal con- tacts-avoid moving your pulse is folded to the "off the fans...

English Manual
Page 20
... risk of the wheels. 2. Place one foot against one of the wheels, and carefully lower the treadmill to the storage position as described above 85° Fahrenheit. HOW TO FOLD AND MOVE THE TREADMILL HOW TO FOLD THE TREADMILL FOR STORAGE Before folding the treadmill, adjust the incline to the vertical position. 2. Slowly release the latch knob.
... risk of the wheels. 2. Place one foot against one of the wheels, and carefully lower the treadmill to the storage position as described above 85° Fahrenheit. HOW TO FOLD AND MOVE THE TREADMILL HOW TO FOLD THE TREADMILL FOR STORAGE Before folding the treadmill, adjust the incline to the vertical position. 2. Slowly release the latch knob.


