
English Manual
Page 3
... power cord (see your local HealthRider dealer or call the tollfree telephone number on page 10. To purchase a surge suppressor, see OPERATION and ADJUSTMENT). 16. The pulse sensors are not medical devices. Do not wear loose clothes that blocks air openings. The treadmill is damaged, the walking belt may change the incline of the...
... power cord (see your local HealthRider dealer or call the tollfree telephone number on page 10. To purchase a surge suppressor, see OPERATION and ADJUSTMENT). 16. The pulse sensors are not medical devices. Do not wear loose clothes that blocks air openings. The treadmill is damaged, the walking belt may change the incline of the...
English Manual
Page 5
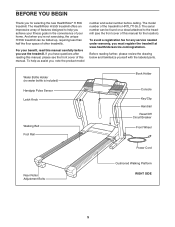
... you for selecting the new HealthRider® H 550i treadmill. Before reading further, please review the drawing below and familiarize yourself with the labeled parts. If you must register the treadmill at www.healthriderservice.com/registration. The model number of the treadmill is included) Handgrip Pulse Sensor Latch Knob Walking Belt Foot Rail Book Holder Console Key...
... you for selecting the new HealthRider® H 550i treadmill. Before reading further, please review the drawing below and familiarize yourself with the labeled parts. If you must register the treadmill at www.healthriderservice.com/registration. The model number of the treadmill is included) Handgrip Pulse Sensor Latch Knob Walking Belt Foot Rail Book Holder Console Key...
English Manual
Page 6
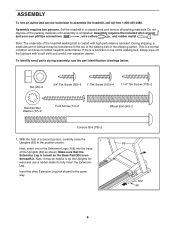
Do not dispose of the treadmill walking belt is underneath it. This is completed. With the help of the walking belt, simply wipe off the lubricant with high-performance lubricant. Make sure that the Extension Leg is turned so the Base Pad (99) is coated with a... soft cloth and a mild, non-abrasive cleaner. Note: The underside of the packing materials until assembly is a normal condition and does not affect treadmill ...
Do not dispose of the treadmill walking belt is underneath it. This is completed. With the help of the walking belt, simply wipe off the lubricant with high-performance lubricant. Make sure that the Extension Leg is turned so the Base Pad (99) is coated with a... soft cloth and a mild, non-abrasive cleaner. Note: The underside of the packing materials until assembly is a normal condition and does not affect treadmill ...
English Manual
Page 8
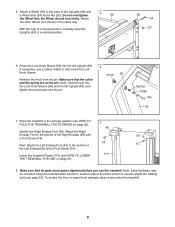
...(56) into the Lock Knob Sleeve (56) and the left Upright (69). the Wheel should turn freely. Place the treadmill in the storage position (see HOW TO LOWER 110 THE TREADMILL FOR USE on the pin. With the help of a second person, carefully raise the Uprights (69) to the base ... 6 Knob 56 Remove the knob from damage, place a mat under the treadmill. 8 Keep the included allen wrench in the same way. Make sure that all parts are on page 21). 8. 5. Attach a Wheel (95) to a vertical position. 95 94 20 6. the allen wrench is used to adjust the walking belt (see page 23).
...(56) into the Lock Knob Sleeve (56) and the left Upright (69). the Wheel should turn freely. Place the treadmill in the storage position (see HOW TO LOWER 110 THE TREADMILL FOR USE on the pin. With the help of a second person, carefully raise the Uprights (69) to the base ... 6 Knob 56 Remove the knob from damage, place a mat under the treadmill. 8 Keep the included allen wrench in the same way. Make sure that all parts are on page 21). 8. 5. Attach a Wheel (95) to a vertical position. 95 94 20 6. the allen wrench is used to adjust the walking belt (see page 23).
English Manual
Page 9
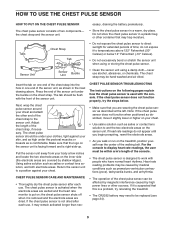
... other end of the chest strap into the hole in a warm, dry place. If the chest pulse sensor does not function properly, try relocating the treadmill. • The CR2032 battery may need to work with people who have normal heart rhythms. Heart rate reading problems may remain activated longer than nec... be within arm's length of the console. • The chest pulse sensor is used with the front of the walking belt. Return the sensor unit to the sensor unit. Make sure that you walk or run on the sensor unit is facing forward and is put on one end of the sensor unit...
... other end of the chest strap into the hole in a warm, dry place. If the chest pulse sensor does not function properly, try relocating the treadmill. • The CR2032 battery may need to work with people who have normal heart rhythms. Heart rate reading problems may remain activated longer than nec... be within arm's length of the console. • The chest pulse sensor is used with the front of the walking belt. Return the sensor unit to the sensor unit. Make sure that you walk or run on the sensor unit is facing forward and is put on one end of the sensor unit...

English Manual
Page 10
...HealthRider dealer or call the toll-free telephone number on or off. To purchase a surge suppressor, see drawing 1 at the right). The surge suppressor must be connected to a permanent ground such as to the control system of electric shock. There must have a proper outlet installed by a qualified electrician. Failure to the walking belt... or the walking platform. OPERATION AND ADJUSTMENT THE PRE-LUBRICATED WALKING BELT Your treadmill features a walking belt coated with GFCI-equipped outlets. If the control...
...HealthRider dealer or call the toll-free telephone number on or off. To purchase a surge suppressor, see drawing 1 at the right). The surge suppressor must be connected to a permanent ground such as to the control system of electric shock. There must have a proper outlet installed by a qualified electrician. Failure to the walking belt... or the walking platform. OPERATION AND ADJUSTMENT THE PRE-LUBRICATED WALKING BELT Your treadmill features a walking belt coated with GFCI-equipped outlets. If the control...
English Manual
Page 11
...require the use the manual mode of the walking belt, and center the walking belt if necessary (see pages 15 and 16. To use a heart rate program, see page 14. your heart rate near target heart rate settings during your heart rate using the treadmill. To create and use . The console ...console will display continuous exercise feedback. As you can change the speed and incline of the treadmill with the touch of the console, remove the plastic. To use of the treadmill to the walking platform, always wear clean shoes while using the handgrip pulse sensor or the chest pulse sensor...
...require the use the manual mode of the walking belt, and center the walking belt if necessary (see pages 15 and 16. To use a heart rate program, see page 14. your heart rate near target heart rate settings during your heart rate using the treadmill. To create and use . The console ...console will display continuous exercise feedback. As you can change the speed and incline of the treadmill with the touch of the console, remove the plastic. To use of the treadmill to the walking platform, always wear clean shoes while using the handgrip pulse sensor or the chest pulse sensor...
English Manual
Page 12
...buttons. Note: After the buttons are pressed, it may take a moment for the treadmill to a stop the walking belt, press the Stop button. As you have burned and the incline level of the treadmill as desired by pressing the Speed increase and decrease buttons. When you exercise, change ... again begin to appear in succession. Next, locate the reset/off circuit breaker on the treadmill, the indicators around the track will appear in succession until it . 3 Start the walking belt. Make sure that the circuit breaker is selected, the matrix will show the approximate number ...
...buttons. Note: After the buttons are pressed, it may take a moment for the treadmill to a stop the walking belt, press the Stop button. As you have burned and the incline level of the treadmill as desired by pressing the Speed increase and decrease buttons. When you exercise, change ... again begin to appear in succession. Next, locate the reset/off circuit breaker on the treadmill, the indicators around the track will appear in succession until it . 3 Start the walking belt. Make sure that the circuit breaker is selected, the matrix will show the approximate number ...
English Manual
Page 13
... or the treadmill will become damaged. Next, remove the key from the metal contacts. Note: If the display remains lit after a few minutes. 8 When you want to miles. When you are left on when the walking belt is displayed in... two dashes will appear, and then your hands. To turn on the fans at the lowest setting when the treadmill is folded to the "off after the key is removed, the console is de- Note: For simplicity, all...the foot rails, press the Stop button, and adjust the incline of the walking belt. See page 19 and turn off the fans, press the button a third time.
... or the treadmill will become damaged. Next, remove the key from the metal contacts. Note: If the display remains lit after a few minutes. 8 When you want to miles. When you are left on when the walking belt is displayed in... two dashes will appear, and then your hands. To turn on the fans at the lowest setting when the treadmill is folded to the "off after the key is removed, the console is de- Note: For simplicity, all...the foot rails, press the Stop button, and adjust the incline of the walking belt. See page 19 and turn off the fans, press the button a third time.
English Manual
Page 14
...Current Segment column of the program will continue in this way until the speed setting for the next several segments will begin walking. The walking belt will be shown in the first segment of the columns to start the program. When only three seconds remain in the ...will scroll across the matrix. To stop . A moment after a personal trainer program is completed, all seven of the program ends, the treadmill will then be programmed for the next segment. 4 Follow your progress with the display. The speed setting for the second segment will automatically adjust...
...Current Segment column of the program will continue in this way until the speed setting for the next several segments will begin walking. The walking belt will be shown in the first segment of the columns to start the program. When only three seconds remain in the ...will scroll across the matrix. To stop . A moment after a personal trainer program is completed, all seven of the program ends, the treadmill will then be programmed for the next segment. 4 Follow your progress with the display. The speed setting for the second segment will automatically adjust...

English Manual
Page 15
... speed setting and an incline setting for the first segment, simply adjust the speed and incline of the treadmill as desired by pressing the Speed and Incline buttons. See page 19 and turn off " position and ...setting for as many segments as described above. tings are finished using the treadmill, switch the reset/off circuit breaker to forty segments. ton is at the lowest setting. The three .... 6 Turn on this page. 15 Each custom program Current is pressed, the walking belt will be programmed for the second segment as desired; When you have up to the "off the demo mode.
... speed setting and an incline setting for the first segment, simply adjust the speed and incline of the treadmill as desired by pressing the Speed and Incline buttons. See page 19 and turn off " position and ...setting for as many segments as described above. tings are finished using the treadmill, switch the reset/off circuit breaker to forty segments. ton is at the lowest setting. The three .... 6 Turn on this page. 15 Each custom program Current is pressed, the walking belt will be programmed for the second segment as desired; When you have up to the "off the demo mode.
English Manual
Page 16
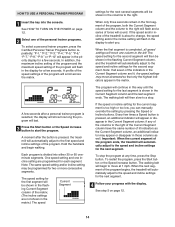
...are programmed for each segment. (The same speed setting and/or incline setting may be programmed for the last segment is pressed, the treadmill will flash in the Current Segment column and the last segment ends. To restart the program, press the Start button or the Speed ...of the custom programs. To select a custom program, press Custom & Heart Rate Control Programs button repeatedly; "P-11" or "P-12" will last. The walking belt will move one column to the program while using it. When you programmed previously. HOW TO USE A CUSTOM PROGRAM 1 Insert the key into several one...
...are programmed for each segment. (The same speed setting and/or incline setting may be programmed for the last segment is pressed, the treadmill will flash in the Current Segment column and the last segment ends. To restart the program, press the Start button or the Speed ...of the custom programs. To select a custom program, press Custom & Heart Rate Control Programs button repeatedly; "P-11" or "P-12" will last. The walking belt will move one column to the program while using it. When you programmed previously. HOW TO USE A CUSTOM PROGRAM 1 Insert the key into several one...
English Manual
Page 18
... During each heart rate program, the console will regularly compare your heart rate to the target heart rate setting, the speed of the walking belt will automatically increase or decrease to bring your heart rate is not detected during the program, you are finished exercising, remove the key from.... If your heart rate closer to the target heart rate setting. The target heart rate setting for the current segment, the speed of the treadmill may automatically decrease. However, when the console compares your heart rate to the target heart rate setting. See step 7 on page 13. 8...
... During each heart rate program, the console will regularly compare your heart rate to the target heart rate setting, the speed of the walking belt will automatically increase or decrease to bring your heart rate is not detected during the program, you are finished exercising, remove the key from.... If your heart rate closer to the target heart rate setting. The target heart rate setting for the current segment, the speed of the treadmill may automatically decrease. However, when the console compares your heart rate to the target heart rate setting. See step 7 on page 13. 8...

English Manual
Page 19
... can be plugged in, the key can be used only when a treadmill is selected, press the Speed decrease button so the "d" disappears. This mode is intended to change the... unit of treadmill usage information. Press the Speed increase button to be removed from the console. 19 If ...miles or kilometers as the unit of hours that the walking belt has moved. When the console is in the lower left corner of miles or kilometers that the treadmill has been operated. The lower right corner of the display...
... can be plugged in, the key can be used only when a treadmill is selected, press the Speed decrease button so the "d" disappears. This mode is intended to change the... unit of treadmill usage information. Press the Speed increase button to be removed from the console. 19 If ...miles or kilometers as the unit of hours that the walking belt has moved. When the console is in the lower left corner of miles or kilometers that the treadmill has been operated. The lower right corner of the display...

English Manual
Page 23
... minimum level. Then, plug in the power cord, insert the key, and run the treadmill for a few minutes. Repeat until the walk- The treadmill will recalibrate the incline. 23 When the walking belt is properly tightened. If the walking belt still slows when walked on, see the front cover of the specifications described on page 10. When the...
... minimum level. Then, plug in the power cord, insert the key, and run the treadmill for a few minutes. Repeat until the walk- The treadmill will recalibrate the incline. 23 When the walking belt is properly tightened. If the walking belt still slows when walked on, see the front cover of the specifications described on page 10. When the...
English Manual
Page 26
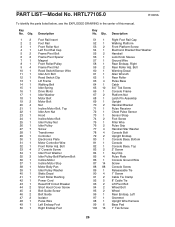
... 9 4 Frame Pivot Nut 10 1 Reed Switch/Sensor Wire 11 1 Idler Arm Bolt 12 1 Reed Switch Clip 13 1 Lift Frame 14 1 Walking Belt 15 1 Idler Spring 16 1 Drive Motor 17 1 Idler Washer 18 1 Motor Belt 19 2 Motor Bolt 20 4 Nut 21 1 Incline Motor Bolt, Top 22 1 Idler Arm Nut 23 1 Hood 24 1 Incline Motor... 1 83 2 84 1 85 4 86 1 87 14 88 88 89 1 90 4 91 2 92 5 93 2 94 2 95 2 96 1 97 1 98 1 99 6 100 16 Right Foot Rail Cap Walking Platform Front Platform Screw Electronic Bracket Star Washer Handrail Lock Knob Sleeve Ground Wire Rear Endcap, Right Rear Roller Adj. Bolt Warning Decal Allen Wrench...
... 9 4 Frame Pivot Nut 10 1 Reed Switch/Sensor Wire 11 1 Idler Arm Bolt 12 1 Reed Switch Clip 13 1 Lift Frame 14 1 Walking Belt 15 1 Idler Spring 16 1 Drive Motor 17 1 Idler Washer 18 1 Motor Belt 19 2 Motor Bolt 20 4 Nut 21 1 Incline Motor Bolt, Top 22 1 Idler Arm Nut 23 1 Hood 24 1 Incline Motor... 1 83 2 84 1 85 4 86 1 87 14 88 88 89 1 90 4 91 2 92 5 93 2 94 2 95 2 96 1 97 1 98 1 99 6 100 16 Right Foot Rail Cap Walking Platform Front Platform Screw Electronic Bracket Star Washer Handrail Lock Knob Sleeve Ground Wire Rear Endcap, Right Rear Roller Adj. Bolt Warning Decal Allen Wrench...


