
English Manual
Page 1
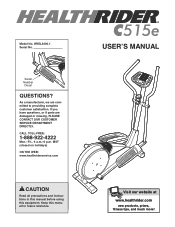
....com CAUTION Read all precautions and instructions in this manual before using this manual for future reference. USER'S MANUAL Visit our website at www.healthrider.com new products, prizes, fitness tips, and much more! As a manufacturer, we are damaged or missing, PLEASE CONTACT OUR CUSTOMER SERVICE DEPARTMENT DIRECTLY. CALL TOLL-FREE: 1-888-922-4222 Mon.-Fri., 6 a.m.-6 p.m. Serial Number Decal QUESTIONS? Keep this equipment.
....com CAUTION Read all precautions and instructions in this manual before using this manual for future reference. USER'S MANUAL Visit our website at www.healthrider.com new products, prizes, fitness tips, and much more! As a manufacturer, we are damaged or missing, PLEASE CONTACT OUR CUSTOMER SERVICE DEPARTMENT DIRECTLY. CALL TOLL-FREE: 1-888-922-4222 Mon.-Fri., 6 a.m.-6 p.m. Serial Number Decal QUESTIONS? Keep this equipment.

English Manual
Page 2
TABLE OF CONTENTS IMPORTANT PRECAUTIONS 3 BEFORE YOU BEGIN 4 ASSEMBLY 5 HOW TO USE THE ELLIPTICAL EXERCISER 9 MAINTENANCE AND TROUBLESHOOTING 13 CONDITIONING GUIDELINES 14 PART LIST 18 EXPLODED DRAWING 19 HOW TO ORDER REPLACEMENT PARTS Back Cover LIMITED WARRANTY Back Cover HEALTHRIDER is a registered trademark of ICON IP, Inc. 2
TABLE OF CONTENTS IMPORTANT PRECAUTIONS 3 BEFORE YOU BEGIN 4 ASSEMBLY 5 HOW TO USE THE ELLIPTICAL EXERCISER 9 MAINTENANCE AND TROUBLESHOOTING 13 CONDITIONING GUIDELINES 14 PART LIST 18 EXPLODED DRAWING 19 HOW TO ORDER REPLACEMENT PARTS Back Cover LIMITED WARRANTY Back Cover HEALTHRIDER is a registered trademark of ICON IP, Inc. 2
English Manual
Page 3
... pulse sensor is missing or illegible, call the toll-free telephone number on the front cover of all times. 7. tions before using . Keep the elliptical exerciser indoors, away from the elliptical exerciser at any time while exercising, stop . 14. When you feel pain or dizziness at all precautions. 12. ICON assumes no responsibility for home use the elliptical exerciser in this manual and order a free replacement decal. Read all instructions before using...
... pulse sensor is missing or illegible, call the toll-free telephone number on the front cover of all times. 7. tions before using . Keep the elliptical exerciser indoors, away from the elliptical exerciser at any time while exercising, stop . 14. When you feel pain or dizziness at all precautions. 12. ICON assumes no responsibility for home use the elliptical exerciser in this manual and order a free replacement decal. Read all instructions before using...
English Manual
Page 4
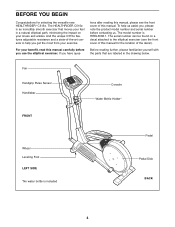
... the versatile new HEALTHRIDER® C515e. To help you , please note the product model number and serial number before you have ques- Before reading further, please familiarize yourself with the parts that moves your feet in the drawing below. And the unique C515e features adjustable resistance and a state-of-the-art console to the elliptical exerciser (see the front cover of this manual carefully before contacting...
... the versatile new HEALTHRIDER® C515e. To help you , please note the product model number and serial number before you have ques- Before reading further, please familiarize yourself with the parts that moves your feet in the drawing below. And the unique C515e features adjustable resistance and a state-of-the-art console to the elliptical exerciser (see the front cover of this manual carefully before contacting...
English Manual
Page 5
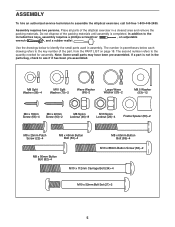
... Button Screw (63)-2 M10 x 112mm Carriage Bolt (34)-4 M10 x 52mm Bolt Set (27)-2 5 Place all parts of the part, from the PART LIST on page 18. Note: Some small parts may have been pre-assembled. Use the drawings below each drawing refers to identify the small parts used in a cleared area and remove the packing materials. The number in parentheses below to the key number of the elliptical exerciser in assembly...
... Button Screw (63)-2 M10 x 112mm Carriage Bolt (34)-4 M10 x 52mm Bolt Set (27)-2 5 Place all parts of the part, from the PART LIST on page 18. Note: Some small parts may have been pre-assembled. Use the drawings below each drawing refers to identify the small parts used in a cleared area and remove the packing materials. The number in parentheses below to the key number of the elliptical exerciser in assembly...
English Manual
Page 6
... is turned toward the Frame. The Console (5) requires four "D" batteries (not included); alkaline batteries are oriented as shown by the markings on page 5 before you begin assembling the elliptical exerciser. Remove the battery cover from the Console and insert four batteries into the Frame (1) and the Upright (2). While another person holds the Upright (2) in the position shown, connect the Upper Wire Harness (86) to the Lower Wire Harness...
... is turned toward the Frame. The Console (5) requires four "D" batteries (not included); alkaline batteries are oriented as shown by the markings on page 5 before you begin assembling the elliptical exerciser. Remove the battery cover from the Console and insert four batteries into the Frame (1) and the Upright (2). While another person holds the Upright (2) in the position shown, connect the Upper Wire Harness (86) to the Lower Wire Harness...

English Manual
Page 7
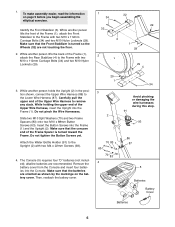
.... While another person holds the Console (5) in the same way. Hand tighten an M8 x 25mm Patch Screw (22) with two M8 x 45mm Button Bolts (50) and two M8 Nylon Locknuts (46). Identify the Left Handlebar (9), which is pointing downward. Insert the excess wire harness into the Upright (2). Attach the Left Handlebar to the Upper Wire Harness (86). Next, slide...
.... While another person holds the Console (5) in the same way. Hand tighten an M8 x 25mm Patch Screw (22) with two M8 x 45mm Button Bolts (50) and two M8 Nylon Locknuts (46). Identify the Left Handlebar (9), which is pointing downward. Insert the excess wire harness into the Upright (2). Attach the Left Handlebar to the Upper Wire Harness (86). Next, slide...
English Manual
Page 8
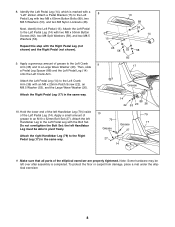
... the lower end of the left Handlebar Leg (79) inside of the elliptical exerciser are properly tightened. the left Handlebar Leg must be left Handlebar Leg to the Left Pedal Leg with the Bolt Set. Attach a Pedal Bracket (15) to the Left Pedal Leg with two M8 x 65mm Button Bolts (89), two M8.5 Washers (53), and two M8 Nylon Locknuts (46). Attach the left over after assembly is marked...
... the lower end of the left Handlebar Leg (79) inside of the elliptical exerciser are properly tightened. the left Handlebar Leg must be left Handlebar Leg to the Left Pedal Leg with the Bolt Set. Attach a Pedal Bracket (15) to the Left Pedal Leg with two M8 x 65mm Button Bolts (89), two M8.5 Washers (53), and two M8 Nylon Locknuts (46). Attach the left over after assembly is marked...
English Manual
Page 9
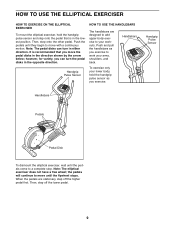
.... Note: The elliptical exerciser does not have a free wheel; When the pedals are designed to add upper-body exercise to move the pedal disks in the lowest position. Push the pedals until the pedals come to a complete stop. Handlebars Handgrip Pulse Sensor To exercise only your workouts. HOW TO USE THE HANDLEBARS The handlebars are stationary, step off the lower pedal. 9 Handgrip Pulse Sensor Handlebars Pedals Pedal Disk To dismount the elliptical exerciser, wait until...
.... Note: The elliptical exerciser does not have a free wheel; When the pedals are designed to add upper-body exercise to move the pedal disks in the lowest position. Push the pedals until the pedals come to a complete stop. Handlebars Handgrip Pulse Sensor To exercise only your workouts. HOW TO USE THE HANDLEBARS The handlebars are stationary, step off the lower pedal. 9 Handgrip Pulse Sensor Handlebars Pedals Pedal Disk To dismount the elliptical exerciser, wait until...
English Manual
Page 10
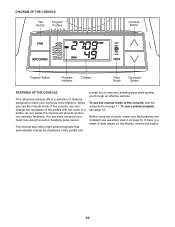
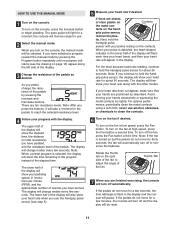
... continuous exercise feedback. To use a preset program, see the instructions on the display, remove the plastic. 10 To use the manual mode of the console, see page 12. Before using the built-in handgrip pulse sensor. As you can even measure your heart rate using the console, make sure that automatically change the resistance of the pedals with the touch of a button. DIAGRAM OF THE CONSOLE Fan Button Program Profiles Increase Button Program Button Program Indicator Display Pace Guide Decrease Button FEATURES...
... continuous exercise feedback. To use a preset program, see the instructions on the display, remove the plastic. 10 To use the manual mode of the console, see page 12. Before using the built-in handgrip pulse sensor. As you can even measure your heart rate using the console, make sure that automatically change the resistance of the pedals with the touch of a button. DIAGRAM OF THE CONSOLE Fan Button Program Profiles Increase Button Program Button Program Indicator Display Pace Guide Decrease Button FEATURES...
English Manual
Page 11
... pulse sensor, remove the plas- The display will then show your heart rate for the pedals to flash in the lower half of the pedals as described. If your heart rate does not appear, make sure that your hands are finished exercising, the console will pause. To turn on the contacts. If the pedals do not move for use. 2 Select the manual mode. Note: When a preset program is detected, the heart...
... pulse sensor, remove the plas- The display will then show your heart rate for the pedals to flash in the lower half of the pedals as described. If your heart rate does not appear, make sure that your hands are finished exercising, the console will pause. To turn on the contacts. If the pedals do not move for use. 2 Select the manual mode. Note: When a preset program is detected, the heart...
English Manual
Page 12
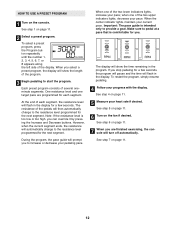
... start the program. See step 5 on page 11. 6 Turn on the console. When you to the resistance level programmed for a few seconds. If you . To select a preset program, press the Program button repeatedly until the number 1, 2, 3, 4, 5, 6, 7, or 8 appears along the left side of several oneminute segments. The display will show the length of the pedals will flash in the program. The resistance of the program. 3 Begin pedaling to pedal...
... start the program. See step 5 on page 11. 6 Turn on the console. When you to the resistance level programmed for a few seconds. If you . To select a preset program, press the Program button repeatedly until the number 1, 2, 3, 4, 5, 6, 7, or 8 appears along the left side of several oneminute segments. The display will show the length of the pedals will flash in the program. The resistance of the program. 3 Begin pedaling to pedal...
English Manual
Page 13
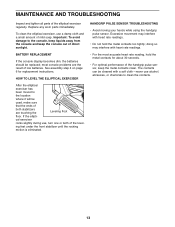
... handgrip pulse sensor, keep the console out of low batteries. HANDGRIP PULSE SENSOR TROUBLESHOOTING • Avoid moving your hands while using the handgrip pulse sensor. The contacts can be cleaned with a soft cloth-never use alcohol, abrasives, or chemicals to the location where it will be replaced; To clean the elliptical exerciser, use , turn one or both stabilizers are the result of direct sunlight. Excessive movement may interfere with heart rate...
... handgrip pulse sensor, keep the console out of low batteries. HANDGRIP PULSE SENSOR TROUBLESHOOTING • Avoid moving your hands while using the handgrip pulse sensor. The contacts can be cleaned with a soft cloth-never use alcohol, abrasives, or chemicals to the location where it will be replaced; To clean the elliptical exerciser, use , turn one or both stabilizers are the result of direct sunlight. Excessive movement may interfere with heart rate...
English Manual
Page 14
... exercise program, consult your cardiovascular system, the key to exercise with pre-existing health problems. The pulse sensor is to achieving the desired results is not a medical device. Aerobic Exercise If your goal is near the middle number in your body uses easily accessible carbohydrate calories for fat burning; Remember that requires large amounts of oxygen for persons over the age of heart rate...
... exercise program, consult your cardiovascular system, the key to exercise with pre-existing health problems. The pulse sensor is to achieving the desired results is not a medical device. Aerobic Exercise If your goal is near the middle number in your body uses easily accessible carbohydrate calories for fat burning; Remember that requires large amounts of oxygen for persons over the age of heart rate...
English Manual
Page 15
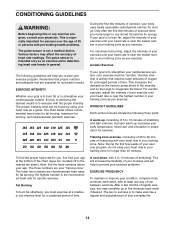
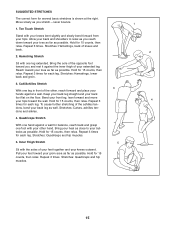
...basic stretches is shown at the right. Keep your back leg straight and your hips. Stretches: Calves, achilles tendons and ankles. 4. Stretches: Quadriceps and hip muscles. 5. SUGGESTED STRETCHES The correct form for each leg. Reach toward your groin area as far as possible. Pull... to your knees outward. Repeat 3 times for 15 counts, then relax. Move slowly as you reach down toward you and rest it against a wall for each leg. Stretches: Hamstrings, lower back and groin. 3. Hold for each leg. Stretches: Quadriceps and hip muscles. 3 5 1 2 4 15 Repeat ...
...basic stretches is shown at the right. Keep your back leg straight and your hips. Stretches: Calves, achilles tendons and ankles. 4. Stretches: Quadriceps and hip muscles. 5. SUGGESTED STRETCHES The correct form for each leg. Reach toward your groin area as far as possible. Pull... to your knees outward. Repeat 3 times for 15 counts, then relax. Move slowly as you reach down toward you and rest it against a wall for each leg. Stretches: Hamstrings, lower back and groin. 3. Hold for each leg. Stretches: Quadriceps and hip muscles. 3 5 1 2 4 15 Repeat ...

English Manual
Page 18
... 1 Resistance Cable 86 1 Upper Wire Harness 87 1 Lower Wire Harness 88 2 Pedal Leg Spacer 89 4 M8 x 65mm Button Bolt 90 4 Motor Washer 91 1 Water Bottle Holder 92 4 M8 Nut 93 2 M4 x 22mm Screw 94 1 M6 Large Washer 95 2 Wave Washer 96 2 M3 x 16mm Screw # 2 Hex Key # 1 Grease # 1 User's Manual Note: "#" indicates a non-illustrated part. Specifications are subject to change without notice. See the back cover of this manual for information about ordering replacement parts...
... 1 Resistance Cable 86 1 Upper Wire Harness 87 1 Lower Wire Harness 88 2 Pedal Leg Spacer 89 4 M8 x 65mm Button Bolt 90 4 Motor Washer 91 1 Water Bottle Holder 92 4 M8 Nut 93 2 M4 x 22mm Screw 94 1 M6 Large Washer 95 2 Wave Washer 96 2 M3 x 16mm Screw # 2 Hex Key # 1 Grease # 1 User's Manual Note: "#" indicates a non-illustrated part. Specifications are subject to change without notice. See the back cover of this manual for information about ordering replacement parts...

English Manual
Page 19
... 65 8 34 47 37 89 92 14 53 88 53 18 56 15 65 46 53 58 53 22 16 20 82 19 EXPLODED DRAWING-Model No.
... 65 8 34 47 37 89 92 14 53 88 53 18 56 15 65 46 53 58 53 22 16 20 82 19 EXPLODED DRAWING-Model No.
English Manual
Page 20
...) days from defects in connection with the use and service conditions, for a particular purpose is shipped to a service center, freight charges to and from state to state. HOW TO ORDER REPLACEMENT PARTS To order replacement parts, please see page 18) LIMITED WARRANTY ICON Health & Fitness, Inc. (ICON) warrants this product to be free from the date of purchase. ICON's obligation under normal use or performance of the...
...) days from defects in connection with the use and service conditions, for a particular purpose is shipped to a service center, freight charges to and from state to state. HOW TO ORDER REPLACEMENT PARTS To order replacement parts, please see page 18) LIMITED WARRANTY ICON Health & Fitness, Inc. (ICON) warrants this product to be free from the date of purchase. ICON's obligation under normal use or performance of the...


