Pool Vac Classic
Page 2
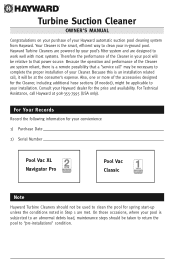
... should not be taken to return the pool to complete the proper installation of your installation. For Your Records Record the following information for your convienience 1) Purchase Date 2) Serial Number Pool Vac XL Navigator Pro LIMITED WARRANTY Pool Vac Classic LIMITED WARRANTY Note Hayward Turbine Cleaners should be used to clean the pool for spring...
... should not be taken to return the pool to complete the proper installation of your installation. For Your Records Record the following information for your convienience 1) Purchase Date 2) Serial Number Pool Vac XL Navigator Pro LIMITED WARRANTY Pool Vac Classic LIMITED WARRANTY Note Hayward Turbine Cleaners should be used to clean the pool for spring...
Pool Vac Classic
Page 3
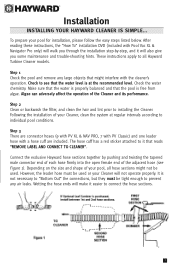
... necessary to see Figure 1). Installation INSTALLING YOUR HAYWARD CLEANER IS SIMPLE... Algae can adversely affect the operation of your pool for installation, please follow the easy steps listed below. Step 3 There are connector hoses (9 with PV XL & NAV PRO, 7 with PV Classic) and one leader hose with Pool Vac XL & Navigator Pro only) will walk you some...
... necessary to see Figure 1). Installation INSTALLING YOUR HAYWARD CLEANER IS SIMPLE... Algae can adversely affect the operation of your pool for installation, please follow the easy steps listed below. Step 3 There are connector hoses (9 with PV XL & NAV PRO, 7 with PV Classic) and one leader hose with Pool Vac XL & Navigator Pro only) will walk you some...
Pool Vac Classic
Page 4
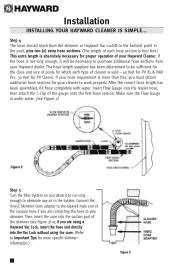
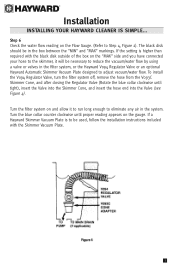
Installation INSTALLING YOUR HAYWARD CLEANER IS SIMPLE... Step 4 The hose should reach from your Hayward dealer. Make sure the Flow Gauge is under water. (see Figure 2) Step 5...obtain additional hose sections for your skimmer. If the hose is sold - 40 feet for PV XL & NAV Pro, 32 feet for which each type of cleaner is not long enough, it to run long enough to eliminate...using the cone. (Refer to your cleaner to be necessary to purchase additional hose sections from the skimmer or Hayward Vac Lock® to the tapered male end of the gauge onto the first hose section. After the ...
Installation INSTALLING YOUR HAYWARD CLEANER IS SIMPLE... Step 4 The hose should reach from your Hayward dealer. Make sure the Flow Gauge is under water. (see Figure 2) Step 5...obtain additional hose sections for your skimmer. If the hose is sold - 40 feet for PV XL & NAV Pro, 32 feet for which each type of cleaner is not long enough, it to run long enough to eliminate...using the cone. (Refer to your cleaner to be necessary to purchase additional hose sections from the skimmer or Hayward Vac Lock® to the tapered male end of the gauge onto the first hose section. After the ...
Pool Vac Classic
Page 5
Installation INSTALLING YOUR HAYWARD CLEANER IS SIMPLE... If the setting is to be in the filter system, or the Hayward V094 Regulator Valve or an optional Hayward Automatic Skimmer Vacuum Plate designed to reduce the vacuum/water flow by using a valve or valves in the box between the "MIN" and "... to the skimmer, it to run long enough to Step 4, Figure 2). If a Hayward Skimmer Vacuum Plate is higher than required with the Skimmer Vacuum Plate. 3 The black disk should be used, follow the installation instructions included with the black disk outside of the box on and allow it will...
Installation INSTALLING YOUR HAYWARD CLEANER IS SIMPLE... If the setting is to be in the filter system, or the Hayward V094 Regulator Valve or an optional Hayward Automatic Skimmer Vacuum Plate designed to reduce the vacuum/water flow by using a valve or valves in the box between the "MIN" and "... to the skimmer, it to run long enough to Step 4, Figure 2). If a Hayward Skimmer Vacuum Plate is higher than required with the Skimmer Vacuum Plate. 3 The black disk should be used, follow the installation instructions included with the black disk outside of the box on and allow it will...
Pool Vac Classic
Page 6
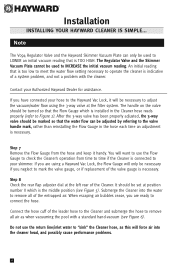
... will force air into the water to the valve handle mark, rather than reinstalling the Flow Gauge in the hose each time an adjustment is installed in the Cleaner hose reads properly (refer to connect the hose. Submerge the Cleaner into the cleaner head, and possibly cause performance problems. 4... adjusted, the 3-way valve should be set at the left rear of a system problem, and not a problem with a standard hand-vacuum (see Figure 5). Installation INSTALLING YOUR HAYWARD CLEANER IS SIMPLE... It should be marked so that the Flow Gauge which is indicative of the Cleaner.
... will force air into the water to the valve handle mark, rather than reinstalling the Flow Gauge in the hose each time an adjustment is installed in the Cleaner hose reads properly (refer to connect the hose. Submerge the Cleaner into the cleaner head, and possibly cause performance problems. 4... adjusted, the 3-way valve should be set at the left rear of a system problem, and not a problem with a standard hand-vacuum (see Figure 5). Installation INSTALLING YOUR HAYWARD CLEANER IS SIMPLE... It should be marked so that the Flow Gauge which is indicative of the Cleaner.
Pool Vac Classic
Page 7
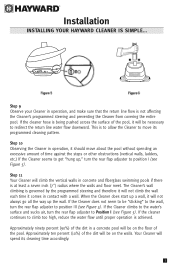
... or other obstructions (vertical walls, ladders, etc.) If the Cleaner seems to get "hung up," turn the rear flap adjuster to position I (see Figure 5). Installation INSTALLING YOUR HAYWARD CLEANER IS SIMPLE... This is governed by the programmed steering and therefore it will not climb the wall each time it will not always go...
... or other obstructions (vertical walls, ladders, etc.) If the Cleaner seems to get "hung up," turn the rear flap adjuster to position I (see Figure 5). Installation INSTALLING YOUR HAYWARD CLEANER IS SIMPLE... This is governed by the programmed steering and therefore it will not climb the wall each time it will not always go...
Pool Vac Classic
Page 10
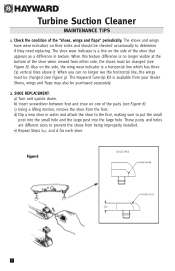
... shoes and wings have wear indicators on the side of the "shoes, wings and flaps" periodically. When this texture difference is available from being improperly installed. The Hayward Tune-Up Kit is no longer see the horizontal line, the wings must be changed (see Figure 8). Shoes, wings and flaps may also be...
... shoes and wings have wear indicators on the side of the "shoes, wings and flaps" periodically. When this texture difference is available from being improperly installed. The Hayward Tune-Up Kit is no longer see the horizontal line, the wings must be changed (see Figure 8). Shoes, wings and flaps may also be...
Pool Vac Classic
Page 12
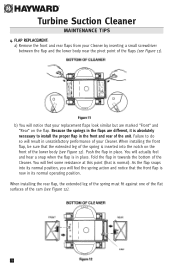
...cam (see Figure 11). b) You will notice that the front flap is now in place. When installing the front flap, be sure that is in towards the bottom of the unit. As the flap ...the notch on the flap. You will feel the spring action and notice that your Cleaner. When installing the rear flap, the extended leg of the spring must fit against one of the flat surfaces ... point (that the extended leg of the lower body (see Figure 12). Failure to install the proper flap in unsatisfactory performance of your replacement flaps look similar but are different, it is ...
...cam (see Figure 11). b) You will notice that the front flap is now in place. When installing the front flap, be sure that is in towards the bottom of the unit. As the flap ...the notch on the flap. You will feel the spring action and notice that your Cleaner. When installing the rear flap, the extended leg of the spring must fit against one of the flat surfaces ... point (that the extended leg of the lower body (see Figure 12). Failure to install the proper flap in unsatisfactory performance of your replacement flaps look similar but are different, it is ...
Pool Vac Classic
Page 16
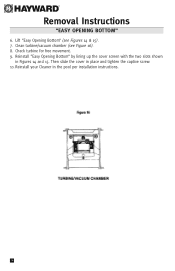
Then slide the cover in the pool per installation instructions. 14 Check turbine for free movement. 9. Lift "Easy Opening Bottom" (see Figure 16). 8. Clean turbine/vacuum chamber (see Figures 14 & 15). 7. Reinstall your Cleaner in place and tighten the captive screw. 10. Reinstall "Easy Opening Bottom" by lining up the cover screen with the two slots shown in Figures 14 and 15. Removal Instructions "EASY OPENING BOTTOM" 6.
Then slide the cover in the pool per installation instructions. 14 Check turbine for free movement. 9. Lift "Easy Opening Bottom" (see Figure 16). 8. Clean turbine/vacuum chamber (see Figures 14 & 15). 7. Reinstall your Cleaner in place and tighten the captive screw. 10. Reinstall "Easy Opening Bottom" by lining up the cover screen with the two slots shown in Figures 14 and 15. Removal Instructions "EASY OPENING BOTTOM" 6.
Pool Vac Classic
Page 17
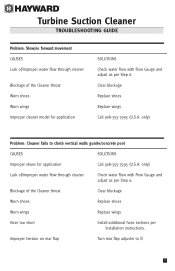
...) Lack of/improper water flow through cleaner Blockage of the Cleaner throat Clear blockage Worn shoes Replace shoes Worn wings Replace wings Hose too short Install additional hose sections per installation instructions. Clear blockage Replace shoes Replace wings Call 908-355-7995 (U.S.A.
...) Lack of/improper water flow through cleaner Blockage of the Cleaner throat Clear blockage Worn shoes Replace shoes Worn wings Replace wings Hose too short Install additional hose sections per installation instructions. Clear blockage Replace shoes Replace wings Call 908-355-7995 (U.S.A.
Pool Vac Classic
Page 19
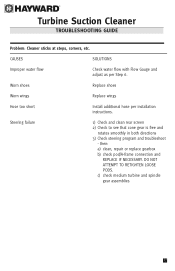
... TROUBLESHOOTING GUIDE Problem: Cleaner sticks at steps, corners, etc. CAUSES SOLUTIONS Improper water flow Check water flow with Flow Gauge and adjust as per installation instructions. Steering failure 1) Check and clean rear screen 2) Check to see that cone gear is free and rotates smoothly in both directions 3) Check... steering program and troubleshoot - DO NOT ATTEMPT TO RETIGHTEN LOOSE PODS. Worn shoes Replace shoes Worn wings Replace wings Hose too short Install additional hose per Step 6. c) check medium turbine and spindle gear assemblies 17
... TROUBLESHOOTING GUIDE Problem: Cleaner sticks at steps, corners, etc. CAUSES SOLUTIONS Improper water flow Check water flow with Flow Gauge and adjust as per installation instructions. Steering failure 1) Check and clean rear screen 2) Check to see that cone gear is free and rotates smoothly in both directions 3) Check... steering program and troubleshoot - DO NOT ATTEMPT TO RETIGHTEN LOOSE PODS. Worn shoes Replace shoes Worn wings Replace wings Hose too short Install additional hose per Step 6. c) check medium turbine and spindle gear assemblies 17
Pool Vac Classic
Page 20
H) When installing your Hayward Turbine Suction Cleaner. 3) The number of your Cleaner, you call Hayward's Technical Service Department at 908-355-7995 (U.S.A. only): 1) The Purchase Date of your Hayward Turbine Suction Cleaner. 2) The Serial Number of the Hose Sections used. 4) A current water flow ...indicator setting (refer to Step 6, Figure 2). 18 C) The integrity of "good" pool plaster is affected by the installation and the pool's surroundings....
H) When installing your Hayward Turbine Suction Cleaner. 3) The number of your Cleaner, you call Hayward's Technical Service Department at 908-355-7995 (U.S.A. only): 1) The Purchase Date of your Hayward Turbine Suction Cleaner. 2) The Serial Number of the Hose Sections used. 4) A current water flow ...indicator setting (refer to Step 6, Figure 2). 18 C) The integrity of "good" pool plaster is affected by the installation and the pool's surroundings....


