
Technical Guide
Page 2
Table of Contents Safety Precautions Installation Programming Operation Programming Scenarios Disassembly/Assembly Password/Commercial Diagnostics/Troubleshooting Page 1 Page 2-14 Page 15-29 Page 30-31 Page 32 Page 33-38 Page 39-40 Page 41-48
Table of Contents Safety Precautions Installation Programming Operation Programming Scenarios Disassembly/Assembly Password/Commercial Diagnostics/Troubleshooting Page 1 Page 2-14 Page 15-29 Page 30-31 Page 32 Page 33-38 Page 39-40 Page 41-48

Technical Guide
Page 17
...SVRS in unprotected mode if included with the SVRS models. Unprotected mode requires manual verification. User Interface PRESET SPEEDS 4 buttons that can be programmed to max set speed for maintenance, end a favorite speed choice or end quick clean. CHECK SYSTEM LED LED will illuminate solid when there ...NAVIGATION BUTTONS The button will blink when in a specific setup menu. STOP /RESUME When pressed it will illuminate once the timers have been programmed., even if the pump is an error condition. TIMERS ACTIVE LED LED will stop the pump for cleaning. The & arrow buttons are ...
...SVRS in unprotected mode if included with the SVRS models. Unprotected mode requires manual verification. User Interface PRESET SPEEDS 4 buttons that can be programmed to max set speed for maintenance, end a favorite speed choice or end quick clean. CHECK SYSTEM LED LED will illuminate solid when there ...NAVIGATION BUTTONS The button will blink when in a specific setup menu. STOP /RESUME When pressed it will illuminate once the timers have been programmed., even if the pump is an error condition. TIMERS ACTIVE LED LED will stop the pump for cleaning. The & arrow buttons are ...
Technical Guide
Page 18
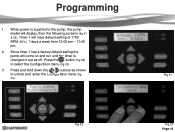
Press the button (fig 32) to unlock and enter the Configuration menu (fig 33). Fig 31 Fig 32 Fig 33 Page 16 Programming 1. Since timer 1 has a factory default setting the pump will come on and run until the timer is supplied to the pump, the pump model will have default setting of 1750 RPM (50%), 7 days a week from 12:00 am - 11:45 pm. 2. When power is changed or set as shown to select the Configuration menu (fig 33). 3. Press and hold down the & buttons as off. Timer 1 will display, then the following screens (fig 31 & 32).
Press the button (fig 32) to unlock and enter the Configuration menu (fig 33). Fig 31 Fig 32 Fig 33 Page 16 Programming 1. Since timer 1 has a factory default setting the pump will come on and run until the timer is supplied to the pump, the pump model will have default setting of 1750 RPM (50%), 7 days a week from 12:00 am - 11:45 pm. 2. When power is changed or set as shown to select the Configuration menu (fig 33). 3. Press and hold down the & buttons as off. Timer 1 will display, then the following screens (fig 31 & 32).
Technical Guide
Page 19
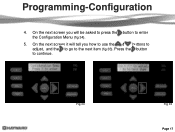
On the next screen it will be asked to press the button to enter the Configuration Menu (fig 34). 5. Fig 34 Fig 35 Page 17 Press the button to the next item (fig 35). On the next screen you will tell you how to use the & buttons to adjust, and the to go to continue. Programming-Configuration 4.
On the next screen it will be asked to press the button to enter the Configuration Menu (fig 34). 5. Fig 34 Fig 35 Page 17 Press the button to the next item (fig 35). On the next screen you will tell you how to use the & buttons to adjust, and the to go to continue. Programming-Configuration 4.
Technical Guide
Page 20
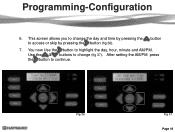
button 7. Use the & buttons to change the day and time by pressing the to change (fig 37). Programming-Configuration 6. You now Use the button to continue. Fig 36 Fig 37 Page 18 After setting the AM/PM press the button to highlight the day, hour, minute and AM/PM. This screen allows you to access or skip by pressing the button (fig 36).
button 7. Use the & buttons to change the day and time by pressing the to change (fig 37). Programming-Configuration 6. You now Use the button to continue. Fig 36 Fig 37 Page 18 After setting the AM/PM press the button to highlight the day, hour, minute and AM/PM. This screen allows you to access or skip by pressing the button (fig 36).
Technical Guide
Page 21
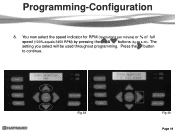
The setting you select will be used throughout programming. Fig 38 Fig 39 Page 19 Press the button to continue. You now select the speed indicator for RPM (revolutions per minute) or % of full speed (100% equals 3450 RPM) by pressing the & buttons (fig 38 & 39). Programming-Configuration 8.
The setting you select will be used throughout programming. Fig 38 Fig 39 Page 19 Press the button to continue. You now select the speed indicator for RPM (revolutions per minute) or % of full speed (100% equals 3450 RPM) by pressing the & buttons (fig 38 & 39). Programming-Configuration 8.

Technical Guide
Page 22
... 41 Page 20 Note: When hooked up to not conflict with the setting within the controller. SVRS model will now see the MAX allowed speed. Programming-Configuration 9. Press the button to 100% by pressing the & buttons (fig 40). You will now see the MIN allowed speed. Same as to... a Hayward/Goldline compatible software controls place the MIN and MAX settings at the lowest and highest settings respectively so as #10 above for pipe. See page 3 ...
... 41 Page 20 Note: When hooked up to not conflict with the setting within the controller. SVRS model will now see the MAX allowed speed. Programming-Configuration 9. Press the button to 100% by pressing the & buttons (fig 40). You will now see the MIN allowed speed. Same as to... a Hayward/Goldline compatible software controls place the MIN and MAX settings at the lowest and highest settings respectively so as #10 above for pipe. See page 3 ...

Technical Guide
Page 23
Press the button to continue . You will now see the Remote Control Mode screen. Press & buttons for Auto Sense (3000 RPM), or a 3 min (max set speed) prime period (fig 42).This function only works in Standalone and Relay Control modes. Press the button to continue. 12. Fig 42 Fig 43 Fig 44 Page 21 Programming-Configuration 11. You will now see the max-speed Prime period. Use the & buttons to toggle between Stand alone/Hayward (Stand alone or Hayward/Goldline compatible software controls), or Relay Control (other controls including third party models) (fig 43 & 44).
Press the button to continue . You will now see the Remote Control Mode screen. Press & buttons for Auto Sense (3000 RPM), or a 3 min (max set speed) prime period (fig 42).This function only works in Standalone and Relay Control modes. Press the button to continue. 12. Fig 42 Fig 43 Fig 44 Page 21 Programming-Configuration 11. You will now see the max-speed Prime period. Use the & buttons to toggle between Stand alone/Hayward (Stand alone or Hayward/Goldline compatible software controls), or Relay Control (other controls including third party models) (fig 43 & 44).
Technical Guide
Page 24
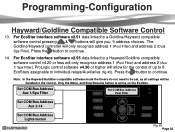
... control of up to 8 EcoStars assignable to continue. 14. Set COM Bus Address Aux 1/Spa Filter Set COM Bus Address Pool Filter Set COM Bus Address Aux 2-14 Set COM Bus Address Lights button Fig 45 Page 22 Programming-Configuration Hayward/Goldline Compatible Software Control 13.... Note: In the Hayward/Goldline compatible software mode the timers do not need to a Hayward/Goldline compatible software control v4.20 or less will be handled in the control. For EcoStar interface software v2.55 ...
... control of up to 8 EcoStars assignable to continue. 14. Set COM Bus Address Aux 1/Spa Filter Set COM Bus Address Pool Filter Set COM Bus Address Aux 2-14 Set COM Bus Address Lights button Fig 45 Page 22 Programming-Configuration Hayward/Goldline Compatible Software Control 13.... Note: In the Hayward/Goldline compatible software mode the timers do not need to a Hayward/Goldline compatible software control v4.20 or less will be handled in the control. For EcoStar interface software v2.55 ...

Technical Guide
Page 25
... enabled you will be asked to enable or disable the Low Temp Operation (Default is 1000 rpm (29%). Press the button to protect the drive . Programming-Configuration 15. In this feature will show in both "C" and "F". by pressing the & buttons. Setting will turn on the...
... enabled you will be asked to enable or disable the Low Temp Operation (Default is 1000 rpm (29%). Press the button to protect the drive . Programming-Configuration 15. In this feature will show in both "C" and "F". by pressing the & buttons. Setting will turn on the...

Technical Guide
Page 26
... no, press the button to continue. Fig 49 Fig 50 Page 24 Press the button to continue (fig 50). 19. Programming-Configuration If you have an HCP3400VSP or HCP3400VSPVR commercial EcoStar please refer to page 39 for directions on the next screen. At this page. 18. There will be a screen telling you... or change time clock perimeters. If the Relay Control or the Stand alone feature is being used the timer menus would like to reset to program. If yes, press and confirm on setting password protection.
... no, press the button to continue. Fig 49 Fig 50 Page 24 Press the button to continue (fig 50). 19. Programming-Configuration If you have an HCP3400VSP or HCP3400VSPVR commercial EcoStar please refer to page 39 for directions on the next screen. At this page. 18. There will be a screen telling you... or change time clock perimeters. If the Relay Control or the Stand alone feature is being used the timer menus would like to reset to program. If yes, press and confirm on setting password protection.

Technical Guide
Page 27
...: No timer or speed settings necessary. Com bus address needs to be set in the timer menu are limited to the Max Settings set . Programming-Timers Stand alone/Hayward Stand alone: Both times and speeds need to be set as needed. . Timer 1 can be changed as relays on control connected pumps. Press...
...: No timer or speed settings necessary. Com bus address needs to be set in the timer menu are limited to the Max Settings set . Programming-Timers Stand alone/Hayward Stand alone: Both times and speeds need to be set as needed. . Timer 1 can be changed as relays on control connected pumps. Press...
Technical Guide
Page 28
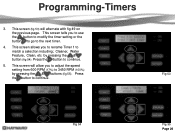
This screen allows you to rename Timer 1 to continue. 5. Press the button to match a selection including; This screen tells you to adjust the speed setting from 600 RPM (17%) to the next timer. 4. This screen will alternate with fig 49 on the previous page. This screen (fig 53) will allow you to use the button to modify the timer setting or the button to go to 3450 RPM (100%) by pressing the & button (fig 54). Fig 53 Fig 54 Fig 55 Page 26 Cleaner, Water Feature, Clean, etc by pressing the & buttons (fig 55). Programming-Timers 3. Press the button to continue.
This screen allows you to rename Timer 1 to continue. 5. Press the button to match a selection including; This screen tells you to adjust the speed setting from 600 RPM (17%) to the next timer. 4. This screen will alternate with fig 49 on the previous page. This screen (fig 53) will allow you to use the button to modify the timer setting or the button to go to 3450 RPM (100%) by pressing the & button (fig 54). Fig 53 Fig 54 Fig 55 Page 26 Cleaner, Water Feature, Clean, etc by pressing the & buttons (fig 55). Programming-Timers 3. Press the button to continue.
Technical Guide
Page 29
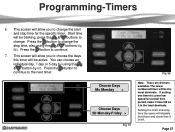
... most dominate. Start time will be active. Fig 56 Choose Days Mo Monday > Choose Days 5D Monday-Friday > Fig 57 Note: There are 8 timers available. Programming-Timers 6. Page 27 This screen will disable that timer and show that it is off.
... most dominate. Start time will be active. Fig 56 Choose Days Mo Monday > Choose Days 5D Monday-Friday > Fig 57 Note: There are 8 timers available. Programming-Timers 6. Page 27 This screen will disable that timer and show that it is off.

Technical Guide
Page 30
... 12 hrs in this Speed button (fig 59). Speeds 1-4 1. Note: The timers active light is now on as the Fig 58 timers have been set . Programming -
... 12 hrs in this Speed button (fig 59). Speeds 1-4 1. Note: The timers active light is now on as the Fig 58 timers have been set . Programming -

Technical Guide
Page 31
You can set the speed from 600 RPM (17%) to page 30 for instructions on speed changing while operating speeds. Fig 61 If at any time during settings for Speed 1. Press the button to confirm any menu item you press the menu button, you can now set press the button to continue. Note: Refer to 3450 RPM (100%) by pressing the & button (fig 61). Page 29 While in this screen you will be asked to continue. 5. After Speed 4 is set Speed 2, 3 & 4 following the directions for any changes. Programming - Speeds 1-4 4.
You can set the speed from 600 RPM (17%) to page 30 for instructions on speed changing while operating speeds. Fig 61 If at any time during settings for Speed 1. Press the button to confirm any menu item you press the menu button, you can now set press the button to continue. Note: Refer to 3450 RPM (100%) by pressing the & button (fig 61). Page 29 While in this screen you will be asked to continue. 5. After Speed 4 is set Speed 2, 3 & 4 following the directions for any changes. Programming - Speeds 1-4 4.

Technical Guide
Page 33
... solid when there is not running. QUICK CLEAN Elevates the speed of the speed buttons is pressed it will illuminate once the timers have been programmed. TIMERS ACTIVE LED LED will stop the pump for cleaning. Disables SVRS if included with the SVRS models. Unprotected mode requires manual verification. Pressed again...
... solid when there is not running. QUICK CLEAN Elevates the speed of the speed buttons is pressed it will illuminate once the timers have been programmed. TIMERS ACTIVE LED LED will stop the pump for cleaning. Disables SVRS if included with the SVRS models. Unprotected mode requires manual verification. Pressed again...

Technical Guide
Page 34
... can be set over each other. 9 am 12 noon 1 pm 3 pm 5:45 am Timer 1: At 9 am The lower the timer number the higher the priority. Programming Scenarios Below is one possible Stand Alone scenario. Goes back to meet spa jet or any water feature requirement. Timer 8: Pump comes on at 6 am...
... can be set over each other. 9 am 12 noon 1 pm 3 pm 5:45 am Timer 1: At 9 am The lower the timer number the higher the priority. Programming Scenarios Below is one possible Stand Alone scenario. Goes back to meet spa jet or any water feature requirement. Timer 8: Pump comes on at 6 am...


