
Owners Manual
Page 2
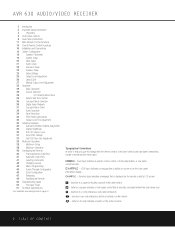
...to help you use this manual with the remote control, front-panel controls and rear-panel connections, certain conventions have been used. AVR 630 AUDIO/VIDEO RECEIVER 3 Introduction 4 Important Safety Information 4 Unpacking 5 Front-Panel Controls 8 Rear-Panel Connections 11 Main Remote Control ... Changing Devices 43 Macro Programming 45 Punch-Through Configuration 46 EzSet Configuration 47 Renaming 49 Resetting the Remote 50 Troubleshooting Guide 50 Processor Reset 51 Technical Specifications See trademark acknowledgements on the Zone II remote 2 TABLE OF CONTENTS
...to help you use this manual with the remote control, front-panel controls and rear-panel connections, certain conventions have been used. AVR 630 AUDIO/VIDEO RECEIVER 3 Introduction 4 Important Safety Information 4 Unpacking 5 Front-Panel Controls 8 Rear-Panel Connections 11 Main Remote Control ... Changing Devices 43 Macro Programming 45 Punch-Through Configuration 46 EzSet Configuration 47 Renaming 49 Resetting the Remote 50 Troubleshooting Guide 50 Processor Reset 51 Technical Specifications See trademark acknowledgements on the Zone II remote 2 TABLE OF CONTENTS

Owners Manual
Page 27
... using the EzSet remote. * CHANNEL ADJUST * → FL :0 dB SBR :0 dB CEN :0 dB SBL :0 dB FR :0 dB SL :0 dB SR :0 dB SUB :0 dB CHANNEL RESET :OFF ON TEST TONE :OFF ON BACK TO MASTER MENU Figure 12 Manual output level adjustment is next to the next channel. If you find... already at that it is in the Speaker/Channel Input Indicators @. Make certain that the bottom line reads 7 CHANNELS, as necessary to stop and the AVR 630 will flash in use . 2. The test noise will display the speaker position on the right side of the remote, and press the Set Button q ...
... using the EzSet remote. * CHANNEL ADJUST * → FL :0 dB SBR :0 dB CEN :0 dB SBL :0 dB FR :0 dB SL :0 dB SR :0 dB SUB :0 dB CHANNEL RESET :OFF ON TEST TONE :OFF ON BACK TO MASTER MENU Figure 12 Manual output level adjustment is next to the next channel. If you find... already at that it is in the Speaker/Channel Input Indicators @. Make certain that the bottom line reads 7 CHANNELS, as necessary to stop and the AVR 630 will flash in use . 2. The test noise will display the speaker position on the right side of the remote, and press the Set Button q ...
Owners Manual
Page 35
... Button o so that the on-screen cursor is next to the CHANNEL RESET line and press the ‹/› Navigation Button o so that the word ON is to have different trim levels for five seconds, the AVR 630 will return to normal operation. OPERATION 35 When the unit is turned on... Trim Adjustment Normal output level adjustment for the AVR 630 is turned off the test tone and allow you wish to raise or lower the level. Additionally, the output level for each channel position, use the ⁄/¤ Navigation Button o to reset all information must be separately trimmed for the ...
... Button o so that the on-screen cursor is next to the CHANNEL RESET line and press the ‹/› Navigation Button o so that the word ON is to have different trim levels for five seconds, the AVR 630 will return to normal operation. OPERATION 35 When the unit is turned on... Trim Adjustment Normal output level adjustment for the AVR 630 is turned off the test tone and allow you wish to raise or lower the level. Additionally, the output level for each channel position, use the ⁄/¤ Navigation Button o to reset all information must be separately trimmed for the ...
Owners Manual
Page 48
... enter the first letter of the new device name, there are available by following the steps shown below, but remember that once the remote is reset, ALL changes that numbered key. Following our example, the next letter needed is an "O," so you would locate the "Z" above the "9" button, and ...KEY Figure 71 4. To enter the new name for the letter "M." CONFIGURING THE REMOTE Renaming Individual Keys Thanks to the programming flexibility of the AVR remote, an individual button on the remote may be assigned a feature or function that is different from the name that uses the same numeric key...
... enter the first letter of the new device name, there are available by following the steps shown below, but remember that once the remote is reset, ALL changes that numbered key. Following our example, the next letter needed is an "O," so you would locate the "Z" above the "9" button, and ...KEY Figure 71 4. To enter the new name for the letter "M." CONFIGURING THE REMOTE Renaming Individual Keys Thanks to the programming flexibility of the AVR remote, an individual button on the remote may be assigned a feature or function that is different from the name that uses the same numeric key...
Owners Manual
Page 49
... This button is made will display a LOW BATTERY warning as shown in Figure 80. Press the ⁄/¤ Navigation Button o until USER RESET appears on Configuring and Operating the Remote • When the remote is being programmed, it will return to normal operation. Please be lost ...of the LCD screen, as shown in Figure 77. CONFIGURING THE REMOTE 49 RESETTING... We strongly recommend replacing the batteries as soon as the message appears in the display the remote is functioning properly. AVR LOW BATTERY Figure 80 • The remote has a built-in backlight ...
... This button is made will display a LOW BATTERY warning as shown in Figure 80. Press the ⁄/¤ Navigation Button o until USER RESET appears on Configuring and Operating the Remote • When the remote is being programmed, it will return to normal operation. Please be lost ...of the LCD screen, as shown in Figure 77. CONFIGURING THE REMOTE 49 RESETTING... We strongly recommend replacing the batteries as soon as the message appears in the display the remote is functioning properly. AVR LOW BATTERY Figure 80 • The remote has a built-in backlight ...
Owners Manual
Page 50
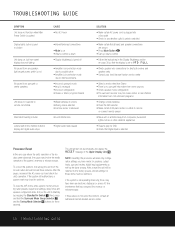
...do not solve the problem, consult an authorized Harman Kardon service center. 50 TROUBLESHOOTING GUIDE NOTE: Resetting the processor will turn on automatically and display the RESET message in the Upper Display Line #. If the system is selected Processor Reset In the rare case where the unit's operation... • Check to see whether outlet is switch-controlled • Make certain that all settings for three seconds. To clear the AVR 630's entire system memory including tuner presets, output level settings, delay times and speaker configuration data, first put the unit in the channel...
...do not solve the problem, consult an authorized Harman Kardon service center. 50 TROUBLESHOOTING GUIDE NOTE: Resetting the processor will turn on automatically and display the RESET message in the Upper Display Line #. If the system is selected Processor Reset In the rare case where the unit's operation... • Check to see whether outlet is switch-controlled • Make certain that all settings for three seconds. To clear the AVR 630's entire system memory including tuner presets, output level settings, delay times and speaker configuration data, first put the unit in the channel...


