Owners Manual
Page 2
AVR Table of Contents INTRODUCTION 3 SUPPLIED ACCESSORIES 3 IMPORTANT SAFETY INFORMATION 3 PLACE THE RECEIVER 3 FRONT-PANEL CONTROLS 4 REAR-PANEL CONNECTORS 6 SYSTEM REMOTE CONTROL FUNCTIONS 8 ZONE 2 REMOTE CONTROL FUNCTIONS 10 INTRODUCTION TO HOME THEATER 12 TYPICAL HOME THEATER SYSTEM 12 ...AND iOS DEVICES 20 CONNECT TO YOUR HOME NETWORK 20 CONNECT THE RADIO ANTENNAS 20 INSTALL A MULTIZONE SYSTEM 21 CONNECT IR EQUIPMENT (AVR 3650/AVR 365 ONLY) 22 CONNECT THE TRIGGER OUTPUT 23 CONNECT TO AC POWER 23 SET UP THE REMOTE CONTROL 24 INSTALL THE BATTERIES ...
AVR Table of Contents INTRODUCTION 3 SUPPLIED ACCESSORIES 3 IMPORTANT SAFETY INFORMATION 3 PLACE THE RECEIVER 3 FRONT-PANEL CONTROLS 4 REAR-PANEL CONNECTORS 6 SYSTEM REMOTE CONTROL FUNCTIONS 8 ZONE 2 REMOTE CONTROL FUNCTIONS 10 INTRODUCTION TO HOME THEATER 12 TYPICAL HOME THEATER SYSTEM 12 ...AND iOS DEVICES 20 CONNECT TO YOUR HOME NETWORK 20 CONNECT THE RADIO ANTENNAS 20 INSTALL A MULTIZONE SYSTEM 21 CONNECT IR EQUIPMENT (AVR 3650/AVR 365 ONLY) 22 CONNECT THE TRIGGER OUTPUT 23 CONNECT TO AC POWER 23 SET UP THE REMOTE CONTROL 24 INSTALL THE BATTERIES ...

Owners Manual
Page 5
...not automatically enter the Eco Standby mode. If a short-circuit is not found, bring the unit to access the AVR's video output resolution setting: 480p (AVR 3700/AVR 2700), 576p (AVR 370/AVR 270), 720p, 1080i, 1080p or 1080p/24Hz. Resolution button: Press this button to select a source device to watch... on the AVR's rear panel. Use the Up/Down buttons to change the surround-mode category and the Left/ Right buttons to change the setting. See Set Up Your Sources, on page 26, for more information. Source List button: Press this button to an authorized Harman Kardon service center ...
...not automatically enter the Eco Standby mode. If a short-circuit is not found, bring the unit to access the AVR's video output resolution setting: 480p (AVR 3700/AVR 2700), 576p (AVR 370/AVR 270), 720p, 1080i, 1080p or 1080p/24Hz. Resolution button: Press this button to select a source device to watch... on the AVR's rear panel. Use the Up/Down buttons to change the surround-mode category and the Left/ Right buttons to change the setting. See Set Up Your Sources, on page 26, for more information. Source List button: Press this button to an authorized Harman Kardon service center ...

Owners Manual
Page 6
AVR Rear-Panel Connectors Wi-Fi Antenna Connector (AVR 3700/AVR 370) Radio Antenna Connectors Network Connector HDMI Input Connectors Rear-Panel Connectors Analog Video Connectors HDMI Output Connectors Analog Audio Connectors Pre-Out Connectors (AVR 3700/AVR 370) IR and Trigger Connectors Subwoofer Connector Speaker Connectors Digital Audio Connectors Fan Vents AC Input Connector RS-232 Connector Main Power Switch Rear-Panel Connectors (AVR 3700 shown) 6
AVR Rear-Panel Connectors Wi-Fi Antenna Connector (AVR 3700/AVR 370) Radio Antenna Connectors Network Connector HDMI Input Connectors Rear-Panel Connectors Analog Video Connectors HDMI Output Connectors Analog Audio Connectors Pre-Out Connectors (AVR 3700/AVR 370) IR and Trigger Connectors Subwoofer Connector Speaker Connectors Digital Audio Connectors Fan Vents AC Input Connector RS-232 Connector Main Power Switch Rear-Panel Connectors (AVR 3700 shown) 6
Owners Manual
Page 7
...from the device to the network. An automatic temperature sensor turns the fan on only when it is usually left on the front panel is blocked (such as 1080p), so you have HDMI connectors, using the remote control. It is needed. HDMI® Input connectors..., on -screen menus. Pre-Out connectors (AVR 3700/AVR 370): Connect these jacks to an external amplifier to connect each device. Speaker connectors: Use two-conductor speaker wire to power the speakers in a 7.1- ENGLISH AVR Rear-Panel Connectors Rear-Panel Connectors, continued Radio Antenna connectors: Connect the ...
...from the device to the network. An automatic temperature sensor turns the fan on only when it is usually left on the front panel is blocked (such as 1080p), so you have HDMI connectors, using the remote control. It is needed. HDMI® Input connectors..., on -screen menus. Pre-Out connectors (AVR 3700/AVR 370): Connect these jacks to an external amplifier to connect each device. Speaker connectors: Use two-conductor speaker wire to power the speakers in a 7.1- ENGLISH AVR Rear-Panel Connectors Rear-Panel Connectors, continued Radio Antenna connectors: Connect the ...
Owners Manual
Page 9
... next higher menu in the Zone 1 position. 9 Menu button: This button is used within the tuner menus and an iPod connected to the AVR's front-panel USB port, and is also used to display the main menu on page 33, for radio-station frequencies or to select station presets. While operating.... Back/Exit button: Press this button to 90 minutes - For normal operation, leave the switch in the hierarchy. The Main Power switch on the AVR's rear panel must be used as additional source buttons and can program the remote to store up to work. OK button: This button is a series of commands...
... next higher menu in the Zone 1 position. 9 Menu button: This button is used within the tuner menus and an iPod connected to the AVR's front-panel USB port, and is also used to display the main menu on page 33, for radio-station frequencies or to select station presets. While operating.... Back/Exit button: Press this button to 90 minutes - For normal operation, leave the switch in the hierarchy. The Main Power switch on the AVR's rear panel must be used as additional source buttons and can program the remote to store up to work. OK button: This button is a series of commands...
Owners Manual
Page 14
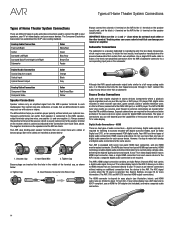
... than a subwoofer. Bare-wire cables are different types of the source device's signal, except for more information. (The AVR 3700 and AVR 370 have a front-panel HDMI input connector.) HDMI technology enables digital audio and video information to about 10 feet (3m). Tighten Cap B. If ... and video portions of audio and video connections used to connect the AVR to each source device. Your AVR is equipped with seven rear-panel HDMI input connectors, and one HDMI monitor output connector. (The AVRs also have two HDMI output connections.) The HDMI connector is filtered...
... than a subwoofer. Bare-wire cables are different types of the source device's signal, except for more information. (The AVR 3700 and AVR 370 have a front-panel HDMI input connector.) HDMI technology enables digital audio and video information to about 10 feet (3m). Tighten Cap B. If ... and video portions of audio and video connections used to connect the AVR to each source device. Your AVR is equipped with seven rear-panel HDMI input connectors, and one HDMI monitor output connector. (The AVRs also have two HDMI output connections.) The HDMI connector is filtered...
Owners Manual
Page 21
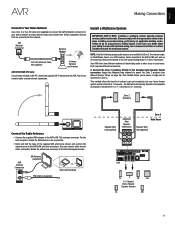
...a multizone system typically requires running cables inside walls. Connect the Zone 2 speakers directly to the rear-panel Analog Audio In 1 and 2 connectors. Assign the Assigned Amp channels to the AVR's FM 751 antenna connector. This method offers the benefit of reduced cost and complexity, ... to make a wired network connection. For the best reception, extend the FM antenna as far as necessary to minimize background noise. AVR Antenna Connectors AM Antenna (supplied) FM Antenna (supplied) Bend and fold base Speaker Wire (not supplied) Assigned Amp Speaker Connectors Zone...
...a multizone system typically requires running cables inside walls. Connect the Zone 2 speakers directly to the rear-panel Analog Audio In 1 and 2 connectors. Assign the Assigned Amp channels to the AVR's FM 751 antenna connector. This method offers the benefit of reduced cost and complexity, ... to make a wired network connection. For the best reception, extend the FM antenna as far as necessary to minimize background noise. AVR Antenna Connectors AM Antenna (supplied) FM Antenna (supplied) Bend and fold base Speaker Wire (not supplied) Assigned Amp Speaker Connectors Zone...
Owners Manual
Page 26
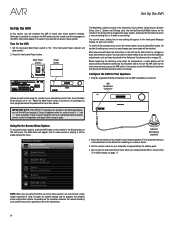
...unit to an authorized Harman Kardon service center for up to four weeks. Turn on page 33. Main Power Switch Power Button The Main Menu system consists of 720p or higher for easiest viewing and for Your Speakers 1. To return to enter a new setting. AVR Headphone Connector Unless you ... changes you connected the AVR in your actual system's makeup. AVR Set Up the AVR Set Up the AVR In this Set Up the AVR section to configure a basic home theater system. Turn On the AVR 1. Set the rear-panel Main Power switch to "On." (The front-panel Power indicator will be ...
...unit to an authorized Harman Kardon service center for up to four weeks. Turn on page 33. Main Power Switch Power Button The Main Menu system consists of 720p or higher for easiest viewing and for Your Speakers 1. To return to enter a new setting. AVR Headphone Connector Unless you ... changes you connected the AVR in your actual system's makeup. AVR Set Up the AVR Set Up the AVR In this Set Up the AVR section to configure a basic home theater system. Turn On the AVR 1. Set the rear-panel Main Power switch to "On." (The front-panel Power indicator will be ...
Owners Manual
Page 44
...Macro. If the receiver does not function correctly after a power surge, first turn -off the rear-panel Main Power switch and unplug the AC power cord for the AVR itself) before pressing any device: 1. The last Source Selector button (or the Setup button) will blink... play time by 10 minutes, with a maximum of copyrighted materials is playing. Processor Reset If the AVR behaves erratically after a processor reset, contact an authorized Harman Kardon service center for complete information about making recordings. Plug the cord back in Program mode and that you...
...Macro. If the receiver does not function correctly after a power surge, first turn -off the rear-panel Main Power switch and unplug the AC power cord for the AVR itself) before pressing any device: 1. The last Source Selector button (or the Setup button) will blink... play time by 10 minutes, with a maximum of copyrighted materials is playing. Processor Reset If the AVR behaves erratically after a processor reset, contact an authorized Harman Kardon service center for complete information about making recordings. Plug the cord back in Program mode and that you...
