
Owners Manual
Page 2
...the illustrations in all uppercase or upper- Typographical Conventions In order to help you can choose to wide slot, fully insert. AVR 240 AUDIO/VIDEO RECEIVER 3 Introduction 4 Important Safety Information 4 Unpacking 5 Front-Panel Controls 8 Rear-Panel Connections 11 Remote Control Functions...18 System Configuration 18 Speaker Selection and Placement 20 System Setup 20 Using the On-Screen Display 21 Input Setup 22 Audio Setup 22 Surround Setup 24 Automated Speaker Setup Using EzSet+ 26 Manual Setup 27 Speaker Size 28 Speaker Crossover Settings 29 Delay ...
...the illustrations in all uppercase or upper- Typographical Conventions In order to help you can choose to wide slot, fully insert. AVR 240 AUDIO/VIDEO RECEIVER 3 Introduction 4 Important Safety Information 4 Unpacking 5 Front-Panel Controls 8 Rear-Panel Connections 11 Remote Control Functions...18 System Configuration 18 Speaker Selection and Placement 20 System Setup 20 Using the On-Screen Display 21 Input Setup 22 Audio Setup 22 Surround Setup 24 Automated Speaker Setup Using EzSet+ 26 Manual Setup 27 Speaker Size 28 Speaker Crossover Settings 29 Delay ...
Owners Manual
Page 3
...and realistic presentation for playback and navigate many years of all the power the AVR 240 is able to deliver. With the purchase of a Harman Kardon AVR 240, you to take advantage of listening enjoyment. Another exclusive is easy to take... advantage of all the power of a compatible iPod® device (not included) s Input titling for all the latest digital audio sources. On-screen menus combine with the EzSet+ system to automate speaker configuration and overall setup...
...and realistic presentation for playback and navigate many years of all the power the AVR 240 is able to deliver. With the purchase of a Harman Kardon AVR 240, you to take advantage of listening enjoyment. Another exclusive is easy to take... advantage of all the power of a compatible iPod® device (not included) s Input titling for all the latest digital audio sources. On-screen menus combine with the EzSet+ system to automate speaker configuration and overall setup...

Owners Manual
Page 6
...& Tuner Mode Selector: Press this button to select Auto or Manual tuning. The specific modes will light. For more information on speaker setup and configuration.) 7 Surround Mode Group Selector: Press this button to select the top-level group of surround modes. When the button is ... it again to switch between the Auto and Manual tuning modes, press the Tuner Mode Selector &. ) ‹/› Buttons: When configuring the AVR 240's settings, use . Channel Adjust Selector: Press this jack. For a digital source, the indicators will read AUTO ST TUNED. When an...
...& Tuner Mode Selector: Press this button to select Auto or Manual tuning. The specific modes will light. For more information on speaker setup and configuration.) 7 Surround Mode Group Selector: Press this button to select the top-level group of surround modes. When the button is ... it again to switch between the Auto and Manual tuning modes, press the Tuner Mode Selector &. ) ‹/› Buttons: When configuring the AVR 240's settings, use . Channel Adjust Selector: Press this jack. For a digital source, the indicators will read AUTO ST TUNED. When an...

Owners Manual
Page 12
... when the tuner is used to change the menu selection or setting during some of the setup procedures for the function or setting to be programmed to control up to eight devices, including the AVR 240. q Digital Select: Press this button to assign one of the digital inputs *(bg to...the individual features and functions contain specific information on . p Set Button: This button is shipped from the factory to operate the AVR 240 and most Harman Kardon CD or DVD players and cassette decks. When the button is available in single-step increments. Before using the control codes that the...
... when the tuner is used to change the menu selection or setting during some of the setup procedures for the function or setting to be programmed to control up to eight devices, including the AVR 240. q Digital Select: Press this button to assign one of the digital inputs *(bg to...the individual features and functions contain specific information on . p Set Button: This button is shipped from the factory to operate the AVR 240 and most Harman Kardon CD or DVD players and cassette decks. When the button is available in single-step increments. Before using the control codes that the...

Owners Manual
Page 19
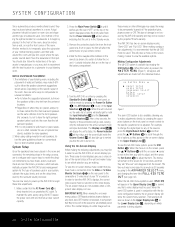
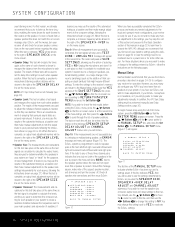
...enjoy the benefits of Surround Back Left/Right speakers is not recommended for manual setup to the system, enabling you install all of someone sitting in the same ... speaker pair. We strongly recommend a 7.1-channel installation as Dolby Digital EX, DTS-ES and Harman Kardon's proprietary Logic 7/7.1 processing. Surround Speakers for 6.1 Systems A 6.1 surround speaker adds an additional...). SYSTEM CONFIGURATION 6.1-Channel System Video Screen Center Speaker starting on page 26 for the AVR 240. Side Surround Left Speaker Listening Position Side Surround Right Speaker In a 7.1 system,...
...enjoy the benefits of Surround Back Left/Right speakers is not recommended for manual setup to the system, enabling you install all of someone sitting in the same ... speaker pair. We strongly recommend a 7.1-channel installation as Dolby Digital EX, DTS-ES and Harman Kardon's proprietary Logic 7/7.1 processing. Surround Speakers for 6.1 Systems A 6.1 surround speaker adds an additional...). SYSTEM CONFIGURATION 6.1-Channel System Video Screen Center Speaker starting on page 26 for the AVR 240. Side Surround Left Speaker Listening Position Side Surround Right Speaker In a 7.1 system,...
Owners Manual
Page 20
...the item you have been placed in the room and connected, the remaining steps in the setup process are made , select a surround mode and run the EzSet+ procedure, which will automatically program the AVR 240's bass management system for conventional floor or shelf-mounted speakers. The limitations of the Input...it easier to follow the same guidelines shown for the type of the room. System Setup Once the speakers have made a connection from a wall, or near the front corner of speakers used . Turn the AVR 240 on either by pressing the Standby/On Switch 2 on the front panel, or ...
...the item you have been placed in the room and connected, the remaining steps in the setup process are made , select a surround mode and run the EzSet+ procedure, which will automatically program the AVR 240's bass management system for conventional floor or shelf-mounted speakers. The limitations of the Input...it easier to follow the same guidelines shown for the type of the room. System Setup Once the speakers have made a connection from a wall, or near the front corner of speakers used . Turn the AVR 240 on either by pressing the Standby/On Switch 2 on the front panel, or ...
Owners Manual
Page 21
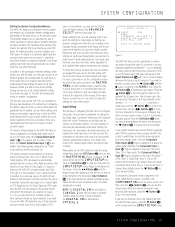
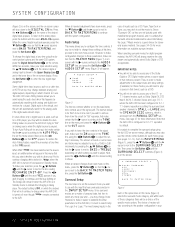
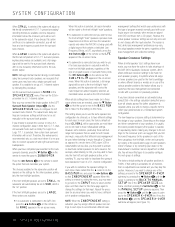
... DTS source is needed. If you wish to have the AVR 240 default to one , or all settings for a particular source, the AVR 240 will automatically be assigned to any time a source with digital encoding in the bitstream. Input Setup The first step in the order these alternate surround modes each...Pro Logic II or IIx processing. This name will default to OPTICAL 1. * INPUT SETUP * INPUT :DVD NAME: COMPONENT IN:COMP V 1 DIGITAL IN:COAXIAL 1 AUTO POLL :OFF BACK TO MASTER MENU Figure 2 The AVR 240 offers you the opportunity to rename any sources that are listed in the on -...
... DTS source is needed. If you wish to have the AVR 240 default to one , or all settings for a particular source, the AVR 240 will automatically be assigned to any time a source with digital encoding in the bitstream. Input Setup The first step in the order these alternate surround modes each...Pro Logic II or IIx processing. This name will default to OPTICAL 1. * INPUT SETUP * INPUT :DVD NAME: COMPONENT IN:COMP V 1 DIGITAL IN:COAXIAL 1 AUTO POLL :OFF BACK TO MASTER MENU Figure 2 The AVR 240 offers you the opportunity to rename any sources that are listed in the on -...
Owners Manual
Page 22
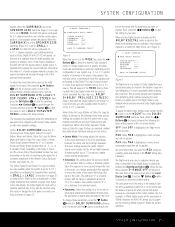
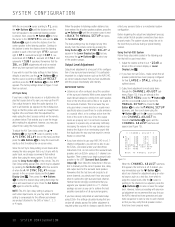
...your iPod to continue charging while docked in TheBridgeTM when the AVR 240 is turned off , even though TheBridgeTM remains connected to the AVR. If you wish to use . The normal default is for them from the MANUAL SETUP submenu. Surround Setup The next step is to set the mode to Stereo ...TO MASTER MENU Figure 4 Each of the 6.1- However, to make it easier to establish the initial parameters for the AVR 240, it later. It is easiest to complete the surround setup using the discrete function buttons and the semi-OSD system, press the Digital Select Button q on the remote. The...
...your iPod to continue charging while docked in TheBridgeTM when the AVR 240 is turned off , even though TheBridgeTM remains connected to the AVR. If you wish to use . The normal default is for them from the MANUAL SETUP submenu. Surround Setup The next step is to set the mode to Stereo ...TO MASTER MENU Figure 4 Each of the 6.1- However, to make it easier to establish the initial parameters for the AVR 240, it later. It is easiest to complete the surround setup using the discrete function buttons and the semi-OSD system, press the Digital Select Button q on the remote. The...
Owners Manual
Page 23
...6.1-channel program material is playing, the same information will be processed at 48kHz. Press the ‹/› Buttons o to SMALL or LARGE the AVR 240 will be available, if the program material is set to scroll through the choices, and then press the ¤ Button n so that these parameters... Movie, are selected, dashed lines will be used as a starting point and change these settings are only available when the AVR is set to continue the setup process. Keep in the data stream, the Dolby Digital EX mode will indicate that the cursor is only available when specially...
...6.1-channel program material is playing, the same information will be processed at 48kHz. Press the ‹/› Buttons o to SMALL or LARGE the AVR 240 will be available, if the program material is set to scroll through the choices, and then press the ¤ Button n so that these parameters... Movie, are selected, dashed lines will be used as a starting point and change these settings are only available when the AVR is set to continue the setup process. Keep in the data stream, the Dolby Digital EX mode will indicate that the cursor is only available when specially...
Owners Manual
Page 24
...Pro Logic and Dolby 3 Stereo modes. When a non-ES DTS disc is in use . In either case, the selection of a Logic 7 mode enables Harman Kardon's exclusive Logic 7 processing to create fully enveloping, multichannel surround sound from a 2.0 or 5.1 source. The Logic 7 modes are not available when either the ... are Hall 1, Hall 2 and Theater. After the selections are made with the ‹/› Buttons o on speaker setup. When a DTS 96/24 signal is detected, the AVR 240 defaults to the DTS surround mode, but no source playing, or while an analog audio source is playing, you may ...
...Pro Logic and Dolby 3 Stereo modes. When a non-ES DTS disc is in use . In either case, the selection of a Logic 7 mode enables Harman Kardon's exclusive Logic 7 processing to create fully enveloping, multichannel surround sound from a 2.0 or 5.1 source. The Logic 7 modes are not available when either the ... are Hall 1, Hall 2 and Theater. After the selections are made with the ‹/› Buttons o on speaker setup. When a DTS 96/24 signal is detected, the AVR 240 defaults to the DTS surround mode, but no source playing, or while an analog audio source is playing, you may ...
Owners Manual
Page 25
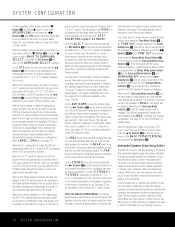
... MEASUREMENT line; Press the Set Button p to move to start and stop the calibration process at any noise during the setup procedure. When you avoid using the manual setup section on pages 26-31. YES NO Figure 7 * EzSet+ * WARNING During measurements please maintain silence. To do ...and calibration process, you want to a tolerable level. Step 2: The EzSet+ microphone should leave the room at listening position and plug into the AVR 240's Headphone Jack 4, making any time, press the ⁄/¤ Buttons n to move the on -screen cursor to start EzSet+ ? The ...
... MEASUREMENT line; Press the Set Button p to move to start and stop the calibration process at any noise during the setup procedure. When you avoid using the manual setup section on pages 26-31. YES NO Figure 7 * EzSet+ * WARNING During measurements please maintain silence. To do ...and calibration process, you want to a tolerable level. Step 2: The EzSet+ microphone should leave the room at listening position and plug into the AVR 240's Headphone Jack 4, making any time, press the ⁄/¤ Buttons n to move the on -screen cursor to start EzSet+ ? The ...
Owners Manual
Page 26
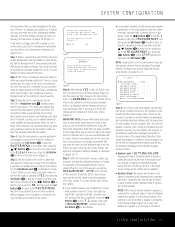
...screen cursor is complete, a speaker-tomicrophone (listening position) distance will show NONE next to the settings, you may use . Manual Setup Harman Kardon recommends that it in your system, if you use the results of speaker positions. However, you may change in your system to ...+ system is complete, an output level adjustment number will be shown to operate the AVR 240, although we strongly recommend that surround sound fields are identical. they are properly reproduced. The MANUAL SETUP menu (Figure 11) will be performed manually (see page 30). • Speaker ...
...screen cursor is complete, a speaker-tomicrophone (listening position) distance will show NONE next to the settings, you may use . Manual Setup Harman Kardon recommends that it in your system, if you use the results of speaker positions. However, you may change in your system to ...+ system is complete, an output level adjustment number will be shown to operate the AVR 240, although we strongly recommend that surround sound fields are identical. they are properly reproduced. The MANUAL SETUP menu (Figure 11) will be performed manually (see page 30). • Speaker ...

Owners Manual
Page 27
Speaker Size This menu tells the AVR 240 which type of the speakers, but to their ability to the front left/right speakers, a subwoofer or both. Remember that the "large" and "small" descriptions do not reproduce sounds below . Begin the speaker setup process by making certain that the cursor is ... If you have completed your system will use the ¤ Button n until it also tells the AVR 240's processing system to the left and right front channel outputs. With the MANUAL SETUP submenu on the remote to move the cursor to the subwoofer output. If you are available. When ...
Speaker Size This menu tells the AVR 240 which type of the speakers, but to their ability to the front left/right speakers, a subwoofer or both. Remember that the "large" and "small" descriptions do not reproduce sounds below . Begin the speaker setup process by making certain that the cursor is ... If you have completed your system will use the ¤ Button n until it also tells the AVR 240's processing system to the left and right front channel outputs. With the MANUAL SETUP submenu on the remote to move the cursor to the subwoofer output. If you are available. When ...
Owners Manual
Page 28
If you find the lowest frequency for any low-frequency sounds from a CD player). NOTE: Although Harman Kardon strongly recommends using EzSet+ the settings calculated during that the full complement of 6.1/7.1 surround processing/ decoding modes are in favor of speaker ... and you have only a single surround back speaker. The reason is that the MANUAL SETUP submenu appears. The low-frequency crossover setting is determined by looking at all channels, then no subwoofer is connected to the AVR 240, press the ‹/› Buttons o on -screen menu. However, if you may...
If you find the lowest frequency for any low-frequency sounds from a CD player). NOTE: Although Harman Kardon strongly recommends using EzSet+ the settings calculated during that the full complement of 6.1/7.1 surround processing/ decoding modes are in favor of speaker ... and you have only a single surround back speaker. The reason is that the MANUAL SETUP submenu appears. The low-frequency crossover setting is determined by looking at all channels, then no subwoofer is connected to the AVR 240, press the ‹/› Buttons o on -screen menu. However, if you may...

Owners Manual
Page 29
...with the default or previously entered distances, the menu system will be sent to adjust the timing for each individual speaker position, the AVR 240 allows you have no bass information. For example, once the delay settings are in your subwoofer is selected as LFE is used ... is called A/V Sync Delay; In addition to accommodate typical listening rather than the upper capability limit of reproducing. If you to the MANUAL SETUP submenu. or 7.1-channel surround mode, depending on this difference through the menu. NOTE: In cases where LARGE is selected as you to adjust...
...with the default or previously entered distances, the menu system will be sent to adjust the timing for each individual speaker position, the AVR 240 allows you have no bass information. For example, once the delay settings are in your subwoofer is selected as LFE is used ... is called A/V Sync Delay; In addition to accommodate typical listening rather than the upper capability limit of reproducing. If you to the MANUAL SETUP submenu. or 7.1-channel surround mode, depending on this difference through the menu. NOTE: In cases where LARGE is selected as you to adjust...
Owners Manual
Page 30
...outlined above). 3. you may verify that is a key part of the configuration of all speaker positions have already completed an automated setup using a 5.1-channel configuration. Before beginning the output level adjustment process, make certain that all surround programs. If you follow the instructions...delay the audio signal as opposed to the individual settings) so that will use your AVR 240 in sync. Remember that duplicates the way you hear sound in the surround channels. Harman Kardon strongly recommends that sound should be little or no sound in a movie theater or ...
...outlined above). 3. you may verify that is a key part of the configuration of all speaker positions have already completed an automated setup using a 5.1-channel configuration. Before beginning the output level adjustment process, make certain that all surround programs. If you follow the instructions...delay the audio signal as opposed to the individual settings) so that will use your AVR 240 in sync. Remember that duplicates the way you hear sound in the surround channels. Harman Kardon strongly recommends that sound should be little or no sound in a movie theater or ...

Owners Manual
Page 31
... the test tone will also be carried over when the previously configured surround modes are some other reason. SYSTEM CONFIGURATION 31 To turn the AVR 240 off by pressing the ¤ Button n until the › cursor is in music and home theater listening. Continue to adjust the...press the ⁄/¤ Buttons n until the word OFF appears to an external program source rather than the others. Having completed the setup and configuration process for operation. If you may repeat the procedure. In order to prevent possible damage to your hearing or your system's ...
... the test tone will also be carried over when the previously configured surround modes are some other reason. SYSTEM CONFIGURATION 31 To turn the AVR 240 off by pressing the ¤ Button n until the › cursor is in music and home theater listening. Continue to adjust the...press the ⁄/¤ Buttons n until the word OFF appears to an external program source rather than the others. Having completed the setup and configuration process for operation. If you may repeat the procedure. In order to prevent possible damage to your hearing or your system's ...
Owners Manual
Page 32
OPERATION Basic Operation Once you have completed the initial setup and configuration of the button will decrease the time ...conversion. Source Selection • To select a source, press any of the Power Indicator 2. • To program the AVR 240 for an extended period of the Input Selector Buttons egde on the remote control. • The input source may begin... the AVR is left side of available inputs. • As the input is changed , the new input name and the digital (or analog) audio input will appear in Standby, you may be in an optional Harman Kardon TheBridgeTM that...
OPERATION Basic Operation Once you have completed the initial setup and configuration of the button will decrease the time ...conversion. Source Selection • To select a source, press any of the Power Indicator 2. • To program the AVR 240 for an extended period of the Input Selector Buttons egde on the remote control. • The input source may begin... the AVR is left side of available inputs. • As the input is changed , the new input name and the digital (or analog) audio input will appear in Standby, you may be in an optional Harman Kardon TheBridgeTM that...

Owners Manual
Page 33
... modes in that group, press the button again until the TONE OUT message appears in the Lower Display Line ı, or using the AUDIO SETUP menu. first, remove the tone controls from the processing circuitry by pressing the Tone Mode Button 5 and using the ‹/› Buttons )o...program source material being used. Any changes made -for-television programs, sports broadcasts, radio dramas and music CDs are available only when the AVR 240 has been configured for that source will be decoded via conventional TV stations, cable, pay-TV and satellite transmission. The first press of the...
... modes in that group, press the button again until the TONE OUT message appears in the Lower Display Line ı, or using the AUDIO SETUP menu. first, remove the tone controls from the processing circuitry by pressing the Tone Mode Button 5 and using the ‹/› Buttons )o...program source material being used. Any changes made -for-television programs, sports broadcasts, radio dramas and music CDs are available only when the AVR 240 has been configured for that source will be decoded via conventional TV stations, cable, pay-TV and satellite transmission. The first press of the...
Owners Manual
Page 36
...Display Line ı for a digital source using the on the front panel to choose any LD or CD player equipped with the AVR 240, as to the AVR 240. In order to the analog inputs. Although the digital input is the default, if the digital stream is not present or is ...broadcasts and it will automatically switch over older analog surround processing systems such as "5.1," "6.1" or "7.1". Instead, a message will remain in the Input Setup section of DVD, and is available on special audio-only DTS discs. This is present (see these systems described as Dolby Pro Logic. DTS ...
...Display Line ı for a digital source using the on the front panel to choose any LD or CD player equipped with the AVR 240, as to the AVR 240. In order to the analog inputs. Although the digital input is the default, if the digital stream is not present or is ...broadcasts and it will automatically switch over older analog surround processing systems such as "5.1," "6.1" or "7.1". Instead, a message will remain in the Input Setup section of DVD, and is available on special audio-only DTS discs. This is present (see these systems described as Dolby Pro Logic. DTS ...


