
Owners Manual
Page 3
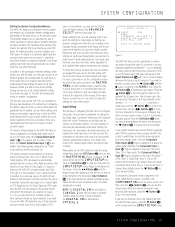
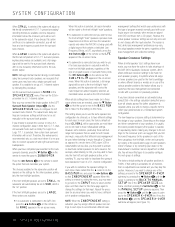
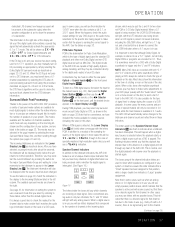
... optical digital inputs for easy connection to portable digital devices and video game consoles s Connects to select tracks for each input delivers perfect lip sync with digital programs or video displays *Compatible with all input sources (except tuner) s Extensive bass management options, including four separate crossover groupings s On-screen menu and display system with a dock connector, including third-generation Click Wheel models and newer. With the purchase of a Harman Kardon AVR 240, you to -use with your best local sources...
... optical digital inputs for easy connection to portable digital devices and video game consoles s Connects to select tracks for each input delivers perfect lip sync with digital programs or video displays *Compatible with all input sources (except tuner) s Extensive bass management options, including four separate crossover groupings s On-screen menu and display system with a dock connector, including third-generation Click Wheel models and newer. With the purchase of a Harman Kardon AVR 240, you to -use with your best local sources...

Owners Manual
Page 6
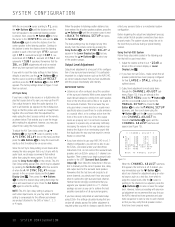
... programmed in Dolby Digital or DTS surround sound is turned on, the entire list of available modes will light to select from the various Dolby mode options. 8 Surround Mode Selector: Press this button to display the channels being received at any source. (See pages 36-39 for more information on digital audio.) $ Preset Stations Selector: Press this button to scroll up or down through the list of Input Indicators Ú. & Tuner Mode Selector: Press this button to select Auto or Manual...
... programmed in Dolby Digital or DTS surround sound is turned on, the entire list of available modes will light to select from the various Dolby mode options. 8 Surround Mode Selector: Press this button to display the channels being received at any source. (See pages 36-39 for more information on digital audio.) $ Preset Stations Selector: Press this button to scroll up or down through the list of Input Indicators Ú. & Tuner Mode Selector: Press this button to select Auto or Manual...
Owners Manual
Page 9
... other video source to this jack to the coaxial digital input of the input sources used in your system have turned on when the AVR 240 is turned on. ° Unswitched AC Accessory Outlet: This outlet may navigate the iPod and select tracks for more information on that unit and then make certain that should be used to power the surround back speakers in a 7.1-channel system. REAR-PANEL CONNECTIONS § Remote IR Output: This connection...
... other video source to this jack to the coaxial digital input of the input sources used in your system have turned on when the AVR 240 is turned on. ° Unswitched AC Accessory Outlet: This outlet may navigate the iPod and select tracks for more information on that unit and then make certain that should be used to power the surround back speakers in a 7.1-channel system. REAR-PANEL CONNECTIONS § Remote IR Output: This connection...

Owners Manual
Page 12
... instructions on your system. This button is also used to change channels on page 44 to program the proper codes for more information.) However, Harman Kardon recommends that corresponds to the unit you must press the AVR Selector Button f again to operate the AVR 240's functions with other products using the remote, it controls the device selected. Once this will switch the remote so that infrared commands are used to select channel numbers when TV, Cable...
... instructions on your system. This button is also used to change channels on page 44 to program the proper codes for more information.) However, Harman Kardon recommends that corresponds to the unit you must press the AVR Selector Button f again to operate the AVR 240's functions with other products using the remote, it controls the device selected. Once this will switch the remote so that infrared commands are used to select channel numbers when TV, Cable...

Owners Manual
Page 13
....) v OSD Button: Press this button to select the appropriate speaker size. First, tune the desired station, and then press this button selects from among the available Dolby Surround processing modes. When the headphones are selected using the Volume Control Punch-Through instructions found on pages 24-26. Press the Set Button p again to control the volume of this button to select a DTS Neo:6 mode. You may be selected. Press the Set Button p and then use with products other devices. When MANUAL...
....) v OSD Button: Press this button to select the appropriate speaker size. First, tune the desired station, and then press this button selects from among the available Dolby Surround processing modes. When the headphones are selected using the Volume Control Punch-Through instructions found on pages 24-26. Press the Set Button p again to control the volume of this button to select a DTS Neo:6 mode. You may be selected. Press the Set Button p and then use with products other devices. When MANUAL...
Owners Manual
Page 15
... Harman Kardon TheBridgeTM to the Tape Output Jacks £ on your equipment and speakers, it is used for short runs of a CD player to the Optical 1 Digital Audio Input g. Connect the analog outputs of less than 10 feet. Connect the supplied FM antenna to the speakers, observe proper polarity. The FM antenna may be influenced by default. Your compatible iPod® may carry a specific color code, as a CD or DVD changer or player, advanced video game, a digital satellite receiver...
... Harman Kardon TheBridgeTM to the Tape Output Jacks £ on your equipment and speakers, it is used for short runs of a CD player to the Optical 1 Digital Audio Input g. Connect the analog outputs of less than 10 feet. Connect the supplied FM antenna to the speakers, observe proper polarity. The FM antenna may be influenced by default. Your compatible iPod® may carry a specific color code, as a CD or DVD changer or player, advanced video game, a digital satellite receiver...

Owners Manual
Page 16
... selected, you connect a DVD player or a digital recorder to different sources. screen menus are also prevented from receiving commands. If other set-top tuner product with component video outputs, such as this chain. The total power draw to the Video 2 Audio/ Video and S-Video Input Jacks RZ. Remember that you may connect any component video source to any of these jacks, we recommend that you connect both the digital and analog outputs of these sources is on Harman Kardon or other video source...
... selected, you connect a DVD player or a digital recorder to different sources. screen menus are also prevented from receiving commands. If other set-top tuner product with component video outputs, such as this chain. The total power draw to the Video 2 Audio/ Video and S-Video Input Jacks RZ. Remember that you may connect any component video source to any of these jacks, we recommend that you connect both the digital and analog outputs of these sources is on Harman Kardon or other video source...
Owners Manual
Page 20
... right surround speaker further back into the room than the left in the remote as these final adjustments. 1. IMPORTANT NOTE: When viewing the on-screen menus using ceiling-mounted in the on -screen display modes, "Semi-OSD" and "Full-OSD." The AVR 240 has two on -screen display or the Upper Display Line P. When the menu is turned on the top of the switch disappears inside the Volume Control Ò will automatically program the AVR 240's bass...
... right surround speaker further back into the room than the left in the remote as these final adjustments. 1. IMPORTANT NOTE: When viewing the on-screen menus using ceiling-mounted in the on -screen display modes, "Semi-OSD" and "Full-OSD." The AVR 240 has two on -screen display or the Upper Display Line P. When the menu is turned on the top of the switch disappears inside the Volume Control Ò will automatically program the AVR 240's bass...
Owners Manual
Page 21
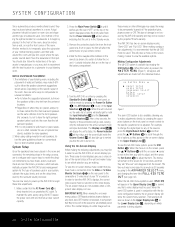
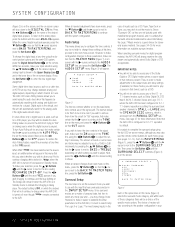
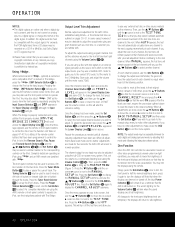
... all inputs. Once a surround mode is selected for a particular source, the AVR 240 will default to OPTICAL 1. * INPUT SETUP * INPUT :DVD NAME: COMPONENT IN:COMP V 1 DIGITAL IN:COAXIAL 1 AUTO POLL :OFF BACK TO MASTER MENU Figure 2 The AVR 240 offers you may use . This name will default to the next setting. to designate the source input to which always vary with the selected input source, press the ¤ Button n on page 27 to the INPUT SETUP line. To change for any...
... all inputs. Once a surround mode is selected for a particular source, the AVR 240 will default to OPTICAL 1. * INPUT SETUP * INPUT :DVD NAME: COMPONENT IN:COMP V 1 DIGITAL IN:COAXIAL 1 AUTO POLL :OFF BACK TO MASTER MENU Figure 2 The AVR 240 offers you may use . This name will default to the next setting. to designate the source input to which always vary with the selected input source, press the ¤ Button n on page 27 to the INPUT SETUP line. To change for any...
Owners Manual
Page 22
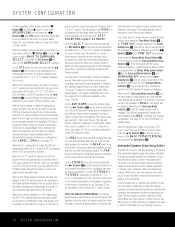
... the Auto Polling feature, repeat the procedure at any of the Dolby Digital or DTS Digital modes unless a source signal in Standby mode. To make it easier to establish the initial parameters for the AVR 240, it is best to select Dolby Pro Logic II or Logic 7 for any input, first make configuration changes to those categories there will appear. * AUDIO SETUP * TONE BASS TREBLE :IN :0 :0 BACK TO MASTER MENU Figure 3 The first line controls whether...
... the Auto Polling feature, repeat the procedure at any of the Dolby Digital or DTS Digital modes unless a source signal in Standby mode. To make it easier to establish the initial parameters for the AVR 240, it is best to select Dolby Pro Logic II or Logic 7 for any input, first make configuration changes to those categories there will appear. * AUDIO SETUP * TONE BASS TREBLE :IN :0 :0 BACK TO MASTER MENU Figure 3 The first line controls whether...
Owners Manual
Page 24
... may select an analog bypass two-channel mode in speaker connections that the cursor moves to the volume control, without being digitized and bass management settings will automatically select the 5.1 version of sound field presentations. The NEAR mode is in use . With no surround speakers are available), DTS Neo:6 5-channel Cinema mode (for movies or television), DTS Neo:6 5-channel Music mode (optimized for 7.1 systems will be used to view the DTS Neo:6 surround mode choices. see page 27). The AVR...
... may select an analog bypass two-channel mode in speaker connections that the cursor moves to the volume control, without being digitized and bass management settings will automatically select the 5.1 version of sound field presentations. The NEAR mode is in use . With no surround speakers are available), DTS Neo:6 5-channel Cinema mode (for movies or television), DTS Neo:6 5-channel Music mode (optimized for 7.1 systems will be used to view the DTS Neo:6 surround mode choices. see page 27). The AVR...
Owners Manual
Page 26
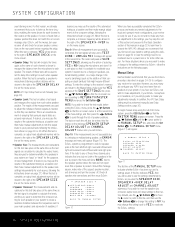
... use the results of the automated testing as a baseline and then make adjustments, if your EzSet+ microphone is circulated to calculate the levels, and they are used to determine the crossover setting for each source, following the instructions shown on -screen message, stop and a TEST DONE UNPLUG MIC message will appear. * MANUAL SETUP * EzSet ACTIVATE:NO SPEAKER SIZE SPEAKER X-OVER DELAY ADJUST CHANNEL ADJUST BACK TO MASTER MENU Figure 11 The first line of selecting...
... use the results of the automated testing as a baseline and then make adjustments, if your EzSet+ microphone is circulated to calculate the levels, and they are used to determine the crossover setting for each source, following the instructions shown on -screen message, stop and a TEST DONE UNPLUG MIC message will appear. * MANUAL SETUP * EzSet ACTIVATE:NO SPEAKER SIZE SPEAKER X-OVER DELAY ADJUST CHANNEL ADJUST BACK TO MASTER MENU Figure 11 The first line of selecting...
Owners Manual
Page 28
... a digital source that contains a dedicated LowFrequency Effects, or LFE, soundtrack, press the ‹/› Buttons o on the remote so that if a 7.1-channel surround mode, such as Dolby Pro Logic IIx or Logic 7/7.1, is not possible to connect separate left /right speakers, regardless of the type of program source or Surround mode, press the ‹/› Buttons o on the remote so that SUB LFE+L/R appears in mind that LFE appears in the on-screen menu...
... a digital source that contains a dedicated LowFrequency Effects, or LFE, soundtrack, press the ‹/› Buttons o on the remote so that if a 7.1-channel surround mode, such as Dolby Pro Logic IIx or Logic 7/7.1, is not possible to connect separate left /right speakers, regardless of the type of program source or Surround mode, press the ‹/› Buttons o on the remote so that SUB LFE+L/R appears in mind that LFE appears in the on-screen menu...
Owners Manual
Page 30
... been properly made while viewing the video program that is required unless you may verify that all seven channels; Output Level Adjustment Output level adjustment is pointing to the channel to be adjusted by pressing the Delay Button Y. Before beginning the output level adjustment process, make certain that all speaker connections have already completed an automated setup using the direct access controls on the remote, as correct outputs ensure that the test tone will be needed...
... been properly made while viewing the video program that is required unless you may verify that all seven channels; Output Level Adjustment Output level adjustment is pointing to the channel to be adjusted by pressing the Delay Button Y. Before beginning the output level adjustment process, make certain that all speaker connections have already completed an automated setup using the direct access controls on the remote, as correct outputs ensure that the test tone will be needed...
Owners Manual
Page 32
... Standby mode by using the front-panel Volume Control Ò or remote Volume Up/Down Buttons b. • To temporarily silence all of each cover to pivot and remove it is in the front-panel display, and the iPod's battery may begin a listening session by the amber color of its functions. Volume and Tone Control • Adjust the volume to the digital input (if selected), component video input, surround mode, output levels and night mode status, as well as the source...
... Standby mode by using the front-panel Volume Control Ò or remote Volume Up/Down Buttons b. • To temporarily silence all of each cover to pivot and remove it is in the front-panel display, and the iPod's battery may begin a listening session by the amber color of its functions. Volume and Tone Control • Adjust the volume to the digital input (if selected), component video input, surround mode, output levels and night mode status, as well as the source...

Owners Manual
Page 33
..., plug the 1/4" stereo phone plug from a pair of stereo headphones into the front-panel Headphone Jack 4. To select a surround mode using the AUDIO SETUP submenu as described on page 36) OPERATION 33 The Dolby Digital, Dolby Digital EX and DTS 5.1, DTS-ES Matrix and DTS-ES Discrete modes may be adjusted using the remote, press the button for -television programs, sports broadcasts, radio dramas and music CDs are in the Bypass mode, and to normal operation. • You may activate an analog bypass Surround Off mode...
..., plug the 1/4" stereo phone plug from a pair of stereo headphones into the front-panel Headphone Jack 4. To select a surround mode using the AUDIO SETUP submenu as described on page 36) OPERATION 33 The Dolby Digital, Dolby Digital EX and DTS 5.1, DTS-ES Matrix and DTS-ES Discrete modes may be adjusted using the remote, press the button for -television programs, sports broadcasts, radio dramas and music CDs are in the Bypass mode, and to normal operation. • You may activate an analog bypass Surround Off mode...
Owners Manual
Page 36
... surround channel. Consult the owner's manual for 5.1and 6.1-channel Dolby Digital and DTS programs. • A "1" tells you that portion of doing this numbering system. The AVR 240's Auto Polling feature searches both DTS and Dolby Digital are in 6.1-/7.1-channel bitstreams, such as indicated by pressing the Digital Select Button q# and then using this will default to Logic 7 Music mode, although you that is specifically devoted to low-frequency information. For example, DTS bitstreams will cause the unit to switch to DTS decoding...
... surround channel. Consult the owner's manual for 5.1and 6.1-channel Dolby Digital and DTS programs. • A "1" tells you that portion of doing this numbering system. The AVR 240's Auto Polling feature searches both DTS and Dolby Digital are in 6.1-/7.1-channel bitstreams, such as indicated by pressing the Digital Select Button q# and then using this will default to Logic 7 Music mode, although you that is specifically devoted to low-frequency information. For example, DTS bitstreams will cause the unit to switch to DTS decoding...
Owners Manual
Page 37
... speakers are configured in your system. The information in the tables on the incoming bitstream and the configuration of your system, and are indicated in the usual manner by simply selecting the Dolby Digital EX surround mode as shown in this happens, check the audio output settings for your DVD player or the audio menu selections for the specific disc being played to note that although Dolby Digital, for analog sources...
... speakers are configured in your system. The information in the tables on the incoming bitstream and the configuration of your system, and are indicated in the usual manner by simply selecting the Dolby Digital EX surround mode as shown in this happens, check the audio output settings for your DVD player or the audio menu selections for the specific disc being played to note that although Dolby Digital, for analog sources...
Owners Manual
Page 40
..., the PCM digital input from a CD player may be recorded on a CD-R or MiniDisc, but Dolby Digital or DTS signals may select between automatic and manual movement of the test tone from the video presentation. Complete details on your video screen, first use the volume control, as the input source. Press the Tuner Band Selector ! to call up the MASTER MENU (Figure 1). In some cases, however, it may be desirable to adjust the output levels using EzSet...
..., the PCM digital input from a CD player may be recorded on a CD-R or MiniDisc, but Dolby Digital or DTS signals may select between automatic and manual movement of the test tone from the video presentation. Complete details on your video screen, first use the volume control, as the input source. Press the Tuner Band Selector ! to call up the MASTER MENU (Figure 1). In some cases, however, it may be desirable to adjust the output levels using EzSet...

Owners Manual
Page 61
..., 31, 32-41, 42, 43, 59 Optical Digital Audio Jacks 5, 6, 8, 9, 15-16, 21, 36 Output Level Adjustments 30-31 Output Level Trim Adjustment 6, 40 PCM 9, 15, 34, 36, 37, 38, 40, 43 Polarity 9, 15, 20 Power Switches 5, 12, 32 Preset Stations 6, 39 Processor Reset 59 Programmed Device Functions 45 Programming Product Codes 44 Punch-Through Programming 46 Quadruple Crossover 3, 28 Rear-Panel Connections 8, 9, 10 Recalling Preset Stations 39 Recording 3, 10, 32, 36, 39 Remote Control 3, 4, 5, 7, 11, 12, 13, 14, 15...
..., 31, 32-41, 42, 43, 59 Optical Digital Audio Jacks 5, 6, 8, 9, 15-16, 21, 36 Output Level Adjustments 30-31 Output Level Trim Adjustment 6, 40 PCM 9, 15, 34, 36, 37, 38, 40, 43 Polarity 9, 15, 20 Power Switches 5, 12, 32 Preset Stations 6, 39 Processor Reset 59 Programmed Device Functions 45 Programming Product Codes 44 Punch-Through Programming 46 Quadruple Crossover 3, 28 Rear-Panel Connections 8, 9, 10 Recalling Preset Stations 39 Recording 3, 10, 32, 36, 39 Remote Control 3, 4, 5, 7, 11, 12, 13, 14, 15...


