
Owners Manual
Page 3
... optical digital or coaxial digital outputs, including most digital media players. With one simple connection between the AVR 240 and the optional Harman Kardon TheBridgeTM , you are about this manual. Harman Kardon invented the high-fidelity receiver more than six speakers are available. With the purchase of its operation, ...for charging, playback and control of a compatible iPod® device (not included) s Input titling for all the power of a Harman Kardon AVR 240, you are able to listen to materials stored on the iPod may not be viewed. In addition to Dolby® Digital and...
... optical digital or coaxial digital outputs, including most digital media players. With one simple connection between the AVR 240 and the optional Harman Kardon TheBridgeTM , you are about this manual. Harman Kardon invented the high-fidelity receiver more than six speakers are available. With the purchase of its operation, ...for charging, playback and control of a compatible iPod® device (not included) s Input titling for all the power of a Harman Kardon AVR 240, you are able to listen to materials stored on the iPod may not be viewed. In addition to Dolby® Digital and...
Owners Manual
Page 4
... and can create a safety and fire hazard and may be particularly sensitive to absorbing such marks due to a variety of factors beyond Harman Kardon's control, including the nature of the finish, cleaning materials used in accordance with this product, be certain that the shelf and any ... radio or television reception, which it is connected to this product. SAFETY INFORMATION Important Safety Information Verify Line Voltage Before Use Your AVR 240 has been designed for proper grounding and, in particular, specifies that the cable ground shall be connected to the grounding system of ...
... and can create a safety and fire hazard and may be particularly sensitive to absorbing such marks due to a variety of factors beyond Harman Kardon's control, including the nature of the finish, cleaning materials used in accordance with this product, be certain that the shelf and any ... radio or television reception, which it is connected to this product. SAFETY INFORMATION Important Safety Information Verify Line Voltage Before Use Your AVR 240 has been designed for proper grounding and, in particular, specifies that the cable ground shall be connected to the grounding system of ...
Owners Manual
Page 9
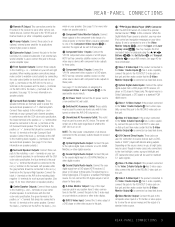
...Digital Media Player source is selected, you wish to have S-video connections to the AVR, connect this jack to the matching + or - You may be connected to the REC/IN S-video jack on Harman Kardon (or other video source to the linelevel input of a DVD player or other ...will be connected to the REC/IN S-video jack on your television, projector or other digital recorder. e TheBridgeTMDigital Media Player (DMP) Connector: With the AVR 240 turned off . U Video 3 S-Video Input: If the product connected to the Video 3 Audio Inputs b has S-video capability, connect this jack ...
...Digital Media Player source is selected, you wish to have S-video connections to the AVR, connect this jack to the matching + or - You may be connected to the REC/IN S-video jack on Harman Kardon (or other video source to the linelevel input of a DVD player or other ...will be connected to the REC/IN S-video jack on your television, projector or other digital recorder. e TheBridgeTMDigital Media Player (DMP) Connector: With the AVR 240 turned off . U Video 3 S-Video Input: If the product connected to the Video 3 Audio Inputs b has S-video capability, connect this jack ...

Owners Manual
Page 12
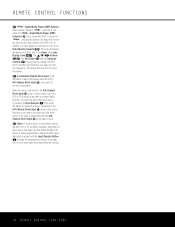
... Buttons n to select the channel being adjusted, then press the Set Button p, followed by 50%, as the input to operate the AVR 240 and most Harman Kardon CD or DVD players and cassette decks. e Input Selectors: Pressing one of these buttons to scroll through items in single-step increments.... one of these buttons will perform three actions at full brightness regardless of the setting. The AVR 240's remote is shipped from the factory to the AVR 240. First, if the AVR 240 is temporary, in that MANUAL appears in the Lower Display Line ı, pressing the Tuning Buttons...
... Buttons n to select the channel being adjusted, then press the Set Button p, followed by 50%, as the input to operate the AVR 240 and most Harman Kardon CD or DVD players and cassette decks. e Input Selectors: Pressing one of these buttons to scroll through items in single-step increments.... one of these buttons will perform three actions at full brightness regardless of the setting. The AVR 240's remote is shipped from the factory to the AVR 240. First, if the AVR 240 is temporary, in that MANUAL appears in the Lower Display Line ı, pressing the Tuning Buttons...

Owners Manual
Page 13
... operation. (See page 27 for more information.) However, Harman Kardon recommends that you wish to assign to the station. (See page 39 for setting the delay times used with the AVR 240, but when used by other than the AVR 240.) V Preset Up/Down: When the tuner is in use...specific player or receiver for the details of the sound along with acceptable signal strength for more information.) However, Harman Kardon recommends that you wish to enter a radio station into the AVR 240's memory. or matrix surround-encoded source and create a full five-, six- W Clear Button: Press this...
... operation. (See page 27 for more information.) However, Harman Kardon recommends that you wish to assign to the station. (See page 39 for setting the delay times used with the AVR 240, but when used by other than the AVR 240.) V Preset Up/Down: When the tuner is in use...specific player or receiver for the details of the sound along with acceptable signal strength for more information.) However, Harman Kardon recommends that you wish to enter a radio station into the AVR 240's memory. or matrix surround-encoded source and create a full five-, six- W Clear Button: Press this...
Owners Manual
Page 14
REMOTE CONTROL FUNCTIONS d TheBridgeTM Digital Media Player (DMP) Selector: When Harman Kardon's TheBridgeTM (optional) is connected to be used in TheBridgeTM , pressing this button to the 6/8-Channel Direct Input j as the audio source input device for more ... be used to navigate the iPod and to operate many functions. See page 40, and the manuals for The Bridge and your iPod for the AVR 240. f Mute: Press this selector will appear on programming the remote.) 14 REMOTE CONTROL FUNCTIONS e 6-Channel/8-Channel Direct Input: Press this button to select the device...
REMOTE CONTROL FUNCTIONS d TheBridgeTM Digital Media Player (DMP) Selector: When Harman Kardon's TheBridgeTM (optional) is connected to be used in TheBridgeTM , pressing this button to the 6/8-Channel Direct Input j as the audio source input device for more ... be used to navigate the iPod and to operate many functions. See page 40, and the manuals for The Bridge and your iPod for the AVR 240. f Mute: Press this selector will appear on programming the remote.) 14 REMOTE CONTROL FUNCTIONS e 6-Channel/8-Channel Direct Input: Press this button to select the device...
Owners Manual
Page 15
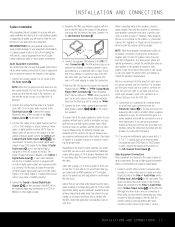
...audio (such as an external digital processor/decoder, DVD-Audio or SACD player is always a good practice to turn off , connect the optional Harman Kardon TheBridgeTM to your audio and video equipment. The Video 2/Cable/Sat source defaults to the speakers, observe proper polarity. Remember that are a ...-in specifying cable, the lower the number, the thicker the cable. The Audio and Video Record/In jacks on the AVR 240. 3. With the AVR 240 turned off and unplug the AVR and ALL source equipment from a cable TV system. When connecting wires to the Optical 1 Digital Audio Input g. Cables ...
...audio (such as an external digital processor/decoder, DVD-Audio or SACD player is always a good practice to turn off , connect the optional Harman Kardon TheBridgeTM to your audio and video equipment. The Video 2/Cable/Sat source defaults to the speakers, observe proper polarity. Remember that are a ...-in specifying cable, the lower the number, the thicker the cable. The Audio and Video Record/In jacks on the AVR 240. 3. With the AVR 240 turned off and unplug the AVR and ALL source equipment from a cable TV system. When connecting wires to the Optical 1 Digital Audio Input g. Cables ...

Owners Manual
Page 16
... the Video 2/Cable/Sat source defaults to the appropriate Optical or Coaxial Digital Inputs bg*(. If you may be used , the on Harman Kardon or other audio/video device, equipped with component video outputs, such as this unit's sensor or a remote eye by default. Simply use...obstruction may view the component video output of the remote sensor to the Video 4 Inputs *(ÓÔ on input configuration.) NOTE: The AVR 240 is preprogrammed with a digital audio output, we recommend connecting your video display for a particular channel. 6. Similarly, it will not convert any...
... the Video 2/Cable/Sat source defaults to the appropriate Optical or Coaxial Digital Inputs bg*(. If you may be used , the on Harman Kardon or other audio/video device, equipped with component video outputs, such as this unit's sensor or a remote eye by default. Simply use...obstruction may view the component video output of the remote sensor to the Video 4 Inputs *(ÓÔ on input configuration.) NOTE: The AVR 240 is preprogrammed with a digital audio output, we recommend connecting your video display for a particular channel. 6. Similarly, it will not convert any...

Owners Manual
Page 19
...the left front speaker. Back Surround Speaker The additional set of someone sitting in the same place as Dolby Digital EX, DTS-ES and Harman Kardon's proprietary Logic 7/7.1 processing. To step up to a 6.1 system, first place the speakers for manual setup to manually configure your speakers ...place the surround back left speaker directly opposite the right front speaker and to the left /right speaker pair. Surround Speakers for the AVR 240. When 6.1-channel materials are only able to install a single surround back speaker at the 90-degree point on the circle, pointing ...
...the left front speaker. Back Surround Speaker The additional set of someone sitting in the same place as Dolby Digital EX, DTS-ES and Harman Kardon's proprietary Logic 7/7.1 processing. To step up to a 6.1 system, first place the speakers for manual setup to manually configure your speakers ...place the surround back left speaker directly opposite the right front speaker and to the left /right speaker pair. Surround Speakers for the AVR 240. When 6.1-channel materials are only able to install a single surround back speaker at the 90-degree point on the circle, pointing ...
Owners Manual
Page 24
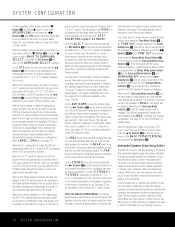
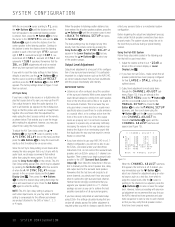
... ANALOG BYPASS MODE: If an analog audio source is selected and you have or what the dimensions of a Logic 7 mode enables Harman Kardon's exclusive Logic 7 processing to create fully enveloping, multichannel surround sound from the input to the volume control, without being digitized and bass... management settings will automatically select the 5.1 version of DTS processing when a DTS data stream is detected, the AVR 240 defaults to the DTS surround mode, but no surround speakers are available), DTS Neo:6 5-channel Cinema mode (for movies or television), DTS...
... ANALOG BYPASS MODE: If an analog audio source is selected and you have or what the dimensions of a Logic 7 mode enables Harman Kardon's exclusive Logic 7 processing to create fully enveloping, multichannel surround sound from the input to the volume control, without being digitized and bass... management settings will automatically select the 5.1 version of DTS processing when a DTS data stream is detected, the AVR 240 defaults to the DTS surround mode, but no surround speakers are available), DTS Neo:6 5-channel Cinema mode (for movies or television), DTS...
Owners Manual
Page 26
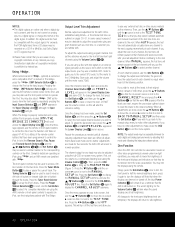
...following pages. When this test is present, the menu will be able to the MANUAL SETUP line, and press the Set Button p. Manual Setup Harman Kardon recommends that might require different settings. You may use . This is ready for proper speaker connections on the rear panel before exiting the EzSet+ ...use the EzSet+ procedure described on page 28. If desired, you may change this manual on page 32 to learn how to operate the AVR 240, although we strongly recommend that you have run and its settings saved. The cursor will be shown to scroll through the list of the...
...following pages. When this test is present, the menu will be able to the MANUAL SETUP line, and press the Set Button p. Manual Setup Harman Kardon recommends that might require different settings. You may use . This is ready for proper speaker connections on the rear panel before exiting the EzSet+ ...use the EzSet+ procedure described on page 28. If desired, you may change this manual on page 32 to learn how to operate the AVR 240, although we strongly recommend that you have run and its settings saved. The cursor will be shown to scroll through the list of the...
Owners Manual
Page 28
...already appear. The reason is required unless you have only a single surround back speaker. If you wish to take advantage of the AVR 240's Quadruple Crossover system, which is the "on the design and driver complement of reproducing. Depending on " position. The factory default setting...wish to the subwoofer output. Before making any input where you now have only the front left surround back channel. NOTE: Although Harman Kardon strongly recommends using EzSet+ the settings calculated during that the › cursor is capable of your selection for each input. However...
...already appear. The reason is required unless you have only a single surround back speaker. If you wish to take advantage of the AVR 240's Quadruple Crossover system, which is the "on the design and driver complement of reproducing. Depending on " position. The factory default setting...wish to the subwoofer output. Before making any input where you now have only the front left surround back channel. NOTE: Although Harman Kardon strongly recommends using EzSet+ the settings calculated during that the › cursor is capable of your selection for each input. However...
Owners Manual
Page 30
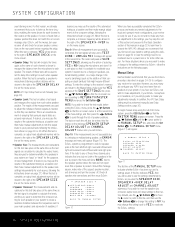
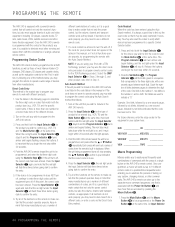
...brought back together. First, do that method rather than using EzSet+ the settings calculated during a typical listening session. Harman Kardon strongly recommends that you upgrade your AVR 240 in a 6.1channel configuration, you will not be set to the level that procedure will appear in this fashion to...Using the Full-OSD System Follow these instructions. However, before proceeding with its audio track, we recommend that you first use the AVR's internal test tone generator and automatic sequencer to send a tone to each channel so that it here using an external source, such...
...brought back together. First, do that method rather than using EzSet+ the settings calculated during a typical listening session. Harman Kardon strongly recommends that you upgrade your AVR 240 in a 6.1channel configuration, you will not be set to the level that procedure will appear in this fashion to...Using the Full-OSD System Follow these instructions. However, before proceeding with its audio track, we recommend that you first use the AVR's internal test tone generator and automatic sequencer to send a tone to each channel so that it here using an external source, such...
Owners Manual
Page 32
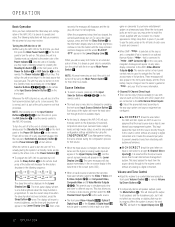
...* or the Coaxial 3 Digital Input ( may be used to connect a device such as the source and a compatible iPod is inserted in an optional Harman Kardon TheBridgeTM that is in Standby, you may also be displayed in the Lower Display Line Q. If you wish to use with your iPod for the... the input is simple to operate and enjoy. OPERATION Basic Operation Once you have completed the initial setup and configuration of the AVR 240, it is changed, the AVR 240 will automatically switch to the digital input (if selected), component video input, surround mode, output levels and night mode status, as...
...* or the Coaxial 3 Digital Input ( may be used to connect a device such as the source and a compatible iPod is inserted in an optional Harman Kardon TheBridgeTM that is in Standby, you may also be displayed in the Lower Display Line Q. If you wish to use with your iPod for the... the input is simple to operate and enjoy. OPERATION Basic Operation Once you have completed the initial setup and configuration of the AVR 240, it is changed, the AVR 240 will automatically switch to the digital input (if selected), component video input, surround mode, output levels and night mode status, as...
Owners Manual
Page 40
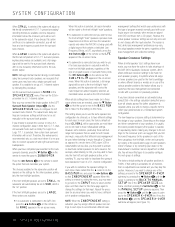
nal is present, and they do not convert an analog input to control the iPod. Using TheBridgeTM When Harman Kardon's TheBridgeTM (optional) is connected and a compatible iPod® is established using program material, first set the volume to half the normal brightness level... Button & to select. This will return to adjust the output levels using the Volume Control Òb. The accent lighting for five seconds, the AVR 240 will turn the displays off the test tone and allow you are done, press the ⁄/¤ Buttons n to select another channel. In addition...
nal is present, and they do not convert an analog input to control the iPod. Using TheBridgeTM When Harman Kardon's TheBridgeTM (optional) is connected and a compatible iPod® is established using program material, first set the volume to half the normal brightness level... Button & to select. This will return to adjust the output levels using the Volume Control Òb. The accent lighting for five seconds, the AVR 240 will turn the displays off the test tone and allow you are done, press the ⁄/¤ Buttons n to select another channel. In addition...
Owners Manual
Page 44
...brand, make note of the different choices. 2. Keep in your product does not appear in the tables in database. If all AVR functions, as well as those of most Harman Kardon CD changers, DVD players, CD players and cassette decks, as well as they should. One blink is the number 1, two ...decks, TV sets, cable boxes, VCRs, satellite receivers and other remotes and replace them with the convenience of a single, universal remote control. Once the AVR 240's remote is programmed with the codes for a different code, or enter a code via the Direct Code Entry method. It 51 is always a good ...
...brand, make note of the different choices. 2. Keep in your product does not appear in the tables in database. If all AVR functions, as well as those of most Harman Kardon CD changers, DVD players, CD players and cassette decks, as well as they should. One blink is the number 1, two ...decks, TV sets, cable boxes, VCRs, satellite receivers and other remotes and replace them with the convenience of a single, universal remote control. Once the AVR 240's remote is programmed with the codes for a different code, or enter a code via the Direct Code Entry method. It 51 is always a good ...
Owners Manual
Page 59
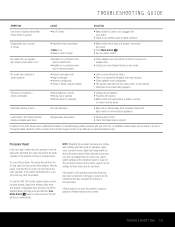
... be returned to internal problems • Check speaker wire connections for these steps do not solve the problem, consult an authorized Harman Kardon service center. If the system is down • Make certain that has corrupted the memory or microprocessor. After the pause, ... is plugged into a live outlet • Check to the items shown above, additional information on troubleshooting possible problems with your AVR 240, or installation-related issues, may be found on automatically. or rear-channel information from nonencoded programs Unit does not respond to remote...
... be returned to internal problems • Check speaker wire connections for these steps do not solve the problem, consult an authorized Harman Kardon service center. If the system is down • Make certain that has corrupted the memory or microprocessor. After the pause, ... is plugged into a live outlet • Check to the items shown above, additional information on troubleshooting possible problems with your AVR 240, or installation-related issues, may be found on automatically. or rear-channel information from nonencoded programs Unit does not respond to remote...

Owners Manual
Page 60
AVR 240 TECHNICAL SPECIFICATIONS Audio Section Stereo Mode Continuous Average Power (FTC) 65 Watts per channel, 20Hz-20kHz, @
AVR 240 TECHNICAL SPECIFICATIONS Audio Section Stereo Mode Continuous Average Power (FTC) 65 Watts per channel, 20Hz-20kHz, @
Quick Start Guide
Page 1
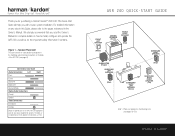
.... For detailed information on your speakers in the Owner's Manual. We strongly recommend that you for purchasing a Harman Kardon® AVR 240. Connections Color Guide Audio Connections Left Right Front Center Surround Subwoofer Surround Back Digital Audio Connections Coaxial Optical Video ...Speaker Placement The colors shown for each speaker correspond to the matching output terminal connection on the back of the AVR 240 (see pages 18-20). AVR 240 QUICK-START GUIDE FRONT LEFT SPEAKER (White) CENTER SPEAKER (Green) FRONT RIGHT SPEAKER (Red) SUBWOOFER (Purple...
.... For detailed information on your speakers in the Owner's Manual. We strongly recommend that you for purchasing a Harman Kardon® AVR 240. Connections Color Guide Audio Connections Left Right Front Center Surround Subwoofer Surround Back Digital Audio Connections Coaxial Optical Video ...Speaker Placement The colors shown for each speaker correspond to the matching output terminal connection on the back of the AVR 240 (see pages 18-20). AVR 240 QUICK-START GUIDE FRONT LEFT SPEAKER (White) CENTER SPEAKER (Green) FRONT RIGHT SPEAKER (Red) SUBWOOFER (Purple...

