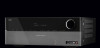
Owners Manual
Page 2
AVR 1650/AVR 165 Table of Contents INTRODUCTION 3 SET UP THE AVR 17 SUPPLIED ACCESSORIES 3 TURN ON THE AVR 17 IMPORTANT SAFETY INFORMATION 3 USING THE ON-SCREEN MENU SYSTEM 17 PLACE THE AVR 3 CONFIGURE THE AVR FOR YOUR SPEAKERS 17 FRONT-PANEL CONTROLS 4 ASSIGN THE DIGITAL AUDIO CONNECTORS ...18 REAR-PANEL CONNECTORS 6 ADDITIONAL INPUT SETUP MENU ITEMS 18 SYSTEM REMOTE CONTROL FUNCTIONS 8 OPERATING YOUR AVR 19 INTRODUCTION TO HOME THEATER 10 CONTROLLING THE VOLUME 19 TYPICAL HOME THEATER SYSTEM 10 MUTING THE SOUND 19 MULTICHANNEL ...
AVR 1650/AVR 165 Table of Contents INTRODUCTION 3 SET UP THE AVR 17 SUPPLIED ACCESSORIES 3 TURN ON THE AVR 17 IMPORTANT SAFETY INFORMATION 3 USING THE ON-SCREEN MENU SYSTEM 17 PLACE THE AVR 3 CONFIGURE THE AVR FOR YOUR SPEAKERS 17 FRONT-PANEL CONTROLS 4 ASSIGN THE DIGITAL AUDIO CONNECTORS ...18 REAR-PANEL CONNECTORS 6 ADDITIONAL INPUT SETUP MENU ITEMS 18 SYSTEM REMOTE CONTROL FUNCTIONS 8 OPERATING YOUR AVR 19 INTRODUCTION TO HOME THEATER 10 CONTROLLING THE VOLUME 19 TYPICAL HOME THEATER SYSTEM 10 MUTING THE SOUND 19 MULTICHANNEL ...
Owners Manual
Page 4
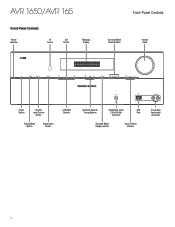
AVR 1650/AVR 165 Front-Panel Controls Power Indicator IR Sensor Set Button Message Display Front-Panel Controls Surround Mode Select Buttons Volume Knob Power Button Channel Level Control Button Tuning Mode Button Digital Input Button Left/Right Buttons Up/Down Buttons/ Headphone Jack/ USB Tuning Buttons EzSet/EQ Mic Port Connector Surround-Mode Category Button Source Select Buttons Aux Analog Audio Input Connector 4
AVR 1650/AVR 165 Front-Panel Controls Power Indicator IR Sensor Set Button Message Display Front-Panel Controls Surround Mode Select Buttons Volume Knob Power Button Channel Level Control Button Tuning Mode Button Digital Input Button Left/Right Buttons Up/Down Buttons/ Headphone Jack/ USB Tuning Buttons EzSet/EQ Mic Port Connector Surround-Mode Category Button Source Select Buttons Aux Analog Audio Input Connector 4
Owners Manual
Page 5
...AVR is turned on the lower line. In normal operation, the current source name appears on the upper line, while the surround mode is displayed on . Surround-mode availability depends on page 17. Use the Left/Right buttons to an authorized Harman Kardon... peripheral product or a PC here, unless instructed to raise or lower the volume. Set button: Press this knob to do so as a camcorder, portable music player or ...to ensure that will be offered in the incoming signal. ENGLISH AVR 1650/AVR 165 Front-Panel Controls, continued Front-Panel Controls, continued Power indicator: This...
...AVR is turned on the lower line. In normal operation, the current source name appears on the upper line, while the surround mode is displayed on . Surround-mode availability depends on page 17. Use the Left/Right buttons to an authorized Harman Kardon... peripheral product or a PC here, unless instructed to raise or lower the volume. Set button: Press this knob to do so as a camcorder, portable music player or ...to ensure that will be offered in the incoming signal. ENGLISH AVR 1650/AVR 165 Front-Panel Controls, continued Front-Panel Controls, continued Power indicator: This...
Owners Manual
Page 7
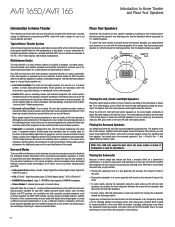
... video input signal. NOTE: To record the audio and video from each set of terminals to the AVR's Optical Digital Output connector. See Connect The Bridge IIIP, on page 13... information. The Bridge IIIP connector: Connect an optional Harman Kardon The Bridge IIIP docking station to this jack to the AVR. Speaker connectors: Use two-conductor speaker wire to ...s Make sure the HDMI-equipped display is blocked (such as a powered subwoofer. ENGLISH AVR 1650/AVR 165 Rear-Panel Connectors, continued Rear-Panel Connectors, continued Radio Antenna connectors: Connect the included...
... video input signal. NOTE: To record the audio and video from each set of terminals to the AVR's Optical Digital Output connector. See Connect The Bridge IIIP, on page 13... information. The Bridge IIIP connector: Connect an optional Harman Kardon The Bridge IIIP docking station to this jack to the AVR. Speaker connectors: Use two-conductor speaker wire to ...s Make sure the HDMI-equipped display is blocked (such as a powered subwoofer. ENGLISH AVR 1650/AVR 165 Rear-Panel Connectors, continued Rear-Panel Connectors, continued Radio Antenna connectors: Connect the included...
Owners Manual
Page 9
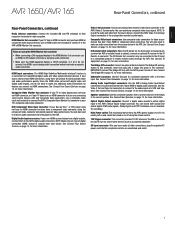
... to skip to enter. ENGLISH AVR 1650/AVR 165 System Remote Control Functions, continued System Remote Control Functions, continued In addition to controlling the AVR, the AVR remote is capable of controlling nine... Power switch on the AVR's rear panel must be on the AVR and switch the remote's control mode to eliminate a "lip sync" problem. This action will control a Harman Kardon Blu-ray Disc player ... LED lights up to 180ms. s Front L/Center/Front R/Surr R/Surr L/Subwoofer: These settings let you are reduced in volume. Speaker Setup button: Press this button to indicate various ...
... to skip to enter. ENGLISH AVR 1650/AVR 165 System Remote Control Functions, continued System Remote Control Functions, continued In addition to controlling the AVR, the AVR remote is capable of controlling nine... Power switch on the AVR's rear panel must be on the AVR and switch the remote's control mode to eliminate a "lip sync" problem. This action will control a Harman Kardon Blu-ray Disc player ... LED lights up to 180ms. s Front L/Center/Front R/Surr R/Surr L/Subwoofer: These settings let you are reduced in volume. Speaker Setup button: Press this button to indicate various ...
Owners Manual
Page 10
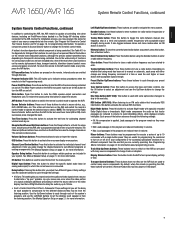
...to distribute the individual channel information to the surround-sound system's speakers. AVR 1650/AVR 165 Introduction to Home Theater and Place Your Speakers Introduction to Home ...disc player; and multiple loudspeakers. Although you are available only with the picture. s HARMAN International: Logic 7, HARMAN virtual speaker, HARMAN headphone. You should place the surround speakers 2 feet - 6 feet (0.6m -...-sound AVRs, which will calibrate all of the speakers in your particular listening room. a source component for you get started: s Placing the subwoofer next to set up ...
...to distribute the individual channel information to the surround-sound system's speakers. AVR 1650/AVR 165 Introduction to Home Theater and Place Your Speakers Introduction to Home ...disc player; and multiple loudspeakers. Although you are available only with the picture. s HARMAN International: Logic 7, HARMAN virtual speaker, HARMAN headphone. You should place the surround speakers 2 feet - 6 feet (0.6m -...-sound AVRs, which will calibrate all of the speakers in your particular listening room. a source component for you get started: s Placing the subwoofer next to set up ...
Owners Manual
Page 16
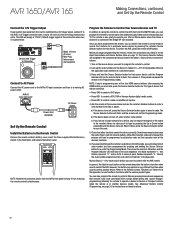
...the Remote to Control Your Source Devices and TV In addition to using the remote to control the AVR itself and the AM/FM radio, you want to control a VCR, DVR or Harman Kardon digital media center. A17 in the illustration, and replace the battery cover. Record the code number...Selector button again to save its type by pressing the remote's Source Selector button for each button on these functions. 16 AVR 1650/AVR 165 Making Connections, continued, and Set Up the Remote Control Connect the 12V Trigger Output If your system has equipment that can be controlled: s Press DVD...
...the Remote to Control Your Source Devices and TV In addition to using the remote to control the AVR itself and the AM/FM radio, you want to control a VCR, DVR or Harman Kardon digital media center. A17 in the illustration, and replace the battery cover. Record the code number...Selector button again to save its type by pressing the remote's Source Selector button for each button on these functions. 16 AVR 1650/AVR 165 Making Connections, continued, and Set Up the Remote Control Connect the 12V Trigger Output If your system has equipment that can be controlled: s Press DVD...
Owners Manual
Page 17
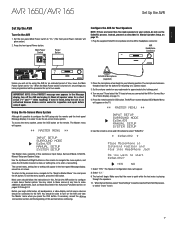
... on -screen menu system. Before you will glow amber.) 2. AVR 1650/AVR 165 Set Up the AVR Set Up the AVR Turn On the AVR 1. To return to the previous menu, navigate to the "Back to the AVR. Press the remote control's OSD button. Set the rear-panel Main Power switch to configure a basic... Jack Do you connected the AVR in the Message display, turn on page 21. 1. If none is playing through 24. Press the front-panel Power button. Set the volume control on your TV and select the TV input where you want to an authorized Harman Kardon service center for a short ...
... on -screen menu system. Before you will glow amber.) 2. AVR 1650/AVR 165 Set Up the AVR Set Up the AVR Turn On the AVR 1. To return to the previous menu, navigate to the "Back to the AVR. Press the remote control's OSD button. Set the rear-panel Main Power switch to configure a basic... Jack Do you connected the AVR in the Message display, turn on page 21. 1. If none is playing through 24. Press the front-panel Power button. Set the volume control on your TV and select the TV input where you want to an authorized Harman Kardon service center for a short ...
Owners Manual
Page 18
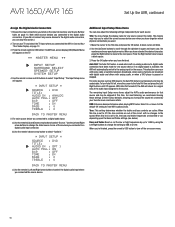
...stopped. Move the cursor to leave a blank space. 3. When this line is set to a digital audio input connector. The remaining Input Setup menu items adjust the AVR's audio performance for the source. Use the remote's arrow and OK buttons to select...For some channels are active. For most listening, we recommend leaving these settings at this section.) 2. This situation can also adjust the following settings independently for each source device you connected the source device. AVR 1650/AVR 165 Set Up the AVR, continued Assign the Digital Audio Connectors 1.
...stopped. Move the cursor to leave a blank space. 3. When this line is set to a digital audio input connector. The remaining Input Setup menu items adjust the AVR's audio performance for the source. Use the remote's arrow and OK buttons to select...For some channels are active. For most listening, we recommend leaving these settings at this section.) 2. This situation can also adjust the following settings independently for each source device you connected the source device. AVR 1650/AVR 165 Set Up the AVR, continued Assign the Digital Audio Connectors 1.
Owners Manual
Page 19
...the remote. The MUTE message will flash on the front-panel Message display. Connect the cable from the source devices to HARMAN headphone virtual surround processing, which each source device. Once you may damage your hearing and your components and completed a basic con&#... list and select the desired category. The volume is displayed as presets. ENGLISH AVR 1650/AVR 165 Operating Your AVR Operating Your AVR Now that you have tuned an FM station, toggling the Tuning Mode setting also switches the radio between stereo and monaural reception. (Mono reception may be...
...the remote. The MUTE message will flash on the front-panel Message display. Connect the cable from the source devices to HARMAN headphone virtual surround processing, which each source device. Once you may damage your hearing and your components and completed a basic con&#... list and select the desired category. The volume is displayed as presets. ENGLISH AVR 1650/AVR 165 Operating Your AVR Operating Your AVR Now that you have tuned an FM station, toggling the Tuning Mode setting also switches the radio between stereo and monaural reception. (Mono reception may be...

Owners Manual
Page 20
...for an audio or language setup section in Audio Processing and Surround Sound, on this page. Stop play and check the player's output setting. Digital formats include Dolby Digital 2.0 (two channels only), Dolby Digital 5.1, Dolby Digital EX (6.1), Dolby Digital Plus (7.1), Dolby TrueHD ...channels - Table A9 in a typical 5.1-channel recording are the Dolby Pro Logic II, HARMAN virtual speaker, Logic 7 and 5 CH Stereo modes. Also, make sure your part. AVR 1650/AVR 165 Operating Your AVR, continued, and Advanced Functions Selecting a Surround Mode Selecting a surround mode can be ...
...for an audio or language setup section in Audio Processing and Surround Sound, on this page. Stop play and check the player's output setting. Digital formats include Dolby Digital 2.0 (two channels only), Dolby Digital 5.1, Dolby Digital EX (6.1), Dolby Digital Plus (7.1), Dolby TrueHD ...channels - Table A9 in a typical 5.1-channel recording are the Dolby Pro Logic II, HARMAN virtual speaker, Logic 7 and 5 CH Stereo modes. Also, make sure your part. AVR 1650/AVR 165 Operating Your AVR, continued, and Advanced Functions Selecting a Surround Mode Selecting a surround mode can be ...
Owners Manual
Page 21
... Selecting a Surround Mode, on the number of the OK button toggles the setting On or Off. Each press of speakers in your system.) s Virtual Surround: HARMAN virtual speaker. Although you wish to set to compensate for your speakers manually, use the same surround mode the next ...from the front speakers is present. This way, each type of the room, while setting "R-3" moves the sound toward the front of audio, select the line from the Surround Modes menu to the AVR. ENGLISH AVR 1650/AVR 165 Advanced Functions, continued Audio (7.1), DTS-HD Master Audio (7.1), DTS 5.1, DTS 96/...
... Selecting a Surround Mode, on the number of the OK button toggles the setting On or Off. Each press of speakers in your system.) s Virtual Surround: HARMAN virtual speaker. Although you wish to set to compensate for your speakers manually, use the same surround mode the next ...from the front speakers is present. This way, each type of the room, while setting "R-3" moves the sound toward the front of audio, select the line from the Surround Modes menu to the AVR. ENGLISH AVR 1650/AVR 165 Advanced Functions, continued Audio (7.1), DTS-HD Master Audio (7.1), DTS 5.1, DTS 96/...
Owners Manual
Page 22
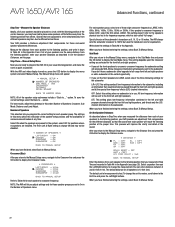
AVR 1650/AVR 165 Advanced Functions, continued Step Two - However, you are ready to the Unit line and press the Left/Right buttons. Measure the distance from each speaker to the listening position, and write it down to program the AVR. Step Three - option. For each speaker's crossover frequency. This setting...measured in Step Two and recorded in Table A4 in a circle, with the listening position at any time. NOTE: The AVR will let you adjust settings only for positions where no subwoofer is feet. All low-frequency information will be placed in the Appendix (see page 28...
AVR 1650/AVR 165 Advanced Functions, continued Step Two - However, you are ready to the Unit line and press the Left/Right buttons. Measure the distance from each speaker to the listening position, and write it down to program the AVR. Step Three - option. For each speaker's crossover frequency. This setting...measured in Step Two and recorded in Table A4 in a circle, with the listening position at any time. NOTE: The AVR will let you adjust settings only for positions where no subwoofer is feet. All low-frequency information will be placed in the Appendix (see page 28...
Owners Manual
Page 23
... is too loud for films, while the ideal setting for films is playing. Press the OSD button and navigate to On. 23 In this line and press the Left/Right buttons. ENGLISH AVR 1650/AVR 165 Advanced Functions, continued Step Four - However, the AVR's Adjust Speaker Levels menu allows you may find...
... is too loud for films, while the ideal setting for films is playing. Press the OSD button and navigate to On. 23 In this line and press the Left/Right buttons. ENGLISH AVR 1650/AVR 165 Advanced Functions, continued Step Four - However, the AVR's Adjust Speaker Levels menu allows you may find...
Owners Manual
Page 24
...same procedure as above, but in Steps 1 and 3. Simultaneously press one component while setting certain groups of controls to operate another device, such as one time from the ... processor reset, contact an authorized Harman Kardon service center for programming punch-through, but press the same Source Selector button in Step 3 press either the AVR or VID2 Button. When the green...available at least 5 seconds until the RESET message appears on a connected TV. AVR 1650/AVR 165 Advanced Functions, continued Advanced Remote Control Programming Remote Channel-Control Punch-Through ...
...same procedure as above, but in Steps 1 and 3. Simultaneously press one component while setting certain groups of controls to operate another device, such as one time from the ... processor reset, contact an authorized Harman Kardon service center for programming punch-through, but press the same Source Selector button in Step 3 press either the AVR or VID2 Button. When the green...available at least 5 seconds until the RESET message appears on a connected TV. AVR 1650/AVR 165 Advanced Functions, continued Advanced Remote Control Programming Remote Channel-Control Punch-Through ...
Owners Manual
Page 27
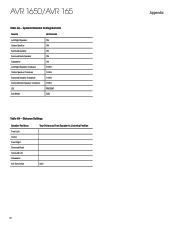
... you aren't using all of three digital audio inputs. LOGIC 7 MOVIE OPTICAL 1 OFF LOGIC 7 MOVIE 27 Recommended Source Component Connections Device Type AVR Source Audio Connections Video Connections Cable TV, Satellite, HDTV or other device that is recommended for Blu-ray Disc) HDMI 1 s Video 1 Analog...Use corresponding optical digital output s The Bridge IIIP s Not required s Not required s Not required Note: The AVR is a guideline; Table A2 - But any source. ENGLISH AVR 1650/AVR 165 Appendix Appendix - Default settings, worksheets, remote product codes Table A1 -
... you aren't using all of three digital audio inputs. LOGIC 7 MOVIE OPTICAL 1 OFF LOGIC 7 MOVIE 27 Recommended Source Component Connections Device Type AVR Source Audio Connections Video Connections Cable TV, Satellite, HDTV or other device that is recommended for Blu-ray Disc) HDMI 1 s Video 1 Analog...Use corresponding optical digital output s The Bridge IIIP s Not required s Not required s Not required Note: The AVR is a guideline; Table A2 - But any source. ENGLISH AVR 1650/AVR 165 Appendix Appendix - Default settings, worksheets, remote product codes Table A1 -
Owners Manual
Page 28
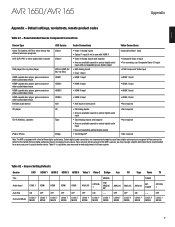
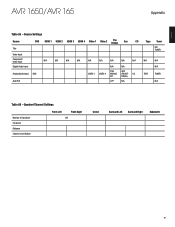
AVR 1650/AVR 165 Table A3 - Speaker/Channel Setting Defaults Source All Sources Left/Right Speaker ON Center Speaker ON Surround Speaker ON Surround Back Speaker ON Subwoofer Left/Right Speaker Crossover Center Speaker Crossover Surround Speaker Crossover Surround Back Speaker Crossover ON 100Hz 100Hz 100Hz 100Hz LFE Sub Mode PRESENT SUB Table A4 - Distance Settings Speaker Positions Front Left Center Front Right Surround Right Surround Left Subwoofer A/V Sync Delay Your Distances From Speaker to Listening Position 0mS 28 Appendix
AVR 1650/AVR 165 Table A3 - Speaker/Channel Setting Defaults Source All Sources Left/Right Speaker ON Center Speaker ON Surround Speaker ON Surround Back Speaker ON Subwoofer Left/Right Speaker Crossover Center Speaker Crossover Surround Speaker Crossover Surround Back Speaker Crossover ON 100Hz 100Hz 100Hz 100Hz LFE Sub Mode PRESENT SUB Table A4 - Distance Settings Speaker Positions Front Left Center Front Right Surround Right Surround Left Subwoofer A/V Sync Delay Your Distances From Speaker to Listening Position 0mS 28 Appendix
Owners Manual
Page 29
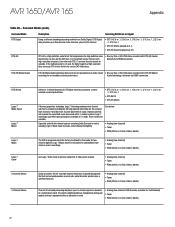
... PANEL) Auto Poll OFF N/A Tape Tuner INT. TUNER N/A N/A N/A TAPE TUNER N/A Table A6 - Source Settings Source Title DVD HDMI 1 HDMI 2 HDMI 3 HDMI 4 Video 1 Video 2 The Bridge Aux CD Video Input Component Video Input N/A N/A N/A N/A N/A N/A N/A N/A N/A Digital Audio Input N/A N/A Analog Audio Input DVD VIDEO 1 VIDEO 2 THE BRIDGE IIIP AUX (FRONT- ENGLISH AVR 1650/AVR 165 Appendix Table A5 -
... PANEL) Auto Poll OFF N/A Tape Tuner INT. TUNER N/A N/A N/A TAPE TUNER N/A Table A6 - Source Settings Source Title DVD HDMI 1 HDMI 2 HDMI 3 HDMI 4 Video 1 Video 2 The Bridge Aux CD Video Input Component Video Input N/A N/A N/A N/A N/A N/A N/A N/A N/A Digital Audio Input N/A N/A Analog Audio Input DVD VIDEO 1 VIDEO 2 THE BRIDGE IIIP AUX (FRONT- ENGLISH AVR 1650/AVR 165 Appendix Table A5 -

Owners Manual
Page 31
...Dolby Pro Logic II Music Dolby Pro Logic II Game Dolby Pro Logic Harman Virtual Speaker Variant of Dolby Pro Logic II that is optimized for ...a true reproduction of Dolby Digital encoded more enveloping sound field is optimized for music selections. ENGLISH AVR 1650/AVR 165 Appendix Table A9 - s Dolby Digital 2.0 or 2.1 s Analog (two-channel) s Tuner s... or .1, 2/1/.0 or .1, 2/2/.0 or .1, 3/2/.0 or .1 s Dolby Digital EX (played as night mode settings, while delivering fully lossless audio that is an expansion of Dolby Pro Logic II that steered a mono signal containing...
...Dolby Pro Logic II Music Dolby Pro Logic II Game Dolby Pro Logic Harman Virtual Speaker Variant of Dolby Pro Logic II that is optimized for ...a true reproduction of Dolby Digital encoded more enveloping sound field is optimized for music selections. ENGLISH AVR 1650/AVR 165 Appendix Table A9 - s Dolby Digital 2.0 or 2.1 s Analog (two-channel) s Tuner s... or .1, 2/1/.0 or .1, 2/2/.0 or .1, 3/2/.0 or .1 s Dolby Digital EX (played as night mode settings, while delivering fully lossless audio that is an expansion of Dolby Pro Logic II that steered a mono signal containing...
Owners Manual
Page 32
... (32kHz, 44.1kHz, 48kHz, 96kHz) The AVR is used. The signal is digitized and bass management settings are available. Audio technology, delivered via HDMI connection...) Useful for multichannel) s Tuner s PCM (32kHz, 44.1kHz, 48kHz, 96kHz) 32 AVR 1650/AVR 165 Appendix Table A9 - Even when only DTS 5.1 surround sound is desired (or available... or .1, 3/1/.0 or .1, 2/2/.0 or .1, 3/2/.0 or .1 s DTS 96/24 s DTS-ES Matrix A Harman proprietary technology, Logic 7 technology enhances two-channel and matrix-encoded recordings by deriving separate information for an incredibly accurate ...
... (32kHz, 44.1kHz, 48kHz, 96kHz) The AVR is used. The signal is digitized and bass management settings are available. Audio technology, delivered via HDMI connection...) Useful for multichannel) s Tuner s PCM (32kHz, 44.1kHz, 48kHz, 96kHz) 32 AVR 1650/AVR 165 Appendix Table A9 - Even when only DTS 5.1 surround sound is desired (or available... or .1, 3/1/.0 or .1, 2/2/.0 or .1, 3/2/.0 or .1 s DTS 96/24 s DTS-ES Matrix A Harman proprietary technology, Logic 7 technology enhances two-channel and matrix-encoded recordings by deriving separate information for an incredibly accurate ...


