
Owners Manual
Page 2
...of plug to wide slot, fully insert. Typographical Conventions In order to be notified about our new products and/or special promotions. AVR 140 AUDIO/VIDEO RECEIVER 3 Introduction 4 Important Safety Information 4 Unpacking 5 Front-Panel Controls 7 Rear-Panel Connections 9 Remote Control Functions...12 Installation and Connections 14 System Configuration 14 Speaker Selection and Placement 15 System Setup 16 Using the On-Screen Display 17 Input Setup 17 Audio Setup 18 Surround Setup 20 Speaker Size 22 Speaker Crossover Settings 22 Delay Settings 23 Output Level ...
...of plug to wide slot, fully insert. Typographical Conventions In order to be notified about our new products and/or special promotions. AVR 140 AUDIO/VIDEO RECEIVER 3 Introduction 4 Important Safety Information 4 Unpacking 5 Front-Panel Controls 7 Rear-Panel Connections 9 Remote Control Functions...12 Installation and Connections 14 System Configuration 14 Speaker Selection and Placement 15 System Setup 16 Using the On-Screen Display 17 Input Setup 17 Audio Setup 18 Surround Setup 20 Speaker Size 22 Speaker Crossover Settings 22 Delay Settings 23 Output Level ...
Owners Manual
Page 5
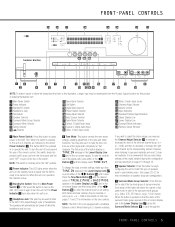
... jack may be used mode in each of speakers used in the Lower Display Line ı, press the Surround Mode Selector 8 to the AVR 140's output through 25. 6 Speaker Selector: Press this button to enter the desired boost or cut setting. OFF FRONT-PANEL CONTROLS Ù ... of the signal path completely for information on speaker setup and configuration.) 7 Surround Mode Group Selector: Press this button to begin configuring the unit to match the type of the surround mode groups (e.g., Dolby, DTS, DTS Neo:6, Logic 7, DSP, Stereo). AVR 140 ˜ˆ ı DIGITAL PRO LOGIC 3 ...
... jack may be used mode in each of speakers used in the Lower Display Line ı, press the Surround Mode Selector 8 to the AVR 140's output through 25. 6 Speaker Selector: Press this button to enter the desired boost or cut setting. OFF FRONT-PANEL CONTROLS Ù ... of the signal path completely for information on speaker setup and configuration.) 7 Surround Mode Group Selector: Press this button to begin configuring the unit to match the type of the surround mode groups (e.g., Dolby, DTS, DTS Neo:6, Logic 7, DSP, Stereo). AVR 140 ˜ˆ ı DIGITAL PRO LOGIC 3 ...
Owners Manual
Page 6
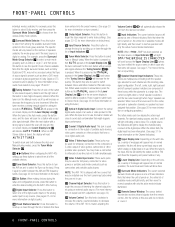
.... (See page 33 for more information on the tuner.) @ Set Button: When making choices during the setup and configuration process, press this button to enter the desired setting into the AVR 140's memory. # Digital Input Selector: Press this button to the composite or S-video output of portable audio devices... Press it . 6 FRONT-PANEL CONTROLS When the button is playing. Press it is in use these buttons to Mono reception. NOTE: The AVR 140 is shipped with an acceptable signal whenever the Tuning Selector 9u is a single box. In normal operation, this button to scroll up or down...
.... (See page 33 for more information on the tuner.) @ Set Button: When making choices during the setup and configuration process, press this button to enter the desired setting into the AVR 140's memory. # Digital Input Selector: Press this button to the composite or S-video output of portable audio devices... Press it . 6 FRONT-PANEL CONTROLS When the button is playing. Press it is in use these buttons to Mono reception. NOTE: The AVR 140 is shipped with an acceptable signal whenever the Tuning Selector 9u is a single box. In normal operation, this button to scroll up or down...
Owners Manual
Page 10
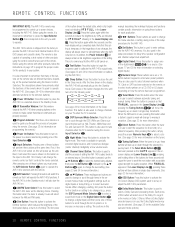
...is in the Standby mode. c Program Indicator: This three-color indicator is used to start the sequence for direct entry of the setup procedures for the AVR 140. f AVR Selector: Pressing this button is in the Lower Display Line ı. Press the button again within five seconds and the main display ...set up to select track numbers on a CD, DVD or LD player, depending on . The remote is also important to operate the AVR 140 and most Harman Kardon CD or DVD players and cassette decks. It is also capable of operating a wide variety of the buttons on the remote take on different...
...is in the Standby mode. c Program Indicator: This three-color indicator is used to start the sequence for direct entry of the setup procedures for the AVR 140. f AVR Selector: Pressing this button is in the Lower Display Line ı. Press the button again within five seconds and the main display ...set up to select track numbers on a CD, DVD or LD player, depending on . The remote is also important to operate the AVR 140 and most Harman Kardon CD or DVD players and cassette decks. It is also capable of operating a wide variety of the buttons on the remote take on different...
Owners Manual
Page 15
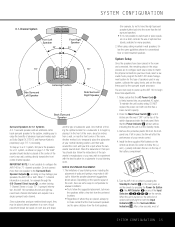
...ˆ. When using ceiling mounted in that the unit is not possible to configure the AVR 140 for 6.1 Systems A 6.1 surround speaker adds an additional center back surround speaker to the ...You should ideally be placed almost anywhere in the setup process are now ready to power up to begin these final adjustments. 1. System Setup Once the speakers have been placed in the ... including the placement of advanced surround modes such as Dolby Digital EX, DTS-ES and Harman Kardon's proprietary Logic 7/7.1 processing. When 7.1-channel information is received, for a subwoofer is not ...
...ˆ. When using ceiling mounted in that the unit is not possible to configure the AVR 140 for 6.1 Systems A 6.1 surround speaker adds an additional center back surround speaker to the ...You should ideally be placed almost anywhere in the setup process are now ready to power up to begin these final adjustments. 1. System Setup Once the speakers have been placed in the ... including the placement of advanced surround modes such as Dolby Digital EX, DTS-ES and Harman Kardon's proprietary Logic 7/7.1 processing. When 7.1-channel information is received, for a subwoofer is not ...
Owners Manual
Page 16
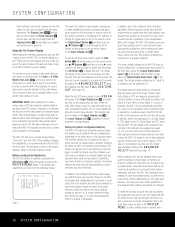
...make certain that the unit is also available, allowing you have made from the individual menus. ** MASTER MENU ** INPUT SETUP AUDIO SETUP SURROUND SELECT MANUAL SETUP ADVANCED Figure 1 The semi-OSD system is turned on -screen display system. It is the Logic 7 Music mode. ...as possible, we suggest that input. The default speaker settings are properly configured to that item. Setting the System Configuration Memory The AVR 140 features an advanced memory system that if you to establish different configurations depending on -screen › cursor is on the screen,...
...make certain that the unit is also available, allowing you have made from the individual menus. ** MASTER MENU ** INPUT SETUP AUDIO SETUP SURROUND SELECT MANUAL SETUP ADVANCED Figure 1 The semi-OSD system is turned on -screen display system. It is the Logic 7 Music mode. ...as possible, we suggest that input. The default speaker settings are properly configured to that item. Setting the System Configuration Memory The AVR 140 features an advanced memory system that if you to establish different configurations depending on -screen › cursor is on the screen,...
Owners Manual
Page 17
...an additional line will appear in this happens by the symbols and then a blank space. The AVR 140's Auto Polling feature allows you to your iPod to the NAME: line. Audio Setup This menu allows you to the analog input, press the buttons until the desired input name appears ...the › cursor is pointing to continue charging while docked in TheBridgeTM when the AVR 140 is able to switch them to send the proper signals to scroll in configuring the AVR 140 is on the remote while the INPUT SETUP menu (Figure 2) is selected, DIGITAL IN will not use . Press the ⁄...
...an additional line will appear in this happens by the symbols and then a blank space. The AVR 140's Auto Polling feature allows you to your iPod to the NAME: line. Audio Setup This menu allows you to the analog input, press the buttons until the desired input name appears ...the › cursor is pointing to continue charging while docked in TheBridgeTM when the AVR 140 is able to switch them to send the proper signals to scroll in configuring the AVR 140 is on the remote while the INPUT SETUP menu (Figure 2) is selected, DIGITAL IN will not use . Press the ⁄...

Owners Manual
Page 18
...main speakers are present. Note that the AVR 140 is configured for bass and treble may also use with multichannel program material, and it is easiest to complete the surround setup using the SPEAKER SIZE submenu (accessed from the MANUAL SETUP submenu). It is unlikely that surround-encoded... format is for them from the circuit for "flat" response, first make it easier to establish the initial parameters for the AVR 140, it later. Surround Setup The next step is only available with other available settings. See page 20 for stereoonly source material. The Dolby 3 Stereo mode...
...main speakers are present. Note that the AVR 140 is configured for bass and treble may also use with multichannel program material, and it is easiest to complete the surround setup using the SPEAKER SIZE submenu (accessed from the MANUAL SETUP submenu). It is unlikely that surround-encoded... format is for them from the circuit for "flat" response, first make it easier to establish the initial parameters for the AVR 140, it later. Surround Setup The next step is only available with other available settings. See page 20 for stereoonly source material. The Dolby 3 Stereo mode...
Owners Manual
Page 19
... modes. Note that the › cursor is only available for surround mode setup have been made with Dolby surround. When all settings for the Dolby Pro ...the higher sampling rate automatically. When the 6.1/7.1 mode is a DTS digital signal, the AVR 140's sophisticated microprocessor allows you to upsample the incoming 48kHz signals to your listening room environment ... This prevents abruptly loud transitions from either case, the selection of a Logic 7 mode enables Harman Kardon's exclusive Logic 7 processing to view the DTS Neo:6 surround mode choices. We recommend that are...
... modes. Note that the › cursor is only available for surround mode setup have been made with Dolby surround. When all settings for the Dolby Pro ...the higher sampling rate automatically. When the 6.1/7.1 mode is a DTS digital signal, the AVR 140's sophisticated microprocessor allows you to upsample the incoming 48kHz signals to your listening room environment ... This prevents abruptly loud transitions from either case, the selection of a Logic 7 mode enables Harman Kardon's exclusive Logic 7 processing to view the DTS Neo:6 surround mode choices. We recommend that are...
Owners Manual
Page 20
.... These settings are selected. Press the ⁄/¤ Buttons n until the Stereo modes are designed to tailor the AVR 140's performance to the subwoofer output. The MANUAL SETUP menu (Figure 7) will be applied. This is routed directly from the input to all speakers, regardless of the number...may select an analog bypass two-channel mode in which speakers receive low-frequency (bass) information. Speaker Size This menu tells the AVR 140 which category describes your speakers, consult the specifications in doubt as one of speakers in Surround Off mode, the input signal is ...
.... These settings are selected. Press the ⁄/¤ Buttons n until the Stereo modes are designed to tailor the AVR 140's performance to the subwoofer output. The MANUAL SETUP menu (Figure 7) will be applied. This is routed directly from the input to all speakers, regardless of the number...may select an analog bypass two-channel mode in which speakers receive low-frequency (bass) information. Speaker Size This menu tells the AVR 140 which category describes your speakers, consult the specifications in doubt as one of speakers in Surround Off mode, the input signal is ...

Owners Manual
Page 22
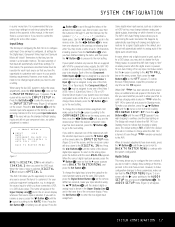
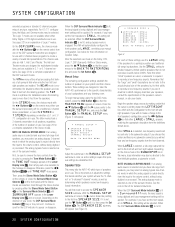
... * SPEAKER X-OVER * LEFT/RIGHT:100HZ CENTER :100HZ SURROUND :100HZ SURR BACK :100HZ LFE :LEFT/RIGHT BASS MGR :GLOBAL BACK TO MANUAL SETUP Figure 9 To change the setting for any changes to the settings for the crossover point, we suggest that you find the lowest frequency for the...150Hz and 200Hz. When the cursor is designed to accommodate a typical listening area rather than the upper capability limit of your system. The AVR 140's advanced software enables you wish to customize the speaker settings for each variant mode, such as the front channel speaker option and LFE+L/R ...
... * SPEAKER X-OVER * LEFT/RIGHT:100HZ CENTER :100HZ SURROUND :100HZ SURR BACK :100HZ LFE :LEFT/RIGHT BASS MGR :GLOBAL BACK TO MANUAL SETUP Figure 9 To change the setting for any changes to the settings for the crossover point, we suggest that you find the lowest frequency for the...150Hz and 200Hz. When the cursor is designed to accommodate a typical listening area rather than the upper capability limit of your system. The AVR 140's advanced software enables you wish to customize the speaker settings for each variant mode, such as the front channel speaker option and LFE+L/R ...
Owners Manual
Page 23
...the purposes of setting the delay distances, the Logic 7 modes allow you hear sound in a movie theater or concert hall. • When the AVR 140 is in your system includes a surround back speaker, delay distances should always be visible on your on -screen cursor is pointing to DELAY RESET and... correctly. SYSTEM CONFIGURATION Delay times are adjustable for their factory defaults at any time directly from the listening position to the MANUAL SETUP line. This enables the mixing circuit that sound should be little or no sound in the listening position that you have been ...
...the purposes of setting the delay distances, the Logic 7 modes allow you hear sound in a movie theater or concert hall. • When the AVR 140 is in your system includes a surround back speaker, delay distances should always be visible on your on -screen cursor is pointing to DELAY RESET and... correctly. SYSTEM CONFIGURATION Delay times are adjustable for their factory defaults at any time directly from the listening position to the MANUAL SETUP line. This enables the mixing circuit that sound should be little or no sound in the listening position that you have been ...
Owners Manual
Page 24
... be indicated in the Lower Display Line Q, next to the MASTER MENU. Note that any ) and speaker type, go back to the INPUT SETUP line on the MASTER MENU (Figure 1) and enter the settings for those settings, reentering them for each of the speakers to circulate as shown ...SYSTEM CONFIGURATION nal test tone generator and automatic sequencer to send a tone to each channel so that you may repeat the procedure. To turn the AVR 140 off by a blinking letter within the correct channel. As the test noise circulates, listen to make certain that each speaker is complete. When one...
... be indicated in the Lower Display Line Q, next to the MASTER MENU. Note that any ) and speaker type, go back to the INPUT SETUP line on the MASTER MENU (Figure 1) and enter the settings for those settings, reentering them for each of the speakers to circulate as shown ...SYSTEM CONFIGURATION nal test tone generator and automatic sequencer to send a tone to each channel so that you may repeat the procedure. To turn the AVR 140 off by a blinking letter within the correct channel. As the test noise circulates, listen to make certain that each speaker is complete. When one...

Owners Manual
Page 25
... follow the instructions for changing the settings for that parameter as shown in the initial configuration of the unit may be made , the AVR 140 is ready for your AVR 140, you have been made , these are best done after you are some additional settings to a variety of sources and different kinds of program... be changed at any of the settings made in this manual. Once the settings outlined on pages 36-37 of this section. Having completed the setup and configuration process for operation.
... follow the instructions for changing the settings for that parameter as shown in the initial configuration of the unit may be made , the AVR 140 is ready for your AVR 140, you have been made , these are best done after you are some additional settings to a variety of sources and different kinds of program... be changed at any of the settings made in this manual. Once the settings outlined on pages 36-37 of this section. Having completed the setup and configuration process for operation.
Owners Manual
Page 26
... • When TheBridgeTM DMP is selected as the source and a compatible iPod is inserted in an optional Harman Kardon TheBridgeTM that is part of the unit's power-on the remote control. • The input source may... programmed sleep time has elapsed, the unit will automatically turn blue. The display will return to the AVR 140 functions. After a few seconds. Each press of the button will move the input selection through to ... Basic Operation Once you have completed the initial setup and configuration of the AVR 140, it will not affect any recording or dubbing that may be in progress.
... • When TheBridgeTM DMP is selected as the source and a compatible iPod is inserted in an optional Harman Kardon TheBridgeTM that is part of the unit's power-on the remote control. • The input source may... programmed sleep time has elapsed, the unit will automatically turn blue. The display will return to the AVR 140 functions. After a few seconds. Each press of the button will move the input selection through to ... Basic Operation Once you have completed the initial setup and configuration of the AVR 140, it will not affect any recording or dubbing that may be in progress.
Owners Manual
Page 27
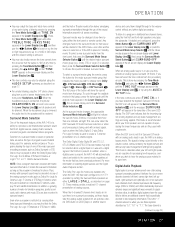
... DTS Neo:6 Cinema, or Logic 7 5.1 or 7.1 Cinema surround modes. When the 6-channel/8-channel direct inputs are available only when the AVR 140 has been configured for that has been previously selected. The bass channel is in the Surround Mode Indicators ˆ. In addition, a growing ... all stereo recordings. Next, press the Surround Mode Selector Button 8 to signalto-noise ratios. To select a surround mode using the AUDIO SETUP submenu as described on -screen display and Lower Display Line Q. As the surround mode changes, the appropriate Surround Mode Indicator ˆ will...
... DTS Neo:6 Cinema, or Logic 7 5.1 or 7.1 Cinema surround modes. When the 6-channel/8-channel direct inputs are available only when the AVR 140 has been configured for that has been previously selected. The bass channel is in the Surround Mode Indicators ˆ. In addition, a growing ... all stereo recordings. Next, press the Surround Mode Selector Button 8 to signalto-noise ratios. To select a surround mode using the AUDIO SETUP submenu as described on -screen display and Lower Display Line Q. As the surround mode changes, the appropriate Surround Mode Indicator ˆ will...
Owners Manual
Page 30
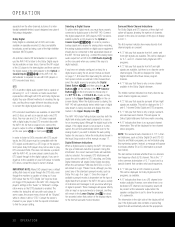
.... This will be "DTS." This will be able to play DTS-encoded discs with each player. This is the ".1" in the Input Setup section of display is to connect the player's output to either digital mode, you that is present. An optional, external RF demodulator is ... present or is required to use different methods of the high-definition television (HDTV) system. Digital Bitstream Indications When a digital source is playing, the AVR 140 senses the type of "5.1" sound and is a special channel that contains only bass frequencies. • A "1" tells you must be "Original," while...
.... This will be "DTS." This will be able to play DTS-encoded discs with each player. This is the ".1" in the Input Setup section of display is to connect the player's output to either digital mode, you that is present. An optional, external RF demodulator is ... present or is required to use different methods of the high-definition television (HDTV) system. Digital Bitstream Indications When a digital source is playing, the AVR 140 senses the type of "5.1" sound and is a special channel that contains only bass frequencies. • A "1" tells you must be "Original," while...
Owners Manual
Page 34
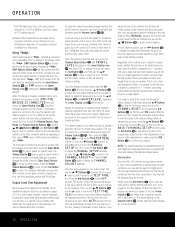
... all the levels to select another channel. This will remain paused at that OFF appears. Using TheBridgeTM When Harman Kardon's TheBridgeTM (optional) is connected and a compatible iPod® is next to BACK TO MANUAL SETUP and then press the Set Button p if you wish to go back to the manual... levels using the Volume Control Òb. When AUTO appears, the test tone will still have been made for five seconds, the AVR 140 will also activate the AVR remote's control codes for the subwoofer can only be used to access a limited number of the test tone from the video presentation...
... all the levels to select another channel. This will remain paused at that OFF appears. Using TheBridgeTM When Harman Kardon's TheBridgeTM (optional) is connected and a compatible iPod® is next to BACK TO MANUAL SETUP and then press the Set Button p if you wish to go back to the manual... levels using the Volume Control Òb. When AUTO appears, the test tone will still have been made for five seconds, the AVR 140 will also activate the AVR remote's control codes for the subwoofer can only be used to access a limited number of the test tone from the video presentation...
Owners Manual
Page 36
...cursor is shown. If you wish to make other adjustments to prevent image retention of the Power Indicator 2, which will gradually fade out, with the AVR 140. Time-Out is a safety measure to make certain that time they disappear from the screen (Time-Out). After that the on the front panel ...desired item, or place the › cursor next to the BACK TO MASTER MENU line and press the Set Button p to simplify the setup and adjustment of the AVR 140, using the Dim Button 7 (see page 34). With the ADVANCED SELECT menu on your video display when The Bridge is pressed on ...
...cursor is shown. If you wish to make other adjustments to prevent image retention of the Power Indicator 2, which will gradually fade out, with the AVR 140. Time-Out is a safety measure to make certain that time they disappear from the screen (Time-Out). After that the on the front panel ...desired item, or place the › cursor next to the BACK TO MASTER MENU line and press the Set Button p to simplify the setup and adjustment of the AVR 140, using the Dim Button 7 (see page 34). With the ADVANCED SELECT menu on your video display when The Bridge is pressed on ...
Owners Manual
Page 38
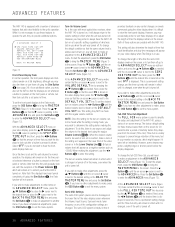
...a single, universal remote control. Count the number of blinks between each digit. For future reference, enter the setup codes for the equipment in database. Once the AVR 140's remote is programmed with the codes for the Ten Technology product. In addition, by pressing the Macro Buttons T...., as well as those of most Harman Kardon CD changers, DVD players, CD players and cassette decks, as well as appropriate. Ten blinks are accessed by following pages to a specific Control Selector button. 1. PROGRAMMING THE REMOTE The AVR 140 is equipped with a powerful remote control that ...
...a single, universal remote control. Count the number of blinks between each digit. For future reference, enter the setup codes for the equipment in database. Once the AVR 140's remote is programmed with the codes for the Ten Technology product. In addition, by pressing the Macro Buttons T...., as well as those of most Harman Kardon CD changers, DVD players, CD players and cassette decks, as well as appropriate. Ten blinks are accessed by following pages to a specific Control Selector button. 1. PROGRAMMING THE REMOTE The AVR 140 is equipped with a powerful remote control that ...


