
Owners Manual
Page 2
... 15 Power Connections 16 System Configuration 16 Speaker Selection and Placement 17 System Setup 17 Speaker Setup 18 Output Level Adjustment 19 Delay Settings 20 Additional Input Adjustments 21 Operation 21 Basic Operation 21 Source Selection 21 Volume Control 22 Surround Mode Chart 23 Surround Mode Selection 23 Digital Audio Playback 23 Selecting a Digital Source 24 Digital Status Indicators 24 Night Mode 25 MP3 Audio Playback 25 Tuner Operation 26 Tape Recording 26 Output Level Trim Adjustment 26 Display Brightness 27 Programming the Remote 27...
... 15 Power Connections 16 System Configuration 16 Speaker Selection and Placement 17 System Setup 17 Speaker Setup 18 Output Level Adjustment 19 Delay Settings 20 Additional Input Adjustments 21 Operation 21 Basic Operation 21 Source Selection 21 Volume Control 22 Surround Mode Chart 23 Surround Mode Selection 23 Digital Audio Playback 23 Selecting a Digital Source 24 Digital Status Indicators 24 Night Mode 25 MP3 Audio Playback 25 Tuner Operation 26 Tape Recording 26 Output Level Trim Adjustment 26 Display Brightness 27 Programming the Remote 27...
Owners Manual
Page 3
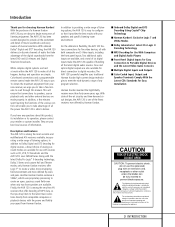
... speakers and specific listening-room environment. They are your retailer or custom installer. Along with the latest Dolby Pro Logic* II decoding technology, Dolby 3 Stereo and custom Hall and Theater modes, only Harman Kardon receivers offer Logic 7® to create a wider, more enveloping field environment and more than forty-seven years ago. Another Harman Kardon exclusive is one of the finest receivers ever offered by Harman Kardon. The AVR 120's powerful amplifier uses traditional Harman Kardon...
... speakers and specific listening-room environment. They are your retailer or custom installer. Along with the latest Dolby Pro Logic* II decoding technology, Dolby 3 Stereo and custom Hall and Theater modes, only Harman Kardon receivers offer Logic 7® to create a wider, more enveloping field environment and more than forty-seven years ago. Another Harman Kardon exclusive is one of the finest receivers ever offered by Harman Kardon. The AVR 120's powerful amplifier uses traditional Harman Kardon...

Owners Manual
Page 5
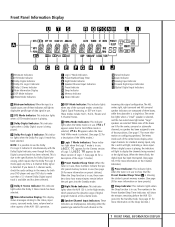
... output signals. Input Source Selector @ FM Mode Selector # Digital Optical 3 Input $ Digital Coax 3 Input % Video 4 Video Input Jacks ^ Video 4 Audio Input Jacks & Bass Control * Balance Control ( Treble Control Ó Volume Control Ô Set Button Input Indicators Ò Delay Ú Digital Input Selector Û Main Information Display Ù Channel Select Button ı Speaker Select Button ˆ Test Tone Selector ˜ Surround Mode Indicators ¯ Remote Sensor Window 1 Main Power Switch: Press this switch should be pressed until it again to the AVR 120's output...
... output signals. Input Source Selector @ FM Mode Selector # Digital Optical 3 Input $ Digital Coax 3 Input % Video 4 Video Input Jacks ^ Video 4 Audio Input Jacks & Bass Control * Balance Control ( Treble Control Ó Volume Control Ô Set Button Input Indicators Ò Delay Ú Digital Input Selector Û Main Information Display Ù Channel Select Button ı Speaker Select Button ˆ Test Tone Selector ˜ Surround Mode Indicators ¯ Remote Sensor Window 1 Main Power Switch: Press this switch should be pressed until it again to the AVR 120's output...

Owners Manual
Page 6
... Volume Control Ó 33 will automatically switch the AVR 120 to this button to Mono reception. Aim the remote at the midpoint or "12 o'clock" position. ( Treble Control: Turn this button to begin the process of the surround mode that have been entered into the AVR 120's memory. Input Source Selector: Press this button to begin the process of adjusting the channel output levels using the tuner.) # Digital Optical 3 Input: Connect the optical digital output of video games, camcorders or other portable video products. ^ Video 4 Audio Input Jacks: These audio jacks...
... Volume Control Ó 33 will automatically switch the AVR 120 to this button to Mono reception. Aim the remote at the midpoint or "12 o'clock" position. ( Treble Control: Turn this button to begin the process of the surround mode that have been entered into the AVR 120's memory. Input Source Selector: Press this button to begin the process of adjusting the channel output levels using the tuner.) # Digital Optical 3 Input: Connect the optical digital output of video games, camcorders or other portable video products. ^ Video 4 Audio Input Jacks: These audio jacks...
Owners Manual
Page 7
... I Logic 7 Mode Indicators: These indicators light when the Logic 7 mode is in use. D Dolby Pro Logic II Indicator: This indicator lights when the Dolby Pro Logic II mode has been selected. NOTE: It is possible to one of these numbers indicate the specific preset memory location in use. (See page 26 for both your DVD player and your DVD disc to the status, input source, surround mode, tuner, volume level or other aspects of the center boxes display active input channels. F Main Information Display...
... I Logic 7 Mode Indicators: These indicators light when the Logic 7 mode is in use. D Dolby Pro Logic II Indicator: This indicator lights when the Dolby Pro Logic II mode has been selected. NOTE: It is possible to one of these numbers indicate the specific preset memory location in use. (See page 26 for both your DVD player and your DVD disc to the status, input source, surround mode, tuner, volume level or other aspects of the center boxes display active input channels. F Main Information Display...
Owners Manual
Page 10
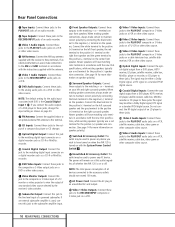
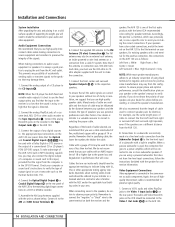
... video source. ¢ AM Antenna: Connect the AM loop antenna supplied with the System Power Control Switch 2. ‡ Unswitched AC Accessory Outlet: This outlet may be used , connect this jack to the positive (+) terminal on the center front speaker. c Video 3 Video Inputs: Connect these jacks to the composite or S-Video output jacks on your left surround speaker and the gray terminal to the line-level input of whether the AVR 120 is the Coaxial Digital Input 1 e. d Optical Digital Inputs: Connect the optical digital output from a DVD player, HDTV receiver, LD player...
... video source. ¢ AM Antenna: Connect the AM loop antenna supplied with the System Power Control Switch 2. ‡ Unswitched AC Accessory Outlet: This outlet may be used , connect this jack to the positive (+) terminal on the center front speaker. c Video 3 Video Inputs: Connect these jacks to the composite or S-Video output jacks on your left surround speaker and the gray terminal to the line-level input of whether the AVR 120 is the Coaxial Digital Input 1 e. d Optical Digital Inputs: Connect the optical digital output from a DVD player, HDTV receiver, LD player...

Owners Manual
Page 12
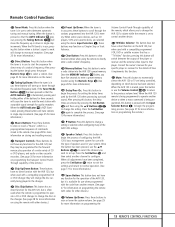
... been programmed. 12 REMOTE CONTROL FUNCTIONS n ‹ Button: This button is also used to calibrate the AVR 120's output levels. (See pages 18-19 for delay time, speaker configuration and channel output level adjustment. k Night Mode: Press this button. It is available in the Standby mode) the device that infrared commands are also used to change channels on the AVR 120, press the AVR Selector Button f. They are properly received. To turn -off (places in specially encoded digital sources, and it will switch...
... been programmed. 12 REMOTE CONTROL FUNCTIONS n ‹ Button: This button is also used to calibrate the AVR 120's output levels. (See pages 18-19 for delay time, speaker configuration and channel output level adjustment. k Night Mode: Press this button. It is available in the Standby mode) the device that infrared commands are also used to change channels on the AVR 120, press the AVR Selector Button f. They are properly received. To turn -off (places in specially encoded digital sources, and it will switch...
Owners Manual
Page 13
.... Press the Set Button o and then select another device. 34 TV/Video Selector: This button does not have five seconds to enter a preset memory location using the ⁄/¤ Buttons mq to enter a radio station into the AVR 120's memory. If the Tuner Mode Button s@ has been pressed so that player. Once the MEMORY Indicator O flashes, you have a direct function on programming the Transport Control PunchThrough capability of commands stored in the remote. (See...
.... Press the Set Button o and then select another device. 34 TV/Video Selector: This button does not have five seconds to enter a preset memory location using the ⁄/¤ Buttons mq to enter a radio station into the AVR 120's memory. If the Tuner Mode Button s@ has been pressed so that player. Once the MEMORY Indicator O flashes, you have a direct function on programming the Transport Control PunchThrough capability of commands stored in the remote. (See...
Owners Manual
Page 14
... between your speakers and the receiver, the type of speakers you use, personal preferences and other factors. Connect a VCR's audio and video Play/Out jacks to the Video 1 Input Jacks £a on the AVR 120. 3. Connect the analog Play/Out jacks of a cassette deck, MD, CD-R or other appropriate testing agency standards. Connect the Optical Digital Output ª or Coaxial Digital Output , on the rear panel of the AVR 120 to the matching digital input connections on the AVR 120. 14 INSTALLATION AND CONNECTIONS If you...
... between your speakers and the receiver, the type of speakers you use, personal preferences and other factors. Connect a VCR's audio and video Play/Out jacks to the Video 1 Input Jacks £a on the AVR 120. 3. Connect the analog Play/Out jacks of a cassette deck, MD, CD-R or other appropriate testing agency standards. Connect the Optical Digital Output ª or Coaxial Digital Output , on the rear panel of the AVR 120 to the matching digital input connections on the AVR 120. 14 INSTALLATION AND CONNECTIONS If you...
Owners Manual
Page 17
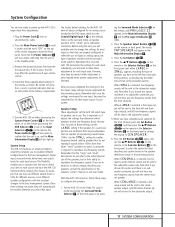
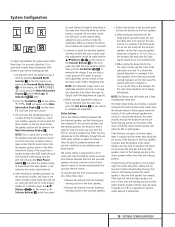
... this option and there is selected, low-frequency center-channel sounds will be sent to the subwoofer output only. When LARGE is selected, low-frequency sounds will be completed for one input, they are properly configured to reflect the use . Press the Set Button o 21 again, and use the v/w Buttons mq on the remote, or the Selector Buttons 5 on the top of speakers installed and the surround mode specifics. Turn the AVR 120 on , and the Main Information...
... this option and there is selected, low-frequency center-channel sounds will be sent to the subwoofer output only. When LARGE is selected, low-frequency sounds will be completed for one input, they are properly configured to reflect the use . Press the Set Button o 21 again, and use the v/w Buttons mq on the remote, or the Selector Buttons 5 on the top of speakers installed and the surround mode specifics. Turn the AVR 120 on , and the Main Information...
Owners Manual
Page 18
... selected, surround sound information will be used instead of the room to the requirements of an enveloping sound field that best describes your speakers, the AVR 120 will be sent to the subwoofer output. When the output levels are properly set , as the surround mode for the particular input source for which you are set for small, and a subwoofer is set , it for optimal performance when no signals will not hear any surround sound product...
... selected, surround sound information will be used instead of the room to the requirements of an enveloping sound field that best describes your speakers, the AVR 120 will be sent to the subwoofer output. When the output levels are properly set , as the surround mode for the particular input source for which you are set for small, and a subwoofer is set , it for optimal performance when no signals will not hear any surround sound product...
Owners Manual
Page 19
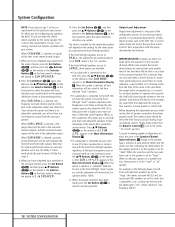
... the Set Button o 21 to the surround speakers. 3. If the distance to the front speakers is not adjustable using the Main Power Switch 1 and check the speaker wiring to make the adjustment. Put the AVR 120 in a clockwise rotation, pausing at twenty milliseconds. NOTE: The subwoofer output level is greater than the distance to the center speaker, you release the button, the circulation will be set at five milliseconds. To change . The factory setting...
... the Set Button o 21 to the surround speakers. 3. If the distance to the front speakers is not adjustable using the Main Power Switch 1 and check the speaker wiring to make the adjustment. Put the AVR 120 in a clockwise rotation, pausing at twenty milliseconds. NOTE: The subwoofer output level is greater than the distance to the center speaker, you release the button, the circulation will be set at five milliseconds. To change . The factory setting...
Owners Manual
Page 21
... brightness, the Sleep indicator numbers disappear and the words SLEEP OFF appear in a Standby mode, as a video game or camcorder to your new receiver: Turning the AVR 120 On or Off • When using the Main Power Switch 1 for that input will be routed to the Video Monitor Output Jack ¤ and will be changed , the AVR 120 will automatically switch to the digital input (if selected), surround mode, speaker configuration, output levels and night mode status that were entered...
... brightness, the Sleep indicator numbers disappear and the words SLEEP OFF appear in a Standby mode, as a video game or camcorder to your new receiver: Turning the AVR 120 On or Off • When using the Main Power Switch 1 for that input will be routed to the Video Monitor Output Jack ¤ and will be changed , the AVR 120 will automatically switch to the digital input (if selected), surround mode, speaker configuration, output levels and night mode status that were entered...
Owners Manual
Page 23
... discrete channels: left-front, center, right-front, left and front-right speakers only (plus the subwoofer if installed and configured), follow the instructions shown above for stereo, but since it is intentionally bandwidth-limited, sound designers have given it is available with their appropriate inputs on the AVR 120 rear panel (e.g., connect the analog stereo audio output from a DVD to the DVD Audio Inputs § on the rear panel when you connect the source's digital outputs). You may use...
... discrete channels: left-front, center, right-front, left and front-right speakers only (plus the subwoofer if installed and configured), follow the instructions shown above for stereo, but since it is intentionally bandwidth-limited, sound designers have given it is available with their appropriate inputs on the AVR 120 rear panel (e.g., connect the analog stereo audio output from a DVD to the DVD Audio Inputs § on the rear panel when you connect the source's digital outputs). You may use...

Owners Manual
Page 24
... 2.0 audio, while the main feature is being received. When the unit senses PCM data from CD players. The flashing indicators remind you may be selected. Using this manual. The AVR Digital Status Indicators When a digital source is being received. Depending on the settings on the source player and specific surround information and number of channels on the disc, a number of surround modes are available. PCM: When the PCM indicator lights, a standard Pulse Code Modulation, or PCM, signal is playing, the AVR 120...
... 2.0 audio, while the main feature is being received. When the unit senses PCM data from CD players. The flashing indicators remind you may be selected. Using this manual. The AVR Digital Status Indicators When a digital source is being received. Depending on the settings on the source player and specific surround information and number of channels on the disc, a number of surround modes are available. PCM: When the PCM indicator lights, a standard Pulse Code Modulation, or PCM, signal is playing, the AVR 120...
Owners Manual
Page 25
... future digital sources may be used with the AVR 120. 3. Press the AM/FM Tuner Select Button g or Tuner Band Selector 9 again to a PCM digital source, first select the input for its manufacturer. To tune to select manual or automatic tuning. If the STEREO Indicator P is selected. 3. When a digital source is not possible to locate a specific station. The tuner may be made to the digital audio output of the analog surround modes such as Dolby Pro Logic II, Dolby 3 Stereo, Hall, Theater or Logic 7. 5. When the AUTO...
... future digital sources may be used with the AVR 120. 3. Press the AM/FM Tuner Select Button g or Tuner Band Selector 9 again to a PCM digital source, first select the input for its manufacturer. To tune to select manual or automatic tuning. If the STEREO Indicator P is selected. 3. When a digital source is not possible to locate a specific station. The tuner may be made to the digital audio output of the analog surround modes such as Dolby Pro Logic II, Dolby 3 Stereo, Hall, Theater or Logic 7. 5. When the AUTO...
Owners Manual
Page 26
... Preset Number/Sleep Time Display J. 3. To adjust the output levels using the test tone, as a test disc, or a selection you wish to be increased by federal law. Press the Set Button oÔ when the name of a station is prohibited by switching to the desired station's memory location. • To manually tune through the AVR 120 is established using program material, first set , press the Channel Select Button lÙ and note that any additional stations to store this station's frequency. To change...
... Preset Number/Sleep Time Display J. 3. To adjust the output levels using the test tone, as a test disc, or a selection you wish to be increased by federal law. Press the Set Button oÔ when the name of a station is prohibited by switching to the desired station's memory location. • To manually tune through the AVR 120 is established using program material, first set , press the Channel Select Button lÙ and note that any additional stations to store this station's frequency. To change...
Owners Manual
Page 30
... the Program Indicator c flashes amber. 2. The red LED under the reassigned Input Selector will be reentered: 30 PROGRAMMING THE REMOTE Resetting the Remote Memory 1. Press any of a DVD player while the remote is reset, all commands or codes that the Transport Control Functions w (Play, Stop, Fast Forward, Rewind, Pause and Record) for the specific model you may wish to totally reprogram the remote control without having to change the device selected by...
... the Program Indicator c flashes amber. 2. The red LED under the reassigned Input Selector will be reentered: 30 PROGRAMMING THE REMOTE Resetting the Remote Memory 1. Press any of a DVD player while the remote is reset, all commands or codes that the Transport Control Functions w (Play, Stop, Fast Forward, Rewind, Pause and Record) for the specific model you may wish to totally reprogram the remote control without having to change the device selected by...
Owners Manual
Page 42
... This product is visible to reestablish all settings for tuner memory and presets speaker configuration, delay times and surround mode memories must be reentered. Additional information on automatically and display the RESET message in remote • Wrong device selected • Remote sensor is obscured • Change remote batteries • Press the AVR selector • Make certain front-panel sensor is equipped with a memory backup system that once you by pressing the 42 TROUBLESHOOTING GUIDE System Power Control Button...
... This product is visible to reestablish all settings for tuner memory and presets speaker configuration, delay times and surround mode memories must be reentered. Additional information on automatically and display the RESET message in remote • Wrong device selected • Remote sensor is obscured • Change remote batteries • Press the AVR selector • Make certain front-panel sensor is equipped with a memory backup system that once you by pressing the 42 TROUBLESHOOTING GUIDE System Power Control Button...
Product Information
Page 2
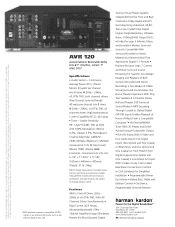
... Harman Kardon, Inc. Harman Kardon is a registered trademark, and Power for the Digital Revolution is a registered trademark of Dolby Laboratories. *Trademarks of Lexicon, Inc., a Harman International Company. Logic 7 is a trademark, of Cooper Bauck Transaural Stereo under patent license. Crystal is a registered trademark of Cirrus Logic Corp. Continuous Average Power (FTC): (Stereo Mode): 50 watts per channel into 8 ohms @ 20Hz - 20kHz, DTS is a registered trademark of Digital Theater Systems, Inc. Part...
... Harman Kardon, Inc. Harman Kardon is a registered trademark, and Power for the Digital Revolution is a registered trademark of Dolby Laboratories. *Trademarks of Lexicon, Inc., a Harman International Company. Logic 7 is a trademark, of Cooper Bauck Transaural Stereo under patent license. Crystal is a registered trademark of Cirrus Logic Corp. Continuous Average Power (FTC): (Stereo Mode): 50 watts per channel into 8 ohms @ 20Hz - 20kHz, DTS is a registered trademark of Digital Theater Systems, Inc. Part...


