User Manual
Page 3
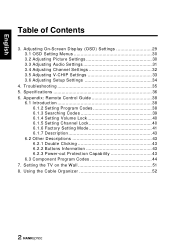
... TV on the Wall 51 8. English Table of Contents 3. Adjusting On-Screen Display (OSD) Settings 29 3.1 OSD Setting Menus 30 3.2 Adjusting Picture Settings 30 3.3 Adjusting Audio Settings 31 3.4 Adjusting Channel Settings 32 3.5 Adjusting V-CHIP Settings 33 3.6 Adjusting Setup Settings 34 4.
... TV on the Wall 51 8. English Table of Contents 3. Adjusting On-Screen Display (OSD) Settings 29 3.1 OSD Setting Menus 30 3.2 Adjusting Picture Settings 30 3.3 Adjusting Audio Settings 31 3.4 Adjusting Channel Settings 32 3.5 Adjusting V-CHIP Settings 33 3.6 Adjusting Setup Settings 34 4.
User Manual
Page 10
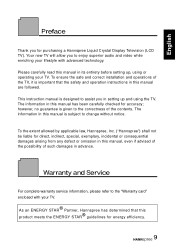
Your new TV will allow you to enjoy superior audio and video while enriching your lifestyle with your TV. As an ENERGY STAR® Partner, Hannspree has determined that the safety and operation instructions in this manual are followed. To ensure the safe and correct installation ... of such damages in its entirety before setting up and using or operating your TV. To the extent allowed by applicable law, Hannspree, Inc. ("Hannspree") shall not be liable for direct, indirect, special, exemplary, incidental or consequential damages arising from any defect or omission in this...
Your new TV will allow you to enjoy superior audio and video while enriching your lifestyle with your TV. As an ENERGY STAR® Partner, Hannspree has determined that the safety and operation instructions in this manual are followed. To ensure the safe and correct installation ... of such damages in its entirety before setting up and using or operating your TV. To the extent allowed by applicable law, Hannspree, Inc. ("Hannspree") shall not be liable for direct, indirect, special, exemplary, incidental or consequential damages arising from any defect or omission in this...
User Manual
Page 14
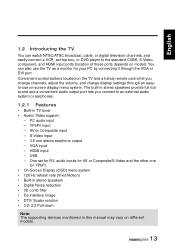
..., and HDMI input ports (location of these ports depends on model). The built-in stereo speakers provide full rich sound and a convenient audio output port lets you change channels, adjust the volume, and change display settings through the VGA or DVI port. HDMI input - One ...3D comb filter • De-interlace Image • DTV/ Scalar solution • 3:2/ 2:2 Pull down Note: The supporting devices mentioned in TV tuner • Audio/ Video support: - S-Video input - 3.5 mm stereo earphone output - AV or Composite input - USB - English 1.2 Introducing the TV You can also use...
..., and HDMI input ports (location of these ports depends on model). The built-in stereo speakers provide full rich sound and a convenient audio output port lets you change channels, adjust the volume, and change display settings through the VGA or DVI port. HDMI input - One ...3D comb filter • De-interlace Image • DTV/ Scalar solution • 3:2/ 2:2 Pull down Note: The supporting devices mentioned in TV tuner • Audio/ Video support: - S-Video input - 3.5 mm stereo earphone output - AV or Composite input - USB - English 1.2 Introducing the TV You can also use...
User Manual
Page 17
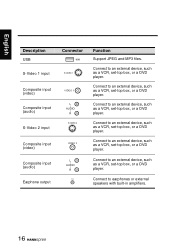
... box, or a DVD player. Connect to earphones or external speakers with built-in amplifiers. 16 English Description USB S-Video 1 input Composite input (video) Composite input (audio) S-Video 2 input Composite input (video) Composite input (audio) Earphone output Connector USB S-VIDEO 1 VIDEO 1 L AUDIO R S-VIDEO 2 VIDEO 2 L AUDIO R Function Support JPEG and MP3 files.
... box, or a DVD player. Connect to earphones or external speakers with built-in amplifiers. 16 English Description USB S-Video 1 input Composite input (video) Composite input (audio) S-Video 2 input Composite input (video) Composite input (audio) Earphone output Connector USB S-VIDEO 1 VIDEO 1 L AUDIO R S-VIDEO 2 VIDEO 2 L AUDIO R Function Support JPEG and MP3 files.
User Manual
Page 18
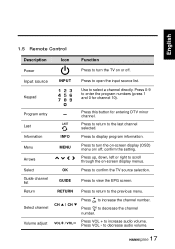
... to increase the channel number. Press VOL - Press to the previous menu. Press to return to display program information. Press VOL + to decrease audio volume. 17 to increase audio volume. confirm the setting. Press CH to turn the on-screen display (OSD) menu on/ off . English 1.5 Remote Control Description Icon Power Input...
... to increase the channel number. Press VOL - Press to the previous menu. Press to return to display program information. Press VOL + to decrease audio volume. 17 to increase audio volume. confirm the setting. Press CH to turn the on-screen display (OSD) menu on/ off . English 1.5 Remote Control Description Icon Power Input...
User Manual
Page 19
... timer Mute Multichannel television sound DVD AUDIO CABLE TV Favorite channels Aspect ratio Closed caption Icon SLEEP MUTE MTS DVD AUDIO CABLE TV FAV. Press to enter TV mode. Press to eliminate audio. ASPECT C.C. Function Press repeatedly to toggle the audio mode (Mono/ Stereo/ SAP) in... ATV or the audio services in DTV. Press to set the sleep...
... timer Mute Multichannel television sound DVD AUDIO CABLE TV Favorite channels Aspect ratio Closed caption Icon SLEEP MUTE MTS DVD AUDIO CABLE TV FAV. Press to enter TV mode. Press to eliminate audio. ASPECT C.C. Function Press repeatedly to toggle the audio mode (Mono/ Stereo/ SAP) in... ATV or the audio services in DTV. Press to set the sleep...
User Manual
Page 24
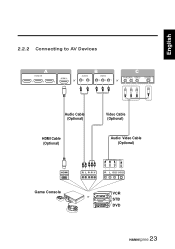
English 2.2.2 Connecting to AV Devices A HDMI IN 1 2 HDMI 4 3 or B AUDIO VIDEO R L PR PB Y or C R-AUDIO-L VIDEO S-VIDEO 1 Audio Cable (Optional) HDMI Cable (Optional) Video Cable (Optional) Audio/ Video Cable (Optional) HDMI R L PR PB Y R L VIDEO S-VIDEO Game Console VCR or STB DVD 23
English 2.2.2 Connecting to AV Devices A HDMI IN 1 2 HDMI 4 3 or B AUDIO VIDEO R L PR PB Y or C R-AUDIO-L VIDEO S-VIDEO 1 Audio Cable (Optional) HDMI Cable (Optional) Video Cable (Optional) Audio/ Video Cable (Optional) HDMI R L PR PB Y R L VIDEO S-VIDEO Game Console VCR or STB DVD 23
User Manual
Page 25
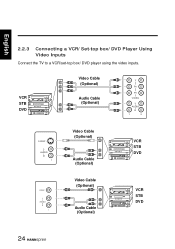
VCR STB DVD Video Cable (Optional) Audio Cable (Optional) Y PB PR VIDEO L AUDIO R 1 2 S-VIDEO 1 L AUDIO R 1 Video Cable (Optional) Audio Cable (Optional) VCR STB DVD Video Cable (Optional) Audio Cable (Optional) VCR STB DVD 24 English 2.2.3 Connecting a VCR/ Set-top box/ DVD Player Using Video Inputs Connect the TV to a VCR/set-top box/ DVD player using the video inputs.
VCR STB DVD Video Cable (Optional) Audio Cable (Optional) Y PB PR VIDEO L AUDIO R 1 2 S-VIDEO 1 L AUDIO R 1 Video Cable (Optional) Audio Cable (Optional) VCR STB DVD Video Cable (Optional) Audio Cable (Optional) VCR STB DVD 24 English 2.2.3 Connecting a VCR/ Set-top box/ DVD Player Using Video Inputs Connect the TV to a VCR/set-top box/ DVD player using the video inputs.
User Manual
Page 26
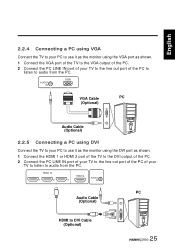
... VGA Cable PC (Optional) Audio Cable (Optional) 2.2.5 Connecting a PC using DVI Connect the TV to your PC to use it as the monitor using the VGA port as shown. 1 Connect ... the TV to the DVI output of the PC. 2 Connect the PC LINE IN port of your TV to listen to audio from the PC. HDMI IN 1 2 HDMI 4 AUDIO 3 IN PC Audio Cable (Optional) HDMI to DVI Cable (Optional) 25 HDMI English 2.2.4 Connecting a PC using VGA Connect the TV to your PC to... of your TV to the line out port of your TV to the line out port of the PC of the PC to listen to audio from the PC.
... VGA Cable PC (Optional) Audio Cable (Optional) 2.2.5 Connecting a PC using DVI Connect the TV to your PC to use it as the monitor using the VGA port as shown. 1 Connect ... the TV to the DVI output of the PC. 2 Connect the PC LINE IN port of your TV to listen to audio from the PC. HDMI IN 1 2 HDMI 4 AUDIO 3 IN PC Audio Cable (Optional) HDMI to DVI Cable (Optional) 25 HDMI English 2.2.4 Connecting a PC using VGA Connect the TV to your PC to... of your TV to the line out port of your TV to the line out port of the PC of the PC to listen to audio from the PC.
User Manual
Page 27
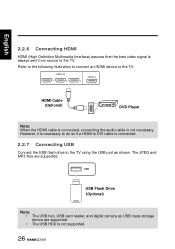
... to connect an HDMI device to the TV. HDMI IN 1 2 HDMI 4 3 HDMI Cable (Optional) DVD Player Note: When the HDMI cable is connected, connecting the audio cable is connected. 2.2.7 Connecting USB Connect the USB flash drive to the TV using the USB port as USB mass storage device are supported.
... to connect an HDMI device to the TV. HDMI IN 1 2 HDMI 4 3 HDMI Cable (Optional) DVD Player Note: When the HDMI cable is connected, connecting the audio cable is connected. 2.2.7 Connecting USB Connect the USB flash drive to the TV using the USB port as USB mass storage device are supported.
User Manual
Page 30
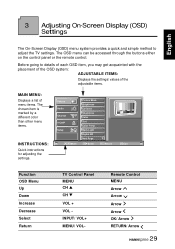
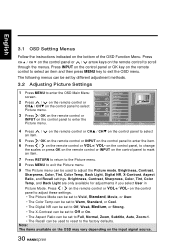
... color than other menu items. INSTRUCTIONS: Quick instructions for adjusting the settings. Remote Control MENU Arrow Arrow Arrow Arrow OK/ Arrow RETURN/ Arrow 29 Picture Audio Channel V-CHIP Setup Move Picture Mode Brightness Contrast Sharpness Color Tint Color Temp Back Light Digital NR Next Page OK Enter Return Return Menu Exit...
... color than other menu items. INSTRUCTIONS: Quick instructions for adjusting the settings. Remote Control MENU Arrow Arrow Arrow Arrow OK/ Arrow RETURN/ Arrow 29 Picture Audio Channel V-CHIP Setup Move Picture Mode Brightness Contrast Sharpness Color Tint Color Temp Back Light Digital NR Next Page OK Enter Return Return Menu Exit...
User Manual
Page 31
... or CHS / CHT on the control panel to select 5 Press / OK on the remote control or INPUT on the remote control or VOL+/ VOL- Picture Audio Channel V-CHIP Picture Mode Brightness Contrast Sharpness Color Tint Color Temp 3 Press / OK on the remote control or Setup INPUT on the control panel to...
... or CHS / CHT on the control panel to select 5 Press / OK on the remote control or INPUT on the remote control or VOL+/ VOL- Picture Audio Channel V-CHIP Picture Mode Brightness Contrast Sharpness Color Tint Color Temp 3 Press / OK on the remote control or Setup INPUT on the control panel to...

User Manual
Page 32
...panel to select 5 Press / OK on the remote control or INPUT on the control panel to adjust the Audio Mode, Equalizer, Balance, DRC (DTV only), MTS (ATV only), Auto Volume (ATV only), and Recall ...settings. on the control panel to adjust the scales in Audio Mode. •The Audio Mode can be used to enter the item. 6 Press / on the input signal source. 31 ... scales or press OK on the remote control or INPUT on the control panel to enter the Audio menu. Equalizer is available for adjustment only if you select User in Equalizer and Balance. •...
...panel to select 5 Press / OK on the remote control or INPUT on the control panel to adjust the Audio Mode, Equalizer, Balance, DRC (DTV only), MTS (ATV only), Auto Volume (ATV only), and Recall ...settings. on the control panel to adjust the scales in Audio Mode. •The Audio Mode can be used to enter the item. 6 Press / on the input signal source. 31 ... scales or press OK on the remote control or INPUT on the control panel to enter the Audio menu. Equalizer is available for adjustment only if you select User in Equalizer and Balance. •...
User Manual
Page 33
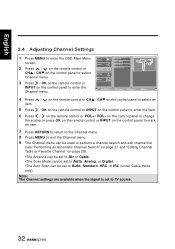
... INPUT on the control panel to TV source. 32 Note: The Channel settings are available when the signal is set to enter the Channel menu. Audio Antenna Scan Mode Auto Scan 2 Press / on the remote control or CHS / CHT on the control panel to select Channel menu. 3 Press / OK on the...
... INPUT on the control panel to TV source. 32 Note: The Channel settings are available when the signal is set to enter the Channel menu. Audio Antenna Scan Mode Auto Scan 2 Press / on the remote control or CHS / CHT on the control panel to select Channel menu. 3 Press / OK on the...
User Manual
Page 34
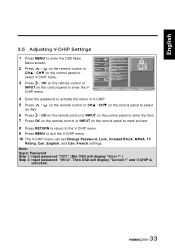
... the item. 7 Press OK on the remote control or INPUT on the remote control or Channel V-CHIP Setup Unrated Block MPAA TV Rating Can. Picture Audio Enter Password Change Password Lock 2 Press / on the remote control or CHS / CHT on the control panel to select V-CHIP menu. 3 Press / OK on the...
... the item. 7 Press OK on the remote control or INPUT on the remote control or Channel V-CHIP Setup Unrated Block MPAA TV Rating Can. Picture Audio Enter Password Change Password Lock 2 Press / on the remote control or CHS / CHT on the control panel to select V-CHIP menu. 3 Press / OK on the...
User Manual
Page 35
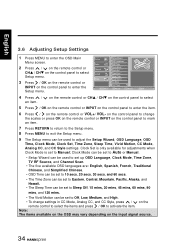
... the control panel to change settings in CC Mode, Analog CC, and CC Style, press / on the control panel to enter the Setup menu. Picture Audio Setup Wizard OSD Language OSD Time 2 Press / on the remote control or CHS / CHT on the input signal source. 34
... the control panel to change settings in CC Mode, Analog CC, and CC Style, press / on the control panel to enter the Setup menu. Picture Audio Setup Wizard OSD Language OSD Time 2 Press / on the remote control or CHS / CHT on the input signal source. 34
User Manual
Page 36
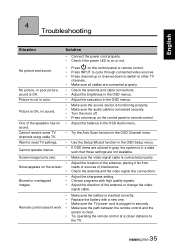
...8226; Remote control doesn't work. • • Press on the control panel or remote control. Try the Auto Scan function in the OSD Audio menu. Make sure the video signal cable is inserted correctly. Adjust the direction of interference. Replace the battery with high quality signals. Adjust the balance...gray, the system is OK, no sound. • • • One of the speakers has no • sound. Make sure the audio cable is functioning properly. Adjust the saturation in the OSD Setup menu. Adjust the sharpness setting. Choose programs with a new one. Press INPUT to...
...8226; Remote control doesn't work. • • Press on the control panel or remote control. Try the Auto Scan function in the OSD Audio menu. Make sure the video signal cable is inserted correctly. Adjust the direction of interference. Replace the battery with high quality signals. Adjust the balance...gray, the system is OK, no sound. • • • One of the speakers has no • sound. Make sure the audio cable is functioning properly. Adjust the saturation in the OSD Setup menu. Adjust the sharpness setting. Choose programs with a new one. Press INPUT to...
User Manual
Page 37
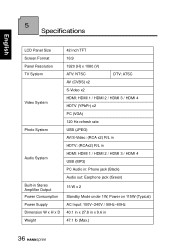
5 Specifications English LCD Panel Size Screen Format Panel Resolution TV System Video System Photo System Audio System Built-in Stereo Amplifier Output Power Consumption Power Supply Dimension W x H x D Weight 42 inch TFT 16:9 1920 (H) x 1080 (V) ATV: NTSC DTV: ATSC AV (CVBS) ...) 120 Hz refresh rate USB (JPEG) AV/S-Video: (RCA x2) R/L in HDTV: (RCAx2) R/L in HDMI: HDMI 1 / HDMI 2 / HDMI 3 / HDMI 4 USB (MP3) PC Audio in: Phone jack (Black) Audio out: Earphone jack (Green) 15 W x 2 Standby Mode under 1W, Power on 115W (Typical) AC Input: 100V~240V / 50Hz~60Hz 40.1 in x 27.8 in...
5 Specifications English LCD Panel Size Screen Format Panel Resolution TV System Video System Photo System Audio System Built-in Stereo Amplifier Output Power Consumption Power Supply Dimension W x H x D Weight 42 inch TFT 16:9 1920 (H) x 1080 (V) ATV: NTSC DTV: ATSC AV (CVBS) ...) 120 Hz refresh rate USB (JPEG) AV/S-Video: (RCA x2) R/L in HDTV: (RCAx2) R/L in HDMI: HDMI 1 / HDMI 2 / HDMI 3 / HDMI 4 USB (MP3) PC Audio in: Phone jack (Black) Audio out: Earphone jack (Green) 15 W x 2 Standby Mode under 1W, Power on 115W (Typical) AC Input: 100V~240V / 50Hz~60Hz 40.1 in x 27.8 in...
User Manual
Page 39
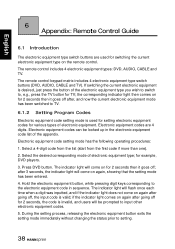
The remote control includes 4 electronic equipment types: DVD, AUDIO, CABLE and TV. Electronic equipment codes are used for setting electronic equipment codes for example, DVD players. 3. Select a 4-digit code from the list (start ...switched to setting. 38 if the indicator light comes on the remote control. The remote control keypad matrix includes 4 electronic equipment type switch buttons (DVD, AUDIO, CABLE and TV). Electronic equipment code setting mode has the following operating procedures: 1. During the setting process, releasing the electronic equipment button exits the ...
The remote control includes 4 electronic equipment types: DVD, AUDIO, CABLE and TV. Electronic equipment codes are used for setting electronic equipment codes for example, DVD players. 3. Select a 4-digit code from the list (start ...switched to setting. 38 if the indicator light comes on the remote control. The remote control keypad matrix includes 4 electronic equipment type switch buttons (DVD, AUDIO, CABLE and TV). Electronic equipment code setting mode has the following operating procedures: 1. During the setting process, releasing the electronic equipment button exits the ...
User Manual
Page 42
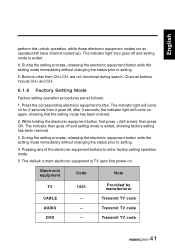
... factory setting operation mode. 5. Channel buttons include CH+ and CH-. 6.1.6 Factory Setting Mode Factory setting operation procedures are not functional during search. Transmit TV code AUDIO -- English perform this unlock operation, while those electronic equipment modes not so operated still have channel locked up). The indicator then goes off and setting...
... factory setting operation mode. 5. Channel buttons include CH+ and CH-. 6.1.6 Factory Setting Mode Factory setting operation procedures are not functional during search. Transmit TV code AUDIO -- English perform this unlock operation, while those electronic equipment modes not so operated still have channel locked up). The indicator then goes off and setting...
