User Manual
Page 2
... Description of Warning Symbols 3 Safety Notices 4 Preface 6 Warranty and Service 6 1. Setting up your TV 18 2.1 Basic Connections 18 2.1.1 Power Connection 18 2.1.2 Connecting an Antenna or Cable TV 18 2.2 Connecting External Devices 19 2.2.1 Connecting External Earphones 19 2.2.2 Connecting to AV Devices 20 2.2.3 ...HDMI 23 2.2.7 Connecting USB 23 2.2.8 Connecting a VCR/ STB/ DVD Player using SCART . 24 2.3 Using the TV 25 2.3.1 Turning the TV On and Off 25 2.3.2 Switching Source Signals 25 2.3.3 Performing an Automatic Channel Search 25 2.3.4 Selecting Channels 25 1
... Description of Warning Symbols 3 Safety Notices 4 Preface 6 Warranty and Service 6 1. Setting up your TV 18 2.1 Basic Connections 18 2.1.1 Power Connection 18 2.1.2 Connecting an Antenna or Cable TV 18 2.2 Connecting External Devices 19 2.2.1 Connecting External Earphones 19 2.2.2 Connecting to AV Devices 20 2.2.3 ...HDMI 23 2.2.7 Connecting USB 23 2.2.8 Connecting a VCR/ STB/ DVD Player using SCART . 24 2.3 Using the TV 25 2.3.1 Turning the TV On and Off 25 2.3.2 Switching Source Signals 25 2.3.3 Performing an Automatic Channel Search 25 2.3.4 Selecting Channels 25 1
User Manual
Page 3
Troubleshooting 34 5. Adjusting On-Screen Display (OSD) Settings 27 3.1 OSD Setting Menus 28 3.2 Adjusting Picture Settings 28 3.3 Adjusting Audio Settings 29 3.4 Adjusting Clock and Timer Settings 30 3.5 Adjusting Channel Settings 31 3.6 Adjusting PC Setting Options 32 3.7 Adjusting Setup Settings 33 4. Using the Cable Organizer 38 2 English Table of Contents 2.3.5 Adjusting the Volume 25 2.3.6 Editing the Favorite List 26 2.3.7 Editing the Channel List 26 3. Setting the TV on the Wall 37 8. Support Timing 35 6. Specifications 36 7.
Troubleshooting 34 5. Adjusting On-Screen Display (OSD) Settings 27 3.1 OSD Setting Menus 28 3.2 Adjusting Picture Settings 28 3.3 Adjusting Audio Settings 29 3.4 Adjusting Clock and Timer Settings 30 3.5 Adjusting Channel Settings 31 3.6 Adjusting PC Setting Options 32 3.7 Adjusting Setup Settings 33 4. Using the Cable Organizer 38 2 English Table of Contents 2.3.5 Adjusting the Volume 25 2.3.6 Editing the Favorite List 26 2.3.7 Editing the Channel List 26 3. Setting the TV on the Wall 37 8. Support Timing 35 6. Specifications 36 7.

User Manual
Page 4
Hannspree cannot accept responsibility for any failure to electrical equipment for use within certain voltage limits. English Regulatory Information CE Conformity Statement This device is in ... on the harmonization of the laws of Member States relating to satisfy the requirements resulting from a non-recommended modification of electric shocks due to this TV. This symbol is used to alert users to the risk of the device. Description of Warning Symbols CAUTION RISK OF ELECTRIC SHOCK DO NOT OPEN...
Hannspree cannot accept responsibility for any failure to electrical equipment for use within certain voltage limits. English Regulatory Information CE Conformity Statement This device is in ... on the harmonization of the laws of Member States relating to satisfy the requirements resulting from a non-recommended modification of electric shocks due to this TV. This symbol is used to alert users to the risk of the device. Description of Warning Symbols CAUTION RISK OF ELECTRIC SHOCK DO NOT OPEN...
User Manual
Page 5
... not expose this apparatus to provide enough space for the emission of heat. English Safety Notices Installation Safety Notes Location Avoid allowing the TV to get prolonged exposure to sunlight or other than that contained in the operating instructions unless you are qualified to do so. Notes:... on the source signal, use a VGA monitor cable with ferrite shield. 4 To reduce the influence of heat. Leave sufficient distance between the TV and the wall to rain or moisture. CAUTION These servicing instructions are excluded. • This device uses a VGA connector to connect to dripping...
... not expose this apparatus to provide enough space for the emission of heat. English Safety Notices Installation Safety Notes Location Avoid allowing the TV to get prolonged exposure to sunlight or other than that contained in the operating instructions unless you are qualified to do so. Notes:... on the source signal, use a VGA monitor cable with ferrite shield. 4 To reduce the influence of heat. Leave sufficient distance between the TV and the wall to rain or moisture. CAUTION These servicing instructions are excluded. • This device uses a VGA connector to connect to dripping...

User Manual
Page 6
...screen is broken, do not disassemble the casing. 3. Do not attempt to use the TV unattended. 8. To avoid overloading the power supply, never plug too many electrical devices into the vent of the TV is otherwise damaged, unplug the power cord immediately and contact an authorized service technician. ...5. Avoid blocking the TV's vents, do not place the TV on the power cord. Avoid hitting or scraping it. Hold the ...
...screen is broken, do not disassemble the casing. 3. Do not attempt to use the TV unattended. 8. To avoid overloading the power supply, never plug too many electrical devices into the vent of the TV is otherwise damaged, unplug the power cord immediately and contact an authorized service technician. ...5. Avoid blocking the TV's vents, do not place the TV on the power cord. Avoid hitting or scraping it. Hold the ...
User Manual
Page 7
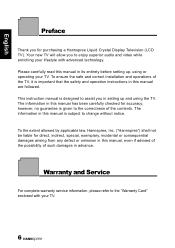
... technology. The information in this manual in setting up , using the TV. The information in this manual are followed. To the extent allowed by applicable law, Hannspree, Inc. ("Hannspree") shall not be liable for purchasing a Hannspree Liquid Crystal Display Television (LCD TV). Your new TV will allow you in its entirety before setting up and using...
... technology. The information in this manual in setting up , using the TV. The information in this manual are followed. To the extent allowed by applicable law, Hannspree, Inc. ("Hannspree") shall not be liable for purchasing a Hannspree Liquid Crystal Display Television (LCD TV). Your new TV will allow you in its entirety before setting up and using...

User Manual
Page 8
...mentioned herein are trademarks of Dolby Laboratories. 7 The TV described in any form by implication, estoppel or otherwise, any license under the copyrights, patents, patent applications or trademarks of Hannspree (or other third parties). Hannspree (or other third parties) preserves the exclusive rights ... any copyrighted software contained in the product described herein shall not be reproduced in this manual may include copyrighted software of Hannspree, except for the normal, non-exclusive use , copying and distribution. No part of this manual may be distributed, modified...
...mentioned herein are trademarks of Dolby Laboratories. 7 The TV described in any form by implication, estoppel or otherwise, any license under the copyrights, patents, patent applications or trademarks of Hannspree (or other third parties). Hannspree (or other third parties) preserves the exclusive rights ... any copyrighted software contained in the product described herein shall not be reproduced in this manual may include copyrighted software of Hannspree, except for the normal, non-exclusive use , copying and distribution. No part of this manual may be distributed, modified...
User Manual
Page 9
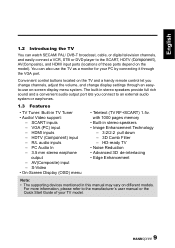
English 1 Getting Started 1.1 Package Contents Make sure the following components are included in Europe when it . 8 Please refer to the recycle information from our website to handle it is missing or damaged. • TV • User's manual • Quick start guide • Warranty card • Power cord • Remote control and batteries • TV cleaning cloth According to WEEE regulation, this TV can't be handled as normal trash in the box. Please contact Hannspree Customer Service immediately if anything is out of usage.
English 1 Getting Started 1.1 Package Contents Make sure the following components are included in Europe when it . 8 Please refer to the recycle information from our website to handle it is missing or damaged. • TV • User's manual • Quick start guide • Warranty card • Power cord • Remote control and batteries • TV cleaning cloth According to WEEE regulation, this TV can't be handled as normal trash in the box. Please contact Hannspree Customer Service immediately if anything is out of usage.
User Manual
Page 10
... or digital television channels, and easily connect a VCR, STB or DVD player to an external audio system or earphones. 1.3 Features • TV Tuner: Built-in TV Tuner • Audio/ Video support: - SCART inputs - HDMI inputs - with 1000 pages memory • Built-in this manual may vary... model). PC Audio In - 3.5 mm stereo earphone output - S-Video • On-Screen Display (OSD) menu • Teletext (TV RF+SCART) 1.5v. HD-ready TV • Noise Reduction • Advanced 3D de-interlacing • Edge Enhancement Note: • The supporting devices mentioned in stereo speakers ...
... or digital television channels, and easily connect a VCR, STB or DVD player to an external audio system or earphones. 1.3 Features • TV Tuner: Built-in TV Tuner • Audio/ Video support: - SCART inputs - HDMI inputs - with 1000 pages memory • Built-in this manual may vary... model). PC Audio In - 3.5 mm stereo earphone output - S-Video • On-Screen Display (OSD) menu • Teletext (TV RF+SCART) 1.5v. HD-ready TV • Noise Reduction • Advanced 3D de-interlacing • Edge Enhancement Note: • The supporting devices mentioned in stereo speakers ...

User Manual
Page 11
... adjust Remote IR sensor Power/Standby indicator Speakers P VOL + VOL - Press to decrease the volume or move to a CI device. 10 Press to turn the TV on the OSD menu. Function Press to select the proper input source. Indicate power (green) or standby (red) status.
... adjust Remote IR sensor Power/Standby indicator Speakers P VOL + VOL - Press to decrease the volume or move to a CI device. 10 Press to turn the TV on the OSD menu. Function Press to select the proper input source. Indicate power (green) or standby (red) status.

User Manual
Page 12
..., STB, or a DVD player. Component Inputs (Video) Component Inputs (Audio) SCART 1 IN/OUT Connect to earphones or external speakers with AV, SVideo, RGB, L/R IN, Analog TV Out, and L/R Out. 11 Connect to an external device, such as a VCR, STB, or a DVD player. SCART 1 Connect to devices such as a VCR, STB, or... set-top box. S-Video Input Composite Input (Video) Composite Inputs (Audio) Earphone Output HDMI 4 Input S-VIDEO VIDEO R-AUDIO-L HDMI 4 Connect to an antenna or cable TV. Not available for users.
..., STB, or a DVD player. Component Inputs (Video) Component Inputs (Audio) SCART 1 IN/OUT Connect to earphones or external speakers with AV, SVideo, RGB, L/R IN, Analog TV Out, and L/R Out. 11 Connect to an external device, such as a VCR, STB, or a DVD player. SCART 1 Connect to devices such as a VCR, STB, or... set-top box. S-Video Input Composite Input (Video) Composite Inputs (Audio) Earphone Output HDMI 4 Input S-VIDEO VIDEO R-AUDIO-L HDMI 4 Connect to an antenna or cable TV. Not available for users.

User Manual
Page 13
...Input HDMI 1 Input HDMI 2 Input HDMI 3 Input Power Connector VGA AUDIO IN HDMI IN 1 HDMI IN 2 HDMI IN 3 Connect to select the input signal types: TV, SCART1, SCART2, Composite, S-Video, Component, HDMI 1, HDMI 2, HDMI 3, HDMI 4, and Computer. 12 Connect a HDMI equipment or a HDMIDVI adapter cable to devices ...such as a VCR, STB, or a DVD player with AV, SVideo, L/R IN. Press to a PC's VGA port. Connect to turn the TV on or off. Connect to the included power cord. 1.6 Remote Control Description Icon Power Input Signal Type INPUT Function Press to a PC's line/audio port...
...Input HDMI 1 Input HDMI 2 Input HDMI 3 Input Power Connector VGA AUDIO IN HDMI IN 1 HDMI IN 2 HDMI IN 3 Connect to select the input signal types: TV, SCART1, SCART2, Composite, S-Video, Component, HDMI 1, HDMI 2, HDMI 3, HDMI 4, and Computer. 12 Connect a HDMI equipment or a HDMIDVI adapter cable to devices ...such as a VCR, STB, or a DVD player with AV, SVideo, L/R IN. Press to a PC's VGA port. Connect to turn the TV on or off. Connect to the included power cord. 1.6 Remote Control Description Icon Power Input Signal Type INPUT Function Press to a PC's line/audio port...

User Manual
Page 15
..., press to display the teletext over the program on the screen (programmable in the OSD menu or teletext mode. Press to display a table of the TV channel. Press PS to decrease the program number. Press PT to increase the program number. Press to adjust the screen size (programmable in the teletext...
..., press to display the teletext over the program on the screen (programmable in the OSD menu or teletext mode. Press to display a table of the TV channel. Press PS to decrease the program number. Press PT to increase the program number. Press to adjust the screen size (programmable in the teletext...
User Manual
Page 16
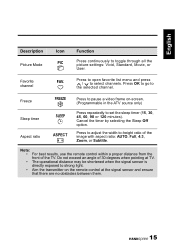
...option. Press to open favorite list menu and press / to the selected channel. Do not exceed an angle of 30 degrees when pointing at TV. • The operational distance may be shortened when the signal sensor is directly exposed to strong light. • Aim the transmitter on -screen.... (Programmable in the ATV source only) Sleep timer Aspect ratio SLEEP ASPECT Press repeatedly to -height ratio of the TV. Favorite channel FAV. Freeze FREEZE Press to toggle through all the picture settings: Vivid, Standard, Movie, or User. Note: • For best results...
...option. Press to open favorite list menu and press / to the selected channel. Do not exceed an angle of 30 degrees when pointing at TV. • The operational distance may be shortened when the signal sensor is directly exposed to strong light. • Aim the transmitter on -screen.... (Programmable in the ATV source only) Sleep timer Aspect ratio SLEEP ASPECT Press repeatedly to -height ratio of the TV. Favorite channel FAV. Freeze FREEZE Press to toggle through all the picture settings: Vivid, Standard, Movie, or User. Note: • For best results...

User Manual
Page 19
... the plug at the other end of the power cord into a power outlet. 2.1.2 Connecting an Antenna or Cable TV Connect one end of the TV. Antenna Coaxial Cable Ground Clamp Ground Note: • Images are for illustration only and may vary by model or region. • If you cannot receive ...channels after connecting to TV/DTV jack on the rear of the VHF/UHF (Antenna) or CATV cable to an antenna or cable TV line, try scanning for channels. 18
... the plug at the other end of the power cord into a power outlet. 2.1.2 Connecting an Antenna or Cable TV Connect one end of the TV. Antenna Coaxial Cable Ground Clamp Ground Note: • Images are for illustration only and may vary by model or region. • If you cannot receive ...channels after connecting to TV/DTV jack on the rear of the VHF/UHF (Antenna) or CATV cable to an antenna or cable TV line, try scanning for channels. 18

User Manual
Page 20
English 2.2 Connecting External Devices Connect external devices such as VCRs, STBs, DVD players, video game consoles, earphones, or a PC to the TV using the appropriate ports on the rear of the TV. 2.2.1 Connecting External Earphones Headphones Speakers (Built-in Amplifiers) Note: • External speakers or headphones are not included with the TV. • The internal TV speakers will not output sound when headphones are plugged in. • Use external speakers with built-in amplifiers only. • Only one external device for sound can be connected at a time. 19
English 2.2 Connecting External Devices Connect external devices such as VCRs, STBs, DVD players, video game consoles, earphones, or a PC to the TV using the appropriate ports on the rear of the TV. 2.2.1 Connecting External Earphones Headphones Speakers (Built-in Amplifiers) Note: • External speakers or headphones are not included with the TV. • The internal TV speakers will not output sound when headphones are plugged in. • Use external speakers with built-in amplifiers only. • Only one external device for sound can be connected at a time. 19
User Manual
Page 21
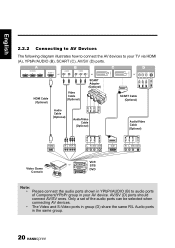
... the audio ports can be selected when connecting AV devices. • The Video and S-Video ports in group (D) share the same R/L Audio ports in your TV via HDMI (A), YPbPr/AUDIO (B), SCART (C), AV/SV (D) ports. A B C HDMI IN 1 2 3 HDMI 4 or AUDIO R L VIDEO PR PB Y or D R-AUDIO-L VIDEO S-VIDEO or HDMI Cable (Optional) Video...
... the audio ports can be selected when connecting AV devices. • The Video and S-Video ports in group (D) share the same R/L Audio ports in your TV via HDMI (A), YPbPr/AUDIO (B), SCART (C), AV/SV (D) ports. A B C HDMI IN 1 2 3 HDMI 4 or AUDIO R L VIDEO PR PB Y or D R-AUDIO-L VIDEO S-VIDEO or HDMI Cable (Optional) Video...

User Manual
Page 22
VCR STB DVD Video Cable (Optional) Audio Cable (Optional) VIDEO Y PB PR AUDIO L R R-AUDIO-L VIDEO VCR STB DVD Audio Cable (Optional) Video Cable (Optional) R-AUDIO-L S-VIDEO VCR STB DVD Audio Cable (Optional) S-Video Cable (Optional) 21 English 2.2.3 Connecting a VCR/ STB/ DVD Player Using Component Video/Audio, Composite Video/Audio, or S-Video/Audio Connect the TV to a VCR/ STB/ DVD player using three different types of video/audio inputs.
VCR STB DVD Video Cable (Optional) Audio Cable (Optional) VIDEO Y PB PR AUDIO L R R-AUDIO-L VIDEO VCR STB DVD Audio Cable (Optional) Video Cable (Optional) R-AUDIO-L S-VIDEO VCR STB DVD Audio Cable (Optional) S-Video Cable (Optional) 21 English 2.2.3 Connecting a VCR/ STB/ DVD Player Using Component Video/Audio, Composite Video/Audio, or S-Video/Audio Connect the TV to a VCR/ STB/ DVD player using three different types of video/audio inputs.

User Manual
Page 23
... line out port of the PC to the PC Audio In port of your TV to listen to audio from the PC. AUDIO IN VGA PC VGA Cable (Optional) Audio Cable (Optional) 2.2.5 Connecting a PC using DVI Connect the TV to your PC to use it as the monitor using the VGA port... as shown. 1 Connect the HDMI port of the TV to the DVI output of the PC. 2 Connect the line out port of the PC...
... line out port of the PC to the PC Audio In port of your TV to listen to audio from the PC. AUDIO IN VGA PC VGA Cable (Optional) Audio Cable (Optional) 2.2.5 Connecting a PC using DVI Connect the TV to your PC to use it as the monitor using the VGA port... as shown. 1 Connect the HDMI port of the TV to the DVI output of the PC. 2 Connect the line out port of the PC...

User Manual
Page 24
SERVICE USB Drive (Optional) 23 However, it is necessary to do so if a HDMI to DVI cable is not necessary. HDMI IN 1 2 3 HDMI 4 HDMI Cable (Optional) DVD Player Note: When the HDMI cable is connected, connecting the audio cable is connected. 2.2.7 Connecting USB Service port, for DTV F/W update only. English 2.2.6 Connecting HDMI HDMI (High Definition Multimedia Interface) assures that the best video signal is always sent from source to the TV. Refer to the following illustration to connect a HDMI device to the TV.
SERVICE USB Drive (Optional) 23 However, it is necessary to do so if a HDMI to DVI cable is not necessary. HDMI IN 1 2 3 HDMI 4 HDMI Cable (Optional) DVD Player Note: When the HDMI cable is connected, connecting the audio cable is connected. 2.2.7 Connecting USB Service port, for DTV F/W update only. English 2.2.6 Connecting HDMI HDMI (High Definition Multimedia Interface) assures that the best video signal is always sent from source to the TV. Refer to the following illustration to connect a HDMI device to the TV.


