
User Manual
Page 1
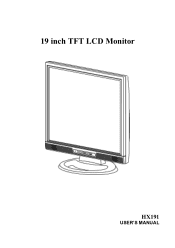
19 inch TFT LCD Monitor HX191 USER'S MANUAL
19 inch TFT LCD Monitor HX191 USER'S MANUAL

User Manual
Page 2
... into an outlet on , the user is connected. Socket-outlet shall be near the equipment and shall be retained for help. User's Manual Before operating the monitor, please read this equipment does cause harmful interference to radio or television reception, which the receiver is encouraged to try... to which can radiate radio frequency energy, and if not installed and used in accordance with regard to radio communications. If this manual thoroughly. Consult the dealer or an experienced radio/TV technician for future reference. These limits are designed to Part 15 of the FCC ...
... into an outlet on , the user is connected. Socket-outlet shall be near the equipment and shall be retained for help. User's Manual Before operating the monitor, please read this equipment does cause harmful interference to radio or television reception, which the receiver is encouraged to try... to which can radiate radio frequency energy, and if not installed and used in accordance with regard to radio communications. If this manual thoroughly. Consult the dealer or an experienced radio/TV technician for future reference. These limits are designed to Part 15 of the FCC ...
User Manual
Page 3
..., manufactured and tested according to improve the working environment for a high performance product, designed with displays in a more information, please visit www.tcodevelopment.com 3 User's Manual Congratulations! The display you have a certified environmental management system such as cadmium, mercury and lead. beneficial both for the user and the environment • Electrical...
..., manufactured and tested according to improve the working environment for a high performance product, designed with displays in a more information, please visit www.tcodevelopment.com 3 User's Manual Congratulations! The display you have a certified environmental management system such as cadmium, mercury and lead. beneficial both for the user and the environment • Electrical...

User Manual
Page 4
On the contrary, other material can be classified to recycle this product. User's Manual Recycling Information We, the Hanns.G care very much about our environment protection strategy and firmly believe that it helps us have healthier earth via appropriate ...
On the contrary, other material can be classified to recycle this product. User's Manual Recycling Information We, the Hanns.G care very much about our environment protection strategy and firmly believe that it helps us have healthier earth via appropriate ...

User Manual
Page 5
User's Manual TABLE OF CONTENTS SAFETY NOTICE 6 PRECAUTIONS 6 SPECIAL NOTES ON LCD MONITORS 7 BEFORE YOU OPERATE THE MONITOR 8 FEATURES 8 CHECKING THE CONTENTS OF THE PACKAGE 8 INSTALLATION INSTRUCTIONS 9 POWER...9 MAKING CONNECTIONS 10 ADJUSTING THE VIEWING ANGLE 11 OPERATING INSTRUCTIONS 12 GENERAL INSTRUCTIONS 12 FRONT PANEL CONTROL 13 HOW TO ADJUST A SETTING 14 PLUG AND PLAY 17 TECHNICAL SUPPORT (FAQ 18 Q & A FOR GENERAL PROBLEMS 18 ERROR MESSAGE & POSSIBLE SOLUTIONS 19 APPENDIX 20 SPECIFICATIONS 20 5
User's Manual TABLE OF CONTENTS SAFETY NOTICE 6 PRECAUTIONS 6 SPECIAL NOTES ON LCD MONITORS 7 BEFORE YOU OPERATE THE MONITOR 8 FEATURES 8 CHECKING THE CONTENTS OF THE PACKAGE 8 INSTALLATION INSTRUCTIONS 9 POWER...9 MAKING CONNECTIONS 10 ADJUSTING THE VIEWING ANGLE 11 OPERATING INSTRUCTIONS 12 GENERAL INSTRUCTIONS 12 FRONT PANEL CONTROL 13 HOW TO ADJUST A SETTING 14 PLUG AND PLAY 17 TECHNICAL SUPPORT (FAQ 18 Q & A FOR GENERAL PROBLEMS 18 ERROR MESSAGE & POSSIBLE SOLUTIONS 19 APPENDIX 20 SPECIFICATIONS 20 5
User Manual
Page 6
... source indicated on a bed, sofa, rug, or similar surface. If you are provided for long period of the user to comply with the monitor. User's Manual SAFETY NOTICE 1. WARNING: To prevent fire or shock hazard, do not expose the monitor to qualified personnel only. Refer servicing to rain or moisture. If...
... source indicated on a bed, sofa, rug, or similar surface. If you are provided for long period of the user to comply with the monitor. User's Manual SAFETY NOTICE 1. WARNING: To prevent fire or shock hazard, do not expose the monitor to qualified personnel only. Refer servicing to rain or moisture. If...

User Manual
Page 7
SPECIAL NOTES ON LCD MONITORS User's Manual The following symptoms are normal with LCD monitor and do not indicate a problem. • Due to the nature of 99.99% or more. In this ...
SPECIAL NOTES ON LCD MONITORS User's Manual The following symptoms are normal with LCD monitor and do not indicate a problem. • Due to the nature of 99.99% or more. In this ...
User Manual
Page 8
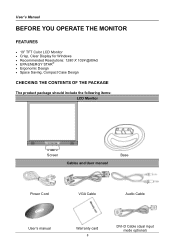
User's Manual BEFORE YOU OPERATE THE MONITOR FEATURES • 19" TFT Color LCD Monitor • Crisp, Clear Display for Windows • Recommended Resolutions: 1280 X 1024 @60Hz • EPA ENERGY STAR® • Ergonomic Design • Space Saving, Compact Case Design CHECKING THE CONTENTS OF THE PACKAGE The product package should include the following items: LCD Monitor Screen Cables and User manual Base Power Cord VGA Cable Audio Cable User's manual Warranty card 8 DVI-D Cable (dual input mode optional)
User's Manual BEFORE YOU OPERATE THE MONITOR FEATURES • 19" TFT Color LCD Monitor • Crisp, Clear Display for Windows • Recommended Resolutions: 1280 X 1024 @60Hz • EPA ENERGY STAR® • Ergonomic Design • Space Saving, Compact Case Design CHECKING THE CONTENTS OF THE PACKAGE The product package should include the following items: LCD Monitor Screen Cables and User manual Base Power Cord VGA Cable Audio Cable User's manual Warranty card 8 DVI-D Cable (dual input mode optional)
User Manual
Page 9
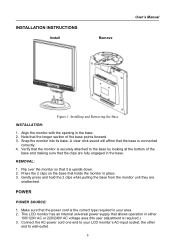
... securely attached to wall-outlet . 9 Align the monitor with the opening in the base. 2. Installing and Removing the Base INSTALLATION: 1. INSTALLATION INSTRUCTIONS Install Remove User's Manual Figure.1. REMOVAL: 1. POWER POWER SOURCE: 1.
... securely attached to wall-outlet . 9 Align the monitor with the opening in the base. 2. Installing and Removing the Base INSTALLATION: 1. INSTALLATION INSTRUCTIONS Install Remove User's Manual Figure.1. REMOVAL: 1. POWER POWER SOURCE: 1.
User Manual
Page 10
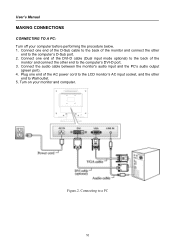
... the AC power cord to the LCD monitor's AC input socket, and the other end to the computer's D-Sub port. 2. Connecting to Wall outlet. 5. User's Manual MAKING CONNECTIONS CONNECTING TO A PC: Turn off your monitor and computer.
... the AC power cord to the LCD monitor's AC input socket, and the other end to the computer's D-Sub port. 2. Connecting to Wall outlet. 5. User's Manual MAKING CONNECTIONS CONNECTING TO A PC: Turn off your monitor and computer.
User Manual
Page 11
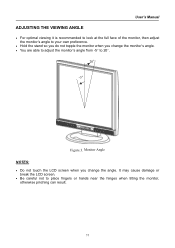
... careful not to 20°. 20° -5° Figure.3. Monitor Angle NOTES: • Do not touch the LCD screen when you change the angle. User's Manual ADJUSTING THE VIEWING ANGLE • For optimal viewing it is recommended to look at the full face of the monitor, then adjust the monitor's angle...
... careful not to 20°. 20° -5° Figure.3. Monitor Angle NOTES: • Do not touch the LCD screen when you change the angle. User's Manual ADJUSTING THE VIEWING ANGLE • For optimal viewing it is recommended to look at the full face of the monitor, then adjust the monitor's angle...

User Manual
Page 12
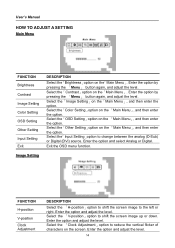
Figure.4. The other control buttons are located on the front panel of the monitor (See Figure.4). Control Panel Buttons 12 By changing these settings, the picture can be adjusted to your personal preferences. • The power cord should be connected. • Connect the Signal cable from the monitor to the VGA card. • Press the power button to turn on the monitor. The power indicator will light up. User's Manual OPERATING INSTRUCTIONS GENERAL INSTRUCTIONS Press the power button to turn the monitor on or off.
Figure.4. The other control buttons are located on the front panel of the monitor (See Figure.4). Control Panel Buttons 12 By changing these settings, the picture can be adjusted to your personal preferences. • The power cord should be connected. • Connect the Signal cable from the monitor to the VGA card. • Press the power button to turn on the monitor. The power indicator will light up. User's Manual OPERATING INSTRUCTIONS GENERAL INSTRUCTIONS Press the power button to turn the monitor on or off.

User Manual
Page 13
..., always unplug the monitor before cleaning it with a mild detergent solution. When the Function Key Lock is enabled, only the Power button is OFF. 2. User's Manual FRONT PANEL CONTROL • Power Button: Press this button for D-sub only) When OSD menu is in off status, press and hold this button to...
..., always unplug the monitor before cleaning it with a mild detergent solution. When the Function Key Lock is enabled, only the Power button is OFF. 2. User's Manual FRONT PANEL CONTROL • Power Button: Press this button for D-sub only) When OSD menu is in off status, press and hold this button to...
User Manual
Page 14
... screen image to shift the screen image up or down. Enter the option and adjust the level. Enter the option and adjust the level. User's Manual HOW TO ADJUST A SETTING Main Menu FUNCTION Brightness Contrast Image Setting Color Setting OSD Setting Other Setting Input Setting Exit DESCRIPTION Select the「Brightness...
... screen image to shift the screen image up or down. Enter the option and adjust the level. Enter the option and adjust the level. User's Manual HOW TO ADJUST A SETTING Main Menu FUNCTION Brightness Contrast Image Setting Color Setting OSD Setting Other Setting Input Setting Exit DESCRIPTION Select the「Brightness...
User Manual
Page 15
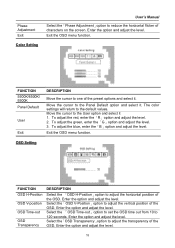
... the option and adjust the level. 15 Exit the OSD menu function. Enter the option and adjust the level. Phase Adjustment Exit Color Setting User's Manual Select the「Phase Adjustment」option to the default values. FUNCTION 5500K/6500K/ 9300K Panel Default User Exit DESCRIPTION Move the cursor to one...
... the option and adjust the level. 15 Exit the OSD menu function. Enter the option and adjust the level. Phase Adjustment Exit Color Setting User's Manual Select the「Phase Adjustment」option to the default values. FUNCTION 5500K/6500K/ 9300K Panel Default User Exit DESCRIPTION Move the cursor to one...
User Manual
Page 16
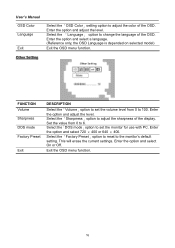
... level. Select the「Factory Preset」option to reset to adjust the color of the OSD. Enter the option and adjust the level. User's Manual OSD Color Language Exit Select the「OSD Color」setting option to the monitor's default setting. Set the value from 0 to adjust the sharpness...
... level. Select the「Factory Preset」option to reset to adjust the color of the OSD. Enter the option and adjust the level. User's Manual OSD Color Language Exit Select the「OSD Color」setting option to the monitor's default setting. Set the value from 0 to adjust the sharpness...
User Manual
Page 17
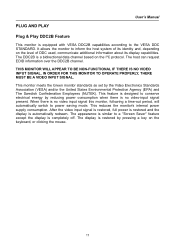
... is restored by pressing a key on the level of its identity and, depending on the keyboard, or clicking the mouse. 17 PLUG AND PLAY User's Manual Plug & Play DDC2B Feature This monitor is automatically redrawn. After the video input signal is restored, full power is restored and the display is equipped...
... is restored by pressing a key on the level of its identity and, depending on the keyboard, or clicking the mouse. 17 PLUG AND PLAY User's Manual Plug & Play DDC2B Feature This monitor is automatically redrawn. After the video input signal is restored, full power is restored and the display is equipped...

User Manual
Page 18
... of the pins are bent. *Adjust pixel frequency CLOCK and PHASE or press hot-key (AUTO) *Adjust RGB color or select color temperature 18 User's Manual TECHNICAL SUPPORT (FAQ) Q & A FOR GENERAL PROBLEMS PROBLEM & QUESTION Power LED is not on the keyboard while observing the CAPS LOCK LED. The LED should be...
... of the pins are bent. *Adjust pixel frequency CLOCK and PHASE or press hot-key (AUTO) *Adjust RGB color or select color temperature 18 User's Manual TECHNICAL SUPPORT (FAQ) Q & A FOR GENERAL PROBLEMS PROBLEM & QUESTION Power LED is not on the keyboard while observing the CAPS LOCK LED. The LED should be...

User Manual
Page 19
... set to unsuitable display mode, set the computer to display mode given in the following table. Check the signal-cable's connection pins for damage. User's Manual ERROR MESSAGE & POSSIBLE SOLUTIONS CABLE NOT CONNECTED : 1. FACTORY PRESET TIMING TABLE: MODE RESOLUTION 1 640×350 @70Hz 2 640×400 @56Hz 3 640×400 @70Hz...
... set to unsuitable display mode, set the computer to display mode given in the following table. Check the signal-cable's connection pins for damage. User's Manual ERROR MESSAGE & POSSIBLE SOLUTIONS CABLE NOT CONNECTED : 1. FACTORY PRESET TIMING TABLE: MODE RESOLUTION 1 640×350 @70Hz 2 640×400 @56Hz 3 640×400 @70Hz...
User Manual
Page 20
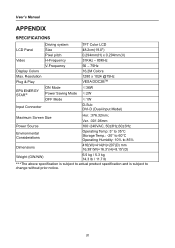
....2M Colors 1280 x 1024 @75Hz VESA DDC2BTM ≤36W ≤2W ≤1W D-Sub DVI-D (Dual-Input Model) Maximum Screen Size Hor. :376.32mm; User's Manual APPENDIX SPECIFICATIONS LCD Panel Video Display Colors Max.
....2M Colors 1280 x 1024 @75Hz VESA DDC2BTM ≤36W ≤2W ≤1W D-Sub DVI-D (Dual-Input Model) Maximum Screen Size Hor. :376.32mm; User's Manual APPENDIX SPECIFICATIONS LCD Panel Video Display Colors Max.