
User Manual
Page 2
... device complies with the limits for a Class B digital device, pursuant to provide reasonable protection against harmful interference in a particular installation. User's Manual Before operating the monitor, please read this device must accept any interference received, including interference that interference will not occur in a residential installation. However, there is connected. ƒ Consult the dealer or an experienced radio...
... device complies with the limits for a Class B digital device, pursuant to provide reasonable protection against harmful interference in a particular installation. User's Manual Before operating the monitor, please read this device must accept any interference received, including interference that interference will not occur in a residential installation. However, there is connected. ƒ Consult the dealer or an experienced radio...

User Manual
Page 3
... and environmental requirements in order to improve the working environment for the user and to reduce sight and strain problems. Important parameters are luminance, contrast, resolution, reflectance, colour rendition and image stability. This means that also minimizes the impact...Displays label. The display you have a certified environmental management system such as manufacturers all over the world. Our labelling system started with scientists, experts, users as well as EMAS or ISO 14 001 • Restrictions on our natural environment. Energy • Energy-saving mode...
... and environmental requirements in order to improve the working environment for the user and to reduce sight and strain problems. Important parameters are luminance, contrast, resolution, reflectance, colour rendition and image stability. This means that also minimizes the impact...Displays label. The display you have a certified environmental management system such as manufacturers all over the world. Our labelling system started with scientists, experts, users as well as EMAS or ISO 14 001 • Restrictions on our natural environment. Energy • Energy-saving mode...
User Manual
Page 5
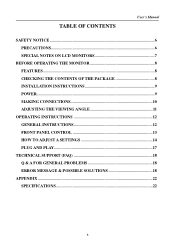
TABLE OF CONTENTS User's Manual SAFETY NOTICE ...6 PRECAUTIONS...6 SPECIAL NOTES ON LCD MONITORS 7 BEFORE OPERATING THE MONITOR 8 FEATURES...8 CHECKING THE CONTENTS OF THE PACKAGE 8 INSTALLATION INSTRUCTIONS 9 POWER...9 MAKING CONNECTIONS 10 ADJUSTING THE VIEWING ANGLE 11 OPERATING INSTRUCTIONS 12 GENERAL INSTRUCTIONS 12 FRONT PANEL CONTROL 13 HOW TO ADJUST A SETTINGS 14 PLUG AND PLAY 17 TECHNICAL SUPPORT (FAQ 18 Q & A FOR GENERAL PROBLEMS 18 ERROR MESSAGE & POSSIBLE SOLUTIONS 18 APPENDIX ...22 SPECIFICATIONS 22 5
TABLE OF CONTENTS User's Manual SAFETY NOTICE ...6 PRECAUTIONS...6 SPECIAL NOTES ON LCD MONITORS 7 BEFORE OPERATING THE MONITOR 8 FEATURES...8 CHECKING THE CONTENTS OF THE PACKAGE 8 INSTALLATION INSTRUCTIONS 9 POWER...9 MAKING CONNECTIONS 10 ADJUSTING THE VIEWING ANGLE 11 OPERATING INSTRUCTIONS 12 GENERAL INSTRUCTIONS 12 FRONT PANEL CONTROL 13 HOW TO ADJUST A SETTINGS 14 PLUG AND PLAY 17 TECHNICAL SUPPORT (FAQ 18 Q & A FOR GENERAL PROBLEMS 18 ERROR MESSAGE & POSSIBLE SOLUTIONS 18 APPENDIX ...22 SPECIFICATIONS 22 5
User Manual
Page 6
... cables and AC power cord, if any object into the slot on the label. User's Manual SAFETY NOTICE 1. WARNING: To prevent fire or shock hazard, do not expose the monitor to correct such interference. The changes or modifications not expressly approved by yourself; opening or removing covers can result in fire or electric shock. • Never push any , must be used...
... cables and AC power cord, if any object into the slot on the label. User's Manual SAFETY NOTICE 1. WARNING: To prevent fire or shock hazard, do not expose the monitor to correct such interference. The changes or modifications not expressly approved by yourself; opening or removing covers can result in fire or electric shock. • Never push any , must be used...
User Manual
Page 7
... recovered slowly by changing the image or turning off the Power Switch and then turn it on again to make sure the flicker disappears. • You may flicker during initial use . • The LCD screen has effective pixels of the fluorescent light, the screen may find slightly uneven brightness on the screen depending on the desktop pattern you use . In this case, the screen is displayed for repair. FOR MORE INFORMATION...
... recovered slowly by changing the image or turning off the Power Switch and then turn it on again to make sure the flicker disappears. • You may flicker during initial use . • The LCD screen has effective pixels of the fluorescent light, the screen may find slightly uneven brightness on the screen depending on the desktop pattern you use . In this case, the screen is displayed for repair. FOR MORE INFORMATION...
User Manual
Page 8
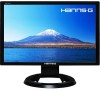
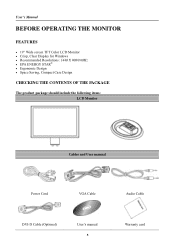
User's Manual BEFORE OPERATING THE MONITOR FEATURES • 19" Wide screen TFT Color LCD Monitor • Crisp, Clear Display for Windows • Recommended Resolutions: 1440 X 900@60Hz • EPA ENERGY STAR® • Ergonomic Design • Space Saving, Compact Case Design CHECKING THE CONTENTS OF THE PACKAGE The product package should include the following items: LCD Monitor Cables and User manual Power Cord VGA Cable Audio Cable DVI-D Cable (Optional) User's manual 8 Warranty card
User's Manual BEFORE OPERATING THE MONITOR FEATURES • 19" Wide screen TFT Color LCD Monitor • Crisp, Clear Display for Windows • Recommended Resolutions: 1440 X 900@60Hz • EPA ENERGY STAR® • Ergonomic Design • Space Saving, Compact Case Design CHECKING THE CONTENTS OF THE PACKAGE The product package should include the following items: LCD Monitor Cables and User manual Power Cord VGA Cable Audio Cable DVI-D Cable (Optional) User's manual 8 Warranty card
User Manual
Page 9
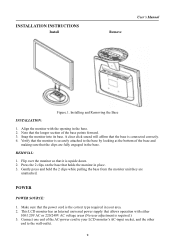
... your LCD monitor's AC-input socket, and the other end to the base by looking at the bottom of the base points forward. 3. REMOVAL: 1. A clear click sound will affirm that the power cord is connected correctly. 4. Press the 2 clips on the base that the longer section of the base and making sure that it is required.) 3. Snap the monitor into its base. Installing and Removing the Base INSTALLATION: 1. INSTALLATION INSTRUCTIONS Install Remove User's Manual Figure.1. POWER POWER SOURCE: 1.
... your LCD monitor's AC-input socket, and the other end to the base by looking at the bottom of the base points forward. 3. REMOVAL: 1. A clear click sound will affirm that the power cord is connected correctly. 4. Press the 2 clips on the base that the longer section of the base and making sure that it is required.) 3. Snap the monitor into its base. Installing and Removing the Base INSTALLATION: 1. INSTALLATION INSTRUCTIONS Install Remove User's Manual Figure.1. POWER POWER SOURCE: 1.
User Manual
Page 10
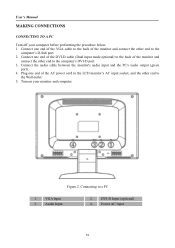
... Input 10 Connect one end of the monitor and connect the other end to the computer's DVI-D port. 3. Figure.2. DVI-D Input (optional) 4. User's Manual MAKING CONNECTIONS CONNECTING TO A PC Turn off your monitor and computer. Plug one end of the DVI-D cable (Dual input mode optional) to the back of the AC power cord to the LCD monitor's AC input socket, and the other end to the Wall outlet. 5. Connect the audio cable between the monitor's audio input and the PC's audio output (green port). 4. Turn...
... Input 10 Connect one end of the monitor and connect the other end to the computer's DVI-D port. 3. Figure.2. DVI-D Input (optional) 4. User's Manual MAKING CONNECTIONS CONNECTING TO A PC Turn off your monitor and computer. Plug one end of the DVI-D cable (Dual input mode optional) to the back of the AC power cord to the LCD monitor's AC input socket, and the other end to the Wall outlet. 5. Connect the audio cable between the monitor's audio input and the PC's audio output (green port). 4. Turn...
User Manual
Page 11
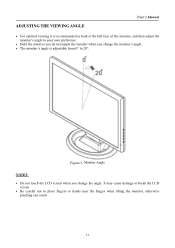
... break the LCD screen. • Be careful not to 20°. ADJUSTING THE VIEWING ANGLE User's Manual • For optimal viewing it is recommended to look at the full face of the monitor, and then adjust the monitor's angle to your own preference. • Hold the stand so you do not topple the monitor when you change the monitor's angle. • The monitor's angle is adjustable from...
... break the LCD screen. • Be careful not to 20°. ADJUSTING THE VIEWING ANGLE User's Manual • For optimal viewing it is recommended to look at the full face of the monitor, and then adjust the monitor's angle to your own preference. • Hold the stand so you do not topple the monitor when you change the monitor's angle. • The monitor's angle is adjustable from...

User Manual
Page 12
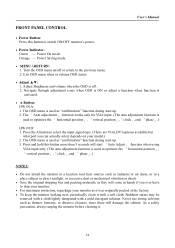
... the power button to turn the monitor on or off. By changing these settings, the picture can be adjusted to your personal preference. • The power cord should be connected. • Connect the Signal cable from the monitor to the VGA card. • Press the power button to turn on the front panel of the monitor (See Figure 4). The power indicator will light up. Brightness adjustment button /▲ [+] 5. Power Button 2. Figure.4. Volume adjustment button / ▼ [-] 6. Control Panel Buttons CONTROL PANEL BUTTONS: 1. Menu / Return 3. Auto adjustment /Input source...
... the power button to turn the monitor on or off. By changing these settings, the picture can be adjusted to your personal preference. • The power cord should be connected. • Connect the Signal cable from the monitor to the VGA card. • Press the power button to turn on the front panel of the monitor (See Figure 4). The power indicator will light up. Brightness adjustment button /▲ [+] 5. Power Button 2. Figure.4. Volume adjustment button / ▼ [-] 6. Control Panel Buttons CONTROL PANEL BUTTONS: 1. Menu / Return 3. Auto adjustment /Input source...
User Manual
Page 13
... the A button to optimize the 「horizontal position」, 「vertical position」,「clock」,and 「phase」.) HW191D: 1. Press and hold this button to the previous menu. 2. Adjust Brightness and volume when the OSD is off or return to switch ON/OFF monitor's power. • Power Indicator: Green - Stubborn stains may be removed with a cloth lightly dampened with a soft cloth. User's Manual FRONT PANEL CONTROL • Power Button: Press this button more than...
... the A button to optimize the 「horizontal position」, 「vertical position」,「clock」,and 「phase」.) HW191D: 1. Press and hold this button to the previous menu. 2. Adjust Brightness and volume when the OSD is off or return to switch ON/OFF monitor's power. • Power Indicator: Green - Stubborn stains may be removed with a cloth lightly dampened with a soft cloth. User's Manual FRONT PANEL CONTROL • Power Button: Press this button more than...

User Manual
Page 14
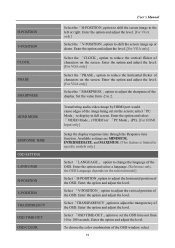
... auto adjustment function is used to optimize the 「horizontal position」, 「vertical position」,「clock」,and 「phase」. [For VGA Input only] ASPECT RATIO When the aspect ratio of screen is distorted, you may cause the screen showing black bands. [The availability of the display according to activate or deactivate the automatic signal search function. [For DVI/ HDMI Input only] COLOR SETTING WARM NATURE COOL USER IMAGE SETTING AUTO ADJUST Adjust...
... auto adjustment function is used to optimize the 「horizontal position」, 「vertical position」,「clock」,and 「phase」. [For VGA Input only] ASPECT RATIO When the aspect ratio of screen is distorted, you may cause the screen showing black bands. [The availability of the display according to activate or deactivate the automatic signal search function. [For DVI/ HDMI Input only] COLOR SETTING WARM NATURE COOL USER IMAGE SETTING AUTO ADJUST Adjust...
User Manual
Page 15
... select a language. [Reference only, the OSD Language depends on the screen. Enter the option and adjust the level. [For VGA only] Select the「SHARPNESS」option to the left or right. H-POSITION V-POSITION CLOCK PHASE SHARPNESS HDMI MODE RESPONSE TIME OSD SETTING LANGUAGE H-POSITION V-POSITION TRANSPARENCY OSD TIME-OUT OSD COLOR User's Manual Select the「H-POSITION」option to shift the screen image to adjust the sharpness of the display. Transferring audio-video image by HDMI port would...
... select a language. [Reference only, the OSD Language depends on the screen. Enter the option and adjust the level. [For VGA only] Select the「SHARPNESS」option to the left or right. H-POSITION V-POSITION CLOCK PHASE SHARPNESS HDMI MODE RESPONSE TIME OSD SETTING LANGUAGE H-POSITION V-POSITION TRANSPARENCY OSD TIME-OUT OSD COLOR User's Manual Select the「H-POSITION」option to shift the screen image to adjust the sharpness of the display. Transferring audio-video image by HDMI port would...
User Manual
Page 16
... 「FACTORY RESET」option to reset to switch the function On or Off. Display Horizontal frequency/Vertical frequency/Resolution information. 16 This will erase the current settings. Enter the option and select On or Off. User's Manual SYSTEM AUDIO INPUT VOLUME MUTE DDC/CI FACTORY RESET INFORMATION 「OSD COLOR」option under 「OSD SETTING」menu, choose modes 1/2/3. if no sound is outputted, it is connected to monitor's LINE IN (or AUDIO IN) port. [For HDMI Input only...
... 「FACTORY RESET」option to reset to switch the function On or Off. Display Horizontal frequency/Vertical frequency/Resolution information. 16 This will erase the current settings. Enter the option and select On or Off. User's Manual SYSTEM AUDIO INPUT VOLUME MUTE DDC/CI FACTORY RESET INFORMATION 「OSD COLOR」option under 「OSD SETTING」menu, choose modes 1/2/3. if no sound is outputted, it is connected to monitor's LINE IN (or AUDIO IN) port. [For HDMI Input only...
User Manual
Page 17
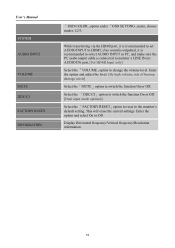
... to the VESA DDC STANDARD. This reduces the monitor's internal power supply consumption. This monitor meets the Green monitor standards as set by pressing a key on the I²C protocol. It allows the monitor to power saving mode. THIS MONITOR WILL APPEAR TO BE NON-FUNCTIONAL IF THERE IS NO VIDEO INPUT SIGNAL. After the video input signal is restored, full power is restored and the display is a bidirectional data channel based on...
... to the VESA DDC STANDARD. This reduces the monitor's internal power supply consumption. This monitor meets the Green monitor standards as set by pressing a key on the I²C protocol. It allows the monitor to power saving mode. THIS MONITOR WILL APPEAR TO BE NON-FUNCTIONAL IF THERE IS NO VIDEO INPUT SIGNAL. After the video input signal is restored, full power is restored and the display is a bidirectional data channel based on...
User Manual
Page 18
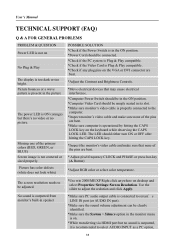
... colors (RED, GREEN, or BLUE) Screen image is ON (orange) but no picture. Use the silder to adjust the reslution and click Apply. *Make sure PC audio output cable is connected to screen's LINE IN port (or AUDIO IN port). *Make sure the sound volume adjustment can be snugly seated in its slot. *Make sure monitor's video cable is properly connected to be connected. *Check if the PC system is Plug & Play compatible. *Check if the Video Card is Plug & Play compatible. *Check if any plug...
... colors (RED, GREEN, or BLUE) Screen image is ON (orange) but no picture. Use the silder to adjust the reslution and click Apply. *Make sure PC audio output cable is connected to screen's LINE IN port (or AUDIO IN port). *Make sure the sound volume adjustment can be snugly seated in its slot. *Make sure monitor's video cable is properly connected to be connected. *Check if the PC system is Plug & Play compatible. *Check if the Video Card is Plug & Play compatible. *Check if any plug...
User Manual
Page 19
User's Manual and make sure PC audio output cable is connected to monitor's LINE IN port(or AUDIO IN port). [For HDMI Input only] 19
User's Manual and make sure PC audio output cable is connected to monitor's LINE IN port(or AUDIO IN port). [For HDMI Input only] 19
User Manual
Page 20
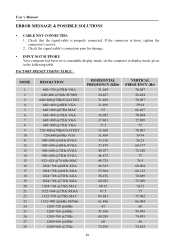
...75Hz MAC 1152×864 @75Hz SXGA 1152×870 @75Hz MAC 1152×900 @66Hz SUN66 1280×720 @60Hz 1280×768 @60Hz 1280×768 @75Hz 1280×960 @60Hz 1280×960 @75Hz HORIZONTAL FREQUENCY ... Check the signal-cable's connection pins for damage. ƒ INPUT NOT SUPPORT: Your computer has been set to unsuitable display mode, set the computer to display mode given in the following table. User's Manual ERROR MESSAGE & POSSIBLE SOLUTIONS ƒ CABLE NOT CONNECTED: 1. Check that the signal-cable is properly connected, If the connector is loose, tighten the connector's screws...
...75Hz MAC 1152×864 @75Hz SXGA 1152×870 @75Hz MAC 1152×900 @66Hz SUN66 1280×720 @60Hz 1280×768 @60Hz 1280×768 @75Hz 1280×960 @60Hz 1280×960 @75Hz HORIZONTAL FREQUENCY ... Check the signal-cable's connection pins for damage. ƒ INPUT NOT SUPPORT: Your computer has been set to unsuitable display mode, set the computer to display mode given in the following table. User's Manual ERROR MESSAGE & POSSIBLE SOLUTIONS ƒ CABLE NOT CONNECTED: 1. Check that the signal-cable is properly connected, If the connector is loose, tighten the connector's screws...
User Manual
Page 22
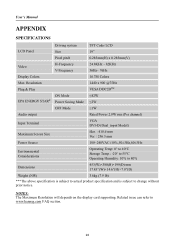
... the display card supporting. Related issue can refer to change without prior notice. User's Manual APPENDIX SPECIFICATIONS LCD Panel Driving system Size TFT Color LCD 19" Pixel pitch 0.285mm(H) x 0.285mm(V) Video H-Frequency V-Frequency 24.8KHz - 82KHz 56Hz- 76Hz Display Colors 16.7M Colors Max. Resolution 1440 x 900 @75Hz Plug & Play VESA DDC2BTM ON Mode ≤42W EPA ENERGY STAR® Power Saving Mode ≤2W OFF Mode ≤1W Audio output Rated Power 2.0W rms (Per channel) Input Terminal VGA DVI-D (Dual_input Model) Maximum Screen Size Hor...
... the display card supporting. Related issue can refer to change without prior notice. User's Manual APPENDIX SPECIFICATIONS LCD Panel Driving system Size TFT Color LCD 19" Pixel pitch 0.285mm(H) x 0.285mm(V) Video H-Frequency V-Frequency 24.8KHz - 82KHz 56Hz- 76Hz Display Colors 16.7M Colors Max. Resolution 1440 x 900 @75Hz Plug & Play VESA DDC2BTM ON Mode ≤42W EPA ENERGY STAR® Power Saving Mode ≤2W OFF Mode ≤1W Audio output Rated Power 2.0W rms (Per channel) Input Terminal VGA DVI-D (Dual_input Model) Maximum Screen Size Hor...

Brochure
Page 1
... VESA DISPLAY Size: 19" Widescreen Active Matrix TFT display Resolution: 1440 x 900 WXGA+ Color: 16.2 Million Pixel Pitch: 0.283(H)mm x 0.283(V)mm Brightness: 300 cd/m² Contrast: 700:1 Response Time: 5ms Viewing Angle (H/V): 170˚/160˚ Panel Treatment: Anti-glare Hardcoating INTERFACE Analog Input: (1) D-Sub 15 Pin (VGA) Audio Input: (1) 3.5mm Stereo CONVENIENCE Color: Black Audio: 1W x 2 Channel Built-In Stereo Speakers Tilt Stand: 0˚ - 20˚ Mounting: VESA Standard Mounting Points Kensington Lock OSD in 11 languages POWER Input...
... VESA DISPLAY Size: 19" Widescreen Active Matrix TFT display Resolution: 1440 x 900 WXGA+ Color: 16.2 Million Pixel Pitch: 0.283(H)mm x 0.283(V)mm Brightness: 300 cd/m² Contrast: 700:1 Response Time: 5ms Viewing Angle (H/V): 170˚/160˚ Panel Treatment: Anti-glare Hardcoating INTERFACE Analog Input: (1) D-Sub 15 Pin (VGA) Audio Input: (1) 3.5mm Stereo CONVENIENCE Color: Black Audio: 1W x 2 Channel Built-In Stereo Speakers Tilt Stand: 0˚ - 20˚ Mounting: VESA Standard Mounting Points Kensington Lock OSD in 11 languages POWER Input...


