
User Manual
Page 2
... harmful interference to which can radiate radio frequency energy, and if not installed and used in accordance with the instructions, may cause undesired operations. Connect the equipment into an outlet on , the user is encouraged to try to Part 15 of EMC directive 2004/108/EC with regard to Electromagnetic Compatibility, and 73/23/EEC and 93/68...
... harmful interference to which can radiate radio frequency energy, and if not installed and used in accordance with the instructions, may cause undesired operations. Connect the equipment into an outlet on , the user is encouraged to try to Part 15 of EMC directive 2004/108/EC with regard to Electromagnetic Compatibility, and 73/23/EEC and 93/68...
User Manual
Page 4
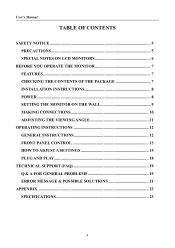
User's Manual TABLE OF CONTENTS SAFETY NOTICE 5 PRECAUTIONS 5 SPECIAL NOTES ON LCD MONITORS 6 BEFORE YOU OPERATE THE MONITOR 7 FEATURES...7 CHECKING THE CONTENTS OF THE PACKAGE 7 INSTALLATION INSTRUCTIONS 8 POWER...8 SETTING THE MONITOR ON THE WALL 9 MAKING CONNECTIONS 10 ADJUSTING THE VIEWING ANGLE 11 OPERATING INSTRUCTIONS 12 GENERAL INSTRUCTIONS 12 FRONT PANEL CONTROL 13 HOW TO ADJUST A SETTINGS 15 PLUG AND PLAY 18 TECHNICAL SUPPORT (FAQ 19 Q & A FOR GENERAL PROBLEMS 19 ERROR MESSAGE & POSSIBLE SOLUTIONS 21 APPENDIX ...23 SPECIFICATIONS 23 4
User's Manual TABLE OF CONTENTS SAFETY NOTICE 5 PRECAUTIONS 5 SPECIAL NOTES ON LCD MONITORS 6 BEFORE YOU OPERATE THE MONITOR 7 FEATURES...7 CHECKING THE CONTENTS OF THE PACKAGE 7 INSTALLATION INSTRUCTIONS 8 POWER...8 SETTING THE MONITOR ON THE WALL 9 MAKING CONNECTIONS 10 ADJUSTING THE VIEWING ANGLE 11 OPERATING INSTRUCTIONS 12 GENERAL INSTRUCTIONS 12 FRONT PANEL CONTROL 13 HOW TO ADJUST A SETTINGS 15 PLUG AND PLAY 18 TECHNICAL SUPPORT (FAQ 19 Q & A FOR GENERAL PROBLEMS 19 ERROR MESSAGE & POSSIBLE SOLUTIONS 21 APPENDIX ...23 SPECIFICATIONS 23 4

User Manual
Page 5
... monitor on the monitor. • Do not attempt to the appliance. User's Manual SAFETY NOTICE 1. The changes or modifications not expressly approved by yourself; Shielded interface cables and AC power cord, if any object into the slot on an unstable cart, stand, or table. Please refer all servicing to qualified service personnel. • The wall socket shall be installed near water, e.g. Do not open...
... monitor on the monitor. • Do not attempt to the appliance. User's Manual SAFETY NOTICE 1. The changes or modifications not expressly approved by yourself; Shielded interface cables and AC power cord, if any object into the slot on an unstable cart, stand, or table. Please refer all servicing to qualified service personnel. • The wall socket shall be installed near water, e.g. Do not open...
User Manual
Page 6
... repair the monitor yourself. It may remain after switching the image, when the same image is recovered slowly by changing the image or turning off the Power Switch and then turn it on again to make sure the flicker disappears. • You may find slightly uneven brightness on the screen depending on the desktop pattern you use. • The LCD screen has effective pixels of the fluorescent light, the screen may flicker...
... repair the monitor yourself. It may remain after switching the image, when the same image is recovered slowly by changing the image or turning off the Power Switch and then turn it on again to make sure the flicker disappears. • You may find slightly uneven brightness on the screen depending on the desktop pattern you use. • The LCD screen has effective pixels of the fluorescent light, the screen may flicker...

User Manual
Page 7
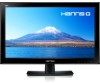
User's Manual BEFORE YOU OPERATE THE MONITOR FEATURES • 60cm / 23.6" Wide Screen TFT Color LCD Monitor • Crisp, Clear Display for Windows • EPA ENERGY STAR® • GP Green Product • Ergonomic Design • Space Saving, Compact Case Design CHECKING THE CONTENTS OF THE PACKAGE The product package should include the following items: LCD Monitor Cables and User manual Power Cord Warranty Card Quick Start Guide User's Manual Audio Cable (optional) VGA Cable 7 DVI Cable (optional)
User's Manual BEFORE YOU OPERATE THE MONITOR FEATURES • 60cm / 23.6" Wide Screen TFT Color LCD Monitor • Crisp, Clear Display for Windows • EPA ENERGY STAR® • GP Green Product • Ergonomic Design • Space Saving, Compact Case Design CHECKING THE CONTENTS OF THE PACKAGE The product package should include the following items: LCD Monitor Cables and User manual Power Cord Warranty Card Quick Start Guide User's Manual Audio Cable (optional) VGA Cable 7 DVI Cable (optional)

User Manual
Page 8
User's Manual INSTALLATION INSTRUCTIONS INSTALL REMOVE Figure.1. A clear click sound will affirm that the base is upside down. 2. Connect the AC-power cord one end to your area. 2. Installing and Removing the Base INSTALLATION: 1. Gently press and hold the 1 clip while pulling the base from the monitor unit they are fully engaged in the base. Make sure that it is connected correctly. 4. Snap the monitor into its base. Flip over the monitor so that...
User's Manual INSTALLATION INSTRUCTIONS INSTALL REMOVE Figure.1. A clear click sound will affirm that the base is upside down. 2. Connect the AC-power cord one end to your area. 2. Installing and Removing the Base INSTALLATION: 1. Gently press and hold the 1 clip while pulling the base from the monitor unit they are fully engaged in the base. Make sure that it is connected correctly. 4. Snap the monitor into its base. Flip over the monitor so that...
User Manual
Page 9
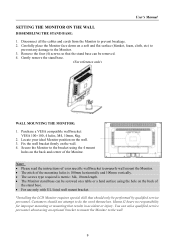
... mounting holes is 100mm horizontally and 100mm vertically. • The screws type required is metric: M4, 10mm length. • The Monitor stand base can be screwed on a table or a hard surface using an optional bracket to mount the Monitor to prevent breakage. 2. Disconnect all the cables and cords from the Monitor to the wall. 9 User's Manual SETTING THE MONITOR ON THE WALL DISSEMBLING THE STAND BASE: 1. You can be performed by qualified service...
... mounting holes is 100mm horizontally and 100mm vertically. • The screws type required is metric: M4, 10mm length. • The Monitor stand base can be screwed on a table or a hard surface using an optional bracket to mount the Monitor to prevent breakage. 2. Disconnect all the cables and cords from the Monitor to the wall. 9 User's Manual SETTING THE MONITOR ON THE WALL DISSEMBLING THE STAND BASE: 1. You can be performed by qualified service...

User Manual
Page 10
User's Manual MAKING CONNECTIONS CONNECTING TO A PC Turn off your monitor and computer. Connect the audio cable between the monitor's audio input and the PC's audio output (green port). 4. Connect one end of the VGA cable to the back of the monitor and connect the other end to the computer's VGA port. 2. Connect one end of the AC power cord to the LCD monitor's AC input socket, and the other end to the computer's DVI port. 3. Figure.2. Connecting to Wall outlet. 5. Plug one end of...
User's Manual MAKING CONNECTIONS CONNECTING TO A PC Turn off your monitor and computer. Connect the audio cable between the monitor's audio input and the PC's audio output (green port). 4. Connect one end of the VGA cable to the back of the monitor and connect the other end to the computer's VGA port. 2. Connect one end of the AC power cord to the LCD monitor's AC input socket, and the other end to the computer's DVI port. 3. Figure.2. Connecting to Wall outlet. 5. Plug one end of...

User Manual
Page 11
User's Manual ADJUSTING THE VIEWING ANGLE • For optimal viewing it is recommended to look at the full face of the monitor, then adjust the monitor's angle to your own preference. • Hold the stand so you do not topple the monitor when you change the monitor's angle. • You are able to adjust the monitor's angle from -5° to place fingers or hands near the...
User's Manual ADJUSTING THE VIEWING ANGLE • For optimal viewing it is recommended to look at the full face of the monitor, then adjust the monitor's angle to your own preference. • Hold the stand so you do not topple the monitor when you change the monitor's angle. • You are able to adjust the monitor's angle from -5° to place fingers or hands near the...
User Manual
Page 12
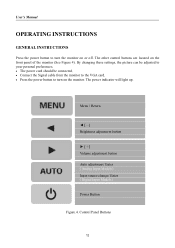
... indicator will light up. User's Manual OPERATING INSTRUCTIONS GENERAL INSTRUCTIONS Press the power button to turn the monitor on or off. The other control buttons are located on the monitor. Control Panel Buttons 12 Menu / Return ◄ [-] Brightness adjustment button ► [+] Volume adjustment button Auto adjustment/ Enter 《Analog Input Models》 Input source change/ Enter 《Digital Input Models》 Power Button Figure.4. By changing these settings, the picture can be adjusted to your personal preferences. • The power cord should be...
... indicator will light up. User's Manual OPERATING INSTRUCTIONS GENERAL INSTRUCTIONS Press the power button to turn the monitor on or off. The other control buttons are located on the monitor. Control Panel Buttons 12 Menu / Return ◄ [-] Brightness adjustment button ► [+] Volume adjustment button Auto adjustment/ Enter 《Analog Input Models》 Input source change/ Enter 《Digital Input Models》 Power Button Figure.4. By changing these settings, the picture can be adjusted to your personal preferences. • The power cord should be...

User Manual
Page 13
...》function during start 「Auto Adjust」 function when using VGA input only. (The auto adjustment function is used to optimize the 「horizontal position」, 「vertical position」,「clock」,and 「phase」.) •【AUTO】Button: 《Digital Input Models》 1. Change Resolution: For similar screen display resolutions (see table below), the screen resolution can be changed by pressing the【MENU button to switch ON/OFF of monitor's power. • Power Indicator: Green - Power On mode. The actual...
...》function during start 「Auto Adjust」 function when using VGA input only. (The auto adjustment function is used to optimize the 「horizontal position」, 「vertical position」,「clock」,and 「phase」.) •【AUTO】Button: 《Digital Input Models》 1. Change Resolution: For similar screen display resolutions (see table below), the screen resolution can be changed by pressing the【MENU button to switch ON/OFF of monitor's power. • Power Indicator: Green - Power On mode. The actual...
User Manual
Page 14
...monitor before cleaning it with a mild detergent solution. Stubborn stains may be removed with a cloth lightly dampened with a soft cloth. NOTES: • Do not install the monitor in a location near heat sources such as radiators or air dusts, or in a place subject to direct sunlight, or excessive dust or mechanical vibration or shock. • Save...@60Hz ↔ 1600×900@60Hz ** The screen resolutions available will damage the cabinet. Never use strong solvents such as it was originally packed at the factory. • To keep the monitor looking new, periodically clean it . 14
...monitor before cleaning it with a mild detergent solution. Stubborn stains may be removed with a cloth lightly dampened with a soft cloth. NOTES: • Do not install the monitor in a location near heat sources such as radiators or air dusts, or in a place subject to direct sunlight, or excessive dust or mechanical vibration or shock. • Save...@60Hz ↔ 1600×900@60Hz ** The screen resolutions available will damage the cabinet. Never use strong solvents such as it was originally packed at the factory. • To keep the monitor looking new, periodically clean it . 14

User Manual
Page 15
... change between analog (VGA) or Digital (DVI) source. Select「BRIGHTNESS」option to adjust the contrast value. Also, you may select the「ACTIVE CONTRAST」option. Enter the option and select Analog or Digital. [Dual input mode optional] AUTO SEARCH From the Signal Selection menu, select the 「AUTO SEARCH」 option to activate or deactivate the automatic signal search function. [For DVI/ HDMI Input only] COLOR SETTING WARM NATURE (6500K) COOL USER IMAGE SETTING Adjust...
... change between analog (VGA) or Digital (DVI) source. Select「BRIGHTNESS」option to adjust the contrast value. Also, you may select the「ACTIVE CONTRAST」option. Enter the option and select Analog or Digital. [Dual input mode optional] AUTO SEARCH From the Signal Selection menu, select the 「AUTO SEARCH」 option to activate or deactivate the automatic signal search function. [For DVI/ HDMI Input only] COLOR SETTING WARM NATURE (6500K) COOL USER IMAGE SETTING Adjust...
User Manual
Page 16
...;H-POSITION」option to shift the screen image to reduce the horizontal flicker of the display. Enter the option and adjust the level. Enter the option and adjust the level. [For VGA only] Select the 「V-POSITION」option to view videos with complete image. (VIDEO MODE only functions for inputs from -2 to DVI ports for video transmission. User's Manual H-POSITION V-POSITION CLOCK PHASE SHARPNESS VIDEO MODE RESPONSE TIME OSD SETTING LANGUAGE H-POSITION V-POSITION TRANSPARENCY display, which may cause the screen showing black...
...;H-POSITION」option to shift the screen image to reduce the horizontal flicker of the display. Enter the option and adjust the level. Enter the option and adjust the level. [For VGA only] Select the 「V-POSITION」option to view videos with complete image. (VIDEO MODE only functions for inputs from -2 to DVI ports for video transmission. User's Manual H-POSITION V-POSITION CLOCK PHASE SHARPNESS VIDEO MODE RESPONSE TIME OSD SETTING LANGUAGE H-POSITION V-POSITION TRANSPARENCY display, which may cause the screen showing black...
User Manual
Page 17
.... Display Horizontal frequency/Vertical frequency/Resolution information. 17 Select the「MUTE」option to the monitor's default setting. Select 「OSD TIME-OUT」option to set AUDIO INPUT to change the volume level. While transferring via the HDMI port, it is recommended to select AUDIO INPUT as PC, and make sure the PC audio output cable is recommended to set the OSD time out from 10 to models with incorporated audio.] ● By high volume...
.... Display Horizontal frequency/Vertical frequency/Resolution information. 17 Select the「MUTE」option to the monitor's default setting. Select 「OSD TIME-OUT」option to set AUDIO INPUT to change the volume level. While transferring via the HDMI port, it is recommended to select AUDIO INPUT as PC, and make sure the PC audio output cable is recommended to set the OSD time out from 10 to models with incorporated audio.] ● By high volume...

User Manual
Page 18
... over the DDC2B channel. User's Manual PLUG AND PLAY Plug & Play DDC2B Feature This monitor is a bidirectional data channel based on the level of its display capabilities. THIS MONITOR WILL APPEAR TO BE NON-FUNCTIONAL IF THERE IS NO VIDEO INPUT SIGNAL. IN ORDER FOR THIS MONITOR TO OPERATE PROPERLY, THERE MUST BE A VIDEO INPUT SIGNAL. 18 It allows the monitor to the VESA DDC STANDARD. The...
... over the DDC2B channel. User's Manual PLUG AND PLAY Plug & Play DDC2B Feature This monitor is a bidirectional data channel based on the level of its display capabilities. THIS MONITOR WILL APPEAR TO BE NON-FUNCTIONAL IF THERE IS NO VIDEO INPUT SIGNAL. IN ORDER FOR THIS MONITOR TO OPERATE PROPERLY, THERE MUST BE A VIDEO INPUT SIGNAL. 18 It allows the monitor to the VESA DDC STANDARD. The...
User Manual
Page 19
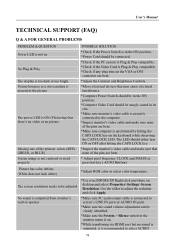
.... *Adjust the Contrast and Brightness Controls. *Move electrical devices that none of the primary colors (RED, GREEN, or BLUE) Screen image is operational by hitting the CAPS LOCK key on . *While transferring via HDMI port but no sound is outputted, it is ON (Flickering) but there's no video or no picture. POSSIBLE SOLUTION *Check if the Power Switch is in the ON position. *Power Cord should be connected. *Check if the PC system is Plug & Play compatible. *Check...
.... *Adjust the Contrast and Brightness Controls. *Move electrical devices that none of the primary colors (RED, GREEN, or BLUE) Screen image is operational by hitting the CAPS LOCK key on . *While transferring via HDMI port but no sound is outputted, it is ON (Flickering) but there's no video or no picture. POSSIBLE SOLUTION *Check if the Power Switch is in the ON position. *Power Cord should be connected. *Check if the PC system is Plug & Play compatible. *Check...

User Manual
Page 20
... And if you need to use the recommended display resolution that is supported by the monitor. 3. Install the latest Windows 7 video driver of your video card can support Windows 7. 2. If your video card. 2. Suggest to do the following : 1. User's Manual INPUT as a PC option, and make sure PC audio output cable is connected to monitor's LINE IN port(or AUDIO IN port). [For HDMI Input only] Addendum related to Windows 7 When you encounter display problem under Windows 7, you still have display problem after doing the...
... And if you need to use the recommended display resolution that is supported by the monitor. 3. Install the latest Windows 7 video driver of your video card can support Windows 7. 2. If your video card. 2. Suggest to do the following : 1. User's Manual INPUT as a PC option, and make sure PC audio output cable is connected to monitor's LINE IN port(or AUDIO IN port). [For HDMI Input only] Addendum related to Windows 7 When you encounter display problem under Windows 7, you still have display problem after doing the...
User Manual
Page 21
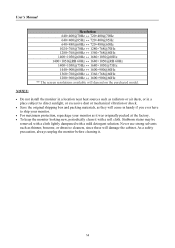
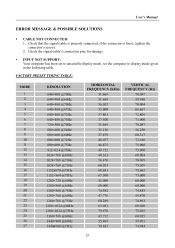
User's Manual ERROR MESSAGE & POSSIBLE SOLUTIONS CABLE NOT CONNECTED: 1. Check the signal-cable's connection pins for damage. FACTORY PRESET TIMING TABLE: MODE 1 2 3 4 5 6 7 8 9 10 11 12 13 14 15 16 17 18 19 20 21 22 23 24 25 26 27 RESOLUTION...215;768 @60Hz 1440×900 @60Hz 1440x900 @75Hz HORIZONTAL FREQUENCY (KHz) 31.469 31.469 36.052 35.000 ...INPUT NOT SUPPORT : Your computer has been set to unsuitable display mode, set the computer to display mode given in the following table. Check that the signal-cable is properly connected, if the connector is loose, tighten the connector's screws...
User's Manual ERROR MESSAGE & POSSIBLE SOLUTIONS CABLE NOT CONNECTED: 1. Check the signal-cable's connection pins for damage. FACTORY PRESET TIMING TABLE: MODE 1 2 3 4 5 6 7 8 9 10 11 12 13 14 15 16 17 18 19 20 21 22 23 24 25 26 27 RESOLUTION...215;768 @60Hz 1440×900 @60Hz 1440x900 @75Hz HORIZONTAL FREQUENCY (KHz) 31.469 31.469 36.052 35.000 ...INPUT NOT SUPPORT : Your computer has been set to unsuitable display mode, set the computer to display mode given in the following table. Check that the signal-cable is properly connected, if the connector is loose, tighten the connector's screws...
User Manual
Page 23
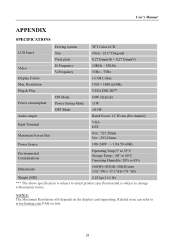
....5 lb) *** The above specification is subject to actual product specification and is subject to www.hannsg.com FAQ section. 23 Related issue can refer to change without prior notice. User's Manual APPENDIX SPECIFICATIONS LCD Panel Driving system Size TFT Color LCD 60cm / 23.6" Diagonal Pixel pitch 0,2715mm(H) × 0,2715mm(V) Video H-Frequency V-Frequency 24KHz - 83KHz 55Hz - 75Hz Display Colors 16.7M Colors Max. NOTES: The Maximum Resolution will depends on the display card supporting.
....5 lb) *** The above specification is subject to actual product specification and is subject to www.hannsg.com FAQ section. 23 Related issue can refer to change without prior notice. User's Manual APPENDIX SPECIFICATIONS LCD Panel Driving system Size TFT Color LCD 60cm / 23.6" Diagonal Pixel pitch 0,2715mm(H) × 0,2715mm(V) Video H-Frequency V-Frequency 24KHz - 83KHz 55Hz - 75Hz Display Colors 16.7M Colors Max. NOTES: The Maximum Resolution will depends on the display card supporting.


