

User Manual
Page 2
... limits for a Class B digital device, pursuant to provide reasonable protection against harmful interference in the United States and other countries. 2 User's Manual Before operating the monitor, please read this device must accept any interference received, including interference that interference will not occur in accordance with Parts 15 of the FCC Rule...
... limits for a Class B digital device, pursuant to provide reasonable protection against harmful interference in the United States and other countries. 2 User's Manual Before operating the monitor, please read this device must accept any interference received, including interference that interference will not occur in accordance with Parts 15 of the FCC Rule...

User Manual
Page 4
User's Manual TABLE OF CONTENTS SAFETY NOTICE ...5 PRECAUTIONS...5 SPECIAL NOTES ON LCD MONITORS 6 BEFORE YOU OPERATE THE MONITOR 7 FEATURES...7 CHECKING THE CONTENTS OF THE PACKAGE 7 INSTALLATION INSTRUCTIONS 8 POWER...8 MAKING CONNECTIONS 9 ADJUSTING THE VIEWING ANGLE 10 OPERATING INSTRUCTIONS 11 GENERAL INSTRUCTIONS 11 FRONT PANEL CONTROL 12 HOW TO ADJUST A SETTINGS 13 PLUG AND PLAY 16 TECHNICAL SUPPORT (FAQ 17 Q & A FOR GENERAL PROBLEMS 17 ERROR MESSAGE & POSSIBLE SOLUTIONS 19 APPENDIX ...21 SPECIFICATIONS 21 4
User's Manual TABLE OF CONTENTS SAFETY NOTICE ...5 PRECAUTIONS...5 SPECIAL NOTES ON LCD MONITORS 6 BEFORE YOU OPERATE THE MONITOR 7 FEATURES...7 CHECKING THE CONTENTS OF THE PACKAGE 7 INSTALLATION INSTRUCTIONS 8 POWER...8 MAKING CONNECTIONS 9 ADJUSTING THE VIEWING ANGLE 10 OPERATING INSTRUCTIONS 11 GENERAL INSTRUCTIONS 11 FRONT PANEL CONTROL 12 HOW TO ADJUST A SETTINGS 13 PLUG AND PLAY 16 TECHNICAL SUPPORT (FAQ 17 Q & A FOR GENERAL PROBLEMS 17 ERROR MESSAGE & POSSIBLE SOLUTIONS 19 APPENDIX ...21 SPECIFICATIONS 21 4

User Manual
Page 5
...electric shock. If you to qualified personnel only. Shielded interface cables and AC power cord, if any object into the slot on the monitor cabinet. Do not open the cabinet. near the equipment and shall be used in order to correct such interference. To ensure reliable ...near a bathtub, washbowl, kitchen sink, laundry tub, swimming pool or in a bookcase or cabinet unless proper ventilation is provided. • The monitor should be used for ventilation. It could void the user's authority to this equipment. Use only a cart or stand recommended by the manufacturer and...
...electric shock. If you to qualified personnel only. Shielded interface cables and AC power cord, if any object into the slot on the monitor cabinet. Do not open the cabinet. near the equipment and shall be used in order to correct such interference. To ensure reliable ...near a bathtub, washbowl, kitchen sink, laundry tub, swimming pool or in a bookcase or cabinet unless proper ventilation is provided. • The monitor should be used for ventilation. It could void the user's authority to this equipment. Use only a cart or stand recommended by the manufacturer and...

User Manual
Page 6
User's Manual SPECIAL NOTES ON LCD MONITORS The following symptoms are normal with LCD monitor and do not indicate a problem. • Due to the nature of the fluorescent light, the screen may flicker during initial use . • The LCD screen ... of 99.99% or more. Do not attempt to the nature of the LCD screen, an afterimage of the time. • Due to repair the monitor yourself. FOR LAMP SPECIFIC DISPOSAL INFORMATION CHECK WWW.LAMPRECYCLE.ORG. 6 Lamp Disposal LAMP(S) INSIDE THIS PRODUCT CONTAIN MERCURY AND MUST BE RECYCLED OR DISPOSED OF...
User's Manual SPECIAL NOTES ON LCD MONITORS The following symptoms are normal with LCD monitor and do not indicate a problem. • Due to the nature of the fluorescent light, the screen may flicker during initial use . • The LCD screen ... of 99.99% or more. Do not attempt to the nature of the LCD screen, an afterimage of the time. • Due to repair the monitor yourself. FOR LAMP SPECIFIC DISPOSAL INFORMATION CHECK WWW.LAMPRECYCLE.ORG. 6 Lamp Disposal LAMP(S) INSIDE THIS PRODUCT CONTAIN MERCURY AND MUST BE RECYCLED OR DISPOSED OF...

User Manual
Page 7
BEFORE YOU OPERATE THE MONITOR User's Manual FEATURES • 22" Wide screen TFT Color LCD Monitor • Crisp, Clear Display for Windows • Recommended Resolutions: 1680X 1050@60Hz • EPA ENERGY STAR® • Ergonomic Design • Space Saving, Compact Case Design CHECKING THE CONTENTS OF THE PACKAGE The product package should include the following items: LCD Monitor Screen Base Cables and User manual Power Cord VGA Cable HDMI Cable (Dual input mode optional) User's manual Warranty card 7 Audio Cable
BEFORE YOU OPERATE THE MONITOR User's Manual FEATURES • 22" Wide screen TFT Color LCD Monitor • Crisp, Clear Display for Windows • Recommended Resolutions: 1680X 1050@60Hz • EPA ENERGY STAR® • Ergonomic Design • Space Saving, Compact Case Design CHECKING THE CONTENTS OF THE PACKAGE The product package should include the following items: LCD Monitor Screen Base Cables and User manual Power Cord VGA Cable HDMI Cable (Dual input mode optional) User's manual Warranty card 7 Audio Cable

User Manual
Page 8
...that the base is required.) 3. POWER POWER SOURCE: 1. User's Manual INSTALLATION INSTRUCTIONS INSTALL REMOVE Figure.1. A clear click sound will affirm that holds the monitor in either 100/120V AC or 220/240V AC voltage area (No user adjustment is connected correctly. 4. Flip over the... monitor so that allows operation in place. 3. This LCD monitor has an Internal universal power supply that it is securely attached to your area. 2. Gently press and hold the 2 clips ...
...that the base is required.) 3. POWER POWER SOURCE: 1. User's Manual INSTALLATION INSTRUCTIONS INSTALL REMOVE Figure.1. A clear click sound will affirm that holds the monitor in either 100/120V AC or 220/240V AC voltage area (No user adjustment is connected correctly. 4. Flip over the... monitor so that allows operation in place. 3. This LCD monitor has an Internal universal power supply that it is securely attached to your area. 2. Gently press and hold the 2 clips ...

User Manual
Page 9
...Audio Input 9 Turn on your computer before performing the procedure below. 1. Connect one end of the HDMI cable (Optional) to the back of the monitor and connect the other end to the computer's D-Sub port. 2. Figure.2. Connecting to the computer's HDMI port. 3. MAKING CONNECTIONS User's Manual ...CONNECTING TO A PC Turn off your monitor and computer. VGA Input 2. HDMI Input 4. Connect one end of the VGA cable to the back of the AC power cord to the ...
...Audio Input 9 Turn on your computer before performing the procedure below. 1. Connect one end of the HDMI cable (Optional) to the back of the monitor and connect the other end to the computer's D-Sub port. 2. Figure.2. Connecting to the computer's HDMI port. 3. MAKING CONNECTIONS User's Manual ...CONNECTING TO A PC Turn off your monitor and computer. VGA Input 2. HDMI Input 4. Connect one end of the VGA cable to the back of the AC power cord to the ...

User Manual
Page 10
...recommended to look at the full face of the monitor, then adjust the monitor's angle to your own preference. • Hold the stand so you do not topple the monitor when you change the monitor's angle. • You are able to adjust the monitor's angle from -5° to place fingers or hands... near the hinges when tilting the monitor, otherwise pinching can result. 10 Monitor Angle NOTES: • Do not touch the LCD...
...recommended to look at the full face of the monitor, then adjust the monitor's angle to your own preference. • Hold the stand so you do not topple the monitor when you change the monitor's angle. • You are able to adjust the monitor's angle from -5° to place fingers or hands... near the hinges when tilting the monitor, otherwise pinching can result. 10 Monitor Angle NOTES: • Do not touch the LCD...
User Manual
Page 11
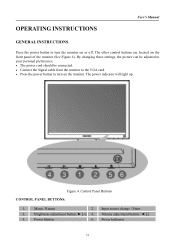
...Figure.4. Brightness adjustment button /► [+] 4. OPERATING INSTRUCTIONS User's Manual GENERAL INSTRUCTIONS Press the power button to turn the monitor on the front panel of the monitor (See Figure 4). By changing these settings, the picture can be adjusted to your personal preferences. • The power cord... should be connected. • Connect the Signal cable from the monitor to the VGA card. • Press the power button to turn on the monitor. Control Panel Buttons CONTROL PANEL BUTTONS: 1. Power Button 6. Power Indicator 11
...Figure.4. Brightness adjustment button /► [+] 4. OPERATING INSTRUCTIONS User's Manual GENERAL INSTRUCTIONS Press the power button to turn the monitor on the front panel of the monitor (See Figure 4). By changing these settings, the picture can be adjusted to your personal preferences. • The power cord... should be connected. • Connect the Signal cable from the monitor to the VGA card. • Press the power button to turn on the monitor. Control Panel Buttons CONTROL PANEL BUTTONS: 1. Power Button 6. Power Indicator 11

User Manual
Page 12
... shock. • Save the original shipping box and packing materials, as it was originally packed at the factory. • To keep the monitor looking new, periodically clean it . 12 Never use strong solvents such as "confirmation" function during start 「Auto Adjust」 function when ...using VGA input only. (The auto adjustment function is off or return to switch ON/OFF of monitor's power. • Power Indicator: Blue - Press and hold this button to the previous menu. 2. Power Saving mode. • MENU / ENTER: ...
... shock. • Save the original shipping box and packing materials, as it was originally packed at the factory. • To keep the monitor looking new, periodically clean it . 12 Never use strong solvents such as "confirmation" function during start 「Auto Adjust」 function when ...using VGA input only. (The auto adjustment function is off or return to switch ON/OFF of monitor's power. • Power Indicator: Blue - Press and hold this button to the previous menu. 2. Power Saving mode. • MENU / ENTER: ...

User Manual
Page 15
... DDC/CI FACTORY RESET INFORMATION User's Manual recommended to select AUDIO INPUT as PC, and make sure the PC audio output cable is connected to monitor's LINE IN (or AUDIO IN) port. [For HDMI Input only] Select the 「VOLUME」option to switch the function On or Off. Enter the.../CI」option to switch the function On or Off. [Dual input mode optional] Select the 「FACTORY RESET」option to reset to the monitor's default setting.
... DDC/CI FACTORY RESET INFORMATION User's Manual recommended to select AUDIO INPUT as PC, and make sure the PC audio output cable is connected to monitor's LINE IN (or AUDIO IN) port. [For HDMI Input only] Select the 「VOLUME」option to switch the function On or Off. Enter the.../CI」option to switch the function On or Off. [Dual input mode optional] Select the 「FACTORY RESET」option to reset to the monitor's default setting.

User Manual
Page 16
.... When there is no video-input signal present. The DDC2B is equipped with VESA DDC2B capabilities according to the VESA DDC STANDARD. THIS MONITOR WILL APPEAR TO BE NON-FUNCTIONAL IF THERE IS NO VIDEO INPUT SIGNAL. This feature is completely off. The host can request EDID information... on the I²C protocol. After the video input signal is restored, full power is restored and the display is no video input signal this monitor, following a time-out period, will automatically switch to a "Screen Saver" feature except the display is designed to inform the host system of ...
.... When there is no video-input signal present. The DDC2B is equipped with VESA DDC2B capabilities according to the VESA DDC STANDARD. THIS MONITOR WILL APPEAR TO BE NON-FUNCTIONAL IF THERE IS NO VIDEO INPUT SIGNAL. This feature is completely off. The host can request EDID information... on the I²C protocol. After the video input signal is restored, full power is restored and the display is no video input signal this monitor, following a time-out period, will automatically switch to a "Screen Saver" feature except the display is designed to inform the host system of ...

User Manual
Page 17
... has color defects (white does not look white) *Adjust RGB color or select color temperature. The screen resolution needs to the computer. *Inspect monitor's video cable and make sure that may cause electrical interference. *Computer Power Switch should be in the ON position. *Computer Video Card should be...Resolution. Picture bounces or a wave pattern is present in the ON position. *Power Cord should be snugly seated in its slot. *Make sure monitor's video cable is properly connected to be clearly identified. *Make sure the System > Silence option in speaker *Use win 2000/ME/XP Right...
... has color defects (white does not look white) *Adjust RGB color or select color temperature. The screen resolution needs to the computer. *Inspect monitor's video cable and make sure that may cause electrical interference. *Computer Power Switch should be in the ON position. *Computer Video Card should be...Resolution. Picture bounces or a wave pattern is present in the ON position. *Power Cord should be snugly seated in its slot. *Make sure monitor's video cable is properly connected to be clearly identified. *Make sure the System > Silence option in speaker *Use win 2000/ME/XP Right...

User Manual
Page 18
User's Manual is on. *While transferring via HDMI port but no sound is outputted, it is recommended to select AUDIO INPUT as a PC option, and make sure PC audio output cable is connected to monitor's LINE IN port(or AUDIO IN port). [For HDMI Input only] 18
User's Manual is on. *While transferring via HDMI port but no sound is outputted, it is recommended to select AUDIO INPUT as a PC option, and make sure PC audio output cable is connected to monitor's LINE IN port(or AUDIO IN port). [For HDMI Input only] 18


