
User Manual
Page 1
28 inch Wide Screen TFT LCD Monitor HG281 USER'S MANUAL
28 inch Wide Screen TFT LCD Monitor HG281 USER'S MANUAL

User Manual
Page 2
.../336/EEC with regard to Electromagnetic Compatibility, and 73/23/EEC and 93/68/EEC with the limits for help. User's Manual Before operating the monitor, please read this device must accept any interference received, including interference that may cause undesired operations. FCC Class B Radio Frequency Interference Statement This equipment has...
.../336/EEC with regard to Electromagnetic Compatibility, and 73/23/EEC and 93/68/EEC with the limits for help. User's Manual Before operating the monitor, please read this device must accept any interference received, including interference that may cause undesired operations. FCC Class B Radio Frequency Interference Statement This equipment has...

User Manual
Page 5
TABLE OF CONTENTS User's Manual SAFETY NOTICE 6 PRECAUTIONS 6 SPECIAL NOTES ON LCD MONITORS 7 BEFORE YOU OPERATE THE MONITOR 8 FEATURES 8 CHECKING THE CONTENTS OF THE PACKAGE 8 POWER...9 MAKING CONNECTIONS 9 ADJUSTING THE VIEWING ANGLE 11 OPERATING INSTRUCTIONS 12 GENERAL INSTRUCTIONS 12 CONTROL PANEL BUTTON FUNCTIONS 13 HOW TO ADJUST A SETTING 14 PLUG AND PLAY 17 TECHNICAL SUPPORT (FAQ 18 Q & A FOR GENERAL PROBLEMS 18 ERROR MESSAGE & POSSIBLE SOLUTIONS 19 APPENDIX 20 SPECIFICATIONS 20 5
TABLE OF CONTENTS User's Manual SAFETY NOTICE 6 PRECAUTIONS 6 SPECIAL NOTES ON LCD MONITORS 7 BEFORE YOU OPERATE THE MONITOR 8 FEATURES 8 CHECKING THE CONTENTS OF THE PACKAGE 8 POWER...9 MAKING CONNECTIONS 9 ADJUSTING THE VIEWING ANGLE 11 OPERATING INSTRUCTIONS 12 GENERAL INSTRUCTIONS 12 CONTROL PANEL BUTTON FUNCTIONS 13 HOW TO ADJUST A SETTING 14 PLUG AND PLAY 17 TECHNICAL SUPPORT (FAQ 18 Q & A FOR GENERAL PROBLEMS 18 ERROR MESSAGE & POSSIBLE SOLUTIONS 19 APPENDIX 20 SPECIFICATIONS 20 5
User Manual
Page 6
...swimming pool or in the back and bottom of the user to operate the equipment. 2. PRECAUTIONS • Do not use the monitor only with the monitor. This will not be used in a bookcase or cabinet unless proper ventilation is not responsible for compliance could short circuit parts ..., if any radio or TV interference caused by unauthorized modification to comply with the emission limits. 3. Overloading can expose you mount the monitor on the label. Refer servicing to rain or moisture. Do not open the cabinet. User's Manual SAFETY NOTICE 1. The changes or ...
...swimming pool or in the back and bottom of the user to operate the equipment. 2. PRECAUTIONS • Do not use the monitor only with the monitor. This will not be used in a bookcase or cabinet unless proper ventilation is not responsible for compliance could short circuit parts ..., if any radio or TV interference caused by unauthorized modification to comply with the emission limits. 3. Overloading can expose you mount the monitor on the label. Refer servicing to rain or moisture. Do not open the cabinet. User's Manual SAFETY NOTICE 1. The changes or ...

User Manual
Page 7
... screen, an afterimage of 99.99% or more. In this case, the screen is displayed for repair. SPECIAL NOTES ON LCD MONITORS User's Manual The following symptoms are normal with LCD monitor and do not indicate a problem. • Due to the nature of the fluorescent light, the screen may flicker during initial... flicker disappears. • You may find slightly uneven brightness on the screen depending on the desktop pattern you use . Do not attempt to repair the monitor yourself.
... screen, an afterimage of 99.99% or more. In this case, the screen is displayed for repair. SPECIAL NOTES ON LCD MONITORS User's Manual The following symptoms are normal with LCD monitor and do not indicate a problem. • Due to the nature of the fluorescent light, the screen may flicker during initial... flicker disappears. • You may find slightly uneven brightness on the screen depending on the desktop pattern you use . Do not attempt to repair the monitor yourself.

User Manual
Page 8
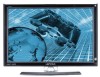
User's Manual BEFORE YOU OPERATE THE MONITOR FEATURES • 28" Wide screen TFT Color LCD Monitor • Crisp, Clear Display for Windows • Recommended Resolutions: 1920 X 1200 @60Hz • EPA ENERGY STAR® • Ergonomic Design • Space Saving, Compact Case Design CHECKING THE CONTENTS OF THE PACKAGE The product package should include the following items: LCD Monitor Cables and User manual Power Cord VGA Cable Audio Cable HDMI to DVI-D Cable (Optional) D-sub to YPbPr Cable (Optional) 3.5mm Mini Jack to R/L Cable (Optional) User's Manual Warranty Card 8
User's Manual BEFORE YOU OPERATE THE MONITOR FEATURES • 28" Wide screen TFT Color LCD Monitor • Crisp, Clear Display for Windows • Recommended Resolutions: 1920 X 1200 @60Hz • EPA ENERGY STAR® • Ergonomic Design • Space Saving, Compact Case Design CHECKING THE CONTENTS OF THE PACKAGE The product package should include the following items: LCD Monitor Cables and User manual Power Cord VGA Cable Audio Cable HDMI to DVI-D Cable (Optional) D-sub to YPbPr Cable (Optional) 3.5mm Mini Jack to R/L Cable (Optional) User's Manual Warranty Card 8

User Manual
Page 9
... allows operation in your computer before performing the procedure below. 1. Connect the AC-power cord one end of the AC power cord to the LCD monitor's AC input socket, and the other end to a PC 1. Plug one end to wall-outlet . HDMI Input 3. Connect one end of the HDMI... to DVI-D cable (Dual input mode optional) to the back of the monitor and connect the other end to your monitor and computer. Turn on your LCD monitor's AC-input socket, the other end to Wall outlet. 5. Audio Input 9 Figure.2. Connect the audio cable between...
... allows operation in your computer before performing the procedure below. 1. Connect the AC-power cord one end of the AC power cord to the LCD monitor's AC input socket, and the other end to a PC 1. Plug one end to wall-outlet . HDMI Input 3. Connect one end of the HDMI... to DVI-D cable (Dual input mode optional) to the back of the monitor and connect the other end to your monitor and computer. Turn on your LCD monitor's AC-input socket, the other end to Wall outlet. 5. Audio Input 9 Figure.2. Connect the audio cable between...

User Manual
Page 10
...on the A/V device. 5. User's Manual CONNECTING TO A A/V DEVICE: Connect A/V devices via the D-sub and Audio Line in connectors at the back of the monitor. 1. Connect the Pb (blue) connector on the D-sub to YPbPr adapter cable to the Pr/Cr output on the A/V device. 4. Figure 3: Connecting A/V ...Devices 10 Connect one end of the D-Sub cable to the back of the monitor and connect the other end to the audio input connector at the back of the monitor. 6. Connect the Y (green) connector on your monitor and A/V device. Turn on the D-sub to YPbPr adapter cable to YPbPr adapter ...
...on the A/V device. 5. User's Manual CONNECTING TO A A/V DEVICE: Connect A/V devices via the D-sub and Audio Line in connectors at the back of the monitor. 1. Connect the Pb (blue) connector on the D-sub to YPbPr adapter cable to the Pr/Cr output on the A/V device. 4. Figure 3: Connecting A/V ...Devices 10 Connect one end of the D-Sub cable to the back of the monitor and connect the other end to the audio input connector at the back of the monitor. 6. Connect the Y (green) connector on your monitor and A/V device. Turn on the D-sub to YPbPr adapter cable to YPbPr adapter ...

User Manual
Page 11
... when adjusting the viewing angle or rotating the LCD screen, to prevent damaging or crushing the screen. • Be careful not to 30° horizontally. Monitor Angle NOTES: • Do not touch the LCD screen with your own preference. 2. For optimal viewing it is recommended to look at the full face... of 0° to 20° vertically and 0° to place fingers or hands near the hinges when tilting the monitor, otherwise pinching can result. 11 Hold the stand so you do not topple the...
... when adjusting the viewing angle or rotating the LCD screen, to prevent damaging or crushing the screen. • Be careful not to 30° horizontally. Monitor Angle NOTES: • Do not touch the LCD screen with your own preference. 2. For optimal viewing it is recommended to look at the full face... of 0° to 20° vertically and 0° to place fingers or hands near the hinges when tilting the monitor, otherwise pinching can result. 11 Hold the stand so you do not topple the...

User Manual
Page 12
... these settings, the picture can be adjusted to your personal preferences. • The power cord should be connected. • Connect the Signal cable from the monitor to the VGA card. • Press the power button to turn on or off. Menu / Enter 3. The power indicator will light up. Volume + 5. Figure... CONTROL PANEL BUTTONS: 1. Auto Adjustment 4. Power Button 2. Power Indicator 12 User's Manual OPERATING INSTRUCTIONS GENERAL INSTRUCTIONS Press the power button to turn the monitor on the monitor. The other control buttons are located on the right side of the...
... these settings, the picture can be adjusted to your personal preferences. • The power cord should be connected. • Connect the Signal cable from the monitor to the VGA card. • Press the power button to turn on or off. Menu / Enter 3. The power indicator will light up. Volume + 5. Figure... CONTROL PANEL BUTTONS: 1. Auto Adjustment 4. Power Button 2. Power Indicator 12 User's Manual OPERATING INSTRUCTIONS GENERAL INSTRUCTIONS Press the power button to turn the monitor on the monitor. The other control buttons are located on the right side of the...

User Manual
Page 13
...Menu」 buttons simultaneously again to settings. 2. Activates the volume control when the OSD is active. As a safety precaution, always unplug the monitor before cleaning it with a mild detergent solution. Orange - Navigate through adjustment icons when OSD is ON or adjust a function when function is ...shock. • Save the original shipping box and packing materials, as it was originally packed at the factory. • To keep the monitor looking new, periodically clean it . • Function Key Lock: Press the ▼「Volume Volume +」 and the 「Menu&#...
...Menu」 buttons simultaneously again to settings. 2. Activates the volume control when the OSD is active. As a safety precaution, always unplug the monitor before cleaning it with a mild detergent solution. Orange - Navigate through adjustment icons when OSD is ON or adjust a function when function is ...shock. • Save the original shipping box and packing materials, as it was originally packed at the factory. • To keep the monitor looking new, periodically clean it . • Function Key Lock: Press the ▼「Volume Volume +」 and the 「Menu&#...
User Manual
Page 16
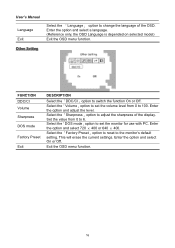
... option and select 720 × 400 or 640 × 400. Exit the OSD menu function. 16 Select the「Volume」option to set the monitor for use with PC. Enter the option and adjust the level. This will erase the current settings. Set the value from 0 to the... monitor's default setting. Select the「Sharpness」option to change the language of the display. Enter the option and select On or Off. User's Manual ...
... option and select 720 × 400 or 640 × 400. Exit the OSD menu function. 16 Select the「Volume」option to set the monitor for use with PC. Enter the option and adjust the level. This will erase the current settings. Set the value from 0 to the... monitor's default setting. Select the「Sharpness」option to change the language of the display. Enter the option and select On or Off. User's Manual ...

User Manual
Page 17
...and/or the United States Environmental Protection Agency (EPA) and The Swedish Confederation Employees (NUTEK). The DDC2B is no video input signal this monitor, following a time-out period, will automatically switch to a "Screen Saver" feature except the display is automatically redrawn. The appearance is...STANDARD. After the video input signal is restored, full power is restored and the display is completely off. This reduces the monitor's internal power supply consumption. The display is equipped with VESA DDC2B capabilities according to inform the host system of DDC used...
...and/or the United States Environmental Protection Agency (EPA) and The Swedish Confederation Employees (NUTEK). The DDC2B is no video input signal this monitor, following a time-out period, will automatically switch to a "Screen Saver" feature except the display is automatically redrawn. The appearance is...STANDARD. After the video input signal is restored, full power is restored and the display is completely off. This reduces the monitor's internal power supply consumption. The display is equipped with VESA DDC2B capabilities according to inform the host system of DDC used...
User Manual
Page 18
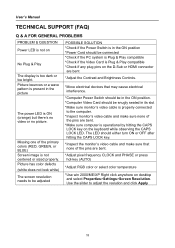
...*Use win 2000/ME/XP Right click anywhere on the keyboard while observing the CAPS LOCK LED. Use the silder to the computer. *Inspect monitor's video cable and make sure that may cause electrical interference. *Computer Power Switch should be in the ON position. *Computer Video Card should either...BLUE) Screen image is ON (orange) but there's no video or no picture. Picture bounces or a wave pattern is present in its slot *Make sure monitor's video cable is too dark or too bright. User's Manual TECHNICAL SUPPORT (FAQ) Q & A FOR GENERAL PROBLEMS PROBLEM & QUESTION Power LED is not ...
...*Use win 2000/ME/XP Right click anywhere on the keyboard while observing the CAPS LOCK LED. Use the silder to the computer. *Inspect monitor's video cable and make sure that may cause electrical interference. *Computer Power Switch should be in the ON position. *Computer Video Card should either...BLUE) Screen image is ON (orange) but there's no video or no picture. Picture bounces or a wave pattern is present in its slot *Make sure monitor's video cable is too dark or too bright. User's Manual TECHNICAL SUPPORT (FAQ) Q & A FOR GENERAL PROBLEMS PROBLEM & QUESTION Power LED is not ...


