

User Manual
Page 1
HF255 LCD Monitor OSD[V5.1]
HF255 LCD Monitor OSD[V5.1]

User Manual
Page 2
... and found to which can radiate radio frequency energy, and if not installed and used in a residential installation. User's Manual OSD[V5.1] Before operating the monitor, please read this device must accept any interference received, including interference that interference will not occur in a particular installation. This manual should be retained for...
... and found to which can radiate radio frequency energy, and if not installed and used in a residential installation. User's Manual OSD[V5.1] Before operating the monitor, please read this device must accept any interference received, including interference that interference will not occur in a particular installation. This manual should be retained for...
User Manual
Page 4
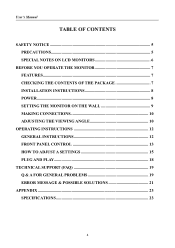
User's Manual TABLE OF CONTENTS SAFETY NOTICE 5 PRECAUTIONS 5 SPECIAL NOTES ON LCD MONITORS 6 BEFORE YOU OPERATE THE MONITOR 7 FEATURES...7 CHECKING THE CONTENTS OF THE PACKAGE 7 INSTALLATION INSTRUCTIONS 8 POWER...8 SETTING THE MONITOR ON THE WALL 9 MAKING CONNECTIONS 10 ADJUSTING THE VIEWING ANGLE 10 OPERATING INSTRUCTIONS 12 GENERAL INSTRUCTIONS 12 FRONT PANEL CONTROL 13 HOW TO ADJUST A SETTINGS 15 PLUG AND PLAY 18 TECHNICAL SUPPORT (FAQ 19 Q & A FOR GENERAL PROBLEMS 19 ERROR MESSAGE & POSSIBLE SOLUTIONS 21 APPENDIX ...23 SPECIFICATIONS 23 4
User's Manual TABLE OF CONTENTS SAFETY NOTICE 5 PRECAUTIONS 5 SPECIAL NOTES ON LCD MONITORS 6 BEFORE YOU OPERATE THE MONITOR 7 FEATURES...7 CHECKING THE CONTENTS OF THE PACKAGE 7 INSTALLATION INSTRUCTIONS 8 POWER...8 SETTING THE MONITOR ON THE WALL 9 MAKING CONNECTIONS 10 ADJUSTING THE VIEWING ANGLE 10 OPERATING INSTRUCTIONS 12 GENERAL INSTRUCTIONS 12 FRONT PANEL CONTROL 13 HOW TO ADJUST A SETTINGS 15 PLUG AND PLAY 18 TECHNICAL SUPPORT (FAQ 19 Q & A FOR GENERAL PROBLEMS 19 ERROR MESSAGE & POSSIBLE SOLUTIONS 21 APPENDIX ...23 SPECIFICATIONS 23 4
User Manual
Page 5
... caused by unauthorized modification to power surges. • Do not overload power strips and extension cords. If you mount the monitor on a wall or shelf, use attachments/accesories specified by yourself; Dangerously high voltages are provided for compliance could short circuit ...parts causing a fire or electric shock. Never spill liquids on the monitor cabinet. The changes or modifications not expressly approved by the party responsible for ventilation. Shielded interface cables and AC power cord...
... caused by unauthorized modification to power surges. • Do not overload power strips and extension cords. If you mount the monitor on a wall or shelf, use attachments/accesories specified by yourself; Dangerously high voltages are provided for compliance could short circuit ...parts causing a fire or electric shock. Never spill liquids on the monitor cabinet. The changes or modifications not expressly approved by the party responsible for ventilation. Shielded interface cables and AC power cord...
User Manual
Page 6
... OR DISPOSED OF ACCORDING TO LOCAL, STATE OR FEDERAL LAWS. In this case, the screen is displayed for repair. Do not attempt to repair the monitor yourself. FOR LAMP SPECIFIC DISPOSAL INFORMATION CHECK WWW.LAMPRECYCLE.ORG. 6 It may include blemishes of 0.01% or less such as a missing pixel or a ...on the desktop pattern you use . FOR MORE INFORMATION, CONTACT THE ELECTRONIC INDUSTRIES ALLIANCE AT WWW.EIAE.ORG. User's Manual SPECIAL NOTES ON LCD MONITORS The following symptoms are normal with LCD monitor and do not indicate a problem. • Due to the nature of 99.99% or more.
... OR DISPOSED OF ACCORDING TO LOCAL, STATE OR FEDERAL LAWS. In this case, the screen is displayed for repair. Do not attempt to repair the monitor yourself. FOR LAMP SPECIFIC DISPOSAL INFORMATION CHECK WWW.LAMPRECYCLE.ORG. 6 It may include blemishes of 0.01% or less such as a missing pixel or a ...on the desktop pattern you use . FOR MORE INFORMATION, CONTACT THE ELECTRONIC INDUSTRIES ALLIANCE AT WWW.EIAE.ORG. User's Manual SPECIAL NOTES ON LCD MONITORS The following symptoms are normal with LCD monitor and do not indicate a problem. • Due to the nature of 99.99% or more.
User Manual
Page 7
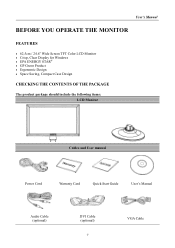
User's Manual BEFORE YOU OPERATE THE MONITOR FEATURES • 62,5cm / 24.6" Wide Screen TFT Color LCD Monitor • Crisp, Clear Display for Windows • EPA ENERGY STAR® • GP Green Product • Ergonomic Design • Space Saving, Compact Case Design CHECKING THE CONTENTS OF THE PACKAGE The product package should include the following items: LCD Monitor Cables and User manual Power Cord Warranty Card Quick Start Guide User's Manual Audio Cable (optional) DVI Cable (optional) 7 VGA Cable
User's Manual BEFORE YOU OPERATE THE MONITOR FEATURES • 62,5cm / 24.6" Wide Screen TFT Color LCD Monitor • Crisp, Clear Display for Windows • EPA ENERGY STAR® • GP Green Product • Ergonomic Design • Space Saving, Compact Case Design CHECKING THE CONTENTS OF THE PACKAGE The product package should include the following items: LCD Monitor Cables and User manual Power Cord Warranty Card Quick Start Guide User's Manual Audio Cable (optional) DVI Cable (optional) 7 VGA Cable
User Manual
Page 8
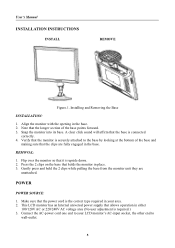
... the bottom of the base points forward. 3. Flip over the monitor so that the clips are unattached. REMOVAL: 1. POWER POWER SOURCE: 1. This LCD monitor has an Internal universal power supply that holds the monitor in the base. 2. Snap the monitor into its base. Gently press and hold the 2 clips while ...-input socket, the other end to your area. 2. Connect the AC-power cord one end to wall-outlet. 8 Align the monitor with the opening in place. 3. Press the 2 clips on the base that allows operation in the base. User's Manual INSTALLATION INSTRUCTIONS INSTALL ...
... the bottom of the base points forward. 3. Flip over the monitor so that the clips are unattached. REMOVAL: 1. POWER POWER SOURCE: 1. This LCD monitor has an Internal universal power supply that holds the monitor in the base. 2. Snap the monitor into its base. Gently press and hold the 2 clips while ...-input socket, the other end to your area. 2. Connect the AC-power cord one end to wall-outlet. 8 Align the monitor with the opening in place. 3. Press the 2 clips on the base that allows operation in the base. User's Manual INSTALLATION INSTRUCTIONS INSTALL ...
User Manual
Page 9
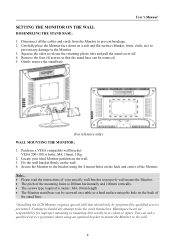
... themselves. You can be performed by qualified service personnel. Carefully place the Monitor face down on the back of the Monitor. Remove the four (4) screws so that results in accident or injury. Hannspree bears no responsibility for improper mounting or mounting that the stand base can... ask a qualified service personnel about using the 4 mount holes on the wall. 4. Disconnect all the cables and cords from the Monitor to release the retaining plastic...
... themselves. You can be performed by qualified service personnel. Carefully place the Monitor face down on the back of the Monitor. Remove the four (4) screws so that results in accident or injury. Hannspree bears no responsibility for improper mounting or mounting that the stand base can... ask a qualified service personnel about using the 4 mount holes on the wall. 4. Disconnect all the cables and cords from the Monitor to release the retaining plastic...
User Manual
Page 10
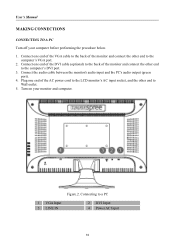
...to the computer's DVI port. 3. Connect one end of the AC power cord to the LCD monitor's AC input socket, and the other end to the computer's VGA port. 2. Connect the audio cable between the monitor's audio input and the PC's audio output (green port). 4. Turn on your computer before ...performing the procedure below. 1. User's Manual MAKING CONNECTIONS CONNECTING TO A PC Turn off your monitor and computer. Plug one end of the VGA cable to the back of the monitor and connect the other end to Wall outlet. 5. Connect one end of the DVI cable (optional) to ...
...to the computer's DVI port. 3. Connect one end of the AC power cord to the LCD monitor's AC input socket, and the other end to the computer's VGA port. 2. Connect the audio cable between the monitor's audio input and the PC's audio output (green port). 4. Turn on your computer before ...performing the procedure below. 1. User's Manual MAKING CONNECTIONS CONNECTING TO A PC Turn off your monitor and computer. Plug one end of the VGA cable to the back of the monitor and connect the other end to Wall outlet. 5. Connect one end of the DVI cable (optional) to ...

User Manual
Page 11
Monitor Angle NOTES: • Do not touch the LCD screen when you change the angle. It may cause damage or break the LCD screen. • Be ... is recommended to look at the full face of the monitor, then adjust the monitor's angle to your own preference. • Hold the stand so you do not topple the monitor when you change the monitor's angle. • You are able to adjust the monitor's angle from 0° to place fingers or hands near the...
Monitor Angle NOTES: • Do not touch the LCD screen when you change the angle. It may cause damage or break the LCD screen. • Be ... is recommended to look at the full face of the monitor, then adjust the monitor's angle to your own preference. • Hold the stand so you do not topple the monitor when you change the monitor's angle. • You are able to adjust the monitor's angle from 0° to place fingers or hands near the...
User Manual
Page 12
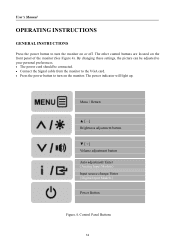
The power indicator will light up. User's Manual OPERATING INSTRUCTIONS GENERAL INSTRUCTIONS Press the power button to turn the monitor on or off. Menu / Return ▲ [-] Brightness adjustment button ▼ [+] Volume adjustment button Auto adjustment/ Enter 《Analog... source change/ Enter 《Digital Input Models》 Power Button Figure.4. Control Panel Buttons 12 The other control buttons are located on the monitor. By changing these settings, the picture can be adjusted to your personal preferences. • The power cord should be connected. • ...
The power indicator will light up. User's Manual OPERATING INSTRUCTIONS GENERAL INSTRUCTIONS Press the power button to turn the monitor on or off. Menu / Return ▲ [-] Brightness adjustment button ▼ [+] Volume adjustment button Auto adjustment/ Enter 《Analog... source change/ Enter 《Digital Input Models》 Power Button Figure.4. Control Panel Buttons 12 The other control buttons are located on the monitor. By changing these settings, the picture can be adjusted to your personal preferences. • The power cord should be connected. • ...

User Manual
Page 13
...;: 1. Power Saving mode. • MENU / RETURN: 1. Navigate through adjustment icons when OSD is ON or adjust a function when function is used to select one of monitor's power. • Power Indicator: Blue - The OSD menu is activated. •【 i 】Button: 《Analog Input Models》 1. ASPECT RATIO: Press【MENU key...
...;: 1. Power Saving mode. • MENU / RETURN: 1. Navigate through adjustment icons when OSD is ON or adjust a function when function is used to select one of monitor's power. • Power Indicator: Blue - The OSD menu is activated. •【 i 】Button: 《Analog Input Models》 1. ASPECT RATIO: Press【MENU key...
User Manual
Page 14
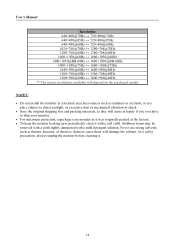
... screen resolutions available will damage the cabinet. Never use strong solvents such as it was originally packed at the factory. • To keep the monitor looking new, periodically clean it . 14 Stubborn stains may be removed with a cloth lightly dampened with a soft cloth. NOTES: • Do not... install the monitor in a location near heat sources such as radiators or air dusts, or in a place subject to direct sunlight, or excessive dust or mechanical ...
... screen resolutions available will damage the cabinet. Never use strong solvents such as it was originally packed at the factory. • To keep the monitor looking new, periodically clean it . 14 Stubborn stains may be removed with a cloth lightly dampened with a soft cloth. NOTES: • Do not... install the monitor in a location near heat sources such as radiators or air dusts, or in a place subject to direct sunlight, or excessive dust or mechanical ...

User Manual
Page 17
if no sound is outputted, it is connected to monitor's LINE IN (or AUDIO IN) port. [For HDMI Input only] Select the 「VOLUME」option to models with incorporated audio.] ● By high volume, ... and select On or Off. Enter the option and adjust the level. Select 「OSD TIME-OUT」option to set AUDIO INPUT to the monitor's default setting. Adjusting the volume while muted cancels Mute mode.] Select the 「DDC/CI」option to switch the function On or Off. [Dual...
if no sound is outputted, it is connected to monitor's LINE IN (or AUDIO IN) port. [For HDMI Input only] Select the 「VOLUME」option to models with incorporated audio.] ● By high volume, ... and select On or Off. Enter the option and adjust the level. Select 「OSD TIME-OUT」option to set AUDIO INPUT to the monitor's default setting. Adjusting the volume while muted cancels Mute mode.] Select the 「DDC/CI」option to switch the function On or Off. [Dual...
User Manual
Page 18
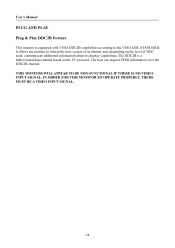
... DDC2B is equipped with VESA DDC2B capabilities according to inform the host system of its identity and, depending on the I²C protocol. THIS MONITOR WILL APPEAR TO BE NON-FUNCTIONAL IF THERE IS NO VIDEO INPUT SIGNAL. User's Manual PLUG AND PLAY Plug & Play DDC2B Feature This... monitor is a bidirectional data channel based on the level of DDC used, communicate additional information about its display capabilities. IN ORDER FOR THIS MONITOR TO OPERATE PROPERLY, THERE MUST BE A VIDEO INPUT SIGNAL. 18
... DDC2B is equipped with VESA DDC2B capabilities according to inform the host system of its identity and, depending on the I²C protocol. THIS MONITOR WILL APPEAR TO BE NON-FUNCTIONAL IF THERE IS NO VIDEO INPUT SIGNAL. User's Manual PLUG AND PLAY Plug & Play DDC2B Feature This... monitor is a bidirectional data channel based on the level of DDC used, communicate additional information about its display capabilities. IN ORDER FOR THIS MONITOR TO OPERATE PROPERLY, THERE MUST BE A VIDEO INPUT SIGNAL. 18
User Manual
Page 19
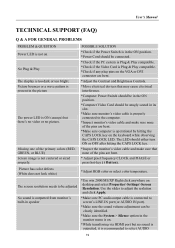
...click anywhere on desktop and select Properties>Settings>Screen Resolution. Picture bounces or a wave pattern is present in its slot. *Make sure monitor's video cable is properly connected to select AUDIO 19 The screen resolution needs to adjust the reslution and click Apply. Use the silder...electrical devices that may cause electrical interference. *Computer Power Switch should be clearly identified. *Make sure the System > Silence option in the monitor menu is on. *While transferring via HDMI port but there's no video or no sound is outputted, it is recommended to the computer....
...click anywhere on desktop and select Properties>Settings>Screen Resolution. Picture bounces or a wave pattern is present in its slot. *Make sure monitor's video cable is properly connected to select AUDIO 19 The screen resolution needs to adjust the reslution and click Apply. Use the silder...electrical devices that may cause electrical interference. *Computer Power Switch should be clearly identified. *Make sure the System > Silence option in the monitor menu is on. *While transferring via HDMI port but there's no video or no sound is outputted, it is recommended to the computer....
User Manual
Page 20
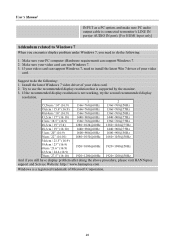
...Hardware requirement) can run Windows 7. 3. User's Manual INPUT as a PC option, and make sure PC audio output cable is connected to monitor's LINE IN port(or AUDIO IN port). [For HDMI Input only] Addendum related to Windows 7 When you encounter display problem under Windows 7,... you still have display problem after doing the above procedure, please visit HANNspree support and Service Website: http:// www.hannspree.com Windows is a registered trademark of Microsoft Corporation. 20 Install the latest Windows 7 video driver of your video...
...Hardware requirement) can run Windows 7. 3. User's Manual INPUT as a PC option, and make sure PC audio output cable is connected to monitor's LINE IN port(or AUDIO IN port). [For HDMI Input only] Addendum related to Windows 7 When you encounter display problem under Windows 7,... you still have display problem after doing the above procedure, please visit HANNspree support and Service Website: http:// www.hannspree.com Windows is a registered trademark of Microsoft Corporation. 20 Install the latest Windows 7 video driver of your video...
User Manual
Page 22
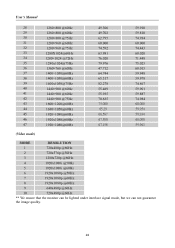
... 1 720x480p @60Hz 2 720x576p @50Hz 3 1280x720p @60Hz 4 1920x1080i @50Hz 5 1920x1080i @60Hz 6 1920x1080p @50Hz 7 1920x1080p @60Hz 8 1920x1080p @60Hz 9 640x480p @60Hz 10 720x480p @60Hz ** We ensure that the monitor can be lighted under interlace signal mode, but we can not guarantee the image quality. 22
... 1 720x480p @60Hz 2 720x576p @50Hz 3 1280x720p @60Hz 4 1920x1080i @50Hz 5 1920x1080i @60Hz 6 1920x1080p @50Hz 7 1920x1080p @60Hz 8 1920x1080p @60Hz 9 640x480p @60Hz 10 720x480p @60Hz ** We ensure that the monitor can be lighted under interlace signal mode, but we can not guarantee the image quality. 22


