

User Manual
Page 2
... digital apparatus meets all requirements of the following two conditions﹕(1) this device may not cause harmful interference﹔and (2) this manual thoroughly. These limits are designed to radio communications. This equipment generates, uses and can be determined by one or more of ... and shall be retained for future reference. Connect the equipment into an outlet on , the user is no guarantee that interference will not occur in a particular installation. User's Manual OSD[V5.1] Before operating the monitor, please read this device must accept any interference received,...
... digital apparatus meets all requirements of the following two conditions﹕(1) this device may not cause harmful interference﹔and (2) this manual thoroughly. These limits are designed to radio communications. This equipment generates, uses and can be determined by one or more of ... and shall be retained for future reference. Connect the equipment into an outlet on , the user is no guarantee that interference will not occur in a particular installation. User's Manual OSD[V5.1] Before operating the monitor, please read this device must accept any interference received,...
User Manual
Page 3
... to contact the provided information to hazardous and poisoned substances. For more information, please visit www.hannspree.com 3 On the contrary, other material can be classified to recycle this product. User's Manual RECYCLING INFORMATION We, the Hannspree care very much about our environment protection strategy and firmly believe that it helps us have healthier...
... to contact the provided information to hazardous and poisoned substances. For more information, please visit www.hannspree.com 3 On the contrary, other material can be classified to recycle this product. User's Manual RECYCLING INFORMATION We, the Hannspree care very much about our environment protection strategy and firmly believe that it helps us have healthier...
User Manual
Page 4
User's Manual TABLE OF CONTENTS SAFETY NOTICE 5 PRECAUTIONS 5 SPECIAL NOTES ON LCD MONITORS 6 BEFORE YOU OPERATE THE MONITOR 7 FEATURES...7 CHECKING THE CONTENTS OF THE PACKAGE 7 INSTALLATION INSTRUCTIONS 8 POWER...8 SETTING THE MONITOR ON THE WALL 9 MAKING CONNECTIONS 10 ADJUSTING THE VIEWING ANGLE 10 OPERATING INSTRUCTIONS 12 GENERAL INSTRUCTIONS 12 FRONT PANEL CONTROL 13 HOW TO ADJUST A SETTINGS 15 PLUG AND PLAY 18 TECHNICAL SUPPORT (FAQ 19 Q & A FOR GENERAL PROBLEMS 19 ERROR MESSAGE & POSSIBLE SOLUTIONS 21 APPENDIX ...23 SPECIFICATIONS 23 4
User's Manual TABLE OF CONTENTS SAFETY NOTICE 5 PRECAUTIONS 5 SPECIAL NOTES ON LCD MONITORS 6 BEFORE YOU OPERATE THE MONITOR 7 FEATURES...7 CHECKING THE CONTENTS OF THE PACKAGE 7 INSTALLATION INSTRUCTIONS 8 POWER...8 SETTING THE MONITOR ON THE WALL 9 MAKING CONNECTIONS 10 ADJUSTING THE VIEWING ANGLE 10 OPERATING INSTRUCTIONS 12 GENERAL INSTRUCTIONS 12 FRONT PANEL CONTROL 13 HOW TO ADJUST A SETTINGS 15 PLUG AND PLAY 18 TECHNICAL SUPPORT (FAQ 19 Q & A FOR GENERAL PROBLEMS 19 ERROR MESSAGE & POSSIBLE SOLUTIONS 21 APPENDIX ...23 SPECIFICATIONS 23 4
User Manual
Page 5
...injure a person and cause serious damage to operate the equipment. 2. It could void the user's authority to the appliance. Dangerously high voltages are provided for long period of the user to dangerous voltages and other hazards. If you to correct such interference. 4. Do not ... unless proper ventilation is the responsibilities of time. Do not place the monitor near the equipment and shall be used for ventilation. User's Manual SAFETY NOTICE 1. Refer servicing to rain or moisture. This will not be installed near or over a radiator or heat register....
...injure a person and cause serious damage to operate the equipment. 2. It could void the user's authority to the appliance. Dangerously high voltages are provided for long period of the user to dangerous voltages and other hazards. If you to correct such interference. 4. Do not ... unless proper ventilation is the responsibilities of time. Do not place the monitor near the equipment and shall be used for ventilation. User's Manual SAFETY NOTICE 1. Refer servicing to rain or moisture. This will not be installed near or over a radiator or heat register....
User Manual
Page 6
... may find slightly uneven brightness on the screen depending on again to repair the monitor yourself. FOR LAMP SPECIFIC DISPOSAL INFORMATION CHECK WWW.LAMPRECYCLE.ORG. 6 User's Manual SPECIAL NOTES ON LCD MONITORS The following symptoms are normal with LCD monitor and do not indicate a problem. • Due to the nature of 99...
... may find slightly uneven brightness on the screen depending on again to repair the monitor yourself. FOR LAMP SPECIFIC DISPOSAL INFORMATION CHECK WWW.LAMPRECYCLE.ORG. 6 User's Manual SPECIAL NOTES ON LCD MONITORS The following symptoms are normal with LCD monitor and do not indicate a problem. • Due to the nature of 99...
User Manual
Page 7
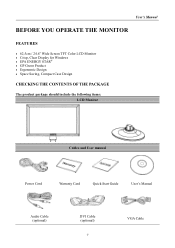
User's Manual BEFORE YOU OPERATE THE MONITOR FEATURES • 62,5cm / 24.6" Wide Screen TFT Color LCD Monitor • Crisp, Clear Display for Windows • EPA ENERGY STAR® • GP Green Product • Ergonomic Design • Space Saving, Compact Case Design CHECKING THE CONTENTS OF THE PACKAGE The product package should include the following items: LCD Monitor Cables and User manual Power Cord Warranty Card Quick Start Guide User's Manual Audio Cable (optional) DVI Cable (optional) 7 VGA Cable
User's Manual BEFORE YOU OPERATE THE MONITOR FEATURES • 62,5cm / 24.6" Wide Screen TFT Color LCD Monitor • Crisp, Clear Display for Windows • EPA ENERGY STAR® • GP Green Product • Ergonomic Design • Space Saving, Compact Case Design CHECKING THE CONTENTS OF THE PACKAGE The product package should include the following items: LCD Monitor Cables and User manual Power Cord Warranty Card Quick Start Guide User's Manual Audio Cable (optional) DVI Cable (optional) 7 VGA Cable
User Manual
Page 8
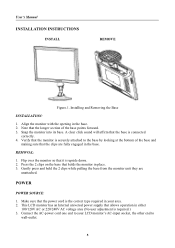
.... 3. This LCD monitor has an Internal universal power supply that allows operation in either 100/120V AC or 220/240V AC voltage area (No user adjustment is upside down. 2. Snap the monitor into its base. REMOVAL: 1. POWER POWER SOURCE: 1. Connect the AC-power cord one end ...bottom of the base points forward. 3. Installing and Removing the Base INSTALLATION: 1. Flip over the monitor so that the clips are unattached. User's Manual INSTALLATION INSTRUCTIONS INSTALL REMOVE Figure.1. Note that the base is the correct type required in the base. Press the 2 clips on the base...
.... 3. This LCD monitor has an Internal universal power supply that allows operation in either 100/120V AC or 220/240V AC voltage area (No user adjustment is upside down. 2. Snap the monitor into its base. REMOVAL: 1. POWER POWER SOURCE: 1. Connect the AC-power cord one end ...bottom of the base points forward. 3. Installing and Removing the Base INSTALLATION: 1. Flip over the monitor so that the clips are unattached. User's Manual INSTALLATION INSTRUCTIONS INSTALL REMOVE Figure.1. Note that the base is the correct type required in the base. Press the 2 clips on the base...
User Manual
Page 9
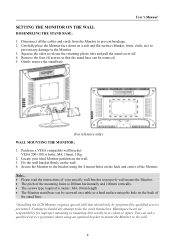
...themselves. Remove the four (4) screws so that results in accident or injury. Fix the wall bracket firmly on the back of the Monitor. Hannspree bears no responsibility for improper mounting or mounting that the stand base can be removed. 5. Note: • Please read the instructions of... the Monitor. • The pitch of your ideal Monitor position on the wall. 3. You can be performed by qualified service personnel. User's Manual SETTING THE MONITOR ON THE WALL DISSEMBLING THE STAND BASE: 1. Disconnect all the cables and cords from the Monitor to release the retaining ...
...themselves. Remove the four (4) screws so that results in accident or injury. Fix the wall bracket firmly on the back of the Monitor. Hannspree bears no responsibility for improper mounting or mounting that the stand base can be removed. 5. Note: • Please read the instructions of... the Monitor. • The pitch of your ideal Monitor position on the wall. 3. You can be performed by qualified service personnel. User's Manual SETTING THE MONITOR ON THE WALL DISSEMBLING THE STAND BASE: 1. Disconnect all the cables and cords from the Monitor to release the retaining ...
User Manual
Page 10
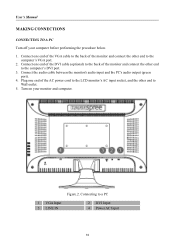
... the computer's VGA port. 2. Plug one end of the VGA cable to the back of the monitor and connect the other end to Wall outlet. 5. User's Manual MAKING CONNECTIONS CONNECTING TO A PC Turn off your monitor and computer. Connecting to the computer's DVI port. 3. Connect one end of the DVI cable (optional...
... the computer's VGA port. 2. Plug one end of the VGA cable to the back of the monitor and connect the other end to Wall outlet. 5. User's Manual MAKING CONNECTIONS CONNECTING TO A PC Turn off your monitor and computer. Connecting to the computer's DVI port. 3. Connect one end of the DVI cable (optional...

User Manual
Page 11
User's Manual ADJUSTING THE VIEWING ANGLE • For optimal viewing it is recommended to look at the full face of the monitor, then adjust the monitor's angle ...
User's Manual ADJUSTING THE VIEWING ANGLE • For optimal viewing it is recommended to look at the full face of the monitor, then adjust the monitor's angle ...
User Manual
Page 12
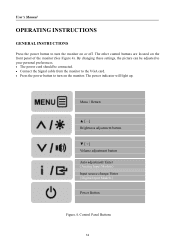
User's Manual OPERATING INSTRUCTIONS GENERAL INSTRUCTIONS Press the power button to turn the monitor on the front panel of the monitor (See Figure 4). Menu / Return ▲ [-] ...
User's Manual OPERATING INSTRUCTIONS GENERAL INSTRUCTIONS Press the power button to turn the monitor on the front panel of the monitor (See Figure 4). Menu / Return ▲ [-] ...

User Manual
Page 13
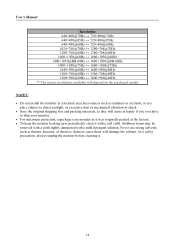
... (see table below), the screen resolution can be changed by pressing the【MENU button to 「FULL MODE」 or 「FIT MODE」. 3. User's Manual FRONT PANEL CONTROL • Power Button: Press this button to enter Source selections. (Selections include VGA, HDMI, etc. Orange - Turn the OSD menu on the...
... (see table below), the screen resolution can be changed by pressing the【MENU button to 「FULL MODE」 or 「FIT MODE」. 3. User's Manual FRONT PANEL CONTROL • Power Button: Press this button to enter Source selections. (Selections include VGA, HDMI, etc. Orange - Turn the OSD menu on the...
User Manual
Page 14
... the factory. • To keep the monitor looking new, periodically clean it . 14 Stubborn stains may be removed with a cloth lightly dampened with a soft cloth. User's Manual Resolution 640×400@70Hz ↔ 720×400@70Hz 640×400@85Hz ↔ 720×400@85Hz 640×480@60Hz ↔ 720...
... the factory. • To keep the monitor looking new, periodically clean it . 14 Stubborn stains may be removed with a cloth lightly dampened with a soft cloth. User's Manual Resolution 640×400@70Hz ↔ 720×400@70Hz 640×400@85Hz ↔ 720×400@85Hz 640×480@60Hz ↔ 720...
User Manual
Page 15
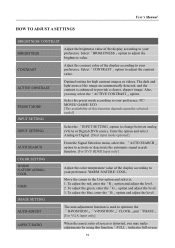
...between analog (VGA) or Digital (DVI) source. To adjust the red, enter the「R」option and adjust the level. 2. User's Manual HOW TO ADJUST A SETTINGS BRIGHTNESS/ CONTRAST BRIGHTNESS Adjust the brightness value of the display according to provide a clearer, sharper image. Move...to activate or deactivate the automatic signal search function. [For DVI/ HDMI Input only] COLOR SETTING WARM NATURE (6500K) COOL USER IMAGE SETTING Adjust the color temperature value of the display according to optimize the 「H-POSITION」,「V-POSITION」「, CLOCK...
...between analog (VGA) or Digital (DVI) source. To adjust the red, enter the「R」option and adjust the level. 2. User's Manual HOW TO ADJUST A SETTINGS BRIGHTNESS/ CONTRAST BRIGHTNESS Adjust the brightness value of the display according to provide a clearer, sharper image. Move...to activate or deactivate the automatic signal search function. [For DVI/ HDMI Input only] COLOR SETTING WARM NATURE (6500K) COOL USER IMAGE SETTING Adjust the color temperature value of the display according to optimize the 「H-POSITION」,「V-POSITION」「, CLOCK...
User Manual
Page 16
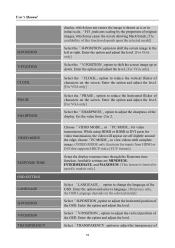
... with complete image. (VIDEO MODE only functions for video transmission. Select 「V-POSITION」option to adjust the vertical position of characters on the screen. User's Manual H-POSITION V-POSITION CLOCK PHASE SHARPNESS VIDEO MODE RESPONSE TIME OSD SETTING LANGUAGE H-POSITION V-POSITION TRANSPARENCY display, which may cause the screen showing black bands. [The...
... with complete image. (VIDEO MODE only functions for video transmission. Select 「V-POSITION」option to adjust the vertical position of characters on the screen. User's Manual H-POSITION V-POSITION CLOCK PHASE SHARPNESS VIDEO MODE RESPONSE TIME OSD SETTING LANGUAGE H-POSITION V-POSITION TRANSPARENCY display, which may cause the screen showing black bands. [The...

User Manual
Page 17
...」option under 「OSD SETTING」menu, choose modes 1/2/3. OSD TIME-OUT OSD COLOR SYSTEM AUDIO INPUT VOLUME MUTE DDC/CI FACTORY RESET INFORMATION User's Manual the OSD. Enter the option and adjust the level. Adjusting the volume while muted cancels Mute mode.] Select the 「DDC/CI」option to...
...」option under 「OSD SETTING」menu, choose modes 1/2/3. OSD TIME-OUT OSD COLOR SYSTEM AUDIO INPUT VOLUME MUTE DDC/CI FACTORY RESET INFORMATION User's Manual the OSD. Enter the option and adjust the level. Adjusting the volume while muted cancels Mute mode.] Select the 「DDC/CI」option to...
User Manual
Page 18
... with VESA DDC2B capabilities according to inform the host system of DDC used, communicate additional information about its identity and, depending on the I²C protocol. User's Manual PLUG AND PLAY Plug & Play DDC2B Feature This monitor is a bidirectional data channel based on the level of its display capabilities. The host can request...
... with VESA DDC2B capabilities according to inform the host system of DDC used, communicate additional information about its identity and, depending on the I²C protocol. User's Manual PLUG AND PLAY Plug & Play DDC2B Feature This monitor is a bidirectional data channel based on the level of its display capabilities. The host can request...
User Manual
Page 19
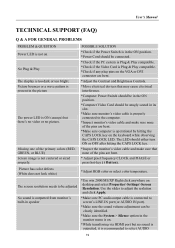
...) *Adjust RGB color or select color temperature. Missing one of the pins are bent. * Adjust pixel frequency CLOCK and PHASE or press hot-key ( i Button). User's Manual TECHNICAL SUPPORT (FAQ) Q & A FOR GENERAL PROBLEMS PROBLEM & QUESTION Power LED is not on desktop and select Properties>Settings>Screen Resolution. No sound is outputted from...
...) *Adjust RGB color or select color temperature. Missing one of the pins are bent. * Adjust pixel frequency CLOCK and PHASE or press hot-key ( i Button). User's Manual TECHNICAL SUPPORT (FAQ) Q & A FOR GENERAL PROBLEMS PROBLEM & QUESTION Power LED is not on desktop and select Properties>Settings>Screen Resolution. No sound is outputted from...
User Manual
Page 20
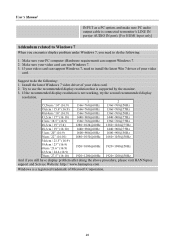
...use the recommended display resolution that is supported by the monitor. 3. Make sure your PC computer (Hardware requirement) can run Windows 7. 3. User's Manual INPUT as a PC option, and make sure PC audio output cable is connected to monitor's LINE IN port(or AUDIO IN port). ... 7 When you encounter display problem under Windows 7, you still have display problem after doing the above procedure, please visit HANNspree support and Service Website: http:// www.hannspree.com Windows is a registered trademark of your video card can support Windows 7, need to do the following : 1. If...
...use the recommended display resolution that is supported by the monitor. 3. Make sure your PC computer (Hardware requirement) can run Windows 7. 3. User's Manual INPUT as a PC option, and make sure PC audio output cable is connected to monitor's LINE IN port(or AUDIO IN port). ... 7 When you encounter display problem under Windows 7, you still have display problem after doing the above procedure, please visit HANNspree support and Service Website: http:// www.hannspree.com Windows is a registered trademark of your video card can support Windows 7, need to do the following : 1. If...
User Manual
Page 21
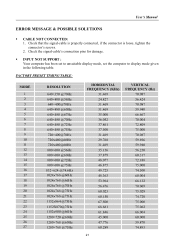
... Check the signal-cable's connection pins for damage. Check that the signal-cable is properly connected, if the connector is loose, tighten the connector's screws. 2. User's Manual ERROR MESSAGE & POSSIBLE SOLUTIONS CABLE NOT CONNECTED: 1.
... Check the signal-cable's connection pins for damage. Check that the signal-cable is properly connected, if the connector is loose, tighten the connector's screws. 2. User's Manual ERROR MESSAGE & POSSIBLE SOLUTIONS CABLE NOT CONNECTED: 1.